Ever wanted to create a game like Subnautica in Unity? Check out Part 4 of our guide here, where we go through how to set up the storage system for the game.
A link to a package containing the project files of this tutorial series can also be found at the end of this article.
Welcome to Part 4 of our Creating an Underwater Survival Game like Subnautica series! In this part of the tutorial, we’ll be covering how to create a storage system in the game.
1. Importing Assets and Icons
Let’s start by importing some assets and icons that we will need. We’ll be importing a table that will be used for crafting, some sprites we can use for game objects, as well as some models that will be useful when we want to add more items to the game later on. All the assets I’ll be using can be found on the Unity Asset Store for free, here:
- Table Model
- Knife Model
- Deodorant Model
- Rock Asset Pack
- Plant Asset Pack
- Quick Outline Tool – great and easy to use for outlining 3D objects and highly recommended!
- Icon sprite sheet
Move all your imported assets into the external assets folder we have in the project. We can now set up all of these new objects as inventory objects now! Make sure to create the scriptable objects for them as well as the world prefabs.
Here’s what our sprite sheet icons for the assets will look like for the game:

2. Setting up New Items
Now we will be setting up some new items and their corresponding prefabs and scriptable objects.
a. ItemScriptableObject Edit
Before we get into creating the ItemScriptableObjects for each of these items, there is a little update that we’ll do first to the itemScriptableObject script.
Go to Assets > Scripts > Inventory and open up our ItemScriptableObject script. We’ll be deleting the itemName declaration we have in there; it would be better to derive the name of the item from the actual name of the ItemScriptableObject rather than having a string dedicated to the itemName.
We’re also going to set the default size of the vector to 1 by 1, by making public Vector2 size = Vector2.one; This way, every time we now create a scriptable object, the default size will now be 1 by 1 instead of 0 by 0. Now you can go ahead and save your changes!
ItemScriptableObject.cs
using System.Collections;
using System.Collections.Generic;
using UnityEngine;

[CreateAssetMenu(fileName ="item", menuName ="ScriptableObject/itemScriptableObject",order = 1)]
public class ItemScriptableObject : ScriptableObject
{
    public int id;
    public string itemName;
    public Vector2 size = Vector2.one; //how many across x and how many across y
    public Sprite sprite;
    public GameObject worldPrefab;
}
b. Creating the New Items
You can upload the sprite sheet we’ve created into a new folder in Assets. We’ll just name this folder to be “Art”. Once you’ve imported that sprite sheet, go into the inspector menu and set the Texture Type to Sprite (2D and UI), and the Sprite Mode to Multiple. It should look something like this:
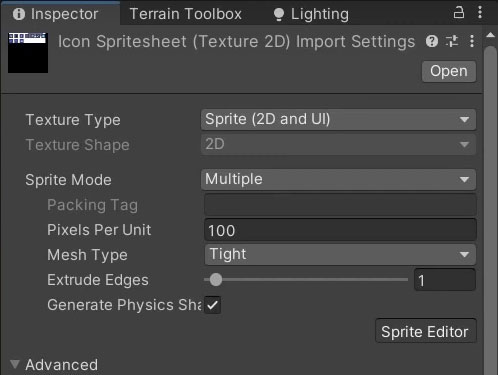
You can head into the sprite editor after you’ve done this. Now, for most 3D Unity Projects, the sprite editor is usually not installed yet – so don’t worry if you receive a pop up like this telling you that there isn’t a Sprite Editor Window registered like so:
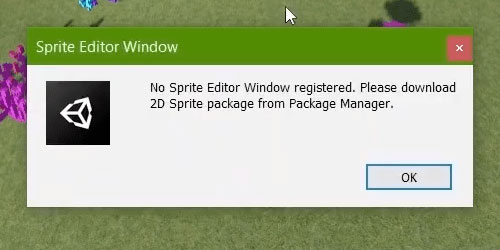
To install it, go into Window > Package Manager and into the Unity Registry. You can then install the “2D Sprite” package, which will resolve your issue.
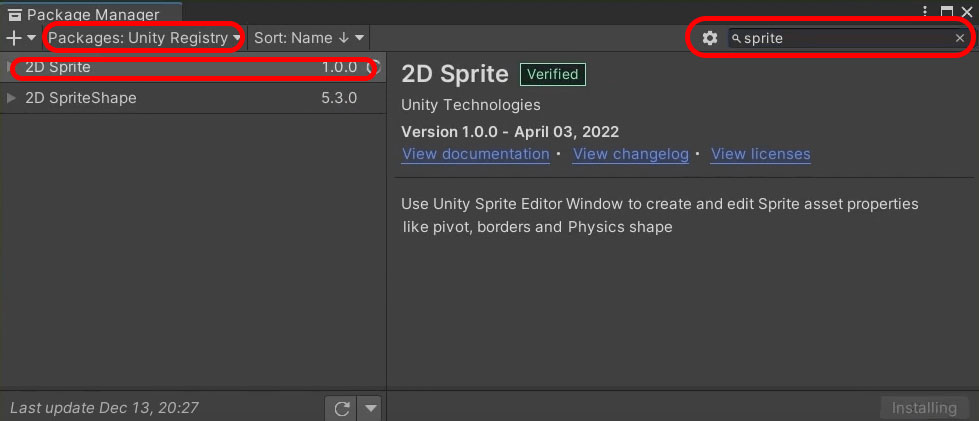
Now you should be able to go into the Sprite Editor! We will then slice the sprite according to these settings:
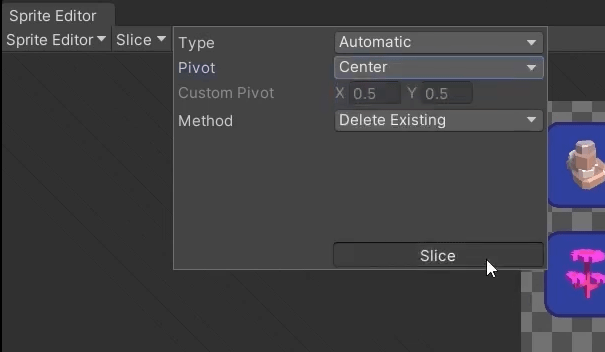
To see how we sliced our sprites, you can go to 3:44 of the video.
Once we’ve completed this, we should have all the sprites we need! You can now create scriptable objects for a bunch of new items and you can do as many as you would like from the assets that you have. Here are the steps you should take when creating each item:
- Create a world prefab with Rigidbody, Box Collider and Interactable Object
- Create an
ItemScriptable - Assign the prefab in item scriptable and the
ItemScriptableto prefab, and assign images accordingly
Also, note that the Table object is not one that can be stored in the inventory or picked up as we will be interacting with it to open up the crafting menu, so it doesn’t need a sprite.
3. Create InteractableUIObject script
This will be a UI prefab script. We need a way to be able to differentiate and keep track of whether an item is located in the inventory or if it is in the storage. So go ahead and create a new InteractableObject script in Assets > Scripts > UI.
Here’s what we need to do in this script:
- Delete the
Start()andUpdate()functions - Create a
public ItemScriptableObject: helps us keep track of what item it is - Use a Boolean expression: helps us determine if an item can be interacted with or not
- Create an
InventorySystemvariable: helps keep track of which type of storage an item is in - Create
Clickable()Function: helps determine if an item is interactable or non-interactable - Create
SetSytem()Function: helps us set the storage box of the item
Go ahead and apply this new script to the InventoryItem prefab, remove the InteractableObject script as a component, and we’re done! We’ll do the same thing to InventorySystem later on as well. Here’s what the script should look like when you’re done:
4. Highlighting Interactable Objects
For this next portion, we’re going to make it such that items that can be interacted with will be highlighted to the player when they hover over them.
a. InteractableUIObject script
We need a way to keep track of whether an item is in a chest or in the players inventory. Because of this, we will replace the InteractableObject script on the InventoryItem prefabs and instead create a new script that allows the item to store a value that keeps track of which system it is currently in.
Note that since the storage system will inherit from the inventory system, we can use an InventorySystem variable to store the value of either system.
In essence, we will need to complete the following:
- In the
InteractableObjectclass, we will need to add an outline component (imported earlier) in order to turn on and off the outline of the object. - Move all object interactions to the PlayerController script, instead of doing it individually on each of the manager scripts
- Create a base class for the UI so that we can make sure that only one menu is open at a time. Since PlayerController is controlling this, we can easily do it.
InteractableUIObject.cs
using System.Collections;
using System.Collections.Generic;
using UnityEngine;

public class InteractableUIObject : MonoBehaviour
{
    //this class is used for the ui prefabs in the inventory and storage system. it keeps track of what storage area its in.
    public ItemScriptableObject item;
    public bool interactable = true;
    public InventorySystem storageBox;

    public void Clickable(bool b)
    {
        interactable = b;
    }

    public void SetSystem(InventorySystem i)
    {
        storageBox = i;
    }
}
Now we can add this script to the InventoryItem prefab, and remove InteractableObject.
b. InteractableObject Script
Now that InteractableObject is no longer used for UI items, we can use it to implement item highlighting, using the Quick Outline asset downloaded earlier. First, we will require a component called Outline. Outline is the name of the script that allows an object to be highlighted. The easiest way to use this is to enable and disable it, which also means to turn the highlight ‘on’ and ‘off’. When RequireComponent is performed, if an object does not have an Outline component, it will simply generate one.
The Quick Outline asset adds an Outline component, and here we will create a function to enable and disable the component. The function will later be implemented in the PlayerController.
Here are the following things we need in the InteractableObject Script:
- Add a Boolean
interactable: helps us disable objects at certain times. For instance, when we’re crafting something at the crafting table, you cannot access the menu and so it will not be highlighted. We set this interactable to True by default. - Keep
Outlineas a variable onInteractableObjectandPlayerController– we will use this to help enable an item to be highlighted. - Create
Awake()andUpdate()Function: Code has to check if PlayerController is hovering over any of the items. If it isn’t hovering over anything, then the outline will be set to false. We will only fill in theUpdate()function once we have moved the interaction with objects to thePlayerController. - Create
Highlight()Function: turns on the outline or highlights the object - Create
Clickable()Function
InteractableObject.cs
using System.Collections.Generic;
using UnityEngine;

[RequireComponent(typeof(Outline))]
public class InteractableObject : MonoBehaviour
{
    public ItemScriptableObject item;
    public bool interactable = true;

    Outline ol;
    public PlayerController pc;

    private void Awake()
    {
        ol = GetComponent<Outline>();
        ol.enabled = false;

        pc = PlayerController.Instance;
    }

    private void Update()
    {

    }

    public void Highlight()
    {
        ol.enabled = true;
    }

    public void Clickable(bool b)
    {
        interactable = b;
    }

}
Now, we can go back to the prefab of all the interactable items and create an Outline component preset. Don’t forget to turn off the outline component to use for all items!
Note: In the video, there is a typo that is solved later on. Make sure to amend ol.GetComponent<Outline>(); to ol = GetComponent<Outline>();.
5. Menu System
Now we can start creating the Storage system menu. Since this game will be utilising multiple systems that all have their own menus, we are first going to create a base class for all menus, to make sure they do not overlap.
a. The UI Base Class
Go to Assets > Scripts > UI and create a new C# Script. This will be our new UIBaseClass script. The InventorySystem, CraftingManager, and StorageManager will be inheriting from the UIBaseClass. This is so that whenever we open their menus, we can pause the game and ensure that only one menu is opened at a time.
Here’s what we will need to do in this script:
- Create
staticvariables: to keep track of which menu is open, or whether menu is even open or not - Create
OpenMenu()function: when the menu is open, we need time to be frozen, change the cursor’s lock state, set the menu active, set the current menu as menu, and finally, setmenuOpento be true. - Create
CloseMenu()function: similar to OpenMenu(), but with everything opposite. - Create
CurrentMenuIsThis()function: checks if the current menu that is open, is this menu. - Create
virtualmethodOpenMenuFunctions(): some menus behave differently from other menus in the game. Now, when other classes inherit from this base class, we can override this method and add whatever functions are needed to it. - Now we will call
OpenMenuFunctions()in theOpenMenu()function before it is set to be active. - Apply the same steps to create the
CloseMenuFunctions()method. - Create
ToggleMenu()function: makes sure that we can only open the menu if no other menus are open, and also to close the menu correctly based on what menu is currently open.
UIBaseClass.cs
using System.Collections;
using System.Collections.Generic;
using UnityEngine;
using UnityEngine.UI;

public class UIBaseClass : MonoBehaviour
{
    public static bool menuOpen = false;
    public static GameObject currentMenu;

    public GameObject menu;

    //opens the menu if possible

    public void ToggleMenu()
    {
        if (!menuOpen)
        {
            Debug.Log("openMenu");
            OpenMenu();
        }
        else if (CurrentMenuIsThis())
        {
            Debug.Log("clsoeMenu");
            CloseMenu();
        }
    }
    public void OpenMenu()
    {
        Time.timeScale = 0;
        Cursor.lockState = CursorLockMode.None;
        OpenMenuFunctions();
        menu.SetActive(true);
        currentMenu = menu;
        menuOpen = true;

    }

    //actions required to open a menu. can be overridden
    public virtual void OpenMenuFunctions()
    {
        return;
    }

    public void CloseMenu()
    {
        Time.timeScale = 1;
        Cursor.lockState = CursorLockMode.Locked;
        CloseMenuFunctions();
        menu.SetActive(false);
        currentMenu = null;
        menuOpen = false;
    }

    //things needed to close the menu
    public virtual void CloseMenuFunctions()
    {
        return;
    }

    public bool CurrentMenuIsThis()
    {
        return currentMenu == menu;
    }

}
And voila! We’re done with our UIBaseClass script!
b. Updating the PlayerController
Now that we have the base class, we will need to edit the PlayerController to pause movement whenever a menu is open. As mentioned earlier, we want to now move over interacting with objects to the PlayerController. This makes creating new systems easier, as they can all link back to the PlayerController. We will also take this chance to implement the highlighting of objects in object interaction functions.
Here are some of the main things to add into the PlayerController script, (or do it together with us in the video at 12:52):
- Change
Start()toAwake() - Add
staticPlayerControllerinstance: so that other manager systems can refer to it. Use agetand aprivatesetso that nothing can change these instances. - Add new
headerwith variables needed for player interaction:- Camera
positionplayerReachfloat– tells us how far the player can reach
InteractableObjectvariable,currentHoverObject– so that we can keep track of the current object we are hovering over. This is also what we’re going to be using for highlighting objects.
- Camera
- Add some things to the
Start()function: settingInstance, and setstatic PlayerController(we do this here instead of in InteractableObject so that the code doesn’t run again and again) - Change
FixedUpdate()function: check directly withUIBaseClassinstead ofInventorySystemto verify if inventory is open - Edit
Update()function: add code for interacting with objects and remove the first if function we had previously and have the debug function be the first. Then, create the functions for stopping all functions if a menu is open. - Create new region for Interaction Functions: this will be the same code we wrote inside the
InventorySystemscript – so go into that script and migrate theHoverObject()function into this new region.- Note: Make sure you delete this function from the
InventorySystemscript once it’s been moved over toPlayerController
- Note: Make sure you delete this function from the
- Update the
Update()function with code for interacting with items: set thecurrentHoverObject– if it isn’tnull, then outline the object. After, we can check if the player clicks on the item. If the item is interactable, we can useInventorySystemto pick the item up.- Note: There was a mistake in the portion of code that checks if the player left clicks – make sure to change it from
GetButtonDown()toGetMouseButtonDown()
- Note: There was a mistake in the portion of code that checks if the player left clicks – make sure to change it from
- Finally, set the Cam in the inspector menu for
PlayerControllerto Main Camera and Player Reach to be 5.
PlayerController.cs
using System.Collections;
using System.Collections.Generic;
using UnityEngine;

public class PlayerController : MonoBehaviour
{
	//reference the transform
	Transform t;
	public static PlayerController Instance { get; private set; }
	InventorySystem iSystem;

	public static bool inWater;
	public static bool isSwimming;
	//if not in water, walk
	//if in water and not swimming, float
	//if in water and swimming, swim

	public LayerMask waterMask;

	[Header("Player Rotation")]
	public float sensitivity = 1;

	//clamp variables
	public float rotationMin;
	public float rotationMax;

	//mouse input variables
	float rotationX;
	float rotationY;

	[Header("Player Movement")]
	public float speed = 1;
	float moveX;
	float moveY;
	float moveZ;

	Rigidbody rb;

	[Header("Player Interaction")]
	public GameObject cam;
	public float playerReach;
	public InteractableObject currentHoverObject;

	// Start is called before the first frame update
	void Awake()
	{
		Instance = this;

		rb = GetComponent<Rigidbody>();
		t = this.transform;

		Cursor.lockState = CursorLockMode.Locked;

		inWater = false;

		iSystem = InventorySystem.Instance;

                InteractableObject.pc = Instance;
	}

	private void FixedUpdate()
	{
		if (!iSystem.inventoryOpen !UIBaseClass.menuOpen)
		{
			SwimmingOrFloating();
			Move();
		}
	}

	// Update is called once per frame
	void Update()
	{
                if (!iSystem.inventoryOpen)
                {
                       LookAround();
                }

		//debug function to unlock cursor
		if (Input.GetKey(KeyCode.Escape))
		{
			Cursor.lockState = CursorLockMode.None;
		}

		//stop all update functions if the menu is open
		if (UIBaseClass.menuOpen)
		{
			return;
		}

		LookAround();

		//interacting with items in the overworld
		currentHoverObject = HoverObject();

		if (currentHoverObject != null)
		{
			//display name

			//outline
			currentHoverObject.Highlight();

			//check if the player left clicks
			if (Input.GetMouseButtonDown(0))
			{
				if (currentHoverObject.interactable)
				{
					iSystem.PickUpItem(currentHoverObject);
				}
			}
		}
	}

        #region Interaction Functions
	InteractableObject HoverObject()
	{
		RaycastHit hit;
		if (Physics.Raycast(cam.transform.position, cam.transform.forward, out hit, playerReach))
		{
			return hit.collider.gameObject.GetComponent<InteractableObject>();
		}

		return null;
	}

	#endregion
}c. Updating the InventorySystem
Now, we can update some of the InventorySystem code. Firstly, we will need to delete the item interaction code, as it has been moved to the PlayerController. Then, we need to change the code referencing the InventoryItem prefabs to use InteractableUIObject instead of InteractableObject.
Lastly, we will remove the original menu functions of the class and make the class inherit from the UIBaseClass.
Here’s a rundown of what we need to do (or follow along from 17:39):
- Make
PickUpItem()function public: this is so thatPlayerControllercan access it - Change inheritance from
MonobehaviourtoUIBaseClass - Delete
inventoryTabandinventoryOpenfrom script: they are now being tracked by theUIBaseClass - Delete
cameraandplayerReach: these interactions are handled now inPlayerController - Delete functions that utilise the above variables that we’ve now deleted
- Change nested
if-elsefunction withinUpdate()for when Tab is pressed: useToggleMenu()instead - Change
InteractableObjecttoInteractableUIObject - Combine if statements to streamline the code in
Update() - Edit
RemoveItem()function: this is because we no longer haveCam - Note: Make sure
SortItems()is virtual so that we are able to override it later on, and thatRemoveItem()is public so we can access it as well later.
InventorySystem.cs
using System.Collections; using System.Collections.Generic; using UnityEngine; using System.Linq; using UnityEngine.UI; using UnityEngine.EventSystems; public class InventorySystem :MonoBehaviourUIBaseClass { public static InventorySystem Instance { get; private set; } private Grid<GridObject> grid; internal int gridWidth = 6; internal int gridHeight = 8; internal float cellSize = 100f; //list of all items in the inventory public List<ItemScriptableObject> inventoryList = new List<ItemScriptableObject>();public GameObject inventoryTab;public GameObject uiPrefab;public bool inventoryOpen;public GameObject cam; public float playerReach;public ItemScriptableObject fillerItem; // Start is called before the first frame update void Awake() {GridObject.inventoryTab = inventoryTab;Instance = this; GridObject.inventoryTab = inventoryTab; GridObject.uiPrefab = uiPrefab; //create the grid grid = new Grid<GridObject>(gridWidth, gridHeight, cellSize, new Vector3(0, 0, 0), (Grid<GridObject> g, int x, int y) => new GridObject(g, x, y)); SortItems(); } // Update is called once per frame void Update() { if (Input.GetKeyDown(KeyCode.Tab)) {if (!inventoryOpen) { Cursor.lockState = CursorLockMode.None; inventoryTab.SetActive(true); } else { Cursor.lockState = CursorLockMode.Locked; inventoryTab.SetActive(false); } inventoryOpen = !inventoryOpen;ToggleMenu(); }InteractableObject i = HoverObject(); if(i!= null) { //check if the player left clicks if (Input.GetMouseButtonDown(0)) { //pickup item PickUpItem(i); } }if (Input.GetMouseButtonDown(1) && EventSystem.current.IsPointerOverGameObject()) {if (EventSystem.current.IsPointerOverGameObject()) {PointerEventData hoveredObj = ExtendedStandaloneInputModule.GetPointerEventData(); foreach(GameObject currentObj in hoveredObj.hovered) {InteractableObjectInteractableUIObject io = currentObj.GetComponent<InteractableObjectInteractableUIObject>(); if(io != null) { Debug.Log("remove " + io.item.name); RemoveItem(io.item); break; } }}} }InteractableObject HoverObject() { RaycastHit hit; if(Physics.Raycast(cam.transform.position,cam.transform.forward, out hit, playerReach)) { return hit.collider.gameObject.GetComponent<InteractableObject>(); } return null; }
There may be some errors arising because of GridObject but we will be editing this later on to make it compatible with the Storage System – so don’t worry about it for now!
d. Touch up outlines
To make the outlines look a little nicer, we’ll be changing the outline color to yellow and its width to 4 for the objects.
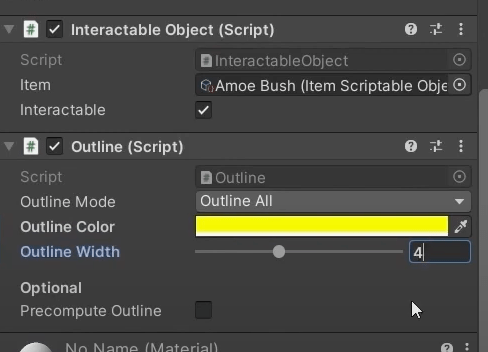
We’ve applied it to the Amoe Bush so you can see how it’s meant to look after we’ve changed the settings here:
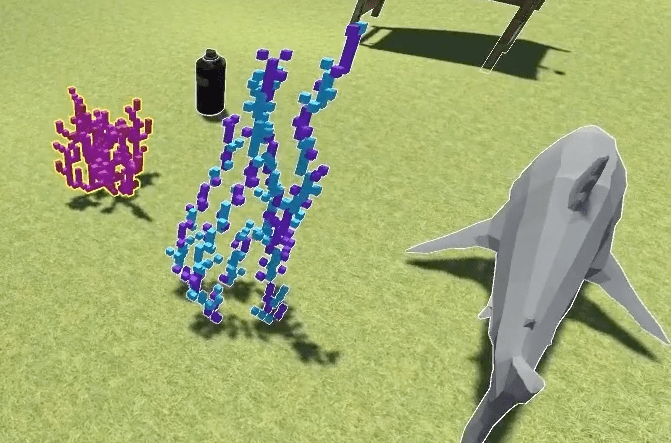
To make this easier, we’ll just disable this setting and save it as a preset so that it’s easier to apply to the other prefabs later on! After you save it as a preset, go into the prefabs folder and select all the prefabs, then click on the saved pre-set for this outline. And voila! All your outlines are done. Make sure you disable them all first before you proceed.
We’ll do the same to the crafting table, since we want it to also have an outline when we hover over it.
5. Reconfiguring the inventory
Now we can reconfigure the inventory so it can be used as a parent class for the Storage System. We will also add the functions that allow the transfer of items between the inventory menu and the storage menu.
a. Modify GridObject script
First, we need to edit the GridObject code to be able to take note of what system is currently holding the object, so we can set it on the InventoryItem prefab.
Here’s a summary of the changes we need to make to the GridObject script (or follow along from here):
- Remove
inventoryTab: we now have theUIBaseClassmenu, so this isn’t necessary. - Modify
SetItem(): we want to add anInventorySystemhere, in whichiSystemwill either be theStorageManageror theInventorySystem - Change
inventoryTab.transformtoiSystem.menu.transform: the storage system will have it’s own separate grid, so when we want to set a new item, we’re going to need the specific grid of whichever system it is - Change
InteractableObjecttoInteractableUIObject: the prefab usesInteractableUIObjectnow - Set the
storageBoxofInteractableUIObjectto the currentiSystem - Put in the
InventorySystemforSetTempAsReal()
GridObject.cs
public class GridObject
{
    public static GameObject inventoryTab;
    public static GameObject uiPrefab;
    private Grid<GridObject> grid;
    public int x;
    public int y;
    private GameObject itemImage;

    public ItemScriptableObject item;
    public ItemScriptableObject tempItem;

    //changes what object placed in this grid object
    public void SetItem(ItemScriptableObject item, InventorySystem iSystem)
    {
        this.item = item;
        if(itemImage == null)
        {
            itemImage = GameObject.Instantiate(uiPrefab, new Vector3(0, 0, 0) * grid.GetCellSize(), Quaternion.identity, inventoryTab.transform iSystem.menu.transform);
        }
        itemImage.GetComponentInChildren<Image>().sprite = item.sprite;
        itemImage.GetComponentsInChildren<RectTransform>()[1].sizeDelta = grid.GetCellSize() * item.size;
        itemImage.GetComponent<RectTransform>().anchoredPosition = new Vector3(x, y, 0) * grid.GetCellSize();
        itemImage.GetComponentInChildren<InteractableObject>().item = item;
        itemImage.GetComponentInChildren<InteractableUIObject>().item = item;
        itemImage.GetComponentInChildren<InteractableUIObject>().storageBox = iSystem;
        itemImage.SetActive(true);
        //trigger event handler
        grid.TriggerGridObjectChanged(x, y);
    }

    public void SetTempAsReal(InventorySystem iSystem)
    {
        ClearItem();
        if (!EmptyTemp())
        {
            SetItem(tempItem,iSystem);
        }
        ClearTemp();
    }
}
b. Update InventorySystem for Storage System
Now, we’ll update the InventorySystem script again so that we can use it as a base for the storage system! You’re going to have to change the grid in the script to be internal, so that StorageSystem can have its own separate grid. We’ll then generalise the inventory list so that we can call it itemsList. This way, both of the systems will have their own lists – one for the inventory and one for the current storage unit.
Ensure that you change the Update() to be internal virtual as well. This is so that it can be overridden by StorageManager, and changed. We’ll also be making the item-interaction functions more versatile. So, instead of having the interactions with the outside of the inventory, you can also interact with the storage unit.
Edits:
- Change
RemoveItem(): generalise the removal of items by usingitemsList. Instead of instantiating here, we’ll consider that the removeItem function can be used when either moving an item from a storage area to a different one, or when it is thrown out of the inventory. Only when we throw it out of the inventory, we will instantiate the prefab – so we will move the instantiation somewhere else! - Create alternative version of
RemoveItem(): this function should help remove multiple items at once. This will mainly be used by the crafting table, which will remove all items, from a specified list, from the inventory. - Create
AddItem(): the opposite of remove item – it is also similar toPickUpItem(), howeverPickUpItem()is specific to picking up items from outside the inventory, whereasAddItem()will be used for all functions whenever an item is picked up from outside the inventory or when items are moved from one storage unit to another. - Edit
PickUpItem()function: we can amend it and utilise our newAddItem()code now - Create
MoveItem(): if an item in theInventorySystemneeds to be moved to a currently opened storage system, this function will be used. It’s also a virtual method that can be overridden in the event that if you’re inStorageManagerand try to move an item, it will move from the storage menu to the inventory menu. (Refer to 28:30 of the video to see how we do this!) - Set some functions to be
internal(refer to code below) – this is so we can access them when we are overriding some of the other functions in our storage system.
InventorySystem.cs
using System.Collections;
using System.Collections.Generic;
using UnityEngine;
using System.Linq;
using UnityEngine.UI;
using UnityEngine.EventSystems;

public class InventorySystem : UIBaseClass
{
    public static InventorySystem Instance { get; private set; }

    private internal Grid<GridObject> grid;

    internal int gridWidth = 6;
    internal int gridHeight = 8;
    internal float cellSize = 100f;

    //list of all items in the inventory
    public List<ItemScriptableObject> inventoryList itemsList = new List<ItemScriptableObject>();

    public GameObject uiPrefab;

    public ItemScriptableObject fillerItem;

    // Start is called before the first frame update
    void Awake()
    {
        Instance = this;

        GridObject.uiPrefab = uiPrefab;

        //create the grid
        grid = new Grid<GridObject>(gridWidth, gridHeight, cellSize, new Vector3(0, 0, 0), (Grid<GridObject> g, int x, int y) => new GridObject(g, x, y));

        SortItems();
    }

    // Update is called once per frame
    internal virtual void Update()
    {
        if (Input.GetKeyDown(KeyCode.Tab))
        {
            ToggleMenu();
        }

        if(Input.GetMouseButtonDown(1) && EventSystem.current.IsPointerOverGameObject())
        {
                PointerEventData hoveredObj = ExtendedStandaloneInputModule.GetPointerEventData();
                foreach (GameObject currentObj in hoveredObj.hovered)
                {
                    InteractableUIObject io = currentObj.GetComponent<InteractableUIObject>();
                    if (io != null)
                    {
                        Debug.Log("remove " + io.item.name);
                        RemoveItem(io.item);
                        break;
                        //move item from one storage space to another
                        io.storageBox.MoveItem(io.item);
                    }
                }
        }
    }


    #region Interacting with items

    //called when you pick up something
    public void PickUpItem(InteractableObject itemPicked)
    {
        inventoryList.Add(itemPicked.item);

        //sort inventory
        if(SortItems() == false)
        {
            //remove it from the inventory list
            inventoryList.Remove(itemPicked.item);

            //error
            Debug.Log("inventory full!");

            return;
        }
        if (AddItem(itemPicked.item))
        {
            //if all goes well, destroy the object
            Destroy(itemPicked.gameObject);
        }
    }

    public bool AddItem(ItemScriptableObject itemAdded)
    {
        itemsList.Add(itemAdded);

        //sort inventory
        if (SortItems() == false)
        {
            //remove it from the inventory list
            itemsList.Remove(itemAdded);

            //error
            Debug.Log("inventory full!");

            return false;
        }

        return true;
    }

    //if to the
    public virtual void MoveItem(ItemScriptableObject item)
    {
        RemoveItem(item);

        //if we are in the regular inventory menu, throw item
        if (CurrentMenuIsThis())
        {
            //we spawn it in the world.
            Instantiate(item.worldPrefab, PlayerController.Instance.cam.transform.position, Quaternion.identity);
            return;
        }

        Debug.Log("other side sorting");
    }

    //remove object from inventory and spawn it in the world
    public void RemoveItem(ItemScriptableObject item)
    {
        itemsList.Remove(item);
        SortItems();
        Instantiate(item.worldPrefab, cam.transform.position, Quaternion.identity);
    }

    public void RemoveItem(List<ItemScriptableObject> items)
    {
        for(int i = 0; i < items.Count; i++)
        {
            itemsList.Remove(items[i]);
        }
        SortItems();
    }

    #endregion

    #region Functions to sort the inventory

    //assign items to gidobjects
    void AssignItemToSpot(ItemScriptableObject item, List<Vector2> coords)
    {
        for (int i = 0; i<coords.Count; i++)
        {
            int x = (int)coords[i].x;
            int y = (int)coords[i].y;
            if (i != 0)
            {
                grid.GetGridObject(x, y).SetTemp(fillerItem);
            }
            else
            {
                grid.GetGridObject(x, y).SetTemp(item);
            }
        }
    }

    void AssignItemToSpot(ItemScriptableObject item, int x, int y)
    {
        grid.GetGridObject(x, y).SetTemp(item);
    }

    internal void ResetTempValues()
    {
        Debug.Log("reset temp");
        foreach(GridObject obj in grid.gridArray)
        {
            obj.ClearTemp();
        }
    }

    bool CheckIfFits(ItemScriptableObject item, Vector2 gridCoordinate)
    {
        List<Vector2> coordsToCheck = new List<Vector2>();

        //get all the coordinates based on the size of the item
        for (int x = 0; x < item.size.x; x++)
        {
            for (int y = 0; y > -item.size.y; y--)
            {
                //if one of the coords is out of bounds, return false
                if((x + gridCoordinate.x) >= gridWidth || (gridCoordinate.y + y) >= gridHeight)
                {
                    return false;
                }

                coordsToCheck.Add(new Vector2(x + gridCoordinate.x, gridCoordinate.y + y));
            }
        }

        //check all the coordinates
        foreach(Vector2 coord in coordsToCheck)
        {
            if(!grid.GetGridObject((int)coord.x, (int)coord.y).EmptyTemp())
            {
                //if there is something in one of these coordinates, return false
                return false;
            }
        }

        //return true
        AssignItemToSpot(item, coordsToCheck);
        return true;
    }

    //check through every spot to find the next available spot
    internal bool AvailSpot(ItemScriptableObject item)
    {
        for (int y = gridHeight - 1; y >= 0; y--)
        {
            for(int x = 0; x < gridWidth; x++)
            {
                //check if the spot is empty
                if (grid.GetGridObject(x, y).EmptyTemp())
                {
                    //check if size one
                    if(item.size == Vector2.one)
                    {
                        AssignItemToSpot(item, x, y);
                        return true;
                    }
                    else
                    {
                        if(CheckIfFits(item,new Vector2(x, y)))
                        {
                            return true;
                        }
                    }
                }

            }
        }

        //after checking every coordinate, no spots found
        return false;
    }

    //function returns true if all items can be sorted, and sorts them properly
    //returns false if items cannot be sorted and deletes all the temporary values
    internal virtual bool SortItems()
    {
        //Debug.Log("SortItems");

        //sort items by size
        var sortedList = inventoryList itemsList.OrderByDescending(s => s.size.x * s.size.y);

        //place items systematically
        foreach (ItemScriptableObject item in sortedList)
        {
            bool hasSpot = AvailSpot(item);
            if (hasSpot == false)
            {
                Debug.Log("doesnt fit!");
                ResetTempValues();
                return false;
            }
        }

        foreach (GridObject obj in grid.gridArray)
        {
            obj.SetTempAsReal(Instance);
        }

        return true;

    }

    #endregion
}
Our InventorySystem should now be ready to work together with our storage system! Go into the Game Manager, and for the Inventory System script, set the menu again.
Set up Script Execution Order
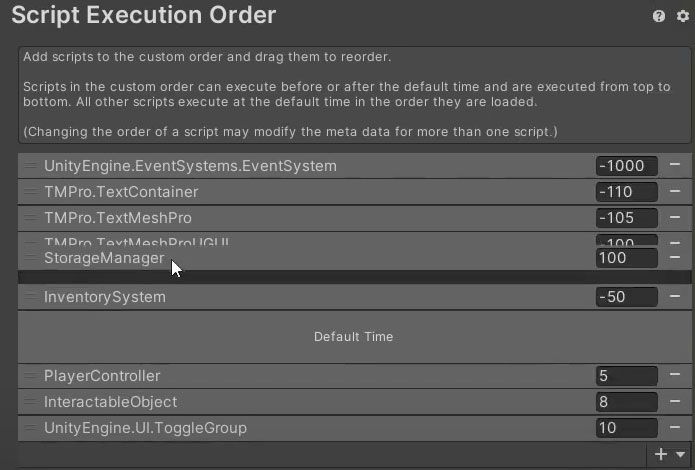
Go to Edit > Project Settings and the script execution order will appear. This is useful if you want to arrange scripts in a specific order, and mainly works for Update() and Awake(), but doesn’t work for Start() so do take note of that. Add InventorySystem into the Order and drag it such that it moves before the Default Time – so that this all loads before all default time scripts. Add PlayerController and move it to right after Default time, and add InteractableObject to be right after PlayerController. This is so that we can get the PlayerController instance on InteractableObject. It should look something like this:
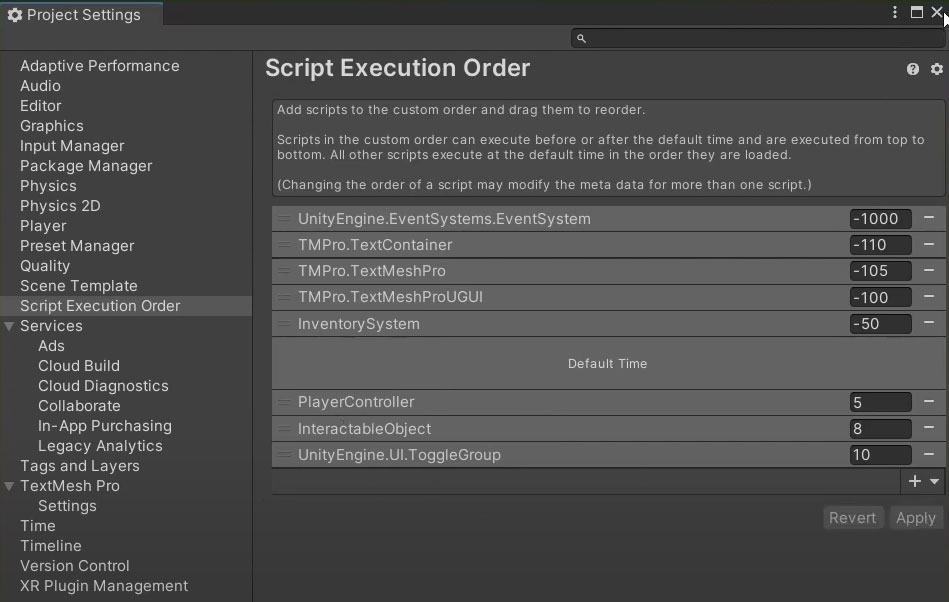
Hit “Apply” – and we’re all set here for now! We’ll adjust the script execution order as we go.
6. Creating the Storage System
To create the storage system, we’re going to create a folder in Assets > Scripts called “Storage”.
a. Create StorageUnit
Create a new script, and name it StorageUnit. This script will inherit from InteractableObject, so it will highlight when hovered over. Also, each instance of StorageUnit will have its own list of ItemScriptableObjects so that it can keep track of which stored units contain which items.
Here’s what we need to do:
- Remove
Start()andUpdate()functions - Create public list of
ItemScriptableObjectsand makeStorageUnitinherit fromInteractableObjectinstead ofMonobehaviour - Set up Chest box so we can put
StorageUniton it, and make it a normal prefab. (Skip to 33:25 to watch how we do this!)
StorageUnit.cs
using System.Collections;
using System.Collections.Generic;
using UnityEngine;

public class StorageUnit : InteractableObject
{
    public List<ItemScriptableObject> storedItems = new List<ItemScriptableObject>();
}
b. Create StorageManager
In the Storage folder, create another script called StorageManager. We’ll make StorageManager inherit from InventorySystem. We want the storage system to work such that when we open our inventory, it opens up the inventory regularly and you have the ability to throw out items from the inventory.
However, if we open up a storage unit, for instance, the chest we set up earlier, it should open up a storage menu which should have its own separate grid. It should also open the inventory menu at the same time, since we’re following Subnautica. It will also then take note of which StorageUnit it is, and display the items in the specified StorageUnit, like the chest. When we click on an item, it should tell us whether it is in the inventory or in the StorageUnit, and then the appropriate functions can then be written to move them to the opposing side, then re-sort both grids.
Here’s what we need for this script (or follow along from 35:05):
- Internalize the
gridWidth,gridHeightandcellSizein theInventorySystemscript - Replace the instance in
InventorySystemwith a new one ofStorageManager - Keep a reference to the current
StorageUnitthat is open - Keep a reference to the inventory menu – so we can open it when we open our storage menu
- In
Awake(), create new grid that will be under the storage menu instead of the inventory menu (this last part of the code is the same as the one we’ve written insideInventorySystem) - Override the
Update()function so that instead of doing the regularInventorySystemUpdate(), we have our own: the menu in here is open when interacting with the chest or storageUnit, and closed by pressing Tab. Because of this, we won’t be able to simply toggle the menu with tab. We will then have to check if the menu is open, check if the current menu is this one, then finally close the menu by pressing Tab. - Note: Because StorageManager inherits from InventorySystem, it also inherits from
UIBaseClass, so you can use functions from UIBaseClass with no issues! - We use
GetKeyUp()instead ofGetKeyDown()like we used inInventorySystem– this is becauseStorageManager’scode will play beforeInventorySystem’scode. This can lead to a situation whereby if you have the storage menu open and you press Tab to close it, in the same time that the menu is being closed,InventorySystemcould potentially open up the inventory menu. This is why inventory manager’sToggleMenu()has to go beforeStorageManager’sToggleMenu(), and thus why we useGetKeyUp()andGetKeyDown(). - Create
OpenMenuFunctions()andCloseMenuFunctions(): forStorageUnit, we’ll need to override theOpenMenuFunctions()because we want to be able to open the inventory menu game object whenever we open the StorageUnit without actually opening the inventory system menu. - Create
SetStorage()function: this is to set the storage, so that whenever this function is called, it tells theStorageManagerwhichStorageUnitis currently being used. This is going to mainly be called inPlayerControllerwhenever we interact withStorageManager, so it will tell us which the current hovered object is – then we can get the StorageUnit’s script from there! We’ll also need to change the reference to the itemsList when weSetStorage(), so that it refers to the currentStorageUnit’sitem list. - Create and
overrideMoveItem()function: this is becauseMoveItem()inInventorySystemspecifically removes the item fromInventorySystemand moves it toStorageManager. However, inStorageManager, we want to do the opposite, which is moving the item fromStorageManagertoInventorySystem. It’s almost exactly the same code!
When you’re done, go ahead and add the Storage Manager script to the Game Manager as a component.
StorageManager.cs
using System.Collections;
using System.Collections.Generic;
using UnityEngine;
using System.Linq;

public class StorageManager : InventorySystem
{
    new public static StorageManager Instance;

    public StorageUnit currentStorageUnit;

    public GameObject inventoryMenu;

    //when this menu is open it counts as storage menu
    //so the code for throwing things out of the ocean wont apply.
    //we can do the same code but for transferring items now
    private void Awake()
    {
        Instance = this;

        //create the grid
        grid = new Grid<GridObject>(gridWidth, gridHeight, cellSize, new Vector3(0, 0, 0), (Grid<GridObject> g, int x, int y) => new GridObject(g, x, y));
    }

    internal override void Update()
    {
        //menu is opened by clicking the object but will be closed with tab
        if(CurrentMenuIsThis() && Input.GetKeyUp(KeyCode.Tab))
        {
            //close the menu
            ToggleMenu();
        }
        return;
    }
    public override void OpenMenuFunctions()
    {
        //this time we open the menu but also open the inventory
        inventoryMenu.SetActive(true);
    }

    public override void CloseMenuFunctions()
    {
        //close the inventory menu too
        inventoryMenu.SetActive(false);
    }

    public void SetStorage(InteractableObject hoverObject)
    {
        currentStorageUnit = hoverObject.GetComponent<StorageUnit>();
        itemsList = currentStorageUnit.storedItems;
        SortItems();
    }

    public override void MoveItem(ItemScriptableObject item)
    {
        RemoveItem(item);

        Debug.Log("other side sorting");
        //move the item to the new location
        InventorySystem.Instance.AddItem(item);
        //sort the other inventory
        InventorySystem.Instance.SortItems();
    }

    internal override bool SortItems()
    {
        Debug.Log("SortItems");

        //sort items by size
        var sortedList = itemsList.OrderByDescending(s => s.size.x * s.size.y);

        //place items systematically
        foreach (ItemScriptableObject item in sortedList)
        {
            bool hasSpot = AvailSpot(item);
            if (hasSpot == false)
            {
                Debug.Log("doesnt fit!");
                ResetTempValues();
                return false;
            }
        }

        foreach (GridObject obj in grid.gridArray)
        {
            obj.SetTempAsReal(Instance);
        }

        return true;

    }

}
This is how your updated InventorySystem script would look like:
InventorySystem.cs
    public static InventorySystem Instance { get; private set; }

    internal Grid<GridObject> grid;

    internal int gridWidth = 6;
    internal int gridHeight = 8;
    internal float cellSize = 100f;

    //list of all items in the inventory
    public List<ItemScriptableObject> itemsList = new List<ItemScriptableObject>();

    public GameObject uiPrefab;

    public ItemScriptableObject fillerItem;


    // Start is called before the first frame update
    void Awake()
    {
        Instance = this;

        GridObject.uiPrefab = uiPrefab;

        //create the grid
        grid = new Grid<GridObject>(gridWidth, gridHeight, cellSize, new Vector3(0, 0, 0), (Grid<GridObject> g, int x, int y) => new GridObject(g, x, y));

        SortItems();
    }

    //if to the
    public virtual void MoveItem(ItemScriptableObject item)
    {
        RemoveItem(item);

        //if we are in the regular inventory menu, throw item
        if (CurrentMenuIsThis())
        {
            //we spawn it in the world.
            Instantiate(item.worldPrefab, PlayerController.Instance.cam.transform.position, Quaternion.identity);
            return;
        }

        Debug.Log("other side sorting");
        //move the item to the new location
        StorageManager.AddItem(item);
    }
7. Creating the Storage System UI
We’re going to need a StorageManager window! In Unity, duplicate the inventory, and rename it as “Storage”. Once you set it active, set it so it aligns to the left side of the page rather than the right. Follow along in the video from 42:30 to see how we configure this.
Now, in the InventorySystem script, we’ll head into the MoveItem() function. Here, we remove the item first, then check the current menu. If the current menu is the inventory, we would spawn it into the world then return for the function. However, what is missing is that we need to check if the item can be moved over to the StorageManager’s current open storage unit. If we can’t, we‘ll have to add a Debug.Log – in this case, we’ll just print it as “cannot fit in storage”. In this event, since it cannot fit, it will have to be added back into the inventory!
So in the StorageManager, we remove the item after its been successfully added into the inventory. However, in this case, we will need to check if the current menu is this one. The logic will be that we first remove the item, then instantiate it to prevent any accidental cases in which the item could be duplicated. We’ll end up with our two different MoveItem functions – one for InventorySystem and one for StorageManager.
a. Update PlayerController
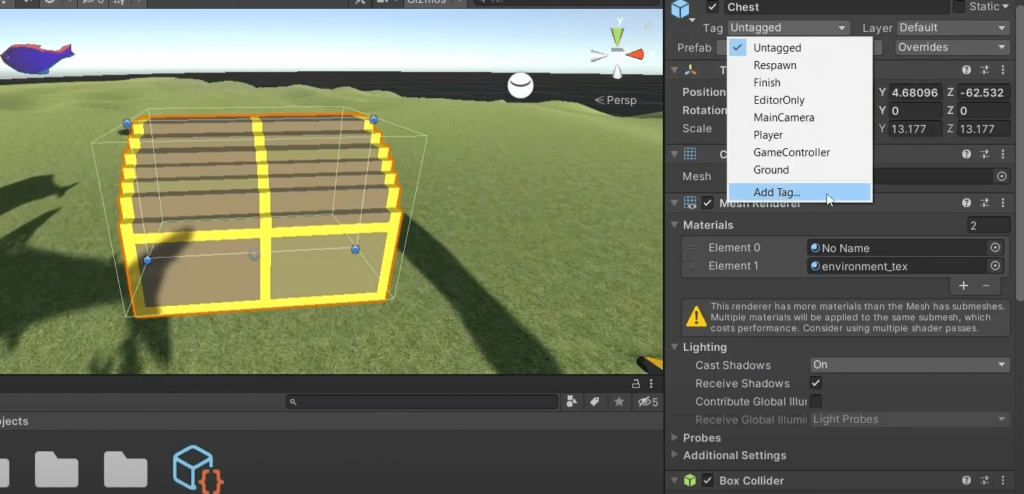
Now, go into PlayerController. The only interaction with objects that we’ve added in this piece of covde is the one for picking up items with the InventorySystem. However, we’re going to use tags to differentiate between specific items like the crafting tables or storage units. This way, we can open up those menus instead of picking up the item. To see how we tag the items, you can skip to 45:50 of the video. We’ll tag the chest as “storage” and the crafting table as “crafting”.
PlayerController.cs
using System.Collections;
using System.Collections.Generic;
using UnityEngine;

public class PlayerController : MonoBehaviour
{
	//reference the transform
	Transform t;
	public static PlayerController Instance { get; private set; }

	InventorySystem iSystem;
	StorageManager sm;

	public static bool inWater;
	public static bool isSwimming;
	//if not in water, walk
	//if in water and not swimming, float
	//if in water and swimming, swim

	public LayerMask waterMask;

	[Header("Player Rotation")]
	public float sensitivity = 1;

	//clamp variables
	public float rotationMin;
	public float rotationMax;

	//mouse input variables
	float rotationX;
	float rotationY;

	[Header("Player Movement")]
	public float speed = 1;
	float moveX;
	float moveY;
	float moveZ;

	Rigidbody rb;

	[Header("Player Interaction")]
	public GameObject cam;
	public float playerReach;
	public InteractableObject currentHoverObject;

	// Start is called before the first frame update
	void Awake()
	{
		Instance = this;

		rb = GetComponent<Rigidbody>();
		t = this.transform;

		Cursor.lockState = CursorLockMode.Locked;

		inWater = false;

		iSystem = InventorySystem.Instance;
		sm = StorageManager.Instance;
	}

	private void FixedUpdate()
	{
		if (!UIBaseClass.menuOpen)
		{
			SwimmingOrFloating();
			Move();
		}
	}

	// Update is called once per frame
	void Update()
	{
		//debug function to unlock cursor
		if (Input.GetKey(KeyCode.Escape))
		{
			Cursor.lockState = CursorLockMode.None;
		}

		//stop all update functions if the menu is open
		if (UIBaseClass.menuOpen)
		{
			return;
		}

		LookAround();

		//interacting with items in the overworld
		currentHoverObject = HoverObject();

		if (currentHoverObject != null)
		{
			//display name

			//outline
			currentHoverObject.Highlight();

			//check if the player left clicks
			if (Input.GetMouseButtonDown(0))
			{
				if (currentHoverObject.interactable)
				{
					if (currentHoverObject.tag == "Storage")
					{
						//do code for chests
						sm.SetStorage(currentHoverObject);
						sm.ToggleMenu();
						return;
					}

					iSystem.PickUpItem(currentHoverObject);

				}
			}
		}
	}
        #region Interaction Functions
	InteractableObject HoverObject()
	{
		RaycastHit hit;
		if (Physics.Raycast(cam.transform.position, cam.transform.forward, out hit, playerReach))
		{
			return hit.collider.gameObject.GetComponent<InteractableObject>();
		}

		return null;
	}

	#endregion
}
Once you’ve set these tags, you can now create a reference to the StorageManager in PlayerController, and set it in Awake(). If you go back to Update(), we go ahead to check if the tag is Storage. If the tag is “storage”, we’ll want to open up the menu. Set the storage to be the currentHoverObject, then toggle the StorageManager’s menu. This will set the correct storage and toggle the menu. We then finish up with a return so that the chest is not picked up! We apply the same logic for the items tagged as “crafting” as well.
b. Update Script Execution Order
Head back into the project settings and set the StorageManager to go before InventorySystem, like so:
Hit apply, and we’re done! You can now hit play in unity and actually interact with the chest to store and take out items!
Conclusion
That’s all for this tutorial on how to set up a storage system! We hope this was helpful. If you like this series, make sure to hit like and subscribe on our YouTube channel — and comment down below or on the video what you think! We hope to see you in the next part of our series.
You can also download the project files.
Here are all the scripts we have for the Unity project so far:
CraftingManager.cs
using System.Collections;
using System.Collections.Generic;
using UnityEngine;
using UnityEngine.UI;
using System.Linq;
using TMPro;

public class CraftingManager : UIBaseClass
{
    InventorySystem iSystem;
    public static CraftingManager Instance;

    public List<RecipeScriptableObject> unlockedRecipes = new List<RecipeScriptableObject>();
    public List<Button> recipeButtons = new List<Button>();

    [Header("GameObjects")]
    public List<Transform> categories;
    public InteractableObject currentTable;
    public Transform spawnCoords;
    public GameObject menuButtonPrefab;
    public GameObject panel;

    // Start is called before the first frame update
    void Awake()
    {
        Instance = this;
        iSystem = InventorySystem.Instance;

        InitialiseCraftingTableUI();
    }

    //function to set the current crafting table
    public void SetTable(InteractableObject currentTable)
    {
        this.currentTable = currentTable;
    }

    //functions to unlock recipes
    public void UnlockRecipe(RecipeScriptableObject recipe)
    {
        //add item to the list
        unlockedRecipes.Add(recipe);

        //reorder the list
        unlockedRecipes = unlockedRecipes.OrderBy(recipe => recipe.category).ToList<RecipeScriptableObject>();

        SetUpButton(recipe);
    }

    public void SetUpButton(RecipeScriptableObject recipe)
    {
        //generate button
        Button currentButton = Instantiate(menuButtonPrefab, menu.transform.GetChild(recipe.category).GetChild(1)).GetComponent<Button>();
        recipeButtons.Add(currentButton);
        currentButton.GetComponent<Image>().sprite = recipe.craftedItem.sprite;
        currentButton.GetComponentInChildren<TextMeshProUGUI>().text = recipe.craftedItem.name;
        //add function to button
        currentButton.onClick.AddListener(() => CraftObjectFunc(recipe));
    }

    //initialise the crafting list
    public void InitialiseCraftingTableUI()
    {
        foreach(RecipeScriptableObject recipe in unlockedRecipes)
        {
            SetUpButton(recipe);
        }
    }

    //overridding base class function so we can do
    //some things we need to do before opening the menu
    public override void OpenMenuFunctions()
    {
        //activate menu closing panel
        panel.SetActive(true);

        //check whats craftable and generate buttons
        for (int i=0; i < recipeButtons.Count; i++)
        {
            RecipeScriptableObject recipe = unlockedRecipes[i];
            Button currentButton = recipeButtons[i];

            //set buttons to active or null based on whether they have enough ingredients
            //if check ingredients is false, set button to not interactable
            recipeButtons[i].interactable = CheckIngredients(unlockedRecipes[i].ingredients);

        }

    }

    public override void CloseMenuFunctions()
    {
        //need to set all table transforms as false too
        ResetCraftingTable();
        //turn off the panel as well
        panel.SetActive(false);
    }

    public void ResetCraftingTable()
    {
        foreach(Transform category in categories)
        {
            category.GetChild(1).gameObject.SetActive(false);
        }
    }

    public void ToggleCategory(GameObject buttonHolder)
    {
        if (!buttonHolder.activeInHierarchy)
        {
            ResetCraftingTable();
            buttonHolder.SetActive(true);
        }
        else
        {
            ResetCraftingTable();
        }

    }

    #region Crafting Functions
    //craft button
    public void CraftObjectFunc(RecipeScriptableObject recipe)
    {
        StartCoroutine(CraftObject(recipe));
    }

    public IEnumerator CraftObject(RecipeScriptableObject recipe)
    {
        //disable the crafting table
        currentTable.Clickable(false);

        //close the menu
        ToggleMenu();
        //remove items from iventory
        iSystem.RemoveItem(recipe.ingredients) ;

        //wait for crafting time
        yield return new WaitForSeconds(recipe.cookingTime);

        GameObject craftedItem = Instantiate(recipe.craftedItem.worldPrefab, spawnCoords.position, spawnCoords.rotation, currentTable.transform);
        craftedItem.GetComponent<Rigidbody>().constraints = RigidbodyConstraints.FreezeAll;

        //enable the crafting table
        currentTable.Clickable(true);
    }

    //check if have all items
    public bool CheckIngredients(List<ItemScriptableObject> ingredients)
    {
        //make temp list
        List<ItemScriptableObject> tempList =new List<ItemScriptableObject>(iSystem.itemsList);

        //check if inventory list has everythign
        for(int i=0; i < ingredients.Count; i++)
        {
            Debug.Log(ingredients[i] + ", " + tempList[i]);
            if (!tempList.Contains(ingredients[i]))
            {
                //if one of the ingredients is missing, cant craft
                Debug.Log("false");
                return false;
            }
            else
            {
                //makes sure if you need two or more of an ingredient,
                //the templist doesnt register both as the same item
                tempList.Remove(ingredients[i]);
            }
        }

        //if all ingredients are found, return true.
        return true;
    }

    #endregion
}
RecipeScriptableObject.cs
using System.Collections;
using System.Collections.Generic;
using UnityEngine;

[CreateAssetMenu(fileName = "recipe", menuName = "ScriptableObject/recipeScriptableObject", order = 2)]
public class RecipeScriptableObject : ScriptableObject
{
    public List<ItemScriptableObject> ingredients;
    public ItemScriptableObject craftedItem;
    public float cookingTime = 2f;
    public int category; //each number is a different category
}
GridObject.cs
using System.Collections;
using System.Collections.Generic;
using UnityEngine;
using UnityEngine.UI;

public class GridObject
{
    public static GameObject uiPrefab;
    private Grid<GridObject> grid;
    public int x;
    public int y;
    private GameObject itemImage;

    public ItemScriptableObject item;
    public ItemScriptableObject tempItem;

    //class constructor
    public GridObject(Grid<GridObject> grid, int x, int y)
    {
        this.grid = grid;
        this.x = x;
        this.y = y;
        item = null;
    }

    public override string ToString()
    {
        return x + ", " + y + "\n" + item.name;
    }

    //changes what object placed in this grid object
    public void SetItem(ItemScriptableObject item, InventorySystem iSystem)
    {
        this.item = item;
        if(itemImage == null)
        {
            itemImage = GameObject.Instantiate(uiPrefab, new Vector3(0, 0, 0) * grid.GetCellSize(), Quaternion.identity, iSystem.menu.transform);
        }
        itemImage.GetComponentInChildren<Image>().sprite = item.sprite;
        itemImage.GetComponentsInChildren<RectTransform>()[1].sizeDelta = grid.GetCellSize() * item.size;
        itemImage.GetComponent<RectTransform>().anchoredPosition = new Vector3(x, y, 0) * grid.GetCellSize();
        itemImage.GetComponentInChildren<InteractableUIObject>().item = item;
        itemImage.GetComponentInChildren<InteractableUIObject>().storageBox = iSystem;
        itemImage.SetActive(true);
        //trigger event handler
        grid.TriggerGridObjectChanged(x, y);
    }

    //clear item from the gridobject
    public void ClearItem()
    {
        item = null;
        if (itemImage != null)
        {
            itemImage.SetActive(false);
        }
        //trigger event handler
        grid.TriggerGridObjectChanged(x, y);
    }

    //returns the current scriptable object
    public ItemScriptableObject GetItem()
    {
        return item;
    }

    //checks if there is no itemscriptableobject in the gridobject
    public bool EmptyItem()
    {
        return item == null;
    }

    public void SetTemp(ItemScriptableObject item)
    {
        tempItem = item;
    }

    public bool EmptyTemp()
    {
        return tempItem == null;
    }

    public void ClearTemp()
    {
        tempItem = null;
    }

    public ItemScriptableObject GetTemp()
    {
        return tempItem;
    }

    public void SetTempAsReal(InventorySystem iSystem)
    {
        ClearItem();
        if (!EmptyTemp())
        {
            SetItem(tempItem,iSystem);
        }
        ClearTemp();
    }
}
InteractableUIObject.cs
using System.Collections;
using System.Collections.Generic;
using UnityEngine;

public class InteractableUIObject : MonoBehaviour
{
    //this class is used for the ui prefabs in the inventory and storage system. it keeps track of what storage area its in.
    public ItemScriptableObject item;
    public bool interactable = true;
    public InventorySystem storageBox;

    public void Clickable(bool b)
    {
        interactable = b;
    }

    public void SetSystem(InventorySystem i)
    {
        storageBox = i;
    }
}
InteractableObject.cs
using System.Collections;
using System.Collections.Generic;
using UnityEngine;

[RequireComponent(typeof(Outline))]
public class InteractableObject : MonoBehaviour
{
    public ItemScriptableObject item;
    public bool interactable = true;

    Outline ol;
    public PlayerController pc;

    private void Awake()
    {
        ol = GetComponent<Outline>();
        ol.enabled = false;

        pc = PlayerController.Instance;
    }

    private void Update()
    {
        if(pc.currentHoverObject == null || !interactable)
        {
            ol.enabled = false;
        }
    }

    public void Highlight()
    {
        ol.enabled = true;
    }

    public void Clickable(bool b)
    {
        interactable = b;
    }

}
InventorySystem.cs
using System.Collections;
using System.Collections.Generic;
using UnityEngine;
using System.Linq;
using UnityEngine.UI;
using UnityEngine.EventSystems;

public class InventorySystem : UIBaseClass
{
    public static InventorySystem Instance { get; private set; }

    public StorageManager sm;

    internal Grid<GridObject> grid;

    internal int gridWidth = 6;
    internal int gridHeight = 8;
    internal float cellSize = 100f;

    //list of all items in the inventory
    public List<ItemScriptableObject> itemsList = new List<ItemScriptableObject>();

    public GameObject uiPrefab;

    public ItemScriptableObject fillerItem;

    // Start is called before the first frame update
    void Awake()
    {
        Instance = this;

        sm = StorageManager.Instance;

        GridObject.uiPrefab = uiPrefab;

        //create the grid
        grid = new Grid<GridObject>(gridWidth, gridHeight, cellSize, new Vector3(0, 0, 0), (Grid<GridObject> g, int x, int y) => new GridObject(g, x, y));

        SortItems();
    }

    // Update is called once per frame
    internal virtual void Update()
    {
        if (Input.GetKeyDown(KeyCode.Tab))
        {
            ToggleMenu();
        }


        if (Input.GetMouseButtonDown(1) && EventSystem.current.IsPointerOverGameObject())
        {
            PointerEventData hoveredObj = ExtendedStandaloneInputModule.GetPointerEventData();
            foreach (GameObject currentObj in hoveredObj.hovered)
            {
                InteractableUIObject io = currentObj.GetComponent<InteractableUIObject>();
                if (io != null)
                {
                    //move item from one storage space to another
                    io.storageBox.MoveItem(io.item);

                }
            }
        }
    }


    #region Interacting with items

    //called when you pick up something
    public void PickUpItem(InteractableObject itemPicked)
    {
        if (AddItem(itemPicked.item))
        {
            //if all goes well, destroy the object
            Destroy(itemPicked.gameObject);
        }
    }

    public bool AddItem(ItemScriptableObject itemAdded)
    {
        itemsList.Add(itemAdded);

        //sort inventory
        if (SortItems() == false)
        {
            //remove it from the inventory list
            itemsList.Remove(itemAdded);

            //error
            Debug.Log("inventory full!");

            return false;
        }

        return true;
    }

    //if to the
    public virtual void MoveItem(ItemScriptableObject item)
    {
        RemoveItem(item);

        //if we are in the regular inventory menu, throw item
        if (CurrentMenuIsThis())
        {
            //we spawn it in the world.
            Instantiate(item.worldPrefab, PlayerController.Instance.cam.transform.position, Quaternion.identity);
            return;
        }

        Debug.Log("other side sorting");
        //move the item to the new location
        sm.AddItem(item);
        //sort the other inventory
        sm.SortItems();
    }

    //remove object from inventory and spawn it in the world
    public void RemoveItem(ItemScriptableObject item)
    {
        itemsList.Remove(item);
        SortItems();
    }

    public void RemoveItem(List<ItemScriptableObject> items)
    {
        for(int i = 0; i < items.Count; i++)
        {
            itemsList.Remove(items[i]);
        }
        SortItems();
    }

    #endregion

    #region Functions to sort the inventory

    //assign items to gidobjects
    void AssignItemToSpot(ItemScriptableObject item, List<Vector2> coords)
    {
        for (int i = 0; i<coords.Count; i++)
        {
            int x = (int)coords[i].x;
            int y = (int)coords[i].y;
            if (i != 0)
            {
                grid.GetGridObject(x, y).SetTemp(fillerItem);
            }
            else
            {
                grid.GetGridObject(x, y).SetTemp(item);
            }
        }
    }

    void AssignItemToSpot(ItemScriptableObject item, int x, int y)
    {
        grid.GetGridObject(x, y).SetTemp(item);
    }

    internal void ResetTempValues()
    {
        Debug.Log("reset temp");
        foreach(GridObject obj in grid.gridArray)
        {
            obj.ClearTemp();
        }
    }

    bool CheckIfFits(ItemScriptableObject item, Vector2 gridCoordinate)
    {
        List<Vector2> coordsToCheck = new List<Vector2>();

        //get all the coordinates based on the size of the item
        for (int x = 0; x < item.size.x; x++)
        {
            for (int y = 0; y > -item.size.y; y--)
            {
                //if one of the coords is out of bounds, return false
                if((x + gridCoordinate.x) >= gridWidth || (gridCoordinate.y + y) >= gridHeight)
                {
                    return false;
                }

                coordsToCheck.Add(new Vector2(x + gridCoordinate.x, gridCoordinate.y + y));
            }
        }

        //check all the coordinates
        foreach(Vector2 coord in coordsToCheck)
        {
            if(!grid.GetGridObject((int)coord.x, (int)coord.y).EmptyTemp())
            {
                //if there is something in one of these coordinates, return false
                return false;
            }
        }

        //return true
        AssignItemToSpot(item, coordsToCheck);
        return true;
    }

    //check through every spot to find the next available spot
    internal bool AvailSpot(ItemScriptableObject item)
    {
        for (int y = gridHeight - 1; y >= 0; y--)
        {
            for(int x = 0; x < gridWidth; x++)
            {
                //check if the spot is empty
                if (grid.GetGridObject(x, y).EmptyTemp())
                {
                    //check if size one
                    if(item.size == Vector2.one)
                    {
                        AssignItemToSpot(item, x, y);
                        return true;
                    }
                    else
                    {
                        if(CheckIfFits(item,new Vector2(x, y)))
                        {
                            return true;
                        }
                    }
                }

            }
        }

        //after checking every coordinate, no spots found
        return false;
    }

    //function returns true if all items can be sorted, and sorts them properly
    //returns false if items cannot be sorted and deletes all the temporary values
    internal virtual bool SortItems()
    {
        //Debug.Log("SortItems");

        //sort items by size
        var sortedList = itemsList.OrderByDescending(s => s.size.x * s.size.y);

        //place items systematically
        foreach (ItemScriptableObject item in sortedList)
        {
            bool hasSpot = AvailSpot(item);
            if (hasSpot == false)
            {
                Debug.Log("doesnt fit!");
                ResetTempValues();
                return false;
            }
        }

        foreach (GridObject obj in grid.gridArray)
        {
            obj.SetTempAsReal(Instance);
        }

        return true;

    }

    #endregion
}
PlayerController.cs
using System.Collections;
using System.Collections.Generic;
using UnityEngine;

public class PlayerController : MonoBehaviour
{
	//reference the transform
	Transform t;
	public static PlayerController Instance { get; private set; }
	CraftingManager cm;
	InventorySystem iSystem;
	StorageManager sm;

	public static bool inWater;
	public static bool isSwimming;
	//if not in water, walk
	//if in water and not swimming, float
	//if in water and swimming, swim

	public LayerMask waterMask;

	[Header("Player Rotation")]
	public float sensitivity = 1;

	//clamp variables
	public float rotationMin;
	public float rotationMax;

	//mouse input variables
	float rotationX;
	float rotationY;

	[Header("Player Movement")]
	public float speed = 1;
	float moveX;
	float moveY;
	float moveZ;

	Rigidbody rb;

	[Header("Player Interaction")]
	public GameObject cam;
	public float playerReach;
	public InteractableObject currentHoverObject;

	// Start is called before the first frame update
	void Awake()
	{
		Instance = this;

		rb = GetComponent<Rigidbody>();
		t = this.transform;

		Cursor.lockState = CursorLockMode.Locked;

		inWater = false;

		cm = CraftingManager.Instance;
		iSystem = InventorySystem.Instance;
		sm = StorageManager.Instance;
	}

	private void FixedUpdate()
	{
		if (!UIBaseClass.menuOpen)
		{
			SwimmingOrFloating();
			Move();
		}
	}

	private void OnTriggerEnter(Collider other)
	{
		SwitchMovement();
	}

	private void OnTriggerExit(Collider other)
	{
		SwitchMovement();
	}

	void SwitchMovement()
	{
		//toggle inWater
		inWater = !inWater;

		//change the rigidbody accordingly.
		rb.useGravity = !rb.useGravity;
	}

	void SwimmingOrFloating()
	{
		bool swimCheck = false;

		if (inWater)
		{
			RaycastHit hit;
			if(Physics.Raycast(new Vector3(t.position.x,t.position.y + 0.5f,t.position.z),Vector3.down,out hit, Mathf.Infinity, waterMask))
			{
				if(hit.distance < 0.1f)
				{
					swimCheck = true;
				}
			}
			else
			{
				swimCheck = true;
			}
		}

		isSwimming = swimCheck;
		//Debug.Log("isSwiming = " + isSwimming);
	}

	// Update is called once per frame
	void Update()
	{
		//debug function to unlock cursor
		if (Input.GetKey(KeyCode.Escape))
		{
			Cursor.lockState = CursorLockMode.None;
		}

		//stop all update functions if the menu is open
		if (UIBaseClass.menuOpen)
		{
			return;
		}

		LookAround();

		//interacting with items in the overworld
		currentHoverObject = HoverObject();

		if (currentHoverObject != null)
		{
			//display name

			//outline
			currentHoverObject.Highlight();

			//check if the player left clicks
			if (Input.GetMouseButtonDown(0))
			{
				if (currentHoverObject.interactable)
				{
					//open crafting or pickup item
					if (currentHoverObject.tag == "Crafter")
					{
						//open the crafting menu and set the current crafting table as this one
						cm.SetTable(currentHoverObject);
						cm.ToggleMenu();
						return;
					}
					if (currentHoverObject.tag == "Storage")
					{
						//do code for chests
						sm.SetStorage(currentHoverObject);
						sm.ToggleMenu();
						return;
					}

					iSystem.PickUpItem(currentHoverObject);

				}
			}
		}
	}

	#region movement functions
	void LookAround()
	{
		//get the mous input
		rotationX += Input.GetAxis("Mouse X")*sensitivity;
		rotationY += Input.GetAxis("Mouse Y")*sensitivity;

		//clamp the y rotation
		rotationY = Mathf.Clamp(rotationY, rotationMin, rotationMax);

		//setting the rotation value every update
		t.localRotation = Quaternion.Euler(-rotationY, rotationX, 0);
	}

	void Move()
	{
		//get the movement input
		moveX = Input.GetAxis("Horizontal");
		moveY = Input.GetAxis("Vertical");
		moveZ = Input.GetAxis("Forward");

		//check if the player is in water
		if (inWater)
		{
			rb.velocity = new Vector2(0,0);
		}
		else
		{
			//check if the player is standing still
			if(moveX == 0 && moveZ == 0)
			{
				rb.velocity = new Vector2(0, rb.velocity.y);
			}
		}

		if (!inWater)
		{
			//move the character (land ver)
			t.Translate(new Quaternion(0, t.rotation.y, 0, t.rotation.w) * new Vector3(moveX, 0, moveZ) * Time.deltaTime * speed, Space.World);
		}
		else
		{
			//check if the player is swimming under water or floating along the top
			if (!isSwimming)
			{
				//move the player (floating ver)
				//clamp the moveY value, so they cannot use space or shift to move up
				moveY = Mathf.Min(moveY, 0);

				//conver the local direction vector into a worldspace vector/
				Vector3 clampedDirection = t.TransformDirection(new Vector3(moveX, moveY, moveZ));

				//clamp the values of this worldspace vector
				clampedDirection = new Vector3(clampedDirection.x, Mathf.Min(clampedDirection.y, 0), clampedDirection.z);

				t.Translate(clampedDirection * Time.deltaTime * speed, Space.World);
			}
			else
			{
				//move the character (swimming ver)
				t.Translate(new Vector3(moveX, 0, moveZ) * Time.deltaTime * speed);
				t.Translate(new Vector3(0, moveY, 0) * Time.deltaTime * speed, Space.World);
			}
		}

	}
	#endregion

	#region Interaction Functions
	InteractableObject HoverObject()
	{
		RaycastHit hit;
		if (Physics.Raycast(cam.transform.position, cam.transform.forward, out hit, playerReach))
		{
			return hit.collider.gameObject.GetComponent<InteractableObject>();
		}

		return null;
	}

	#endregion
}
StorageManager.cs
using System.Collections;
using System.Collections.Generic;
using UnityEngine;
using System.Linq;

public class StorageManager : InventorySystem
{
    new public static StorageManager Instance;

    public StorageUnit currentStorageUnit;

    public GameObject inventoryMenu;

    //when this menu is open it counts as storage menu
    //so the code for throwing things out of the ocean wont apply.
    //we can do the same code but for transferring items now
    private void Awake()
    {
        Instance = this;

        //create the grid
        grid = new Grid<GridObject>(gridWidth, gridHeight, cellSize, new Vector3(0, 0, 0), (Grid<GridObject> g, int x, int y) => new GridObject(g, x, y));
    }

    internal override void Update()
    {
        //menu is opened by clicking the object but will be closed with tab
        if(CurrentMenuIsThis() && Input.GetKeyUp(KeyCode.Tab))
        {
            //close the menu
            ToggleMenu();
        }
        return;
    }
    public override void OpenMenuFunctions()
    {
        //this time we open the menu but also open the inventory
        inventoryMenu.SetActive(true);
    }

    public override void CloseMenuFunctions()
    {
        //close the inventory menu too
        inventoryMenu.SetActive(false);
    }

    public void SetStorage(InteractableObject hoverObject)
    {
        currentStorageUnit = hoverObject.GetComponent<StorageUnit>();
        itemsList = currentStorageUnit.storedItems;
        SortItems();
    }

    public override void MoveItem(ItemScriptableObject item)
    {
        RemoveItem(item);

        Debug.Log("other side sorting");
        //move the item to the new location
        InventorySystem.Instance.AddItem(item);
        //sort the other inventory
        InventorySystem.Instance.SortItems();
    }

    internal override bool SortItems()
    {
        Debug.Log("SortItems");

        //sort items by size
        var sortedList = itemsList.OrderByDescending(s => s.size.x * s.size.y);

        //place items systematically
        foreach (ItemScriptableObject item in sortedList)
        {
            bool hasSpot = AvailSpot(item);
            if (hasSpot == false)
            {
                Debug.Log("doesnt fit!");
                ResetTempValues();
                return false;
            }
        }

        foreach (GridObject obj in grid.gridArray)
        {
            obj.SetTempAsReal(Instance);
        }

        return true;

    }

}
StorageUnit.cs
using System.Collections;
using System.Collections.Generic;
using UnityEngine;

public class StorageUnit : InteractableObject
{
    public List<ItemScriptableObject> storedItems = new List<ItemScriptableObject>();
}
UIBaseClass.cs
using System.Collections;
using System.Collections.Generic;
using UnityEngine;
using UnityEngine.UI;

public class UIBaseClass : MonoBehaviour
{
    public static bool menuOpen = false;
    public static GameObject currentMenu;

    public GameObject menu;

    //opens the menu if possible

    public void ToggleMenu()
    {
        if (!menuOpen)
        {
            Debug.Log("openMenu");
            OpenMenu();
        }
        else if (CurrentMenuIsThis())
        {
            Debug.Log("clsoeMenu");
            CloseMenu();
        }
    }
    public void OpenMenu()
    {
        Time.timeScale = 0;
        Cursor.lockState = CursorLockMode.None;
        OpenMenuFunctions();
        menu.SetActive(true);
        currentMenu = menu;
        menuOpen = true;

    }

    //actions required to open a menu. can be overridden
    public virtual void OpenMenuFunctions()
    {
        return;
    }

    public void CloseMenu()
    {
        Time.timeScale = 1;
        Cursor.lockState = CursorLockMode.Locked;
        CloseMenuFunctions();
        menu.SetActive(false);
        currentMenu = null;
        menuOpen = false;
    }

    //things needed to close the menu
    public virtual void CloseMenuFunctions()
    {
        return;
    }

    public bool CurrentMenuIsThis()
    {
        return currentMenu == menu;
    }

}
