
Are you working on a pixel-art 2D game in Unity and noticing gaps between your tiles? Don’t worry, you’re not alone! While Unity provides fantastic tools for creating visually stunning games, a common issue can crop up when trying to perfectly align your tiles. In this article, we’ll explain why this happens, and offer solutions to help you overcome this challenge. So let’s get started and make your game the envy of all 2D game developers!
1. Why does this happen?
Unity’s Tilemaps are a powerful tool that allows game developers to easily create 2D game levels and environments by arranging and painting tiles on a grid. It simplifies the process of building complex environments, saves development time, and allows developers to focus on other aspects of their game.
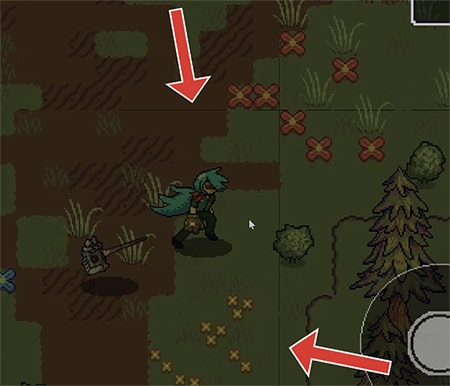
However, sometimes while building your level with tiles, you may have noticed that when moving through your environment, small gaps start to appear between your tiles. These gaps may also appear when zooming in or out with the camera.
When trying to perfectly snap and align tiles, Unity sometimes cannot fill the orthographic size of your camera with the tiles being rendered by your game. To remedy this issue and ensure that the tiles are able to cover the full size of your orthographic camera, Unity takes a few pixels worth of extra space around each tile from your tile map, causing those pesky gaps between your tiles.
2. Possible solutions
There are a few things that may cause the issue above, and we’ve organised them from the most effective solutions to the least. In most cases, applying (a) and (b) below should solve this issue for most people, but if those don’t work, then you can read further than those for more solutions.
a. Configuring the Sprite’s Import settings
Let’s first configure our sprite settings in your sprites’ inspector window and make sure that they are optimally set up for a pixel art game.
- Change the Filter Mode on your sprites to “Point“
- Change your Compression setting to “None”
- Change your Pivot Unit Mode to “Pixels”
- By default, your Pixels Per Unit is set to 100. Change it to your tile size in pixels.
- If your sprites appear blurry or compressed, increase their Max Size to something higher, until they are not blurry anymore.
These changes ensure that your sprites appear crisp and sharp while also allowing them to be more easily snap together pixel-perfectly.
b. Disabling anti-aliasing
Anti-aliasing is a technique used in Unity (and other graphics applications) to smooth out jagged edges and reduce aliasing artefacts in rendered images. Aliasing occurs when the resolution of an image is not high enough to accurately represent a curve or diagonal line, resulting in a jagged or stair-stepped appearance.
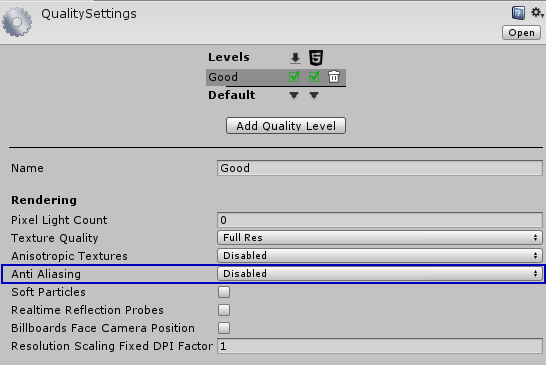
To disable Anti-Aliasing in Unity versions 2019 and before:
- Open the Unity Editor and navigate to the Project Settings menu by selecting Edit > Project Settings from the top menu bar.
- In the Project Settings window, select the Quality category.
- In the Quality category, you will see a list of different quality levels that you can configure. Select the quality level that you want to modify.
- In the Inspector panel, scroll down to the Anti-Aliasing section.
- To disable anti-aliasing, simply set the Anti Aliasing dropdown to “Disabled”.
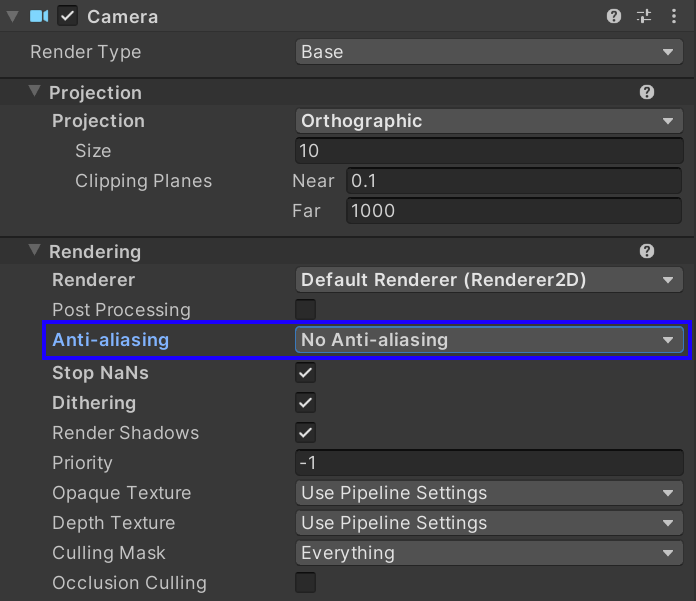
To disable Anti-Aliasing in Unity versions 2020 and after:
- Open the Unity Editor and select the camera you want to modify from the Hierarchy window or Scene view.
- In the Inspector panel, scroll down to the Camera component section.
- Under the Camera component section, find the Anti-aliasing dropdown menu and select “No Anti-aliasing” from the options.
This solution, however, only works in some cases. To check if this solution has worked for you, zoom your camera in or out, then move the camera around at the new zoom level, this should cause tile gaps that were not fixed by disabling anti-aliasing to appear.
c. Using a Sprite Atlas
A Sprite Atlas packs all of the sprites you referenced for packing into individual textures When Unity needs to render/reference one of the sprites you’ve packed, it will automatically load and use the sprite that is packed into the textures that were generated instead of the standalone sprite.
- Add the tilemaps and sprites that you use in your game into the “Objects for Packing” Section
- Change the filter mode to “Point”
- Change your Compression to “None”
- Finally, press the “Pack Preview” button.
And voilà! your tile gaps are gone. This solution is extremely reliable and works almost every time.
d. Using the Pixel Snapping feature in the Pixel Perfect Camera
The Pixel Perfect Camera in Unity is a feature that helps you achieve a pixel-perfect 2D look in your game. It is designed to eliminate common issues that can occur when rendering pixel art, such as distortion or blurriness due to the default import settings of your sprites or the scaling of the camera.
When using the Pixel Perfect Camera, your pixel art remains crisp and clear at different resolutions, and stable in motion. Then, by turning Pixel Snapping on, Sprite Renderers will snap to a grid in world space and further eliminate any gaps or seams between tiles or sprites.
Here’s how you can set up the Pixel Perfect Camera and use its Pixel Snapping function:
- Import the 2D Pixel Perfect Package from your Package Manager.
- Click the ‘Window’ menu in the toolbar followed by ‘Package Manager’. In the new window, click ‘Unity Registry. Select 2D Pixel Perfect from the list on the left, select install and then import on the bottom right of the window. (You may already have this package as it is installed by default if you set up your Unity Project as a 2D project)
- Add the Pixel Perfect Camera component to your Main Camera in your scene.
- Finally, check the Pixel Snapping option.
- With this enabled, sprite renderers will be snapped to a world-space grid automatically, where the grid’s size is based on your chosen Pixels per Unit.
- Note that this does not actually affect any of the transform positions of your game objects. As a result, you can still smoothly interpolate objects between positions, while the visuals remain pixel-perfect and snappy!
3. Conclusion
With these solutions, you should be able to do away with those annoying tile gaps and ensure that your Pixel Art game looks clean and snappy!
Leave a comment below if you want to share your thoughts on this article or point out any extra tips and tricks you may know. That’s all for today folks! Have a wonderful day; AND REMEMBER to rehydrate regularly.