Ever wanted to create a game like Subnautica in Unity? Check out Part 3 of our guide here, where we go through how to set up the inventory system for the game.
A link to a package containing the project files of this tutorial series can also be found at the end of this article.
1. Inventory
Welcome back! In this portion of our tutorial series, we will be focusing on how to create an inventory system for the game.
In order for our player to pick up and keep items, we need an inventory!
Since we’re modelling this game after Subnautica, we will have to first analyse and understand how the inventory system works. In Subnautica, the inventory system is grid-based, where you can pick up items of varying sizes to store them inside the player inventory. This means that an item has to fit in the slots allocated by the inventory – if an item does not fit, it will not be picked up by the player. On top of that, the inventory should be able to sort itself.
Now that we know this, we know that we will need three things for this inventory system:
- 3D models of objects that will spawn in the world that players can pick up
- Grid System
- Sprites with pictures of the 3D model items for display purposes
Let’s get started, shall we?
2. Install Assets
In this project, we use many free external assets. There are a few reasons for this. In general, coding is a lot of work, and to try to code every single thing in the game is a lot more work than necessary. We don’t want to reinvent the wheel. You’ll see that this is a common practice among programmers. We utilise code from other applications or games with similar functionalities and adjust them according to what we need, and that saves us a lot of time because others have run through similar problems and come up with relevant solutions. Open-source code is quite reliable as it has been tested by many people and most likely have been revised many times. This way, we can focus on using our time on creating new systems for the game.
The external assets we’ll be using in the tutorial are as follows:
You can go ahead and import the first two assets by going to Window > Package Manager. The third asset created by CodeMonkey is an excellent grid system that is simple to work with and modify to suit your own needs. They have even made a bunch of different things using that grid system. If that interests you, you can click here for the video in which that grid system was created.
8 February 2025 Update: Please copy CodeMonkey’s Grid class from this forum topic instead. They have recently updated their code, and the new version of their code is not compatible with this tutorial.
Create a new folder in your Scripts folder and name it Inventory. Import the CodeMonkey script for grid into the folder. This grid takes in a grid object, sets up a grid of a specified width, height and cell size, then each cell in the grid will create a grid object to place within it. You may take a look at the comments in the script to see what each function will do.
We’ll be creating our own grid objects to be put within the grid later on in the tutorial. But first, let us set up our prefabs and scriptables.
3. Item Scriptables and Prefabs
The first thing we’ll need to do is create a scriptable object to store the data of each item. For instance, if we wanted to have an item called ‘small fish’, we would need something to store the name, ID number, size, sprite, and prefabs of the object, and so on.
Prefabs are a special type of component that allows fully configured GameObjects to be saved in the Project for reuse. These assets can then be shared between scenes, or even other projects without having to be configured again.
UnityLearn
a. Create New Scriptable Object – ItemScriptableObject
Since it is a scriptable object, we will need to create an asset menu. This allows us to create an instance of this script as an ItemScriptableObject in the menu. We also do not need the Start() or Update() functions, so you can go ahead and remove that. We will also be changing MonoBehaviour into ScriptableObject.
Let’s first declare the variables we need as mentioned earlier – itemName, ID, size, sprite and prefab. The sprite will be what picture will pop up whenever this item is displayed in the inventory. When we remove an item from the inventory, we need to remove it from the inventory menu and also spawn it into the world. We’ll name this variable worldPrefab.
ItemScriptableObject.cs
using System.Collections; using System.Collections.Generic; using UnityEngine; [CreateAssetMenu(fileName = "item", menuName = "ScriptableObjects/itemScriptableObject", order = 1)] public class ItemScriptableObject :MonoBehaviourScriptableObject { public int id; public string itemName; public Vector2 size; //how many across x and how many across y public Sprite sprite; public GameObject WorldPrefab; }
b. Create folder in Assets called “ScriptableObjects”
This is where we can store all our item data. If you right-click inside the folder, you’ll see that there’s an extra menu item now called ScriptableObject. Go ahead and create three of these Scriptable Objects and rename them ‘Small Fish’, ‘Medium Fish’ and ‘Large Fish’. Though the item name can differ from the Scriptable Object name in the inspector menu, we will name them the same way for simplicity this time. Now that these Scriptable Objects have been created, we can now set up the prefabs we need.
c. Set up prefabs
Create a folder in Assets called Prefabs. Go into the Fish prefabs that you will find in the Fish – PolyPack folder you’ve imported, and drag them into the scene.
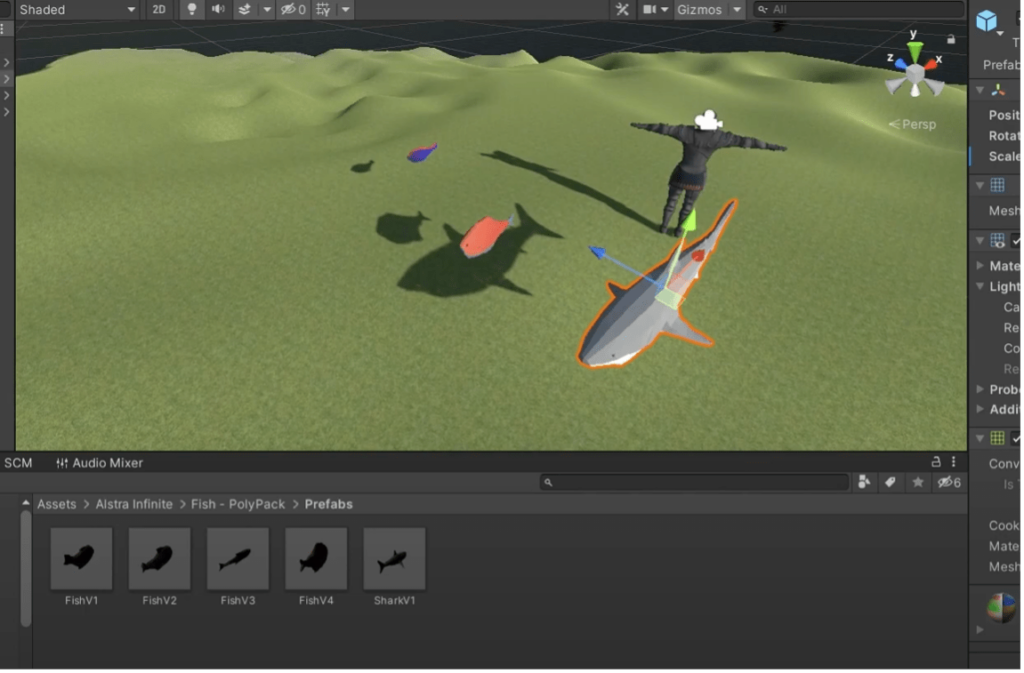
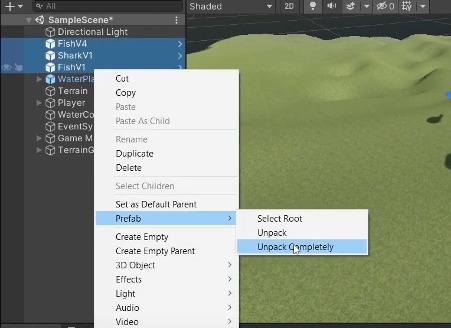
Select all three of the prefabs and unpack them.
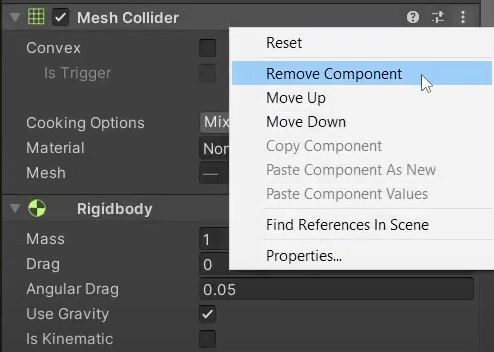
Add a Rigidbody and Box Collider as components using the Inspector menu. Simply click ‘Add Component’ and you can search for these two components. They will automatically set it to the correct size on the Scriptable Objects. Now you can save them as prefabs!
c. Set up prefabs for UI
We will need to set up a prefab for the UI so that when we display the inventory system in the UI, we will have one image for each spot.
Go into PlayerCanvas, create an empty GameObject and name it InventoryItem. There will be one of these for each item in the inventory. This GameObject should be 100 by 100 (which is its default size), and should also have an anchor at the bottom left. This is because each anchor grid anchor point is on the bottom left. Ensure that you press Shift + Alt when you set your anchor. Shift sets the pivot of the image to that point, and Alt will set the item to that specific corner.
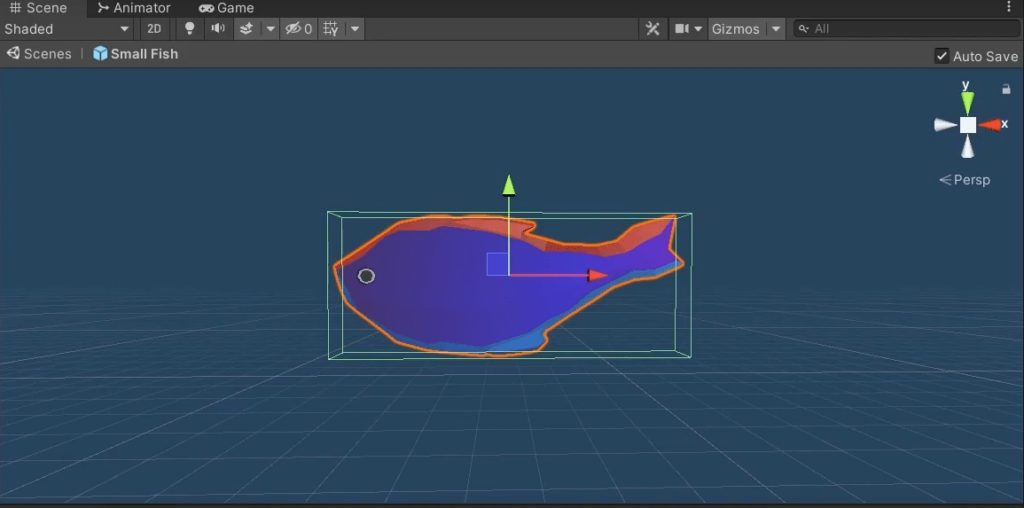
Now, create a child GameObject of InventoryItem and name it Image. This object will hold the image. Even if the pivot is meant to be at the bottom left, the images should start from the top left. So go ahead and set the pivot for this object at the top left and also hold Shift + Alt once again. Set the size to 100 by 100 and add an image component in the inspector section. You can use a generic fish for the image for now. You can also drag it anywhere on the canvas as this is simply going to be a prefab and so it does not really matter where you place this. If you are still unclear about how to do so for this next part, you can refer to this part of the video.
And, voila! We now have a prefab to display each item in the inventory. You can go ahead and drag it into your prefabs folder and remove it from the scene.
e. Set Up World Object Prefabs
World object prefabs are items that you can pick up from the physical world. Go into the Small Fish prefab, and you’ll see in the inspector column that there is a ‘World Prefab’. Click into this, and you’ll see something like this:
Now, we need a way to store the ItemScriptableObject data on this GameObject. If we spawn this object, we will need to know which ItemScriptableObject it is.
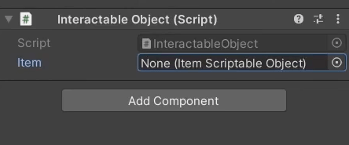
f. Create Class InteractableObject to store Item Scriptable Object data
We’ll need a class to store the ItemScriptableObject data. Go into Scripts > Inventory and create a new script. We will name this new script InteractableObject. This will be a class that can be inherited from, so that you can always get the Item Scriptable Object data from the object. This keeps the item data of the particular world object or inventory image. When coding InteractableObject, you can remove the start and update functions. Simply add a reference to ItemScriptableObject, and you’re done!
InteractableObject.cs
using System.Collections;
using System.Collections.Generic;
using UnityEngine;

public class InteractableObject : MonoBehaviour
{
    public ItemScriptableObject item;
}
Go ahead and assign this script to all the prefabs and assign the items accordingly. To do so, just select an ItemScriptableObject, like ‘Small Fish’, and set it for all the prefabs, including the inventory item prefab.
For the inventory item, add the Interactable Object Script but assign them nothing. Then, whenever it is instantiated, it can be assigned then.
That’s all for the setting up of the creation of an inventory system!
4. Set up Grid and InventorySystem script
Next, we will work on the Grid and InventorySystem scripts. The purpose of the InventorySystem script is to help manage all the functions needed for the inventory. This includes:
- Sorting the items in the grid
- Picking up items
- Removing items in the inventory
The first thing we need to do is create the inventory system and set up the ability to open up or close an inventory by pressing on Tab. So let’s create a new script.
a. Set up InventorySystem script
Create a new C# script inside the Inventory folder and name it InventorySystem. We will be using UnityEngine.UI so remember to add that in!
This would be a Monobehaviour script, so you will not need to delete it for this script. Use a get and private set for the InventorySystem instance to make sure that other scripts cannot modify this instance. In this script, we’ll be needing a grid and you need to type in what kind of grid you will need. We can leave this blank for now, since later on we will be creating a grid object that we will fill in there.
We also need to put in the grid width. In Subnautica, the width is 6, and its height is 8, so we will use these measurements. We’ll also set the cell size to 100f. You can amend this according to what you prefer, based on the resolution of the game. To do this, you would take the length of the screen and divide it in to 6 and 8 spots to see if you can achieve the right cell size.
We’ll need to keep a list of all the items in the inventory, so that we can sort it in the grid. Create a list called inventoryList. Then, we’ll create a reference to the menu to the menu of the inventory that we will be opening and closing, which we will name inventoryTab.
We’ll also need a reference to the prefab that we created earlier on to display on the grid. Then, create a rule that will help keep track of whether the inventory system is open or closed by using a Boolean operation called inventoryOpen.
Instead of Start(), we will change it to Awake(), and set the Instance to be this. Now, in Update(), in order to set up the opening and closing the inventory, we will use some if-else statements to help us do so. So, if Tab is pressed, and the inventory is not open, the system should open the inventory. Set the cursor lock state to none, and then open the inventoryTab. If the inventory is already open, we will need to close the inventoryTab. Lastly, we will need to change inventoryOpen to be the opposite of itself.
Note: Remember that we still have grid object empty – and will fill this out later once we have completed the grid object.
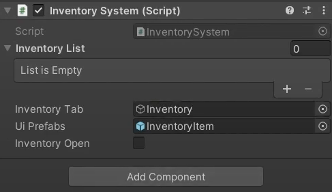
Now we can assign our InventorySystem script to Game Manager and keep the inventory list empty for the time being, and we will also fill this up later. For the UI prefab for GameManager, go into the Prefab folder and drag the InventoryItem prefab into it. It should look like this after you have done so:
And once you’re done, you should have the following script:
InventorySystem.cs
using System.Collections;
using System.Collections.Generic;
using UnityEngine;
using UnityEngine.UI;

public class InventorySystem : MonoBehaviour
{
    public static InventorySystem Instance { get; private set; }

    int gridWidth = 6;
    int gridHeight = 8;
    float cellSize = 100f;

    //list of all items in inventory
    public List<ItemScriptableObject> inventoryList = new List<ItemScriptableObject>();

    public GameObject inventoryTab;
    public GameObject uiPrefab;
    public bool inventoryOpen;

    private void Awake()
    {
        Instance = this;
    }

    private void Update()
    {
        if (Input.GetKeyDown(KeyCode.Tab))
        {
            if (!inventoryOpen)
            {
                Cursor.lockState = CursorLockMode.None;
                inventoryTab.SetActive(true);
            }
            else
            {
                Cursor.lockState = CursorLockMode.Locked;
                inventoryTab.SetActive(false);
            }
            inventoryOpen = !inventoryOpen;
        }
    }
}
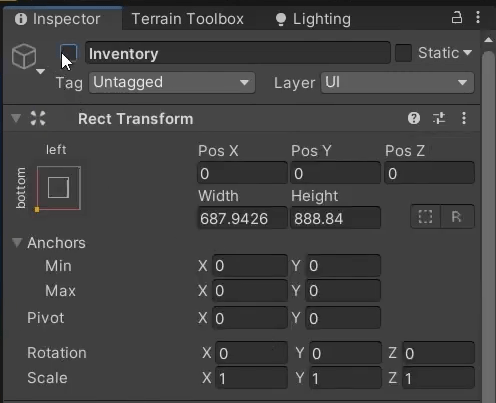
Go to Player Canvas and create an empty object and name it ‘Inventory’. This is what will store our inventory system. Anchor it to the left and set the pivot to be at the bottom. Set the size to 600 by 800 and add an image component to it. You can set the image color to any color, we use blue in the tutorial just to act as the background of the inventory system for now. This means that when the inventory is open, the blue will appear, and when it closes, it disappears! You can now drag the Inventory object into the Inventory Tab, and it should look like this:

Disable it by unchecking the box next to ‘Inventory’ in the inspector so that when it starts, the inventory is correctly disabled.
b. Set Up PlayerController Script
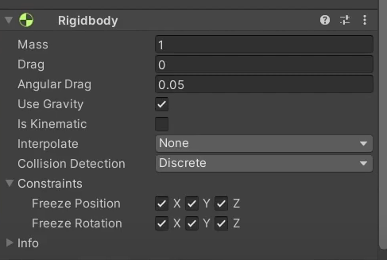
We’ll also need to make sure that our player is not able to move or look around while the inventory is open. To do so, go into the Player object and freeze all the position and rotations for the player under Rigidbody, like so:
So now, if you go to Scripts > Player > Open PlayerController, we will begin on working on cutting off the movement for the player for when the inventory system is open.
Cache the InventorySystem instance and call it iSystem. In the Start() function, get the instance of the InventorySystem. Remember to do this within the Start() rather than directly on the variable itself as the instance is only set in Awake() of InventorySystem. Go into FixedUpdate() and use an if statement. If the inventory is not open, then we can use our movement code. Otherwise, the moment code should not be run. This same logic will be applied to the Lookaround() Code.
PlayerController.cs
InventorySystem iSystem;

void Start()
    {
        rb = GetComponent<Rigidbody>();
        t = this.transform;

        Cursor.lockState = CursorLockMode.Locked;

        inWater = false;

        iSystem = InventorySystem.Instance;
    }

private void FixedUpdate()
    {
        if (!iSystem.inventoryOpen)
        {
            SwimmingOrFloating();
            Move();
        }
    }

void Update()
    {
        if (!iSystem.inventoryOpen)
        {
            LookAround();
        }

        //debug function to unlock cursor
        if (Input.GetKey(KeyCode.Escape))
        {
            Cursor.lockState = CursorLockMode.None;
        }
    }
c. Set up GridObject class
Each section of the grid will store one instance of a GridObject. This helps keeps track of what is stored in each slot in the inventory. Go ahead and create a default grid object class like so:
GridObject.cs
using System; using System.Collections; using System.Collections.Generic; using UnityEngine; public class GridObject: MonoBehaviour{ private Grid<GridObject> grid; public int x; public int y; public ItemScriptableObject item; //class constructor public GridObject(Grid<GridObject> grid, int x, int y) { this.grid = grid; this.x = x; this.y = y; item = null; } //overrides tostring method so it shows both x, y and name value public override string ToString() { return x + ", " + y + "\n" + item.name; } //changes what object placed in this grid object public void SetItem(ItemScriptableObject item) { this.item = item; //trigger event handler grid.TriggerGridObjectChanged(x, y); } //remove object from a grid position public void ClearItem() { item = null; //call event handler grid.TriggerGridObjectChanged(x, y); } //get the object that is placed in the grid public ItemScriptableObject GetItem() { return item; } }
To summarise, here are the things we will need to add to the GridObject class next:
itemImage: Each grid object will have an instance of the inventory image prefab we made earlier to display the contents of theGridObjecttempItem: A temporary slot needs to be allocated so that when we sort the inventory and it doesn’t work, we will still maintain the previous sorting. For instance, when you pick up an item, the system will not be able to know if it can fit until it performs the sorting algorithm. In essence, if the algorithm fails, we can just reject the new item and the inventory remains in the state it was previously sorted in.tempItemFunction: TogetandsetthetempItemSetItemFunction Edits: This is so that when yousetthe item, it updates theitemImage.
GridObject.cs
using System;
using System.Collections;
using System.Collections.Generic;
using UnityEngine;
using UnityEngine.UI;

public class GridObject
{
    public static GameObject inventoryTab;
    public static GameObject uiPrefab;
    private Grid<GridObject> grid;
    public int x;
    public int y;
    private GameObject itemImage;

    public ItemScriptableObject item;
    public ItemScriptableObject tempItem;


    //class constructor
    public GridObject(Grid<GridObject> grid, int x, int y)
    {
        this.grid = grid;
        this.x = x;
        this.y = y;
        item = null;
    }

    //overrides tostring method so it shows both x, y and name value
    public override string ToString()
    {
        return x + ", " + y + "\n" + item.name;
    }

    //changes what object placed in this grid object
    public void SetItem(ItemScriptableObject item)
    {
        this.item = item;
        if(itemImage == null)
        {
            itemImage = GameObject.Instantiate(uiPrefab, new Vector3(0, 0, 0) * grid.GetCellSize(), Quaternion.identity, inventoryTab.transform);
        }
        itemImage.GetComponentInChildren<Image>().sprite = item.sprite;
        itemImage.GetComponentsInChildren<RectTransform>()[1].sizeDelta = grid.GetCellSize() * item.size;
        itemImage.GetComponent<RectTransform>().anchoredPosition = new Vector3(x, y, 0) * grid.GetCellSize();
        itemImage.GetComponentInChildren<InteractableObject>().item = item;
        itemImage.SetActive(true);
        //trigger event handler
        grid.TriggerGridObjectChanged(x, y);
    }

    //remove object from a grid position
    public void ClearItem()
    {
        item = null;
        if (itemImage != null)
        {
            itemImage.SetActive(false);
        }
        //call event handler
        grid.TriggerGridObjectChanged(x, y);
    }

    //get the object that is placed in the grid
    public ItemScriptableObject GetItem()
    {
        return item;
    }

    public void SetTemp(ItemScriptableObject item)
    {
        tempItem = item;
    }

    public bool EmptyTemp()
    {
        return tempItem == null;
    }

    public void ClearTemp()
    {
        tempItem = null;
    }

    public ItemScriptableObject GetTemp()
    {
        return tempItem;
    }

    public void SetTempAsReal()
    {
        ClearItem();
        if (!EmptyTemp())
        {
            SetItem(tempItem);
        }
        ClearTemp();
    }
}
And now, we can go ahead and create our grid like so:
InventorySystem.cs
using System.Collections;
using System.Collections.Generic;
using UnityEngine;
using UnityEngine.UI;

public class InventorySystem : MonoBehaviour
{
    public static InventorySystem Instance { get; private set; }

    private Grid<GridObject> grid;

    int gridWidth = 6;
    int gridHeight = 8;
    float cellSize = 100f;

    //list of all items in inventory
    public List<ItemScriptableObject> inventoryList = new List<ItemScriptableObject>();

    public GameObject inventoryTab;
    public GameObject uiPrefab;
    public bool inventoryOpen;

    private void Awake()
    {
        Instance = this;

        GridObject.inventoryTab = inventoryTab;
        GridObject.uiPrefab = uiPrefab;

        //create the grid
        grid = new Grid<GridObject>(gridWidth, gridHeight, cellSize, new Vector3(0, 0, 0), (Grid<GridObject> g, int x, int y) => new GridObject(g, x, y));

    }

    private void Update()
    {
        if (Input.GetKeyDown(KeyCode.Tab))
        {
            if (!inventoryOpen)
            {
                Cursor.lockState = CursorLockMode.None;
                inventoryTab.SetActive(true);
            }
            else
            {
                Cursor.lockState = CursorLockMode.Locked;
                inventoryTab.SetActive(false);
            }
            inventoryOpen = !inventoryOpen;
        }
    }
}
5. Inventory sorting
First, we will add Linq to the the InventorySystem script – so go ahead and add using System.Linq; to the beginning of your code. When sorting the inventory, we are going to want the inventory to sort all items in the inventory according to size from largest to smallest. The algorithm for it will look like this:
- For every item, run a check on every single index.
- Each check, starting from the cell index, will check if the object is larger than the other objects, one by one, from that index.
- For instance, if you’re at a particular index and the object is two by two, it will check the cell below, to the right and the cell one diagonal from it. If all those cells are empty, it will set the object to be in the first cell and fill the rest of the cells with a filler object that we will need to create.
We will need to create an ItemScriptableObject to take the place of that filler object, so go into your Scriptables folder once again and create a new Scriptable Object and name it ‘Filler Object’. In the inspector menu, we can set the Id of the Item Scriptable Object to -1 and name it “filler”. It does not need a size and we can simply leave the rest of it blank since its meant to be a filler object.
To summarize, here are some of the pieces of code we need in the InventorySystem script:
- Add a variable
ItemScriptableObjectnamedfillerItem: This is where we’re going to assign our filler items in the future. Now you can create a new region that functions to sort the inventory. - Create function
AssignItemToSpot(): This is to assign items to grid objects. This function will be a version that takes in ItemScriptableObject and the coordinates, and it will just assign that object to the coordinates. The second part of this is that if you give it anItemScriptableObjectand then a list of coordinates, then it will assign all of those coordinates to be theItemScriptableObjectand filler objects. AssignItemToSpot(): This function is meant for large objects, where we will be taking this list of coordinates and assign items to them accordingly, whereby if it is the first coordinate, it will be set to the item, and if it is any other coordinate, it will be set to a filler item.- Version 2 of
AssignItemToSpot(): This is for one by one objects, so we can put in a coordinate as well as the item. - Create a function to reset temp values: For this code, we’re basically saying that for every grid object in the grid array, it clears a temp. However, if you want to access grid array, you actually have to go to grid and change grid array to public instead of private. In the original CodeMonkey code, the grid array is set as private, but if you change it to public you can access it to get every GameObject easier.
- When given an ItemScriptableObject and a coordinate, it will check that coordinate and surrounding coordinates to see if there is enough space to fit the item. For instance, if you put in a two by two sized item and a coordinate, it will check that coordinate as well as the coordinate below, to the right, and diagonally from it.
- Getting all coordinates based on size of the item: Recall that our grid starts from the bottom left and goes to the right then upwards – but what we want is to sort starting from the top left instead of the bottom left. This is why we’ll be doing the
yfor this portion in negative rather than positive. If one of these coordinates are out of bounds, we will immediately return false. - Check coordinates: After getting all coordinates, we will need to verify if all of them are empty. If all of them are empty, then the code will reach this point where we return true to
AssignItemToSpot(). This function will now, when given a single coordinate, check if it can fit a large item! AvailSpot()Function: This function, when given an item, checks whether that item is a one by one item or a large item. Then, it runs through every spot in the grid to verify if it can find a spot to fit it. This will be aBooleanfunction – if there are no spots available, it will need to returnfalseto indicate to the inventory sorting algorithm that the current sorting will not work. Again, since the grid by default starts from the bottom left, we need to make sure that it starts from the top left. Then, we need to check if the spot is empty. If it is not, then go ahead and skip to the next grid spot until we reach an empty one, and then we can check if the item is size one. If the item is size one and this grid spot is empty, you can then assign it to the spot and returntrue.CheckIfFits()Function: If the item is not that size, we will need to create a function to verify if it fits.- SortItems() Function: This function is
boolean– we want the function to sort the inventory list based on the size of each item. We can do this usingLinq.
Recall: We had a public list of Item Scriptables which is used to store all the items we have in the inventory. This is where SortItems() is going to sort the items from!
- Create variable,
sortedList: Here, we will useLinq OrderByDescending. Next, we need to go through each item in the list and see if we can find a spot for them. For every item that has been put in, the next item will take that item spot into account. To do so, we will useAvailSpot()with the current item. If the system returns afalse, we will create a warning message to notify the player that the current sort does not work. It should reset the temporary values, and then returnfalse. This way, nothing getssetas the item. - If
AvailSpot()is applied to every item and all of it returnstrue, we continue to set all the temporary values as the real values. This will be done using a second foreach loop in the initial one we just created above. Just like in the reset temp values, we are going to use a similar loop. - However, instead of clearing all the temporary objects, we will just use
obj.SetTempAsReal(). This is so that when every object has been successfully put into temporary spots, it will go through thisforeachloop and set all the temporary spots as real. It will set the item for every single grid and assign the images, item scriptables, and sizes appropriately. Once this is done, return true to finish it up.
InventorySystem.cs
using System.Collections;
using System.Collections.Generic;
using UnityEngine;
using System.Linq;
using UnityEngine.UI;

public class InventorySystem : MonoBehaviour
{
    public static InventorySystem Instance { get; private set; }

    private Grid<GridObject> grid;

    int gridWidth = 6;
    int gridHeight = 8;
    float cellSize = 100f;

    //list of all items in inventory
    public List<ItemScriptableObject> inventoryList = new List<ItemScriptableObject>();

    public GameObject inventoryTab;
    public GameObject uiPrefab;
    public bool inventoryOpen;

    public ItemScriptableObject fillerItem;

    // Start is called before the first frame update
    void Awake()
    {
        Instance = this;

        GridObject.inventoryTab = inventoryTab;
        GridObject.uiPrefab = uiPrefab;

        //create the grid
        grid = new Grid<GridObject>(gridWidth, gridHeight, cellSize, new Vector3(0, 0, 0), (Grid<GridObject> g, int x, int y) => new GridObject(g, x, y));
    }

    private void Update()
    {
        if (Input.GetKeyDown(KeyCode.Tab))
        {
            if (!inventoryOpen)
            {
                Cursor.lockState = CursorLockMode.None;
                inventoryTab.SetActive(true);
            }
            else
            {
                Cursor.lockState = CursorLockMode.Locked;
                inventoryTab.SetActive(false);
            }
            inventoryOpen = !inventoryOpen;
        }
    }

    #region Functions to sort the inventory

    //assign items to gidobjects
    void AssignItemToSpot(ItemScriptableObject item, List<Vector2> coords)
    {
        for (int i = 0; i<coords.Count; i++)
        {
            int x = (int)coords[i].x;
            int y = (int)coords[i].y;
            if (i != 0)
            {
                grid.GetGridObject(x, y).SetTemp(fillerItem);
            }
            else
            {
                grid.GetGridObject(x, y).SetTemp(item);
            }
        }
    }

    void AssignItemToSpot(ItemScriptableObject item, int x, int y)
    {
        grid.GetGridObject(x, y).SetTemp(item);
    }

    void ResetTempValues()
    {
        Debug.Log("reset temp");
        foreach(GridObject obj in grid.gridArray)
        {
            obj.ClearTemp();
        }
    }

    bool CheckIfFits(ItemScriptableObject item, Vector2 gridCoordinate)
    {
        List<Vector2> coordsToCheck = new List<Vector2>();

        //get all the coordinates based on the size of the item
        for (int x = 0; x < item.size.x; x++)
        {
            for (int y = 0; y > -item.size.y; y--)
            {
                //if one of the coords is out of bounds, return false
                if((x + gridCoordinate.x) >= gridWidth || (gridCoordinate.y + y) >= gridHeight)
                {
                    return false;
                }

                coordsToCheck.Add(new Vector2(x + gridCoordinate.x, gridCoordinate.y + y));
            }
        }

        //check all the coordinates
        foreach(Vector2 coord in coordsToCheck)
        {
            if(!grid.GetGridObject((int)coord.x, (int)coord.y).EmptyTemp())
            {
                //if there is something in one of these coordinates, return false
                return false;
            }
        }

        //return true
        AssignItemToSpot(item, coordsToCheck);
        return true;
    }

    //check through every spot to find the next available spot
    bool AvailSpot(ItemScriptableObject item)
    {
        for (int y = gridHeight - 1; y >= 0; y--)
        {
            for(int x = 0; x < gridWidth; x++)
            {
                //check if the spot is empty
                if (grid.GetGridObject(x, y).EmptyTemp())
                {
                    //check if size one
                    if(item.size == Vector2.one)
                    {
                        AssignItemToSpot(item, x, y);
                        return true;
                    }
                    else
                    {
                        if(CheckIfFits(item,new Vector2(x, y)))
                        {
                            return true;
                        }
                    }
                }

            }
        }

        //after checking every coordinate, no spots found
        return false;
    }

    //function returns true if all items can be sorted, and sorts them properly
    //returns false if items cannot be sorted and deletes all the temporary values
    bool SortItems()
    {
        Debug.Log("SortItems");

        //sort items by size
        var sortedList = inventoryList.OrderByDescending(s => s.size.x * s.size.y);

        //place items systematically
        foreach (ItemScriptableObject item in sortedList)
        {
            bool hasSpot = AvailSpot(item);
            if (hasSpot == false)
            {
                Debug.Log("doesnt fit!");
                ResetTempValues();
                return false;
            }
        }

        foreach (GridObject obj in grid.gridArray)
        {
            obj.SetTempAsReal();
        }

        return true;

    }

    #endregion
}
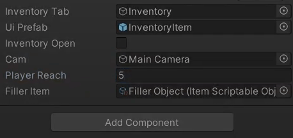
And that’s all for the coding portion for sorting items! You can go ahead and test this code by going to Awake() and call SortItems(). Save this code and go back to Unity, go into Game Manager, into the Inventory System script in the inspector menu and add some Item Scriptable Objects like so:
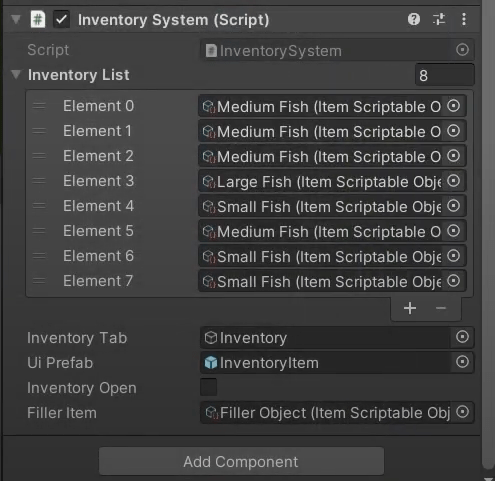
Remember to also set the UI Prefab right below this by dragging the InventoryItem prefab we have from Assets > Prefabs into the UI Prefab. Lastly, set the filler item as Filler Object.
The last thing we need before we can test this out, go into our ClearItem() function and create an if loop. If the itemImage!= null, then we drag itemImage.SetActive(false) into the loop. If there is no item image that has been generated for that, we will have to set it.
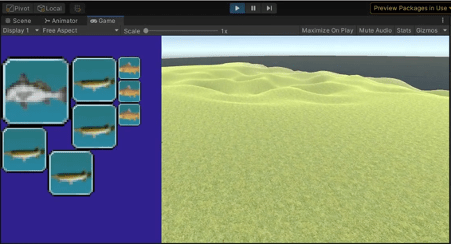
Your inventory will be sorted by size, and it should look something like this when you run the code by pressing play:
6. Picking Up Items
The last portion of this tutorial will be how we will implement the functions that will help players pick up and throw items away for and from the inventory.
First, go into the InventorySystem script we have. In order to pick up objects from the world, a Raycast must be sent from the camera of the player. To do so, we’ll start by adding a few variables.
In InventorySystem, we’re going to keep a reference to the camera and also a public variable to keep track of how long a Raycast to implement – we will name this playerReach since, depending on how long the Raycast is, that is how the player is going to be able to select objects. Here is what we need:
- Create a
#regioncalledInteracting with Items: We will create a few functions that will handle pickups and disposing of items. - Create
HoverObject()Function: This function will perform aRaycastthat will find any objects with the InteractableObject script on it, then return the InteractableObject that it has found. If theRaycasthits an objuect, it willreturntheInteractableObjectcomponent of that object is hit. Otherwise, it will return anull. PickUpItem()Function: This function will take in anInteractableObject. This function will be called up when an item is picked up. When an item is picked up, the item is added to theinventoryListand then check ifSortItems()returns atrueorfalse.- If it returns a false, it has to be removed from the
inventoryListand display an error message on the screen notifying the player that the inventory is full, thenreturn. - Otherwise, the function will not
returnand instead, destroy the GameObject from the World because it is now inside the inventory.
- If it returns a false, it has to be removed from the
- Go into
Update()and insert a variableito beHoverObject(): Ifi!=null(a.k.a if a player is hovering over an object), then the player can left click to call the functionPickupItem().
InventorySystem.cs
using System.Collections;
using System.Collections.Generic;
using UnityEngine;
using System.Linq;
using UnityEngine.UI;

public class InventorySystem : MonoBehaviour
{
    public static InventorySystem Instance { get; private set; }

    private Grid<GridObject> grid;

    int gridWidth = 6;
    int gridHeight = 8;
    float cellSize = 100f;

    //list of all items in the inventory
    public List<ItemScriptableObject> inventoryList = new List<ItemScriptableObject>();

    public GameObject inventoryTab;
    public GameObject uiPrefab;
    public bool inventoryOpen;

    public GameObject cam;

    public float playerReach;

    public ItemScriptableObject fillerItem;

    private void Awake()
    {
        Instance = this;

        GridObject.inventoryTab = inventoryTab;
        GridObject.uiPrefab = uiPrefab;

        //create the grid
        grid = new Grid(gridWidth, gridHeight, cellSize, new Vector3(0, 0, 0), (Grid g, int x, int y) => new GridObject(g, x, y));

        SortItems();

    }

    private void Update()
    {
        if (Input.GetKeyDown(KeyCode.Tab))
        {
            if (!inventoryOpen)
            {
                Cursor.lockState = CursorLockMode.None;
                inventoryTab.SetActive(true);
            }
            else
            {
                Cursor.lockState = CursorLockMode.Locked;
                inventoryTab.SetActive(false);
            }
            inventoryOpen = !inventoryOpen;
        }

        InteractableObject i = HoverObject();

        if(i!= null)
        {
            //check if the player left clicks
            if (Input.GetMouseButtonDown(0))
            {
                //pickup item
                PickUpItem(i);
            }
        }
    }

    #region Interacting with items

    InteractableObject HoverObject()
    {
        RaycastHit hit;
        if(Physics.Raycast(cam.transform.position,cam.transform.forward, out hit, playerReach))
        {
            return hit.collider.gameObject.GetComponent<InteractableObject>();
        }

        return null;
    }

    //called when you pick up something
    void PickUpItem(InteractableObject itemPicked)
    {
        inventoryList.Add(itemPicked.item);

        //sort inventory
        if(SortItems() == false)
        {
            //remove it from the inventory list
            inventoryList.Remove(itemPicked.item);

            //error
            Debug.Log("inventory full!");

            return;
        }

        //if all goes well, destroy the object
        Destroy(itemPicked.gameObject);
    }

    #endregion

    #region functions to sort the inventory


}
Now, your player should be able to pick up objects from the World! To test this out, return to Unity, go into Game Manager and assign the camera. To do so, just drag the Main Camera under Player in the hierarchy into the ‘Cam’ field in the inspector menu! Set the Player Reach to be 5. It should look like this:
Now we can hit run to test out our code and try to pick up objects from the World!
6. Discarding Items
Lastly, we want to be able to right click an item to throw it out while we are in the inventory. In order for the system to detect which icon the player is clicking on, we will have to use the EventSystem. In the EventSystem, it has a Standalone Input Module which provides some functionality for detecting if a player is hovering over a UI object or not. We can use this information to get the UI object that the player is hovering over, destroy it, and then spawn a prefab of the ItemScriptableObject into the World. In order to do this, we need to extend the Standalone Input Module class so that we can access this point of data since it is a private variable.
Here is what we will need to do:
- To extend the Standalone Input Module class, go back into Assets > Scripts > Inventory and create a new script. We will name this
ExtendedStandaloneInputModule. - Remove all of the default
usingand add inusing UnityEngine.EventSystems;: This is a solution that we found on StackOverflow! Instead of inheriting fromMonobehaviour, we can inherit fromStandaloneInputModule, and also remove theStart()andUpdate()functions. - Create a private instance of the
ExtendedStandaloneInputModuleclass, and set the instance to bethis. - Create a
PointerEventDatacalledeventData: This public static function that returns the pointer event data of the cursor. From this instance, we will retrieve the pointer data. In essence, what we are doing here is extending the Standalone Input Module to add an extra function that allows us to get the pointer data of the player’s cursor instead of having it be private, so we can now access it from ourInventorySystemscript!
ExtendedStandaloneInputModule.cs
using UnityEngine.EventSystems;

public class ExtendedStandaloneInputModule : StandaloneInputModule
{
    public static PointerEventData GetPointerEventData(int pointerId = -1)
    {
        PointerEventData eventData;
        _instance.GetPointerData(pointerId, out eventData, true);
        return eventData;
    }

    private static ExtendedStandaloneInputModule _instance;

    protected override void Awake()
    {
        base.Awake();
        _instance = this;
    }
}
- Go back to the
InventorySystemscript and addusing Unity.EventSystems;in the beginning of the script. - Go back to the
Interacting with Itemsregion and create functionRemoveItem(): This allows us to remove an item from the inventory list, then re-sort the inventory.
Finally, it should spawn the World Prefab of that item that was deleted. Now, because we are removing an item, we do not actually need to check if SortItems() will return a false, because it would not possibly happen since the number of items is reduced. Last but not least, it should spawn the object that was removed at the camera’s position.
- Go back to the
Update()function and add another section to check for when the player right clicks: If the cursor is hovering over one of the UI objects, then we get thePointerEventData, which returns to the system all of the items that the cursor is currently hovering over.
The system should be able to cycle through all of them and if the data retrieved has an InteractableObject component, it means that it is an item which can then be removed and have its prefab spawned back into the world! Once the system identifies the InteractableObject, we can then break out of the loop.
InventorySystem.cs
using System.Collections;
using System.Collections.Generic;
using UnityEngine;
using System.Linq;
using UnityEngine.UI;
using UnityEngine.EventSystems;

public class InventorySystem : MonoBehaviour
{
    public static InventorySystem Instance { get; private set; }

    private Grid<GridObject> grid;

    int gridWidth = 6;
    int gridHeight = 8;
    float cellSize = 100f;

    //list of all items in the inventory
    public List<ItemScriptableObject> inventoryList = new List<ItemScriptableObject>();

    public GameObject inventoryTab;
    public GameObject uiPrefab;
    public bool inventoryOpen;

    public GameObject cam;

    public float playerReach;

    public ItemScriptableObject fillerItem;

    private void Awake()
    {
        Instance = this;

        GridObject.inventoryTab = inventoryTab;
        GridObject.uiPrefab = uiPrefab;

        //create the grid
        grid = new Grid(gridWidth, gridHeight, cellSize, new Vector3(0, 0, 0), (Grid g, int x, int y) => new GridObject(g, x, y));

        SortItems();

    }

    private void Update()
    {
        if (Input.GetKeyDown(KeyCode.Tab))
        {
            if (!inventoryOpen)
            {
                Cursor.lockState = CursorLockMode.None;
                inventoryTab.SetActive(true);
            }
            else
            {
                Cursor.lockState = CursorLockMode.Locked;
                inventoryTab.SetActive(false);
            }
            inventoryOpen = !inventoryOpen;
        }

        InteractableObject i = HoverObject();

        if(i!= null)
        {
            //check if the player left clicks
            if (Input.GetMouseButtonDown(0))
            {
                //pickup item
                PickUpItem(i);
            }
        }

        if (Input.GetMouseButtonDown(1))
        {
            if (EventSystem.current.IsPointerOverGameObject())
            {
                PointerEventData hoveredObj = ExtendedStandaloneInputModule.GetPointerEventData();
                foreach(GameObject currentObj in hoveredObj.hovered)
                {
                    InteractableObject io = currentObj.GetComponent<InteractableObject>();
                    if (io != null)
                    {
                        Debug.Log("remove " + io.item.name);
                        RemoveItem(io.item);
                        break;
                    }
                }
            }
        }
    }

    #region Interacting with items

    InteractableObject HoverObject()
    {
        RaycastHit hit;
        if(Physics.Raycast(cam.transform.position,cam.transform.forward, out hit, playerReach))
        {
            return hit.collider.gameObject.GetComponent<InteractableObject>();
        }

        return null;
    }

    //called when you pick up something
    void PickUpItem(InteractableObject itemPicked)
    {
        inventoryList.Add(itemPicked.item);

        //sort inventory
        if(SortItems() == false)
        {
            //remove it from the inventory list
            inventoryList.Remove(itemPicked.item);

            //error
            Debug.Log("inventory full!");

            return;
        }

        //if all goes well, destroy the object
        Destroy(itemPicked.gameObject);
    }

    //remove object from inventory and spawn it in the world
    void RemoveItem(ItemScriptableObject item)
    {
        inventoryList.Remove(item);
        SortItems();
        Instantiate(item.WorldPrefab, cam.transform.position, cam.transform.rotation);
    }

    #endregion

    #region functions to sort the inventory


}
Before we test this out, go back to Unity and into EventSystem. Click on Debug and we will be able to change the default script to the one we just created, ExtendedStandaloneInputModule.
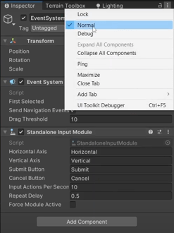
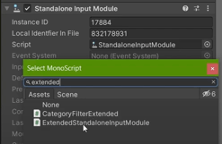
ExtendedStandaloneInputModuleReturn it back to normal after you have done this, and you should be able to see that the Script has been changed to ExtendedStandaloneInputModule.
And.. Voila! Now we can test our code!
Conclusion
Thank you all for tuning in to Part 3 of our game tutorial series for Creating an Underwater Survival Game like Subnautica! Here are all the scripts we’ve created for this tutorial for your reference.
If you need to, you can also download the project files.
ItemScriptableObject.cs
using System.Collections;
using System.Collections.Generic;
using UnityEngine;

[CreateAssetMenu(fileName = "item", menuName = "ScriptableObjects/itemScriptableObject", order = 1)]
public class ItemScriptableObject : ScriptableObject
{
    public int id;
    public string itemName;
    public Vector2 size; //how amny across x and how many across y
    public Sprite sprite;
    public GameObject WorldPrefab;
}
InteractableObject.cs
using System.Collections;
using System.Collections.Generic;
using UnityEngine;

public class InteractableObject : MonoBehaviour
{
    public ItemScriptableObject item;
}
InventorySystem.cs
using System.Collections;
using System.Collections.Generic;
using UnityEngine;
using System.Linq;
using UnityEngine.UI;
using UnityEngine.EventSystems;

public class InventorySystem : MonoBehaviour
{
    public static InventorySystem Instance { get; private set; }

    private Grid<GridObject> grid;

    int gridWidth = 6;
    int gridHeight = 8;
    float cellSize = 100f;

    //list of all items in the inventory
    public List<ItemScriptableObject> inventoryList = new List<ItemScriptableObject>();

    public GameObject inventoryTab;
    public GameObject uiPrefab;
    public bool inventoryOpen;

    public GameObject cam;

    public float playerReach;

    public ItemScriptableObject fillerItem;

    // Start is called before the first frame update
    void Awake()
    {
        Instance = this;

        GridObject.inventoryTab = inventoryTab;
        GridObject.uiPrefab = uiPrefab;

        //create the grid
        grid = new Grid<GridObject>(gridWidth, gridHeight, cellSize, new Vector3(0, 0, 0), (Grid<GridObject> g, int x, int y) => new GridObject(g, x, y));

        SortItems();
    }

    // Update is called once per frame
    void Update()
    {
        if (Input.GetKeyDown(KeyCode.Tab))
        {
            if (!inventoryOpen)
            {
                Cursor.lockState = CursorLockMode.None;
                inventoryTab.SetActive(true);
            }
            else
            {
                Cursor.lockState = CursorLockMode.Locked;
                inventoryTab.SetActive(false);
            }
            inventoryOpen = !inventoryOpen;
        }

        InteractableObject i = HoverObject();

        if(i!= null)
        {
            //check if the player left clicks
            if (Input.GetMouseButtonDown(0))
            {
                //pickup item
                PickUpItem(i);
            }
        }

        if (Input.GetMouseButtonDown(1))
        {
            if (EventSystem.current.IsPointerOverGameObject())
            {
                PointerEventData hoveredObj = ExtendedStandaloneInputModule.GetPointerEventData();
                foreach(GameObject currentObj in hoveredObj.hovered)
                {
                    InteractableObject io = currentObj.GetComponent<InteractableObject>();
                    if(io != null)
                    {
                        Debug.Log("remove " + io.item.name);
                        RemoveItem(io.item);
                        break;
                    }
                }
            }
        }
    }

    #region Interacting with items

    InteractableObject HoverObject()
    {
        RaycastHit hit;
        if(Physics.Raycast(cam.transform.position,cam.transform.forward, out hit, playerReach))
        {
            return hit.collider.gameObject.GetComponent<InteractableObject>();
        }

        return null;
    }

    //called when you pick up something
    void PickUpItem(InteractableObject itemPicked)
    {
        inventoryList.Add(itemPicked.item);

        //sort inventory
        if(SortItems() == false)
        {
            //remove it from the inventory list
            inventoryList.Remove(itemPicked.item);

            //error
            Debug.Log("inventory full!");

            return;
        }

        //if all goes well, destroy the object
        Destroy(itemPicked.gameObject);
    }

    //remove object from inventory and spawn it in the world
    void RemoveItem(ItemScriptableObject item)
    {
        inventoryList.Remove(item);
        SortItems();
        Instantiate(item.worldPrefab, cam.transform.position, Quaternion.identity);
    }

    #endregion

    #region Functions to sort the inventory

    //assign items to gidobjects
    void AssignItemToSpot(ItemScriptableObject item, List<Vector2> coords)
    {
        for (int i = 0; i<coords.Count; i++)
        {
            int x = (int)coords[i].x;
            int y = (int)coords[i].y;
            if (i != 0)
            {
                grid.GetGridObject(x, y).SetTemp(fillerItem);
            }
            else
            {
                grid.GetGridObject(x, y).SetTemp(item);
            }
        }
    }

    void AssignItemToSpot(ItemScriptableObject item, int x, int y)
    {
        grid.GetGridObject(x, y).SetTemp(item);
    }

    void ResetTempValues()
    {
        Debug.Log("reset temp");
        foreach(GridObject obj in grid.gridArray)
        {
            obj.ClearTemp();
        }
    }

    bool CheckIfFits(ItemScriptableObject item, Vector2 gridCoordinate)
    {
        List<Vector2> coordsToCheck = new List<Vector2>();

        //get all the coordinates based on the size of the item
        for (int x = 0; x < item.size.x; x++)
        {
            for (int y = 0; y > -item.size.y; y--)
            {
                //if one of the coords is out of bounds, return false
                if((x + gridCoordinate.x) >= gridWidth || (gridCoordinate.y + y) >= gridHeight)
                {
                    return false;
                }

                coordsToCheck.Add(new Vector2(x + gridCoordinate.x, gridCoordinate.y + y));
            }
        }

        //check all the coordinates
        foreach(Vector2 coord in coordsToCheck)
        {
            if(!grid.GetGridObject((int)coord.x, (int)coord.y).EmptyTemp())
            {
                //if there is something in one of these coordinates, return false
                return false;
            }
        }

        //return true
        AssignItemToSpot(item, coordsToCheck);
        return true;
    }

    //check through every spot to find the next available spot
    bool AvailSpot(ItemScriptableObject item)
    {
        for (int y = gridHeight - 1; y >= 0; y--)
        {
            for(int x = 0; x < gridWidth; x++)
            {
                //check if the spot is empty
                if (grid.GetGridObject(x, y).EmptyTemp())
                {
                    //check if size one
                    if(item.size == Vector2.one)
                    {
                        AssignItemToSpot(item, x, y);
                        return true;
                    }
                    else
                    {
                        if(CheckIfFits(item,new Vector2(x, y)))
                        {
                            return true;
                        }
                    }
                }

            }
        }

        //after checking every coordinate, no spots found
        return false;
    }

    //function returns true if all items can be sorted, and sorts them properly
    //returns false if items cannot be sorted and deletes all the temporary values
    bool SortItems()
    {
        Debug.Log("SortItems");

        //sort items by size
        var sortedList = inventoryList.OrderByDescending(s => s.size.x * s.size.y);

        //place items systematically
        foreach (ItemScriptableObject item in sortedList)
        {
            bool hasSpot = AvailSpot(item);
            if (hasSpot == false)
            {
                Debug.Log("doesnt fit!");
                ResetTempValues();
                return false;
            }
        }

        foreach (GridObject obj in grid.gridArray)
        {
            obj.SetTempAsReal();
        }

        return true;

    }

    #endregion
}
PlayerController.cs
using System.Collections;
using System.Collections.Generic;
using UnityEngine;

public class PlayerController : MonoBehaviour
{
    //reference the transform
    Transform t;

    InventorySystem iSystem;

    public static bool inWater;
    public static bool isSwimming;
    //if not in water, walk
    //if in water and not swimming, float
    //if in water and swimming, swim

    public LayerMask waterMask;

    [Header("Player Rotation")]
    public float sensitivity = 1;

    //clamp variables
    public float rotationMin;
    public float rotationMax;

    //mouse input variables
    float rotationX;
    float rotationY;

    [Header("Player Movement")]
    public float speed = 1;
    float moveX;
    float moveY;
    float moveZ;

    Rigidbody rb;

    // Start is called before the first frame update
    void Start()
    {
        rb = GetComponent<Rigidbody>();
        t = this.transform;

        Cursor.lockState = CursorLockMode.Locked;

        inWater = false;

        iSystem = InventorySystem.Instance;
    }

    private void FixedUpdate()
    {
        if (!iSystem.inventoryOpen)
        {
            SwimmingOrFloating();
            Move();
        }
    }

    private void OnTriggerEnter(Collider other)
    {
        SwitchMovement();
    }

    private void OnTriggerExit(Collider other)
    {
        SwitchMovement();
    }

    void SwitchMovement()
    {
        //toggle inWater
        inWater = !inWater;

        //change the rigidbody accordingly.
        rb.useGravity = !rb.useGravity;
    }

    void SwimmingOrFloating()
    {
        bool swimCheck = false;

        if (inWater)
        {
            RaycastHit hit;
            if(Physics.Raycast(new Vector3(t.position.x,t.position.y + 0.5f,t.position.z),Vector3.down,out hit, Mathf.Infinity, waterMask))
            {
                if(hit.distance < 0.1f)
                {
                    swimCheck = true;
                }
            }
            else
            {
                swimCheck = true;
            }
        }

        isSwimming = swimCheck;
        //Debug.Log("isSwiming = " + isSwimming);
    }

    // Update is called once per frame
    void Update()
    {
        if (!iSystem.inventoryOpen)
        {
            LookAround();
        }


        //debug function to unlock cursor
        if (Input.GetKey(KeyCode.Escape))
        {
            Cursor.lockState = CursorLockMode.None;
        }
    }

    void LookAround()
    {
        //get the mous input
        rotationX += Input.GetAxis("Mouse X")*sensitivity;
        rotationY += Input.GetAxis("Mouse Y")*sensitivity;

        //clamp the y rotation
        rotationY = Mathf.Clamp(rotationY, rotationMin, rotationMax);

        //setting the rotation value every update
        t.localRotation = Quaternion.Euler(-rotationY, rotationX, 0);
    }

    void Move()
    {
        //get the movement input
        moveX = Input.GetAxis("Horizontal");
        moveY = Input.GetAxis("Vertical");
        moveZ = Input.GetAxis("Forward");

        //check if the player is in water
        if (inWater)
        {
            rb.velocity = new Vector2(0,0);
        }
        else
        {
            //check if the player is standing still
            if(moveX == 0 && moveZ == 0)
            {
                rb.velocity = new Vector2(0, rb.velocity.y);
            }
        }

        if (!inWater)
        {
            //move the character (land ver)
            t.Translate(new Quaternion(0, t.rotation.y, 0, t.rotation.w) * new Vector3(moveX, 0, moveZ) * Time.deltaTime * speed, Space.World);
        }
        else
        {
            //check if the player is swimming under water or floating along the top
            if (!isSwimming)
            {
                //move the player (floating ver)
                //clamp the moveY value, so they cannot use space or shift to move up
                moveY = Mathf.Min(moveY, 0);

                //conver the local direction vector into a worldspace vector/
                Vector3 clampedDirection = t.TransformDirection(new Vector3(moveX, moveY, moveZ));

                //clamp the values of this worldspace vector
                clampedDirection = new Vector3(clampedDirection.x, Mathf.Min(clampedDirection.y, 0), clampedDirection.z);

                t.Translate(clampedDirection * Time.deltaTime * speed, Space.World);
            }
            else
            {
                //move the character (swimming ver)
                t.Translate(new Vector3(moveX, 0, moveZ) * Time.deltaTime * speed);
                t.Translate(new Vector3(0, moveY, 0) * Time.deltaTime * speed, Space.World);
            }
        }

    }
}
GridObject.cs
using System.Collections;
using System.Collections.Generic;
using UnityEngine;
using UnityEngine.UI;

public class GridObject
{
    public static GameObject inventoryTab;
    public static GameObject uiPrefab;
    private Grid<GridObject> grid;
    public int x;
    public int y;
    private GameObject itemImage;

    public ItemScriptableObject item;
    public ItemScriptableObject tempItem;

    //class constructor
    public GridObject(Grid<GridObject> grid, int x, int y)
    {
        this.grid = grid;
        this.x = x;
        this.y = y;
        item = null;
    }

    public override string ToString()
    {
        return x + ", " + y + "\n" + item.name;
    }

    //changes what object placed in this grid object
    public void SetItem(ItemScriptableObject item)
    {
        this.item = item;
        if(itemImage == null)
        {
            itemImage = GameObject.Instantiate(uiPrefab, new Vector3(0, 0, 0) * grid.GetCellSize(), Quaternion.identity, inventoryTab.transform);
        }
        itemImage.GetComponentInChildren<Image>().sprite = item.sprite;
        itemImage.GetComponentsInChildren<RectTransform>()[1].sizeDelta = grid.GetCellSize() * item.size;
        itemImage.GetComponent<RectTransform>().anchoredPosition = new Vector3(x, y, 0) * grid.GetCellSize();
        itemImage.GetComponentInChildren<InteractableObject>().item = item;
        itemImage.SetActive(true);
        //trigger event handler
        grid.TriggerGridObjectChanged(x, y);
    }

    //clear item from the gridobject
    public void ClearItem()
    {
        item = null;
        if (itemImage != null)
        {
            itemImage.SetActive(false);
        }
        //trigger event handler
        grid.TriggerGridObjectChanged(x, y);
    }

    //returns the current scriptable object
    public ItemScriptableObject GetItem()
    {
        return item;
    }

    //checks if there is no itemscriptableobject in the gridobject
    public bool EmptyItem()
    {
        return item == null;
    }

    public void SetTemp(ItemScriptableObject item)
    {
        tempItem = item;
    }

    public bool EmptyTemp()
    {
        return tempItem == null;
    }

    public void ClearTemp()
    {
        tempItem = null;
    }

    public ItemScriptableObject GetTemp()
    {
        return tempItem;
    }

    public void SetTempAsReal()
    {
        ClearItem();
        if (!EmptyTemp())
        {
            SetItem(tempItem);
        }
        ClearTemp();
    }
ExtendedStandaloneInputModule.cs
using UnityEngine.EventSystems;

public class ExtendedStandaloneInputModule : StandaloneInputModule
{
    public static PointerEventData GetPointerEventData(int pointerId = -1)
    {
        PointerEventData eventData;
        _instance.GetPointerData(pointerId, out eventData, true);
        return eventData;
    }

    private static ExtendedStandaloneInputModule _instance;

    protected override void Awake()
    {
        base.Awake();
        _instance = this;
    }
}
Tell us what you think in the comments section below! We hope to see you in the next part.
Hello, i have problem with importing Grid Script in Unity version 2022.3.5f1 :
https://prnt.sc/H28-RzkF7emG
Any workarounds to it? Seems like unity has Grid component and script is from forum post.
Hi Tomislav, sorry I missed your message! The issue is addressed in this forum post: https://blog.terresquall.com/community/topic/part-3-codemonkeys-grid-class-for-the-inventory-system/