In the first part of this series, we set up a basic virtual mail server with Postfix that received emails for our domain and forwarded it to a mailbox of our choice. To round off the basic set of features for our mail server, we will be setting up Simple Authentication and Security Layer (SASL) to work with Postfix, so that we can access our mail server with a mailbox client (like Gmail) and send out emails from our domain.
- Setting up SASL
- Connect to the mail server
- Setting up TLS for Postfix
- Troubleshooting common problems
- Conclusion
1. Setting up SASL
SASL is a framework for authentication that can be used with any application that supports it. Postfix works together with SASL to allows users to authenticate themselves using a username and password combination. This authentication mechanism is usually used to identify users who have the permission to send emails from the mail server, so that the mail server does not become an open relay.
a. Installing and starting SASL
To begin, log in to your mail server and install the following packages:
sudo apt-get install sasl2-bin libsasl2-2 libsasl2-modules
After the packages are installed, we need to configure SASL to start up whenever our mail server boots up. Open its configuration file with a text editor:
sudo nano /etc/default/saslauthd
Then, change the line with the START property to say yes:
/etc/default/saslauthd
START=yes
If you don’t find the START line, add it in anywhere on the file.
This will cause saslauthd to start itself up in future whenever the mail server boots up, but Postfix isn’t configured to use it yet.
b. Configuring Postfix to use SASL
To get Postfix to use SASL, we have to create the following file:
sudo nano /etc/postfix/sasl/smtpd.conf
Add the following line into the newly-created file. This will tell Postfix to use SASL as a password authentication service:
/etc/postfix/sasl/smtpd.conf
pwcheck_method: saslauthd
After this, open the Postfix configuration file in /etc/postfix/main.cf.
sudo nano /etc/postfix/main.cf
We will be configuring how Postfix uses SASL:
/etc/postfix/main.cf
smtpd_sasl_auth_enable = yes
smtpd_sasl_security_options = noanonymous
broken_sasl_auth_clients = yes
smtpd_recipient_restrictions = permit_sasl_authenticated permit_mynetworks reject_unauth_destination
Below is a table explaining what these different settings do:
| Property | Value | Description |
|---|---|---|
smtpd_sasl_auth_enable | yes | Enables SASL authentication for Postfix. |
smtpd_sasl_security_options | noanonymous | Disallows anonymous access to the mail server, i.e. users must log in with a valid username and password combination. |
broken_sasl_auth_clients | yes | Accepts authentication attempts from older mail client applications such as Microsoft Outlook Express version 4 and Microsoft Exchange version 5.0, which use an outdated version of the SMTP AUTH command. This basically allows older mail clients to connect to your mail server. |
smtpd_recipient_restrictions | (multiple) | Restricts who can use Postfix to send a SMTP RCPT TO command, i.e. send emails. This command allows the following users to send emails: 1) SASL authenticated, and; 2) users listed under Postfix’s $mynetwork property (i.e. by default, emails the server sends to itself). |
Ensure that your main.cf does not already have a configuration for the above properties. If you have already followed guides to modify your Postfix previously, there is a chance that your smtpd_recipient_restrictions property is already set. In this case, you will have to refer to Postfix’s documentation on it to see which values you want to remove.
c. Circumventing Postfix chroot restrictions
Most installations of Postfix run on chroot, which means that it is unable to read or modify files on the server that are not related to its operation. If this is the case, Postfix will not be able to communicate with saslauthd, which runs on /var/run/saslauthd.
To check if Postfix runs on chroot for your server, check your /etc/postfix/master.cf file. If it has the line smtp inet n - y - - smtpd or smtp inet n - - - - smtpd then your Postfix is running in a chroot.
If your Postfix runs on chroot, you will need to change the folder that saslauthd runs on. Access the /etc/default/saslauthd file again and scroll all the way to the bottom of the configuration file this time. You’ll want to modify the OPTIONS field this time, so that it points to a different folder that is accessible by Postfix:
OPTIONS="-c -m/var/run/saslauthd/var/spool/postfix/var/run/saslauthd"
Following that, we run the following lines below to:
- Remove the
/var/run/saslauthdfolder. - Create a folder at
/var/spool/postfix/var/run/saslauthd - Make a symlink at
/var/run/saslauthdthat points to/var/spool/postfix/var/run/saslauthd.
sudo rm -r /var/run/saslauthd/
sudo mkdir -p /var/spool/postfix/var/run/saslauthd
sudo ln -s /var/spool/postfix/var/run/saslauthd /var/run
You will also need to add the postfix user on your server to the sasl group, or Postfix will not be able to authenticate passwords using saslauthd. The postfix user is responsible for running the Postfix service.
sudo usermod -aG sasl postfix
Finally, restart the postfix service and start the saslauthd service. Postfix should be able to accept user authentication after this:
sudo /etc/init.d/postfix restart
sudo /etc/init.d/saslauthd start
2. Connecting to the mail server
Now that the Postfix mail server is set up, we should be able to connect to it using a mail client. This article will cover connecting to the server using the Gmail client, but you should be able to do it using any mail client that allows you to send email as a different address.
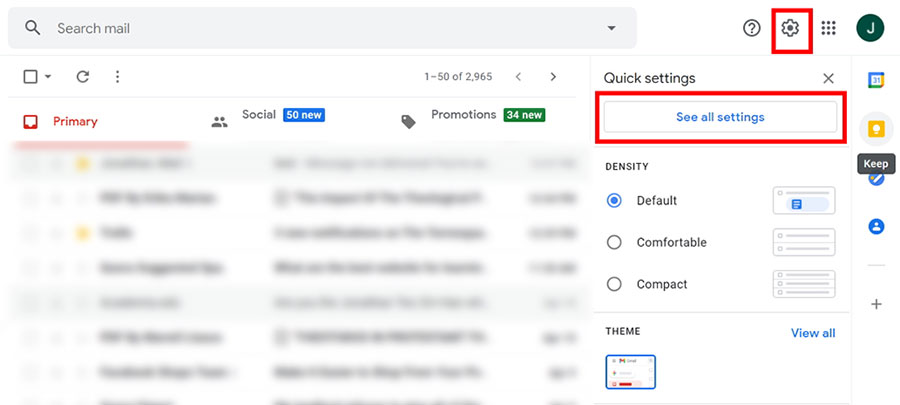
Log in to your Gmail account, and click on the See all settings link under the gear icon on the top-right corner of the screen.
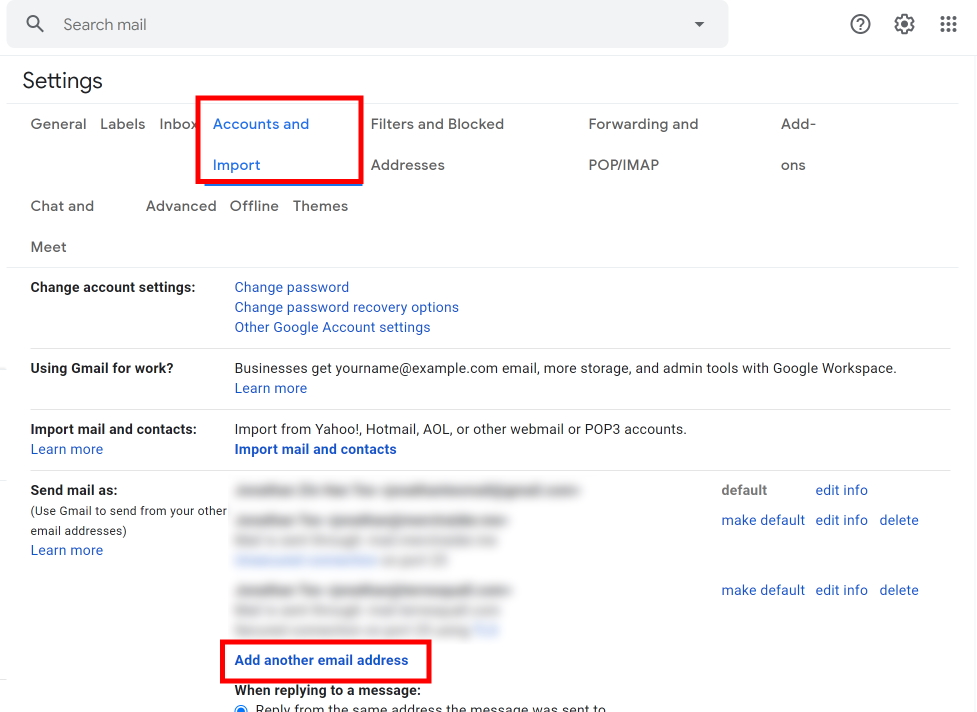
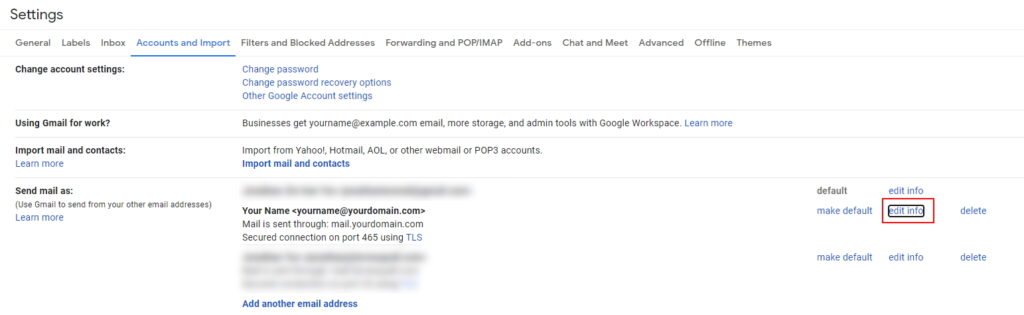
On the Settings page, click on the Accounts and Import tab. Under the Send mail as section, click on Add another email address.
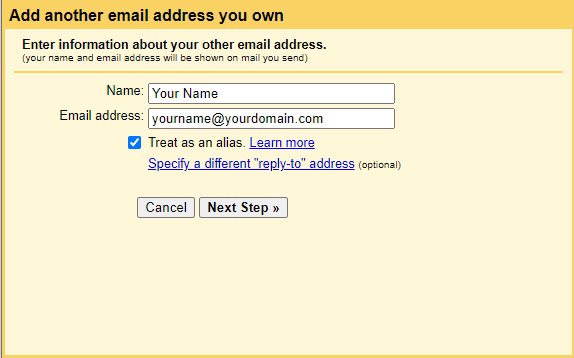
A yellow pop-up should appear, asking you to key in your email address and your display name. Key in the name that you want to display with your email address, along with one of the domain email addresses you set up mail forwarding for in Part 1.
It doesn’t matter whether the Treat as an alias checkbox is checked or unchecked. The checkbox controls whether Gmail separates your inboxes for different email addresses, or merges them. Since our mail server is virtual, if you’ve set up Gmail as your forward address, everything will always go to your default Gmail inbox.
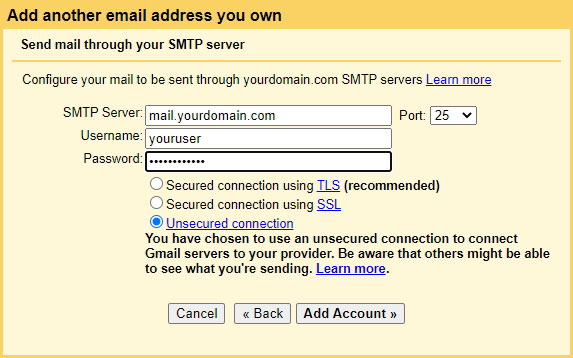
You will now be prompted to give Gmail your server and credentials. Enter the following details for each of the fields:
- SMTP Server: Enter the subdomain that you keyed into your MX record.
- Username: For testing purposes, you can use the
rootaccount for your mail server. In the long run, however, you will want to disable yourrootlogin and create a different account that usessuorsudoto accessrootinstead. - Password: This is the password of the above Username. ‘Nuff said.
Since we have not configured our server to work with a TLS certificate (we’ll be doing that later), we will be using port 25 on an Unsecured connection first.
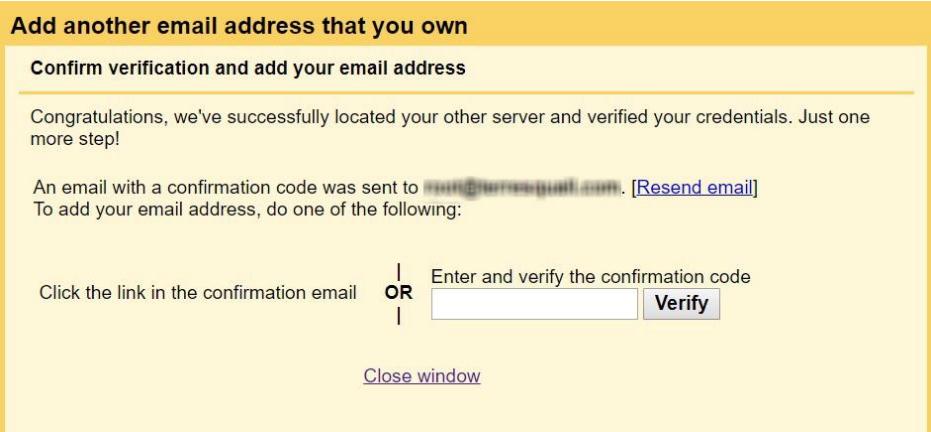
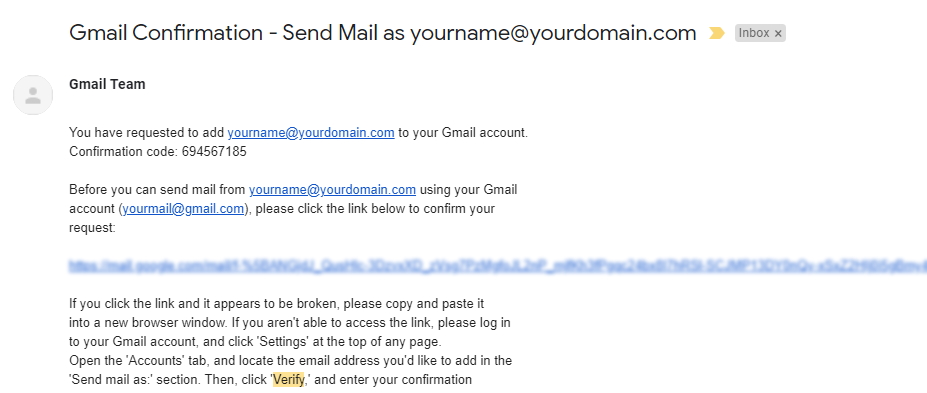
saslauthd process that we just set up.A verification email should be sent to the domain email address you entered. This email should be forwarded to the same Gmail account that you’re currently working on. At the same time, a window should be opened prompting for a confirmation code, so key in the code from the email.
Some mail clients do not require you to verify that you own the email address you want to send emails from. For these clients, once you key in the log in and mail server details, you should be able to send emails using your domain email!
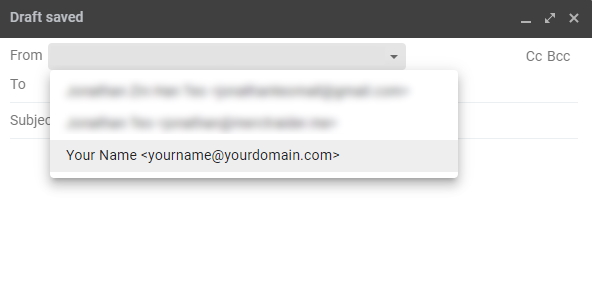
Once this is set up, whenever you compose a new email message in Gmail, you will see a new From tab. This tab allows you to send email using either your Gmail address, or the newly set-up domain address.
3. Setting up TLS for Postfix
The problem with our current setup is that your login credentials are being sent over in plaintext (i.e. it’s unencrypted). This means that anyone who intercepts the data packets in your log-in attempt can see your username and password for your server. To circumvent this, we will need to encrypt our data with Transport Layer Security (TLS) — the same technology that HTTPS connections in web browsers use.
a. Generating a certificate
If you already have a website with HTTPS set up, you can just use the same TLS certificate for Postfix, and skip to the next section.
Otherwise, you will need to generate a TLS certificate using a free application called Let’s Encrypt. A TLS certificate will allow 2 computers to exchange an encryption key using the RSA algorithm, so that secure communication between both computers are possible. The whole process is very complex, and involves a lot of mathematics and logic, but you can learn about the process here.
Enter the following command to install Let’s Encrypt:
sudo apt-get install letsencrypt
Once that is done, you should be able to access the certbot command. We want to run the following command on certbot to generate our certificate; but before you do, open up your DNS records, as we will be needing to add a few TXT records to our domain to prove that we own it:
For the -d arguments below, you can enter as many or as few domains as you like. These are the domains that the TLS certificate will be valid for.
sudo certbot certonly --preferred-challenges=dns --manual --agree-tos -d yourdomain.com -d www.yourdomain.com -d mail.yourdomain.com
Here are what the commands do:
| Option | Description |
|---|---|
certonly | By default, Let’s Encrypt automatically modifies your web server settings to use HTTPS. We don’t want that to happen, in case you already have a web server set up (it’s better to set up HTTPS yourself anyway, since Let’s Encrypt can mess up your web server configurations). |
preferred-challenges=dns | To generate a certificate, Let’s Encrypt first needs to verify that you own your domain. We are specifying that we want to use additional DNS records to verify that. |
--manual | We want to perform manual verification, as automatic verification may fail if you don’t have a web server. |
--agree-tos | By default, you will have to agree to Let’s Encrypt’s Terms of Service before you can use certbot. We are agreeing to it pre-emptively. |
-d [DOMAIN] | Specifies the domains that this certificate will be valid for. |
Once the command has been entered, you will be prompted to accept IP logging (enter y). Then, you will have to create as many new TXT records in your DNS as you have domains. Here is how the output looks like:
Saving debug log to /var/log/letsencrypt/letsencrypt.log
Plugins selected: Authenticator manual, Installer None
Obtaining a new certificate
Performing the following challenges:
dns-01 challenge for mail.terresquall.xyz
dns-01 challenge for terresquall.xyz
dns-01 challenge for www.terresquall.xyz

- - - - - - - - - - - - - - - - - - - - - - - - - - - - - - - - - - - - - - - -
NOTE: The IP of this machine will be publicly logged as having requested this
certificate. If you're running certbot in manual mode on a machine that is not
your server, please ensure you're okay with that.

Are you OK with your IP being logged?
- - - - - - - - - - - - - - - - - - - - - - - - - - - - - - - - - - - - - - - -
(Y)es/(N)o: y

- - - - - - - - - - - - - - - - - - - - - - - - - - - - - - - - - - - - - - - -
Please deploy a DNS TXT record under the name
_acme-challenge.yourdomain.com with the following value:

yF9iYJvFu8pLELDDDOSlyX_0B4Y2iiX9IUYqvlDEgfE

Before continuing, verify the record is deployed.
- - - - - - - - - - - - - - - - - - - - - - - - - - - - - - - - - - - - - - - -
Press Enter to Continue
For each of your subdomains, you will have to add a corresponding TXT record in your DNS, as follows:
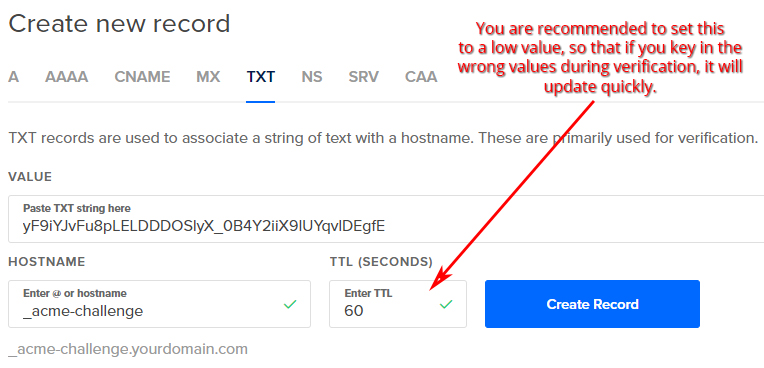
For each domain, you may need to key in a slightly different hostname. For example, if you are verifying for www.yourdomain.com, certbot may prompt you to enter the TXT record for _acme-challenge.www.yourdomain.com. In this case, the hostname field should be _acme-challenge.www.
Having trouble copying the text output from certbot? Most consoles actually allow you to higlight the text and Left-click to copy it (see GIF below). Once done, you can head to your DNS records and Ctrl + V to paste the value.
If your DNS records have been entered correctly, the certificates should be generated. Let’s Encrypt will also tell you where your certificates are stored, so take note of that.
If your certificate generation failed, it is most likely that your DNS records have not been entered correctly, or have not propagated. In such a case, you can use dnschecker.org to check which DNS records are missing.
3.2 Assigning the certificate
We are through with the hard part now. Open up the main.cf config file again.
sudo nano /etc/postfix/main.cf
This time, we want to add the following settings below to enable TLS on Postfix. smtpd_tls_cert_file, smtpd_tls_key_file and smtpd_tls_CAfile should point to the certificates that were generated for your domain.
If you haven’t made too many modifications to your main.cf file, it should already have some of the settings below. You should find the settings under a comment that says # TLS parameters.
/etc/postfix/main.cf
smtpd_tls_cert_file=/etc/letsencrypt/live/yourdomain.com/fullchain.pem
smtpd_tls_key_file=/etc/letsencrypt/live/yourdomain.com/privkey.pem
smtpd_tls_CAfile=/etc/letsencrypt/live/yourdomain.com/chain.pem
smtpd_use_tls=yes
smtpd_tls_session_cache_database = btree:${data_directory}/smtpd_scache
smtp_tls_session_cache_database = btree:${data_directory}/smtp_scache

smtpd_tls_security_level=may
smtp_tls_protocols = !SSLv2, !SSLv3
smtp_tls_mandatory_protocols = !SSLv2, !SSLv3
smtp_tls_mandatory_ciphers = high
smtp_tls_loglevel = 1
smtp_tls_security_level = may
After this is done, reload Postfix using the command below:
sudo postfix reload
Then, try deleting and re-linking your domain email address on Gmail again. This time, however, use Secured connection using TLS instead of Unsecured connection.
With that, your mail server should be set up to send emails using another mail client!
4. Troubleshooting common problems
Setting up a mail server is an extremely intricate task. Hence, even after following this guide, you may find that you’ll have to do some troubleshooting yourself before your mail server starts working. Here, we compile a list of common errors that you might find yourself running into when trying to get your mail server to work.
Before you look through the list below, however, one thing you might want to try is to restart both your Postfix and saslauthd on your server:
sudo /etc/init.d/postfix restart
sudo /etc/init.d/saslauthd restart
This is to make sure that all changes you’ve made to both Postfix and saslauthd have been applied. If it still doesn’t work after the restart, then you’ll want to continue reading:
a. Let’s Encrypt certification woes
If you are having trouble getting yourself certified, you are not alone. Using DNS certification for your Let’s Encrypt certification is one of the harder ways to do it. If you have a web server software installed on your mail server, you can exploring using alternative ways to validate yourself to Let’s Encrypt, such as placing files on your web server.
Otherwise, you can try the following:
- If you have failed DNS verification for Let’s Encrypt before, you will need to wait for some time before trying again. How long you wait will depend on what you set as your TTL for the
TXTrecord that you have entered previously, as Let’s Encrypt will not be able to read your newTXTrecord until the old one expires. - Before you press enter to verify your
TXTrecord, check that it is actually live. You can use online tools (such as this) to read your deployedTXTrecords first, i.e. if your record is deployed at_acme-challenge.yourdomain.comthen you will have to type that into the tool to find your record. - If you can’t find your
TXTrecord even after entering them in your DNS records, then you’ve probably entered them into the wrong address. Either that, or your DNS host takes some time to update your DNS records after you’ve entered it into the system. Different DNS hosts work differently, so you’ll have to go through some trial and error to pinpoint what’s wrong.
If all else fails, you can always move your DNS records to DigitalOcean (like we mentioned in Part 1), and try again in about 24 to 48 hours.
b. Can’t log in!
If you run into problems logging in, check your mail logs at /var/log/mail.log. If it says that your “password verification failed”, like below:
warning: SASL authentication failure: cannot connect to saslauthd server: Permission denied
warning: SASL authentication failure: Password verification failed
Then there is a possibility that you forgot to assign postfix to the sasl group. Run the following command again:
sudo usermod -aG sasl postfix
Afterwards, restart both Postfix and saslauthd:
sudo /etc/init.d/postfix restart
sudo /etc/init.d/saslauthd restart
c. TLS certificate does not match domain
When trying to connect with your mail client, if you’ve got an error saying that your TLS certificate does not match your domain, then you might have forgotten to include the subdomain when generating your certificate (e.g. your certificate is for yourdomain.com, but you are logging in to mail.yourdomain.com).
If this is the case, you will need to generate your certificate again:
sudo certbot certonly --preferred-challenges=dns --manual --agree-tos -d yourdomain.com -d www.yourdomain.com -d mail.yourdomain.com
If you are really missing one of the domains, certbot will ask you if you want to expand your certificate to include the subdomain that you have previously missed out.
5. Conclusion
With this, you are ready to receive and send your emails with Gmail. Let us know in the comments section if you have any feedback!
In the next part, we will be implementing some anti-spoofing policies in our mail server, so as to improve the deliverability of the emails our server sends out.