In the previous part of this tutorial series, we set up a mail server that could accept connections from mail clients like Gmail. This allowed us to send out domain emails using a mail client, instead of having to implement a mailbox on our server.
With our mail server’s basic functionality properly set up, we can now turn our attention to another problem — email deliverability. Spam email is a really big problem online, so many email providers have some kind of system in place to assess whether an incoming email is spam and either flag it, or reject it. Hence, after setting up our mail server, one thing we need to do is to ensure that our mail server conforms to certain email security standards, policies and protocols. This goes a long way to help us communicate to other mail servers that we are trustworthy, so that our emails will be deliverable.
1. Email deliverability
Every respectable email service provider will have a system in place to assess the deliverability of incoming emails. This delivery assessment usually considers a pretty long list of factors.
a. Policies to prevent spoofing
For starters, if you are setting up a new mail server, other email service providers will be looking out for whether you have policies in place to identify spoofers:
- Does the sender of the email implement Sender Policy Framework (SPF) on its DNS records to identify valid senders of its domain emails? SPF records basically specify which IP addresses are allowed to send emails from your domain, so they allow other mail servers to verify that an email came from a legitimate source.
- Does your email come with a DKIM signature? DKIM signatures work similarly to SPF, and offer mail servers another way of verifying that your email came from your mail servers. They offer an additional mode of verification, and are useful in instances when SPF does not work.
- Does your DNS record specify a DMARC policy? DMARC policies are implemented together with SPF and DKIM, and tell other mail servers what to do when an email from your domain fails both SPF and DKIM.
- Does your DNS record specify an rDNS? That is, does your IP address point back to your domain name?
As the 4 factors above help email service providers determine whether emails carrying your domain name as the sender are really from your domain, they are the most important policies to implement for new mail servers — most email service providers will generally accept your emails if you implement these policies properly, since you do not have an emailing history yet.
b. Other factors determining deliverability
Once your mail server is up and running, however, your server’s emailing history, among other things, also become important — many mail servers will also take into account various other factors when determining whether to flag your email as spam, such as:
- The content of your email: There are services nowadays that have been trained to process email content to generate a probability of it being spam, so how you format your content, and what content you send in an email can affect whether an email gets flagged.
- Your sender reputation, or in other words, whether your mail server has a history of sending spam. If your mail server’s emails are frequently flagged as spam, they will be even likelier to be flagged as spam in the future.
- Whether your mail server’s IP address, or IP address range, has been blacklisted by a real-time banlist (RBL). RBLs are services that track servers which send spam, and most mail servers will subscribe to some kind of banlist as a way to weed out spam email.
In this article, we will only be addressing points 2 to 4 — we’ve already handled adding SPF records in Part 1, and points 5 to 7 are beyond the scope of this article.
c. Checking your email deliverability
A great way to check if your implementation of the policies in this article is correct is to use Mail Tester. This is a website that prompts you to send an email to a randomly-generated email address they own. Once your email is sent, they will do a detailed assessment for you, and check for a plethora of things to see how deliverable your email is.

With that out of the way, let’s get started implementing our email policies.
2. Implementing DKIM
DKIM stands for DomainKeys Identified Mail, and it is a verification method that uses asymmetric encryption to verify the identity of the sender. Essentially, DKIM:
- Attaches a DKIM signature (i.e. a hash of the email message encrypted with a private key) to the email.
- Exposes the public key (used to decrypt the DKIM signature) in the DNS records.
To verify if the email passes DKIM, the email receiver generates its own hash of the email message, then decrypts the DKIM signature using the exposed public key to see if the hash sent with the email matches the one that it has generated itself.
Does that sound confusing? Don’t worry, you don’t need to understand DKIM to implement it in Postfix.
a. Installing and configuring OpenDKIM
To implement DKIM on our mail server, we will need to install OpenDKIM:
sudo apt-get install opendkim opendkim-tools
To allow Postfix to interface with OpenDKIM, we will need to add the postfix user to the opendkim user group:
sudo gpasswd -a postfix opendkim
Afterwards, we open and edit OpenDKIM’s configuration file:
sudo nano /etc/opendkim.conf
Add the lines highlighted below to the configuration file:
/etc/opendkim.conf
# Log to syslog
Syslog	yes
# Required to use local socket with MTAs that access the socket as a non-
# privileged user (e.g. Postfix)
UMask	002

#The canonicalization methods used at message signing
Canonicalization	relaxed/simple

Mode	sv
PidFile	/var/run/opendkim/opendkim.pid
SignatureAlgorithm	rsa-sha256

AutoRestart	yes
AutoRestartRate	10/1h

UserID	opendkim:opendkim
Socket	inet:12145@localhost

ExternalIgnoreList	refile:/etc/opendkim/TrustedHosts
InternalHosts	refile:/etc/opendkim/TrustedHosts
KeyTable	refile:/etc/opendkim/KeyTable
SigningTable	refile:/etc/opendkim/SigningTable
Here is a table detailing what each of the configurations mean:
| Configuration | Description |
|---|---|
UserID | Defines the user and user group that OpenDKIM will be running as. In this case, OpenDKIM will be running as the opendkim user in the opendkim group, which were both created during installation. |
Socket | Defines that OpenDKIM will be running under port 12145 in our server (hence the @localhost). We will configure Postfix to access OpenDKIM through port 12145 later. |
ExternalIgnoreList | This defines a list of hosts that do not need DKIM verification, i.e. if email comes from these sources, they are automatically accepted. |
InternalHosts | This defines a list of hosts whose outgoing emails will need a DKIM signature. |
KeyTable | This contains a list of where each domain’s private keys is located. |
SigningTable | This contains a list of where each domain’s public key is located. |
b. Connecting Postfix to OpenDKIM
Now that our OpenDKIM configuration file is filled up, we will need to configure Postfix to access OpenDKIM by using the port that we have set.
First, we head to OpenDKIM’s socket configuration file:
sudo nano /etc/default/opendkim
Make it listen to the socket we just set above by adding the line below somewhere:
/etc/default/opendkim
SOCKET="inet:12145@localhost"
Following that, access Postfix’s configuration files:
sudo nano /etc/postfix/main.cf
Add the following lines at the end to make it use the OpenDKIM mail filter (i.e. milter) we just configured:
/etc/postfix/main.cf
milter_protocol = 2
milter_default_action = accept
smtpd_milters = inet:localhost:12145
non_smtpd_milters = inet:localhost:12145
c. Defining trusted hosts
Next, we will be creating a text file in /etc/opendkim/TrustedHosts. This is one of the files listed in /etc/opendkim.conf, and it contains a list of IP addresses and domains which:
- Are exempted from being DKIM verified when their emails come in (i.e. our mail server doesn’t need to verify its own emails), and;
- Which need to have a DKIM signature generated for them when they send emails out.
Run the following command to create a new directory /etc/opendkim:
sudo mkdir /etc/opendkim
Run the following command to create the file:
sudo nano /etc/opendkim/TrustedHosts
Then, add the following lines to the file:
/etc/opendkim/TrustedHosts
127.0.0.1
localhost
192.168.0.1/24
*.yourdomain.com
Note that you will need to replace *.yourdomain.com with your own email domain.
d. Creating the private key table
Next, we create a file that lists of the location of the private key that will be used to generate the DKIM signature.
Run the following command to create a KeyTable file:
sudo nano /etc/opendkim/KeyTable
Then, add the following to the file:
/etc/opendkim/KeyTable
mail._domainkey.yourdomain.com yourdomain.com:mail:/etc/opendkim/keys/yourdomain.com/mail.private
This file points to 2 locations: 1) the URL points to the location of the TXT DNS record containing the public key, and; 2) the file path points to the location in the server where the private key is contained. Neither of these have been created yet, but we will be doing so below.
Again, remember to replace all instances of yourdomain.com with your own domain name.
e. Creating the signing table
Finally, we will need to create a file named SigningTable. This file tells OpenDKIM which URL it needs to query for the TXT record containing the public key that can be used to decrypt our DKIM signatures.
Run the following command to create the file:
sudo nano /etc/opendkim/SigningTable
Following that, add the line below into the file:
/etc/opendkim/SigningTable
*@yourdomain.com mail._domainkey.yourdomain.com
f. Generating the DKIM keys
Now that all of our tables have been set up, we have to generate both the private and public keys that will be used for the asymmetric encryption that OpenDKIM requires. The private key will be stored in the mail server, while the public key will be stored as a TXT DNS record under our domain.
Create a keys directory in the OpenDKIM folder, and then create a folder within that has the name of your domain with the following commands:
sudo mkdir -p /etc/opendkim/keys/yourdomain.com
cd /etc/opendkim/keys/yourdomain.com
Then, using the opendkim-genkey command, generate both the public and private keys with the following command:
sudo opendkim-genkey -s mail -d yourdomain.com
Now, if you run the ls command, you should find 2 new files in the folder:
$ ls
mail.private  mail.txt
Make sure to change the owner of the folder to opendkim:opendkim with the command below to allow OpenDKIM to have control over the files within the folder:
sudo chown -R opendkim:opendkim /etc/opendkim/keys/yourdomain.com
Again, remember to replace all instances of yourdomain.com above with your own domain!
g. Putting the public key on your DNS record
To complete the set-up of our asymmetric encryption keys, we will have to post our public key found in mail.txt onto a TXT DNS record under our domain. Run the following command to display the contents of the file:
sudo cat mail.txt
You should see something like this:
mail.txt
mail._domainkey    IN  TXT ( "v=DKIM1; h=sha256; k=rsa; "
       "p=MIIBIjANBgkqhkiG9w0BAQEFAAOCAQ8AMIIBCgKCAQEAq/5Yy+LhsGpt3MRrmPUCsRXUsRquk8ICUK4maD4wWt6oZSJVJB6edcaJaseeIRyWxiVh4Eqf+oCKMrkkbi4YTB0Aph21R9uVMMxSBj7Q1n9rHyaSGxq2eyQ+/vTHo1Y82V2MVniLxKynBxBsR+sAxGX/hAAick1/2m5640kMOEXutg8/90CgJkXR3x+UdRq0CaNLBXcvnkGjKS"
       "U6abpHnWX0Asaz2v6tEtgQU8OdodpdyP/LMJjZcRLGsuEaLjirmVDRqvJWVs96WD/JeQpv4mj7fds9Qo5PJUG6AcgWpg9P3wXd6N2HKg0WuMm+81s8Q5D+awBM9BlKe92fJXjMZQIDADAB" )  ; ----- DKIM key mail for yourdomain.com
Extract the text within the brackets (highlighted above) into a text editor (such as Notepad or TextEdit), and remove all line breaks and quotation marks. This should leave us with a result that looks something like what is shown below:
v=DKIM1; h=sha256; k=rsa;p=MIIBIjANBgkqhkiG9w0BAQEFAAOCAQ8AMIIBCgKCAQEAq/5Yy+LhsGpt3MRrmPUCsRXUsRquk8ICUK4maD4wWt6oZSJVJB6edcaJaseeIRyWxiVh4Eqf+oCKMrkkbi4YTB0Aph21R9uVMMxSBj7Q1n9rHyaSGxq2eyQ+/vTHo1Y82V2MVniLxKynBxBsR+sAxGX/hAAick1/2m5640kMOEXutg8/90CgJkXR3x+UdRq0CaNLBXcvnkGjKSU6abpHnWX0Asaz2v6tEtgQU8OdodpdyP/LMJjZcRLGsuEaLjirmVDRqvJWVs96WD/JeQpv4mj7fds9Qo5PJUG6AcgWpg9P3wXd6N2HKg0WuMm+81s8Q5D+awBM9BlKe92fJXjMZQIDADAB
Paste this as a TXT record in your DNS, with mail._domainkey as the hostname of the record.

To test whether your DKIM record has been set up properly on your mail server, you can send another email to Mail Tester to see if it returns a higher score.

3. Implementing DMARC
If you look into the details behind your scoring on Mail Tester, you will notice that the mail tester mentions the following:
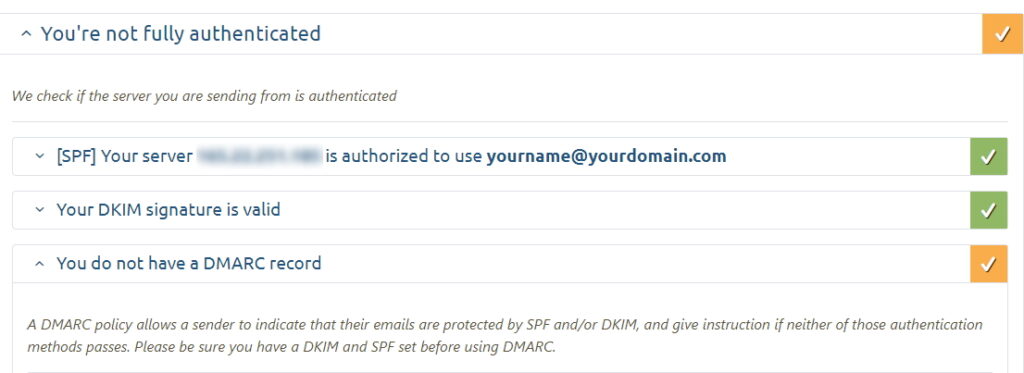
Since we have both SPF and DKIM set up, we can now implement the Domain-based Message Authentication, Reporting and Conformance protocol (DMARC). This protocol tells other mail servers what should be done with emails from our domain that fails both SPF and DKIM verification (i.e. this happens if someone spoofs an email from our domain).
The DMARC protocol also has a reporting mechanism built into it, as it allows us to specify an email address other mail servers can report to if it receives emails that fail the aforementioned SPF and DKIM verification.
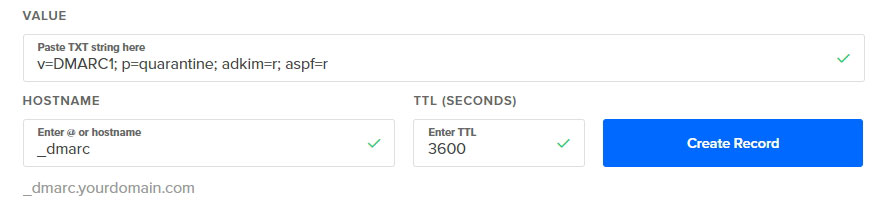
a. Creating the DMARC record
To create a DMARC record, create a TXT record in your DNS with the _dmarc hostname. This record will contain your domain’s DMARC settings.
b. DMARC record syntax
A basic DMARC record looks like this:
v=DMARC1; p=none; adkim=r; aspf=r
| Tag | Description |
|---|---|
v | Specifies the DMARC version. This should always be DMARC1. |
p | What to do with emails that fail both SPF and DKIM verification. There are 3 possible values that can go here:
|
aspf | Alignment policy for the SPF record. This sets whether your subdomains can use the same SPF policy as your main domain.
|
adkim | Alignment policy for the DKIM record. This sets whether subdomains can use the same DKIM policy as your main domain.
|
The example record we gave earlier is a relaxed DMARC — it tells mail servers to do nothing if emails fail both SPF and DKIM verifications. At the very least, you will want to increase p to quarantine (label emails that fail verification as spam), though you can also outright reject these emails:
v=DMARC1; p=reject; adkim=r; aspf=r
If you want to be notified of emails that fail verification on your domain, you can add a valid email address under the rua tag.
v=DMARC1; p=reject; adkim=r; aspf=r; rua=mailto:yourname@yourdomain.com
This will cause other mail servers to notify you when they receive emails that are spoofing as your domain.
4. Ensuring reverse DNS resolution
A final measure that some email service providers will do to check if your mail server is legitimate is to do a reverse DNS (rDNS) lookup. Essentially, it is a DNS lookup, but in reverse.
A regular DNS lookup converts a domain name to an IP address. This is usually provided by A records in a domain’s DNS records.
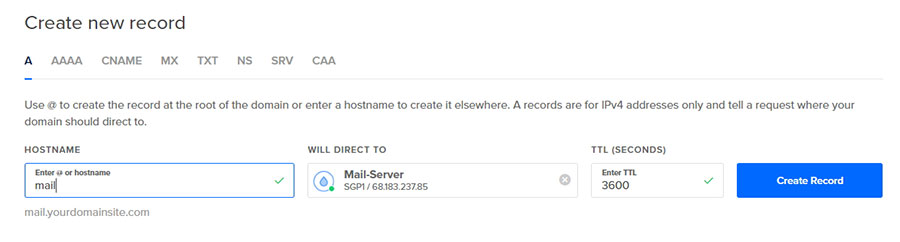
A record says that mail.yourdomainsite.com points to the IP address 68.183.237.85.A reverse DNS lookup converts an IP address to a domain name. This means that, using the example above, it will convert the IP address 68.183.237.85 back to mail.yourdomainsite.com.
Reverse DNS helps to identify legitimate emails, because spoofed emails often come from an IP address that is different from what is listed in the domain’s A record. Some email services (such as Hotmail) may also totally reject your emails if you do not have reverse DNS set up properly.
a. Setting up rDNS
To set up reverse DNS, you will need to have an A record that points to your mail server’s IP address. If your A record points to an elastic IP (or a floating IP, in the case of DigitalOcean), you will need to create an additional A record pointing to your real IP address.
On top of that, depending on your service provider, you may need to configure some settings, or make an application with them. Here’s an (admittedly incomplete) list of service providers, and how to enable rDNS with them:
| Cloud Provider | How to get rDNS resolution |
|---|---|
| Amazon | Apply for a Reverse DNS record here. |
| Alibaba | Follow the steps here. |
| Digital Ocean | Change your droplet name to your mx domain and they will do the rest for you. |
5. Conclusion
Once all of your email policies have been set up, head to Mail Tester and send them another email. You may also want to test the deliverability of your emails by sending them to various email service providers, such as Gmail, Hotmail or Yahoo (a lot of companies use G Suite or Microsoft Exchange for their emails, so you’ll want to make sure your emails can reach Gmail and Hotmail).
Update (10 June 2022): If you are looking to test the deliverability of your email to Google mailboxes, you might also want to check out Spam Checker by Experte. On top of checking your mail deliverability, Spam Checker also checks whether Google mailboxes classify your emails as spam, or if your emails end up in other tabs like Social or Promotions. This is particularly useful if you are planning to send out EDMs to Google inboxes.
Got stuck at any part in this guide? Leave a comment below, and we will get back to you with possible solutions as soon as possible.
In the next part of this guide, we will be adding a Sender Rewriting Scheme to our mail server. This will rectify the problem of our incoming emails failing SPF checks, as our mail server is now forwarding these emails as though they are coming from the original address.