If you own a domain, and are looking to set up email hosting for it, you have a couple of options. You can either:
- Get a generic web hosting service that comes with a cPanel-based email hosting service, or;
- Use services like Google Workspace or Microsoft’s Enterprise Email Service.
The former option is cheap, but can be clunky to use and ineffective with blocking spam. The latter option — being specialised services — are generally much more accessible and effective with spam, but cost more.
There’s actually also a third option, and that is:
- Running your own mail server on a cloud server.
This means that you have to set up the server and maintain it, but it also means that you can have a cheap and effective mail server, instead of having to choose between one or the other.
In this series of articles, we are going to explore how we can set up a virtual mail server using a Mail Transfer Agent (MTA) called Postfix. This will be a fully-featured mail server, meaning that over the course of these articles, we will be building a mail server that can:
- Send and receive emails,
- Filter incoming emails for spam, and;
- Pass email policy checks, so that the emails it sends out are not flagged as spam.
As part of this, we are also going to be setting up our domain name system (DNS) and mail server, as well as set up Postfix on your mail server, so that it becomes capable of receiving and forwarding emails from our domain.
Note: The mail server that we are setting up will be virtual. This means that it will NOT have a mailbox, or a mail client interface. All the emails it receives will be forwarded to a mailbox of our choice, e.g. Gmail or Hotmail. We will also be using the mail clients of these same mailboxes to send our emails in future parts of this series.
- Prerequisites
- Setting up your DNS records
- Installing Postfix
- Configuring Postfix for mail forwarding
- Make sure port 25 is open
- Debugging issues
- Conclusion
1. Prerequisites
In this article, we will be installing Postfix on a DigitalOcean Droplet running Ubuntu 20.02. Feel free to use another cloud service or GNU / Linux distribution (as long as it supports Postfix) if you know your way around.
You’ll also need to own a domain name, so that you can hook your server onto it.
Before we begin, make sure that you:
- Have a GNU / Linux-based distribution set-up on a cloud service provider. We will only be showing you how to install and set-up Postfix.
- Have access to your domain’s DNS records. We will be showing you how to set up the required DNS records to link your mail server to your domain.
Haven’t decided on a cloud service yet? Sign up for DigitalOcean by clicking on the badge below for $100 worth of DigitalOcean credits. If you use DigitalOcean’s $6 per month droplet, these credits should be enough to pay for the server for more than a year!

2. Setting up your DNS records
In this article, we will be setting up our DNS records on DigitalOcean’s nameservers, which will require forwarding your domain’s DNS records to DigitalOcean’s nameservers. This forwarding will take about 24 to 48 hours to kick into effect, however, so you can opt to set up your DNS records somewhere else if you don’t want to wait.
a. Configuring the subdomain for the mail server
To set up our mail subdomain, create an A record that directs to your server.
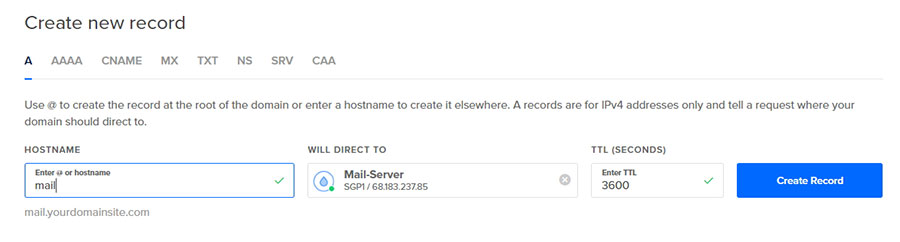
You can create the mail subdomain as a CNAME record instead and it will still work, but this doubles your DNS traffic and goes against internet standards, so it’s generally not recommended.
b. Configuring the MX Record
In addition to that, we need to tell the Internet that this subdomain is where your mail server is. Hence, we need to make a Mail Exchanger (MX) record that directs to the subdomain you’ve just made.
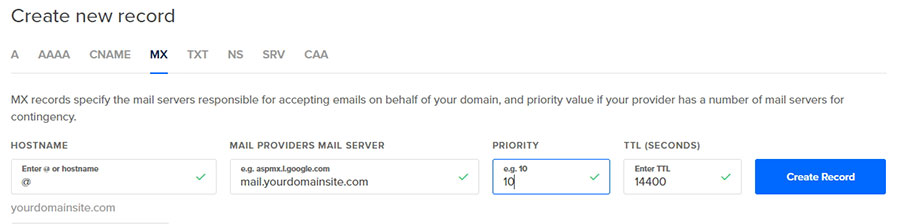
When a mail transfer agent wants to send emails to your domain, it will query the domain’s DNS records and check the domain’s MX record(s) to determine where to send the email to.
If you have multiple MX records defined, it will always pick the MX record with the lowest priority field to send emails to. The higher priority fields serve as backup mail servers, and emails are only delivered to them if the main mail server cannot be reached.
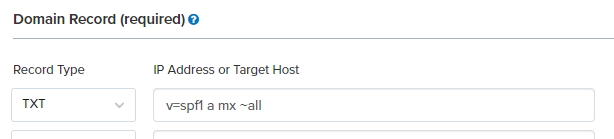
c. Configuring the Sender Policy Framework (SPF)
When setting up DNS records for your mail server, it is especially beneficial to define a Sender Policy Framework (SPF) record. This is a TXT record that tells other email servers which IP address are allowed to send emails using your domain as the address.
Strictly speaking, this is not needed for your mail server to start sending emails, but it goes a long way in ensuring that other mail servers accept emails from you without flagging it as spam, or outright rejecting your emails. Without an SPF record, there is no way for another mail server to determine whether an email from your domain is legitimate. Hence, many mail servers will at least flag your domain emails as spam (if they do not outright reject them).
To create an SPF record in your DNS, create a TXT entry with the following value. This labels 1) the IP address(es) listed in your A record (i.e. your web server), and; 2) the IP address(es) listed in your MX records as legitimate senders of your domain emails:
v=spf1 a mx ~all
TXT record.Here are what the values mean in more detail:
| Segment | Description |
|---|---|
| v=spf1 | The version indicator. It defines the TXT record as an SPF record. You should always use spf1 here as other version are not well-supported. |
| a | Allows all IPs listed as an A record for the domain to send emails. |
| mx | Allows all IPs listed as an MX record for the domain to send emails. |
| ~all | Marks all unspecified IP addresses as unauthorised to send emails from the domain. |
When ~all is used, emails that do not match the requirements return a SoftFail, meaning that they are not rejected entirely, but marked as suspicious (usually, this means they end up going to the spam folder). If your email is currently being spoofed, it by be better to use -all instead, which strictly rejects all unspecified mail servers.
If you want to allow servers outside of your A and MX records to send emails for your domain too, you can use the ip4 attribute to add these additional IP addresses (you can list more than 1 ip4 address in your TXT record):
v=spf1 a mx ip4:1.2.3.4 ~all
For a detailed list of possible SPF record values, you can refer to this article or this one.
3. Installing Postfix
Once you are done working with your DNS records, you can start setting up the server itself. Install postfix on your Ubuntu server.
sudo apt-get install postfix
After it is installed, you will be prompted to select a configuration:
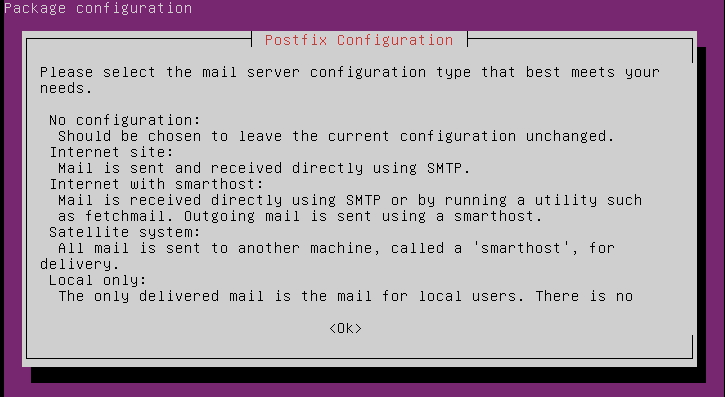
Select Internet Site. You will then be prompted to put in your Fully Qualified Domain Name (FQDN). This will be the domain your email will be using, e.g. if you are setting up email for yourdomainsite.com, then yourdomainsite.com will be your FQDN.
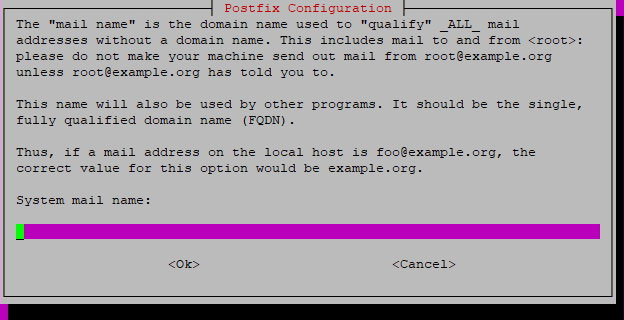
This should be enough for Postfix to generate the requisite configuration files. If the wizard gives you any additional prompts from here on, just submit the default values provided.
4. Configuring Postfix for mail forwarding
We need to tell Postfix how to forward emails and where. To start, open up the configuration file:
sudo nano /etc/postfix/main.cf
We’re using Nano as the text editor because it is easy to use. For a guide on how to use nano, check this article out. You can also consider opening it with Vim for more advanced functionality.
To the configuration file, add the following:
/etc/postfix/main.cf
virtual_alias_domains = localhost
virtual_alias_maps = hash:/etc/postfix/virtual
Save and exit.
What we just did was direct the database of the virtual aliases to a file called virtual. This will be used to generate the database file virtual.db, which will be using this to set up the forwarding email addresses. This file doesn’t exist yet, so let us create the file:
sudo nano /etc/postfix/virtual
In the file, write out the list of email addresses that you want to accept emails with, as well as the mailbox that will be receiving emails for that particular address.
/etc/postfix/virtual
yourname@yourdomain.com yourforwardingemail@gmail.com
Your personal email doesn’t have to be Gmail but I don’t recommend using Hotmail at the beginning. Their email service is stricter and much more likely to drop the email entirely unless your server has a certain amount of reputation. We will be using Gmail as our mail client to send emails out in the next part.
To forward the email to multiple addresses, separate each email address with a comma:
/etc/postfix/virtual
yourname@yourdomain.com yourforwardingemail@gmail.com,anotheremail@gmail.com
If you want to forward all emails under your domain to one specific address, you can do this instead:
/etc/postfix/virtual
@yourdomain.com yourforwardingemail@gmail.com
Now, just saving this file is not going to update Postfix with the new information. Postfix uses lookup tables to access information. Hence, you have to convert the file into a look-up table and then reload Postfix using the following commands:
sudo postmap /etc/postfix/virtual
sudo postfix reload
5. Make sure port 25 is open
Since we’re using SMTP, the emails are forwarded to your server on port 25, so let’s make sure that it is open. A simple way to check this is to use the following command:
sudo netstat -tulpn | grep LISTEN
Installing Postfix will automatically open port 25 in most cases. If port 25 is not open for you, you may have a firewall installed that is blocking the port.
6. Debugging issues
With that, your email server should be working. Try sending an email to the domain addresses that you have just list under your virtual file in Postfix. If you receive it, that’s great!
Otherwise, it could be because:
a. Your DNS settings have not propagated yet.
It can take some time for your DNS settings to propagate around the world. To see if this is the problem, do a DNS lookup and see if the values you’ve entered for your various records are reflected.
b. Your ISP blocked port 25
Many cloud service providers block port 25 by default to prevent spam. If that is the case, you will not be able to open it up even if you specify it in your firewall.
For companies like Alibaba, DigitalOcean, and Amazon, you are able to file a request to have it unblocked for your account.
| Service provider | What you need |
|---|---|
| Alibaba | File an application to have it unblocked, detailing what you’re using it for in accordance with their terms. |
| DigitalOcean | They don’t disclose the criteria, but you’re less likely to have your port unblocked if your account is new. You can try your luck by submitting a support ticket. |
| Amazon | File an application to have it unblocked, detailing what you’re using it for in accordance with their terms. |
Microsoft Azure strictly does not allow for this if your deployment was created after November 15, 2017. They have proposed some alternatives for their users to consider instead.
7. Conclusion
From this, you have set up a mail server with Postfix to serve as a mail forwarder. If you run into any issues, do try posting a comment, and we’ll see if we can help you with it!
For the next part of our tutorial, we will be exploring how we can set up our virtual mail server to send emails using a mail client.
is this part correct
virtual_alias_domains = localhost? shouldn’t it be yourdomain.com (where we want to forward the emails). at least in my case the configuration wasn’t working until i made this change.