Originally developed for Terresquall’s Metroidvania tutorial series, the Bench Universal Save System provides a very easy, plug-and-play way to implement a persistent save system into your project.
In this article, we will use the open-source Unity 2D platformer Kailius as an example to show how easy it is to implement the save system into your game.
1. Introduction
In this tutorial, we will be adding a save system into an open-source Unity 2D platformer called Kailius, using the Bench Universal Save System.
As the game does not have a working save system, this tutorial will guide you through how to create a simple but complete save flow that saves:
- Player position
- Health
- Power
- Attack damage
- Defense
- Score
- Coins
- Gems
- Stars
We will also make 2 visual changes to the game:
- An in-game save bench will be added in certain places to allow the player to save progress.
- Bench’s built-in save slot menu will be added to the title screen, allowing the player to start and load different save files.
2. Preparation
Before we begin, you’ll need to set up the project on your device.
a. Cloning the repository
Since the project is on GitHub, you have 2 options for getting the project onto your device:
- If you’re familiar with using GitHub (or if you want to do it the proper way), you can clone the project from the following URL:
https://github.com/Walkator/Kailius - Alternatively, you can download the project files directly from GitHub using this download link.
If you’re completely new to GitHub, but still want to try it out, I suggest downloading GitHub Desktop, and following the steps here to clone the project.
Once the project is cloned or downloaded (if you downloaded it, you will need to unzip it), you can follow the guide below to open the project in Unity.
b. Importing Bench Universal Save System
After setting up the project, you’ll also need to add the Bench Universal Save System to your project.
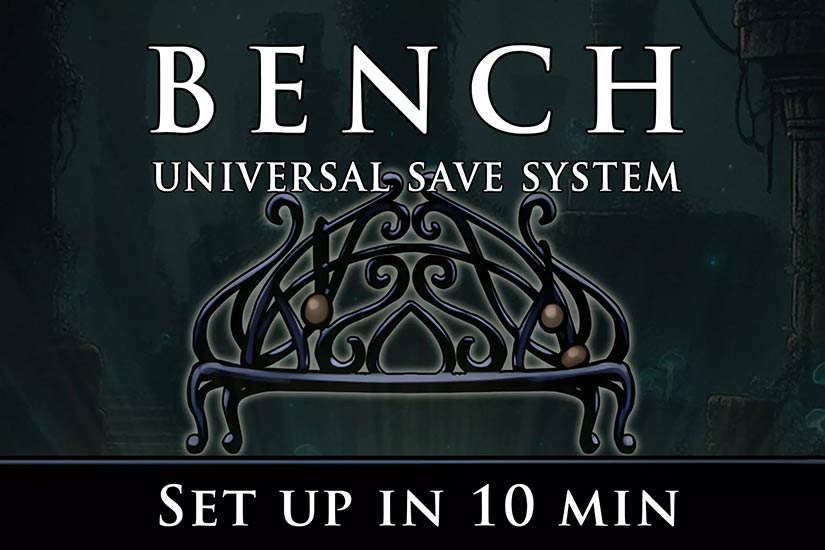
View asset
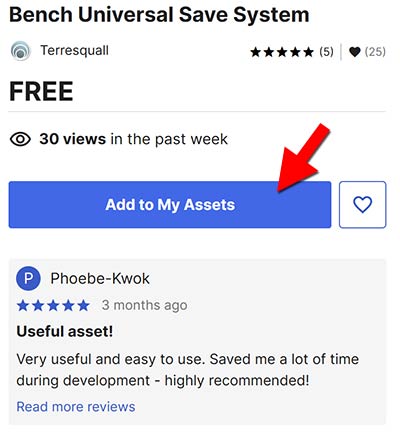
To import the asset, you will first need to head to its page on the asset store by clicking on the image above. Then, log-in to your Unity account and click on Add to My Assets.
With that done, you can now click on Window at the top of the Unity Editor, then open the Package Manager window.
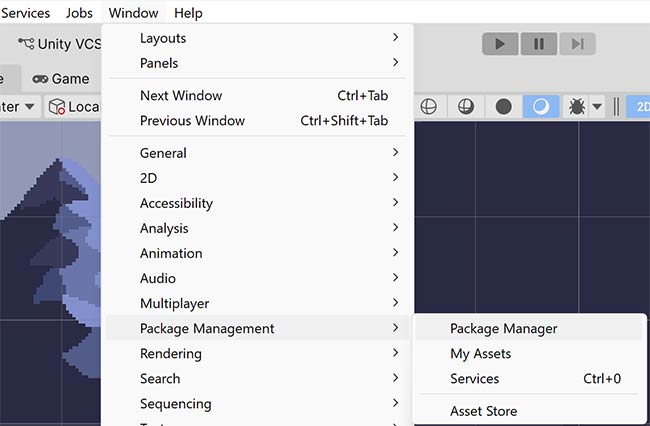
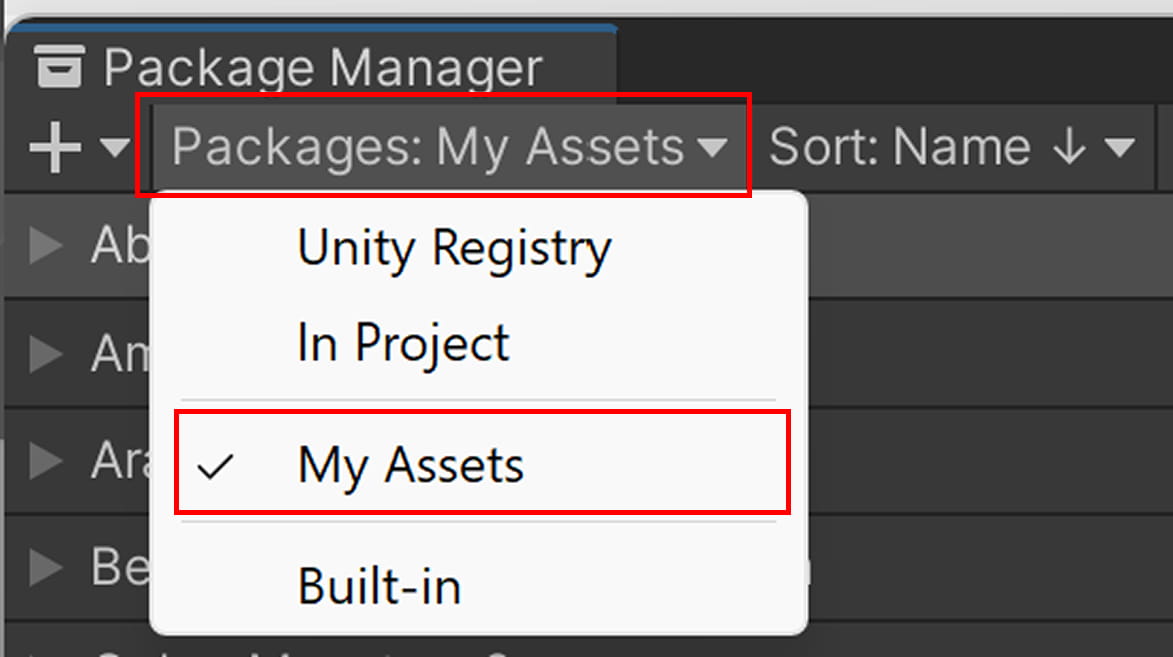
Select My Assets from the dropdown on the top right, and search for the Bench Universal Save System.
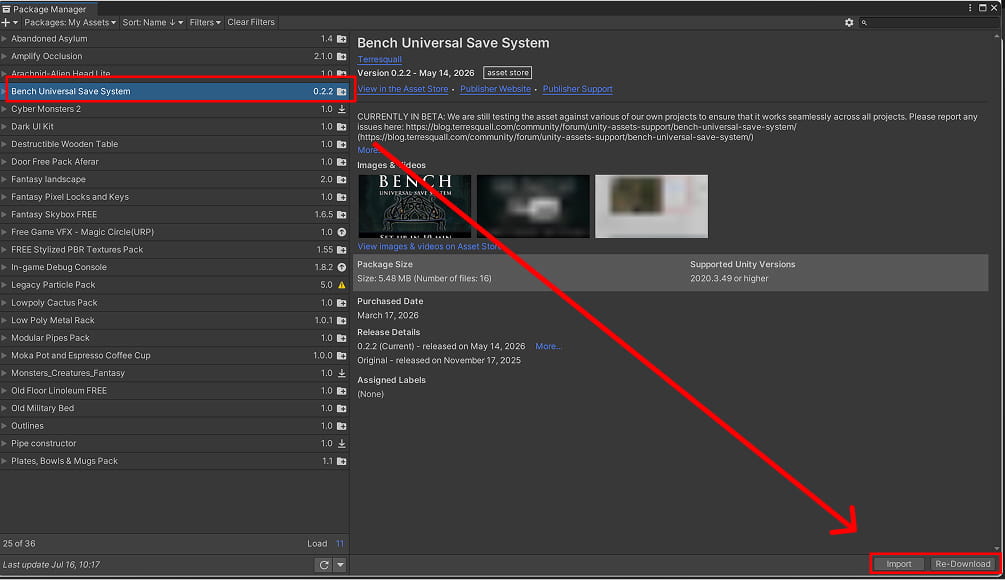
Once you find the asset, select it from the results and click Download. Once the download is complete, click Import to open the Import Unity Package window.
Import all the files into your project and allow Unity to compile the scripts. Then, check the Console window to make sure that the project does not contain any compilation errors before continuing.
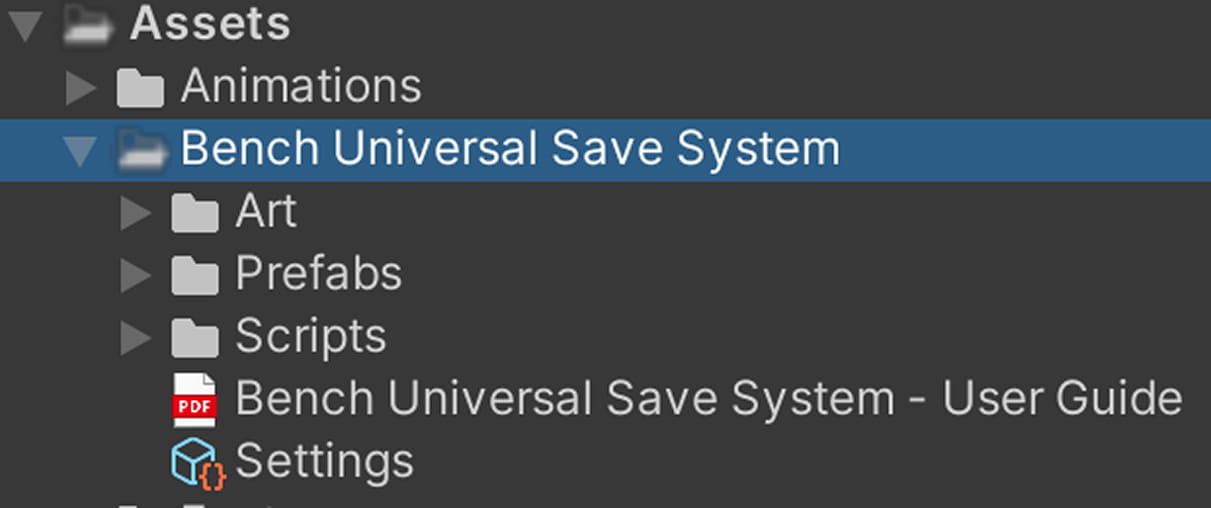
Once this is done, we will be ready to implement our save system. Before you start, if you have the time to spare, you are recommended to read the Bench User Guide to understand how the asset works.
3. Saving Game Data
Now that Bench Universal Save System has been imported into the project, we can start connecting the game’s existing data to Bench.
a. Saving Player Data
The player in Kailius already has a Stats script that stores values such as health, power, attack damage, and defense. Since this script already manages the player’s data, we can make it saveable by allowing it to inherit from Bench’s PersistentObject.
Bench uses PersistentObject to find objects that should be included in the save file. Any script that inherits from PersistentObject can decide what data it wants to save and how that data should be restored.
Stats.cs
using System.Collections; using System.Collections.Generic;using Terresquall; using UnityEngine; using UnityEngine.UI; using TMPro;public class Stats : MonoBehaviour {public class Stats : PersistentObject {public int health = 200; public int power = 0; public int attackDamage = 100; public int defense = 0;private const string DEFAULT_SAVE_ID = "PlayerStatsData"; // Create the SaveData object, which specifies what data needs to be saved. [System.Serializable] public new class SaveData : PersistentObject.SaveData { public int health = 200, power = 0, attackDamage = 100, defense = 0; protected float x, y; // Shorthand to allow us to get / set the position instead of // manually setting the x and y in the save data. public Vector2 position { get { return new Vector2(x, y); } set { x = value.x; y = value.y; } } } // This variable allows us to access health, power, attackDamage and defense. public SaveData data = new SaveData(); // We only need to record the position before saving. // The rest of the attributes are updated live by wrappers. public override PersistentObject.SaveData Save() { if(CanSave()) { data.saveID = saveID; data.position = transform.position; return data; } return null; } // Since wrappers get values from <data>, we only need to set it // and the position variable. public override bool Load(PersistentObject.SaveData loadedData) { data = loadedData as SaveData; if(data != null) { transform.position = data.position; return true; } return false; } // Wrappers that route the getting / setting to the data variable. public int health { get { return data.health; } set { data.health = value; } } public int power { get { return data.power; } set { data.power = value; } } public int attackDamage { get { return data.attackDamage; } set { data.attackDamage = value; } } public int defense { get { return data.defense; } set { data.defense = value; } } public GameObject camera; public GameObject stats; public Image hearts; public Sprite fullHeart; public Sprite heart190; public Sprite heart180; public Sprite heart170; public Sprite heart160; public Sprite heart150; public Sprite heart140; public Sprite heart130; public Sprite heart120; public Sprite heart110; public Sprite heart100; public Sprite heart90; public Sprite heart80; public Sprite heart70; public Sprite heart60; public Sprite heart50; public Sprite heart40; public Sprite heart30; public Sprite heart20; public Sprite heart10; public Sprite emptyHeart; public Image powers; public Sprite fullPower; public Sprite power75; public Sprite power50; public Sprite power25; public Sprite emptyPower; public static Stats instance; public TextMeshProUGUI textDamage; public TextMeshProUGUI textDefense; public GameObject sonidoMuerte; public GameObject sonidoDaño; private bool once = false; // Start is called before the first frame update void Start() { if (string.IsNullOrEmpty(saveID)) { saveID = DEFAULT_SAVE_ID; } if (instance == null) { instance = this; } // Cogemos los datos guardados de las otras escenas if ((int)PlayerPrefs.GetInt("AttackDamage", 0) >= 100) { this.attackDamage = (int)PlayerPrefs.GetInt("AttackDamage", 0); } this.defense = (int)PlayerPrefs.GetInt("Defense", 0); Bench.SaveFile currentSave = Bench.GetCurrentSaveFile(); if (currentSave != null && currentSave.slot == Bench.currentSlot) { Bench.QuickLoad(this); } // Actualiza los contadores this.textDamage.text = "+" + attackDamage.ToString(); this.textDefense.text = "+" + defense.ToString(); } // Update is called once per frame void Update() { // Actualiza los contadores this.textDamage.text = "+" + attackDamage.ToString(); this.textDefense.text = "+" + defense.ToString(); if (health <= 0) { gameObject.GetComponent<Animator>().SetBool("die", true); //gameObject.GetComponentInParent<PlayerController>().destroy(); gameObject.GetComponentInParent<PlayerController>().isDead(); camera.SetActive(true); stats.SetActive(false); if (!once) { Instantiate(sonidoMuerte); once = true; } } switch (health) { case int n when (n >= 200): hearts.sprite = fullHeart; break; case int n when (n >= 190 && n < 200): hearts.sprite = heart190; break; case int n when (n >= 180 && n < 190): hearts.sprite = heart180; break; case int n when (n >= 170 && n < 180): hearts.sprite = heart170; break; case int n when (n >= 160 && n < 170): hearts.sprite = heart160; break; case int n when (n >= 150 && n < 160): hearts.sprite = heart150; break; case int n when (n >= 140 && n < 150): hearts.sprite = heart140; break; case int n when (n >= 130 && n < 140): hearts.sprite = heart130; break; case int n when (n >= 120 && n < 130): hearts.sprite = heart120; break; case int n when (n >= 110 && n < 120): hearts.sprite = heart110; break; case int n when (n >= 100 && n < 110): hearts.sprite = heart100; break; case int n when (n >= 90 && n < 100): hearts.sprite = heart90; break; case int n when (n >= 80 && n < 90): hearts.sprite = heart80; break; case int n when (n >= 70 && n <= 80): hearts.sprite = heart70; break; case int n when (n >= 60 && n < 70): hearts.sprite = heart60; break; case int n when (n >= 50 && n < 60): hearts.sprite = heart50; break; case int n when (n >= 40 && n < 50): hearts.sprite = heart40; break; case int n when (n >= 30 && n < 40): hearts.sprite = heart30; break; case int n when (n >= 20 && n < 30): hearts.sprite = heart20; break; case int n when (n >= 10 && n < 20): hearts.sprite = heart10; break; case int n when (n < 10): hearts.sprite = emptyHeart; break; } switch (power) { case 4: powers.sprite = fullPower; break; case 3: powers.sprite = power75; break; case 2: powers.sprite = power50; break; case 1: powers.sprite = power25; break; case 0: powers.sprite = emptyPower; break; } } public void takeDamage(int value) { if((value-defense) > 0) { this.health -= (value-defense); } Instantiate(sonidoDaño); } public void takeTrueDamage(int value) { this.health -= value; } public void takePower(int value) { this.power += value; } public int getHealth() { return this.health; } public int getPower() { return this.power; } public void setHealth(int value) { this.health += value; if(this.health >= 200) { this.health = 200; } } public void addAttackDamage(int value) { this.attackDamage += value; PlayerPrefs.SetInt("AttackDamage", attackDamage); } public int getAttackDamage() { return this.attackDamage; } public void addDefense(int value) { this.defense += value; PlayerPrefs.SetInt("Defense", defense); } }
In the Player prefab, set the Stats component’s Save ID to PlayerStatsData. This gives the Player a consistent identifier that Bench can use to find its saved data when loading a save file.
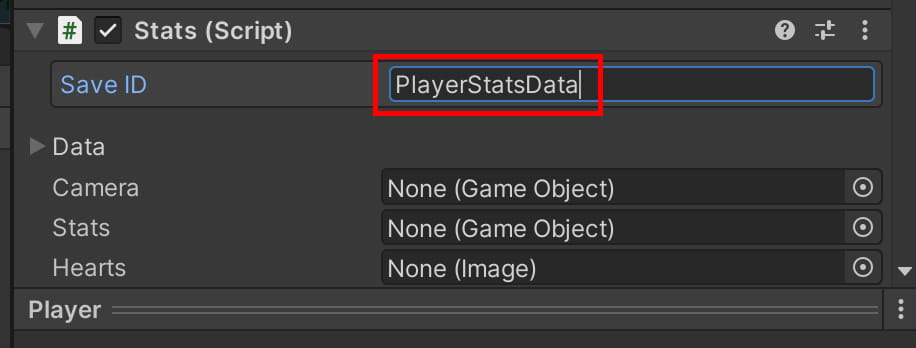
Stats component’s Save ID to PlayerStatsData.In the updated script, Stats contains its own save data class. This means we do not need to create a separate PlayerSaveData class or an extra player save component.
The save data class stores the values that belong to the player. When the game is saved, Bench records the player’s current position and stats. When the game is loaded, those values are restored back into the player.
The most important part is that the player object must have a stable saveID. Bench uses this ID to match saved data with the correct object when loading the game. If the ID changes, Bench will not know which saved data belongs to the player.
b. Saving Score Data with ScoreManager
The project’s existing ScoreManager already manages the score, coins, gems, and stars. Instead of creating another component containing duplicate values, we can allow ScoreManager to save its own data:
ScoreManager.cs
using System.Collections; using System.Collections.Generic; using UnityEngine; using TMPro; using Terresquall; public class ScoreManager :MonoBehaviourPersistentObject { private const string DEFAULT_SAVE_ID = "ScoreManagerData"; public static ScoreManager instance; public TextMeshProUGUI Score; public TextMeshProUGUI textScore; public TextMeshProUGUI textCoins; public TextMeshProUGUI textGems; public TextMeshProUGUI textStars;private int score; private int scoreCoins; private int scoreGems; private int scoreStars;// Wrappers for ScoreManager variables, which draw data // from the save data directly. private int score { get { return data.score; } set { data.score = value; } } private int scoreCoins { get { return data.scoreCoins; } set { data.scoreCoins = value; } } private int scoreGems { get { return data.scoreGems; } set { data.scoreGems = value; } } private int scoreStars { get { return data.scoreStars; } set { data.scoreStars = value; } } private static bool created = false; [System.Serializable] public new class SaveData : PersistentObject.SaveData { public int score, scoreCoins, scoreGems, scoreStars; } public SaveData data = new SaveData(); // Override the default reset function, which assigns it a random save ID. // We always want the same save ID to be used by default. protected override void Reset() { // Automatically assign the save ID if it is empty. if (string.IsNullOrEmpty(saveID)) { saveID = DEFAULT_SAVE_ID; } } public override bool Load(PersistentObject.SaveData loadedData) { SaveData scoreData = loadedData as SaveData; if (scoreData == null) return false; data = scoreData; Score.text = "" + score.ToString(); textScore.text = "" + score.ToString(); textCoins.text = "150/" + scoreCoins.ToString(); textGems.text = "60/" + scoreGems.ToString(); textStars.text = "3/" + scoreStars.ToString(); Debug.Log("Score data loaded with Bench Save System."); return true; } // Start is called before the first frame update void Start() { if (instance == null) { instance = this; }this.score = PlayerPrefs.GetInt("Score", 0); this.scoreCoins = PlayerPrefs.GetInt("ScoreCoins", 0); this.scoreGems = PlayerPrefs.GetInt("ScoreGems", 0); this.scoreStars = PlayerPrefs.GetInt("ScoreStars", 0);Bench.SaveFile currentSave = Bench.GetCurrentSaveFile(); if (currentSave != null && currentSave.slot == Bench.currentSlot) { Bench.QuickLoad(this); } Score.text = "" + score.ToString(); textScore.text = "" + score.ToString(); textCoins.text = "150/" + scoreCoins.ToString(); textGems.text = "60/" + scoreGems.ToString(); textStars.text = "3/" + scoreStars.ToString(); } public void ChangeScore(int scoreValue) { score += scoreValue; textScore.text = "" + score.ToString(); Score.text = "" + score.ToString();PlayerPrefs.SetInt("Score", score);} public void ChangeScoreCoin(int coinValue) { scoreCoins += coinValue; textCoins.text = "150/" + scoreCoins.ToString();PlayerPrefs.SetInt("ScoreCoins", scoreCoins);} public void ChangeScoreGem(int gemValue) { scoreGems += gemValue; textGems.text = "60/" + scoreGems.ToString();PlayerPrefs.SetInt("ScoreGems", scoreGems);} public void ChangeScoreStar(int starsValue) { scoreStars += starsValue; textStars.text = "3/" + scoreStars.ToString();PlayerPrefs.SetInt("ScoreStars", scoreStars);}private void SaveToPlayerPrefs() { PlayerPrefs.SetInt("Score", score); PlayerPrefs.SetInt("ScoreCoins", scoreCoins); PlayerPrefs.SetInt("ScoreGems", scoreGems); PlayerPrefs.SetInt("ScoreStars", scoreStars); }public override PersistentObject.SaveData Save() { if (!CanSave()) return null; data.saveID = saveID; return data; } public int getScoreTotal() { return this.score; } public int getScoreStars() { return this.scoreStars; } }
Just like the Player, the ScoreManager also needs a stable Save ID. In this project, set its Save ID to ScoreManagerData.
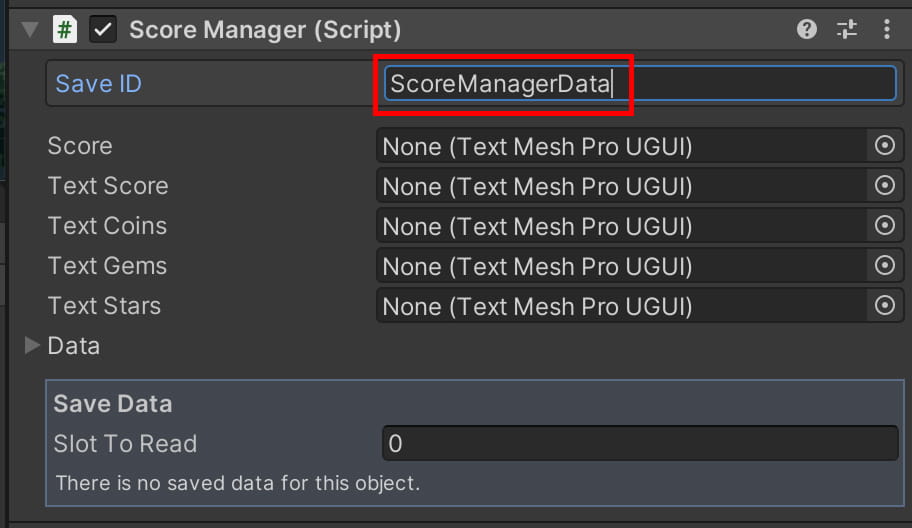
ScoreManagerScoreManagerData4. Adding a Save Point
Now that the player and score data can be saved by Bench, we need to give the player a way to trigger the save during gameplay.
Instead of creating a new save bench script, we will use the Save Point prefab that comes with Bench Universal Save System. This prefab already contains the SavePoint component, so it can detect the player, listen for an interaction key, and call Bench’s save function directly.
a. Placing the Save Point Prefab
First, open the gameplay scene where you want the player to save their progress.
In the Project window, find a Save Point prefab at Assets/Bench Universal Save System/Prefabs/Save Points. Select any prefab and drag it into the Scene.
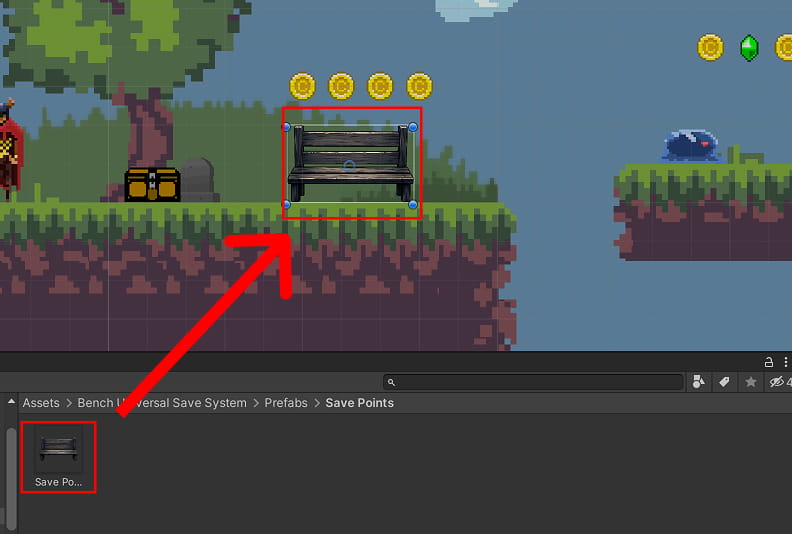
Once the prefab has been added, position it in the level like any other scene object. The prefab already includes a Save Point component, so you do not need to create a separate script for the bench.
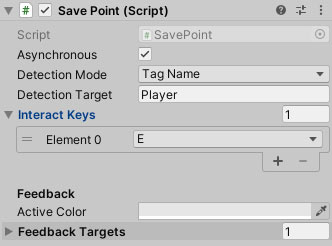
The Prefab is configured so that you can plug it onto the Scene and play, but you may want to change some of the settings on it.

The most important variable to take note of is the Detection Target, which is used to detect the player. By default, it targets all GameObjects with the Player tag.
| Setting | Description |
|---|---|
| Asynchronous | If you uncheck this, whenever you save the game, the game will freeze until the saving is done. |
| Detection Mode | Works with Detection Target to determine which GameObjects, when in proximity with the Save Point, will activate the Save Point. |
| Detection Target | If the Detection Mode is Tag Name, this will work for all GameObjects with the tag name. Otherwise, it will work for all GameObjects that have a certain component. |
| Interact Keys | Which keys will trigger the Save Point when the player is in proximity? |
| Active Color | By default, the Save Point will darken a little when a player character is in proximity to indicate that you can press a key to save. This sets the colour it will darken to. |
| Feedback Targets | All the GameObjects that will be tinted to Active Color when a player character is in range. |
b. Customising our Save Point
In order to add a more obvious prompt to our save point, we will be building a custom save point based on the original one in the Bench asset.
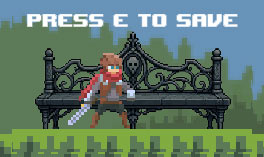
To do so, we’ll first need to write a script to extend the SavePoint script from the Bench asset.
SaveBench.cs
using Terresquall;
using TMPro;
using UnityEngine;

public class SaveBench : SavePoint {

    [Header("Text Hint")]
    [Tooltip("Optional text that appears when the player is inside the Save Point range.")]
    public TMP_Text textHint;

    [Tooltip("When checked, the text hint is hidden while no valid target is inside the Save Point range.")]
    public bool hideTextHintWhenOutOfRange = true;

    [Tooltip("Text shown when a valid target enters the Save Point range.")]
    public string defaultTextHint = "Press E to Save";

    [Tooltip("Text shown when the game is saving.")]
    public string savingTextHint = "Game Saving...";

    [Tooltip("Text shown after the game has been saved.")]
    public string savedTextHint = "Game Saved";

    protected override void Start() {
        base.Start();

        // Add callbacks to show the saved text when we save.
        Bench.OnSaveBegin += (Bench.SaveFile s, Bench.SaveType t) => {
            if (textHint) {
                textHint.text = savingTextHint;
                textHint.gameObject.SetActive(true);
            }
        };
        Bench.OnSaveComplete += (Bench.SaveFile s, Bench.SaveType t) => {
            if (textHint) {
                textHint.text = savedTextHint;
                textHint.gameObject.SetActive(true);
            }
        };

        // Set the text to the default and hide it.
        if (textHint) {
            textHint.text = defaultTextHint;
            textHint.gameObject.SetActive(!hideTextHintWhenOutOfRange);
        }
    }

    // Override the HandleRangeEntry() function to add our own code to it
    // to reset the text hint and show the text.
    protected override bool HandleRangeEntry(Component other) {
        if(base.HandleRangeEntry(other)) {
            if (textHint) {
                textHint.text = defaultTextHint;
                textHint.gameObject.SetActive(true);
            }
            return true;
        }
        return false;
    }

    // Override the HandleRangeExit() function to add our own code to it
    // to reset the text hint and hide it.
    protected override bool HandleRangeExit(Component other) {
        if(base.HandleRangeExit(other)) {
            if (textHint) {
                textHint.text = defaultTextHint;
                if (objectsInRange.Count == 0 && hideTextHintWhenOutOfRange)
                    textHint.gameObject.SetActive(false);
            }
            return true;
        }
        return false;
    }
}
This script adds functionality to the SavePoint script by also adding a TextMeshPro Text component that will toggle on and off when the player goes in range. This is detected by the overriden HandleRangeEnter() and HandleRangeExit() functions from SavePoint.
On top of that, the script also hooks a callback to the Bench.OnSaveBegin and Bench.OnSaveComplete events, so that when the player character begins saving, the text updates to reflect the status of the save.

To get this code to work, you will need to add a Text element to the save bench, and drag the text element onto your SaveBench component.
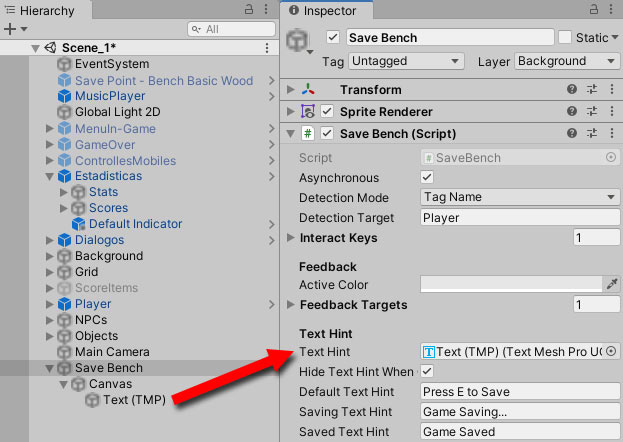
c. Adding a Save Indicator
Next, we will add a save indicator so that the player can see when the game is being saved.
In the Project window, find the default save indicator prefab: Assets/Bench Universal Save System/Prefabs/Save Indicators/Default Indicator.prefab
Drag this prefab into the scene’s Canvas.
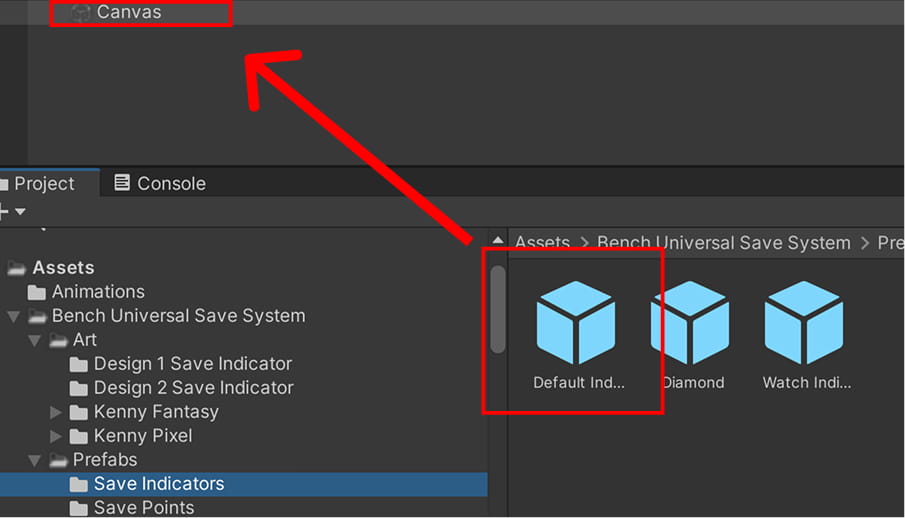
Once the Default Indicator is inside the Canvas, it will automatically appear when Bench saves the game. The indicator will look something like this:

Note that the indicator will only appear if the Save Bench is using asynchronous saving (the Asynchronous checkbox is checked), because synchronous saving will freeze the game until the save is complete, preventing the indicator from appearing.
5. Adding the Title Screen Save Slots
The player can now save their progress from inside the level. However, we still need a way to select, create, and load save files from the title screen.
In this section, we will use the save slot UI included with Bench Universal Save System to add three save slots to the title screen.
a. Adding the Save Slot UI
In the Project window, find a save slot UI prefabs in Assets/Bench Universal Save System/Prefabs/Save Slots UI, and drag one of them into the Menu scene.
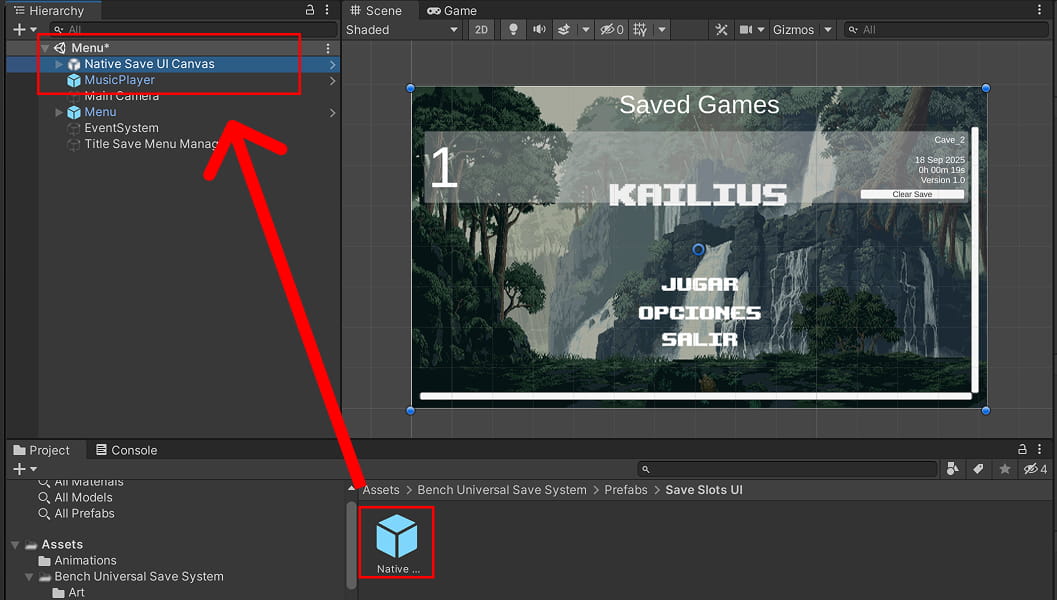
Native Save UI Canvas prefab into the Menu scene.The prefab already contains the components needed to manage save slots, so we do not need to create a separate save slot script.
b. Configuring the Save Slots
Open Window > Bench Universal Save System and create a Bench Settings asset if the project does not already have one.
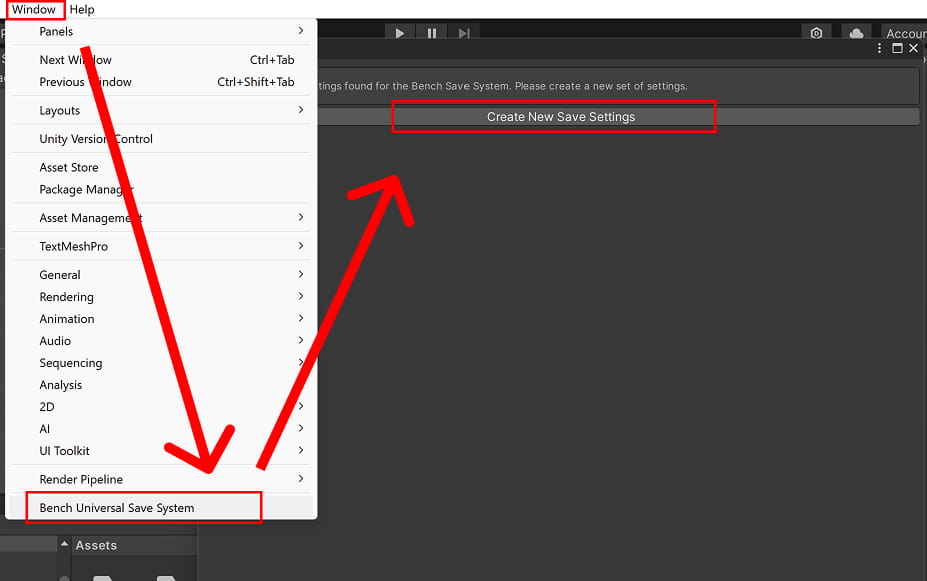
Next, select the UISaveSlotManager inside the Native Save UI Canvas and assign the Bench Settings asset to its Settings field.
Set the save slot’s Default Scene to Scene_1.
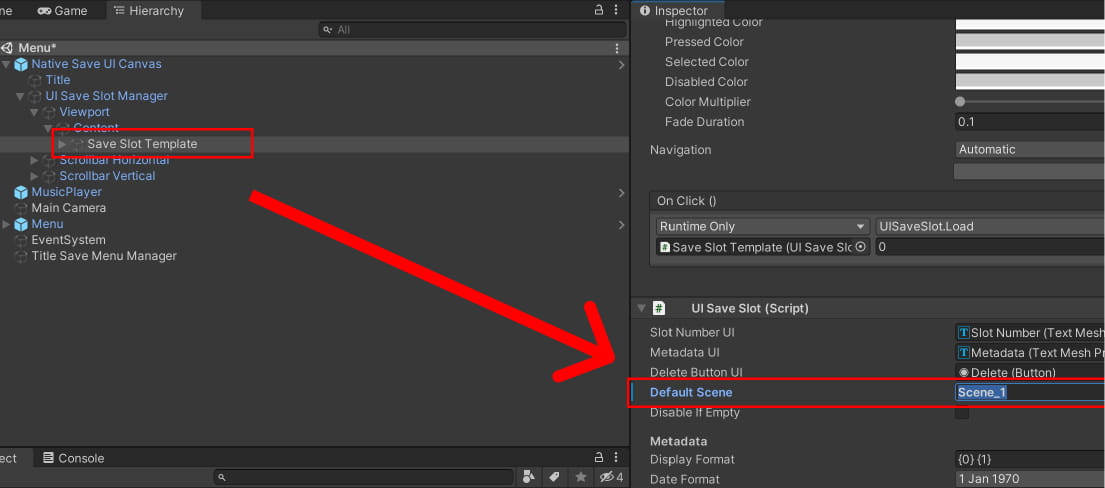
Scene_1.Click Generate Save Slot Elements to generate the three save slots.
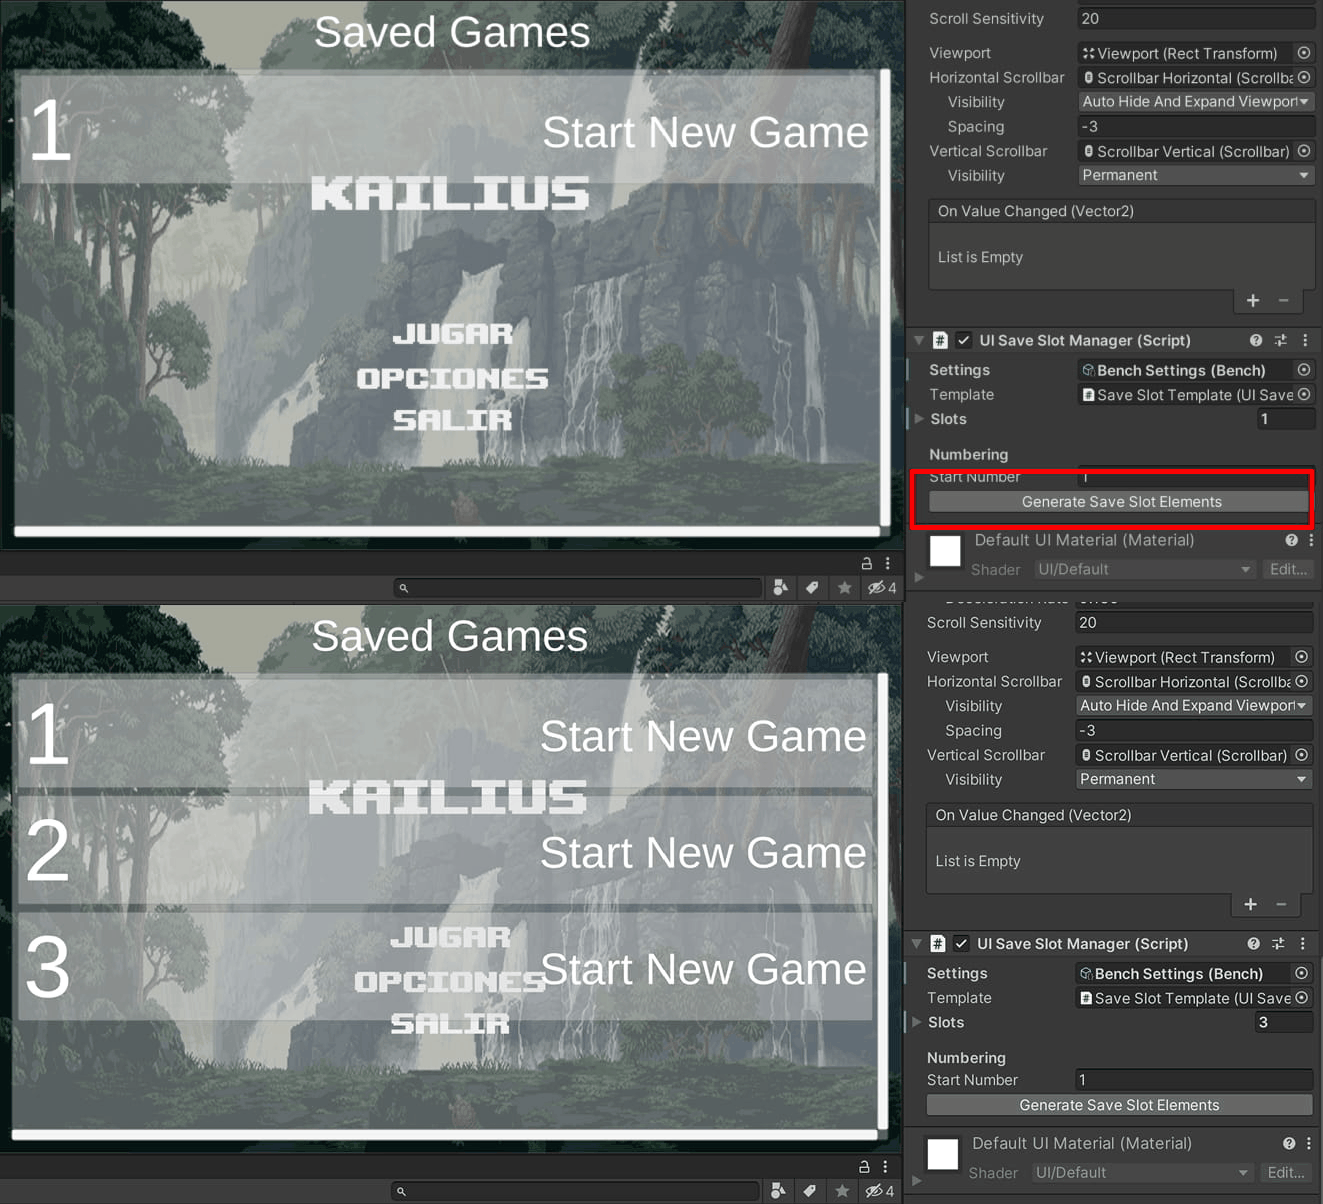
c. Opening the Save Slot Menu
Originally, pressing the Start Game button immediately loaded the first gameplay scene. Instead, we can modify the existing Menu script so that the button opens Bench’s built-in save slot UI.
First, disable the Native Save UI Canvas in the Hierarchy so that it is hidden when the title screen first opens.
Then, update Menu so that PlayGame() activates the save slot UI instead:
Menu.cs
using System.Collections;
using System.Collections.Generic;
using UnityEngine;
using UnityEngine.SceneManagement;

public class Menu : MonoBehaviour {

    public GameObject saveSlotsUI;

    public void PlayGame () {
        PlayerPrefs.SetInt("AttackDamage", 0);
        PlayerPrefs.SetInt("Defense", 0);
        PlayerPrefs.SetInt("Score", 0);
        PlayerPrefs.SetInt("ScoreCoins", 0);
        PlayerPrefs.SetInt("ScoreGems", 0);
        PlayerPrefs.SetInt("ScoreStars", 0);
        SceneManager.LoadScene (SceneManager.GetActiveScene ().buildIndex + 1);
    }

    public void PlayGame() {
        if (saveSlotsUI != null) {
            saveSlotsUI.SetActive(true);
        }
    }

    public void ResumeGame() {
        Time.timeScale = 1;
    }

    public void QuitGame () {
        Application.Quit();
    }

    public void PlayAgain() {
        SceneManager.LoadScene("Menu");
    }
}
To get this to work, you will need to assign the save slots UI prefab you just added to the Save Slots UI field, so that the component knows what element to activate.
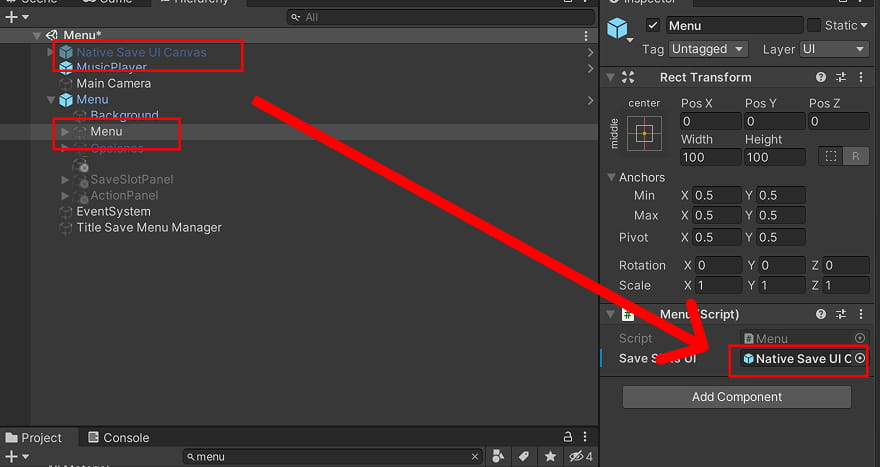
Native Save UI Canvas GameObject to the Save Slots UI field on the Menu component.Now, pressing the Start Game button will open the save slot menu. Selecting an empty slot starts a new game, while selecting a slot containing save data loads that saved game.
6. Troubleshooting
In this section, we document common issues that people run into, as well as how to fix them.
a. Reviewing Save Data
After making a save, we can review the save file directly from the Bench save window. This is useful for checking whether the Save Point has actually created a save file and whether the correct PersistentObject data has been recorded.
After the game has been saved, open the Bench window from the Unity menu:
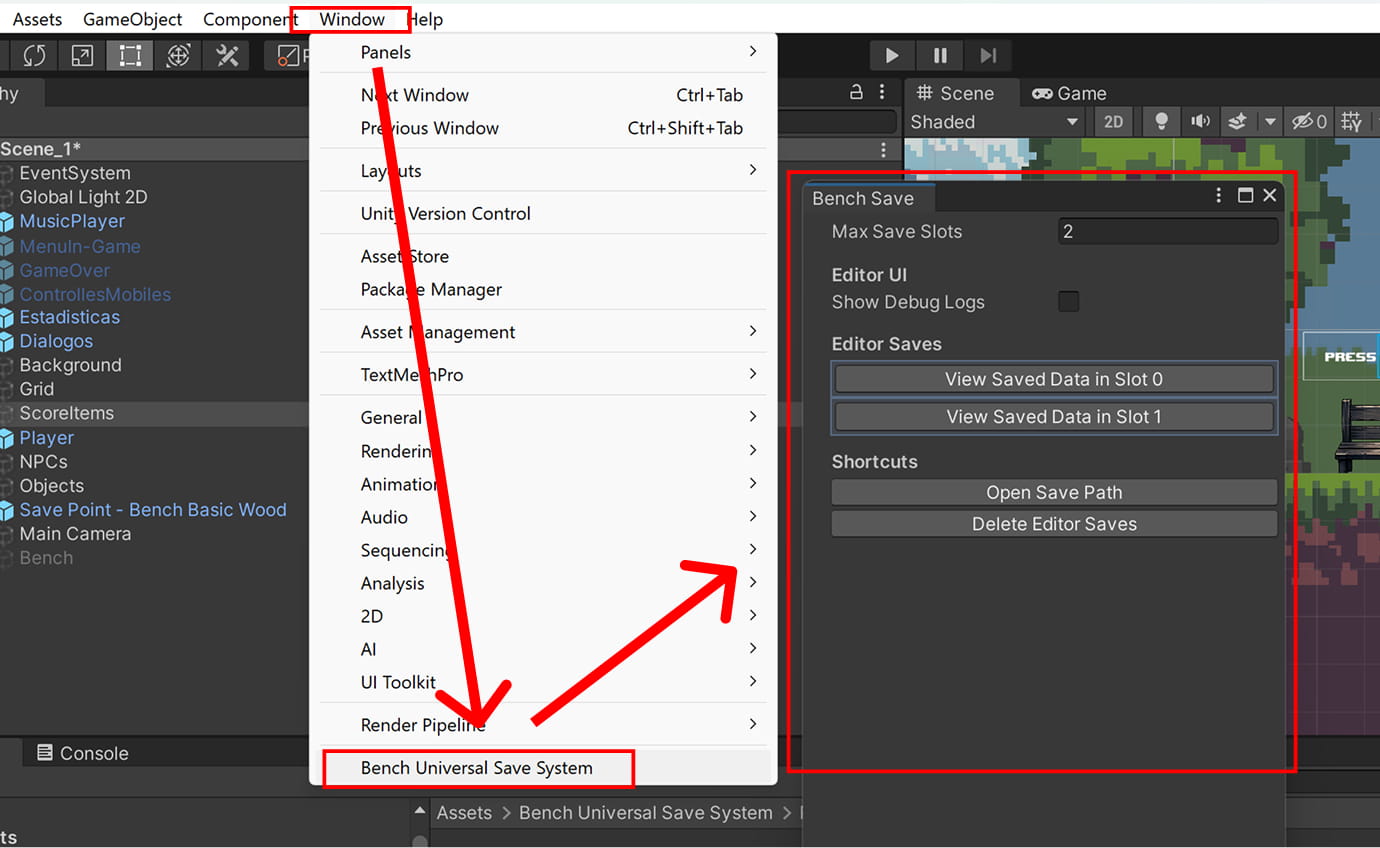
This will open the Bench Save window. In this window, look for the section that lists the save files created in the Editor, as shown above. If the save was created successfully, you should see a button that says View Saved Data in Slot X, which, when clicked on, will show you the saved data.
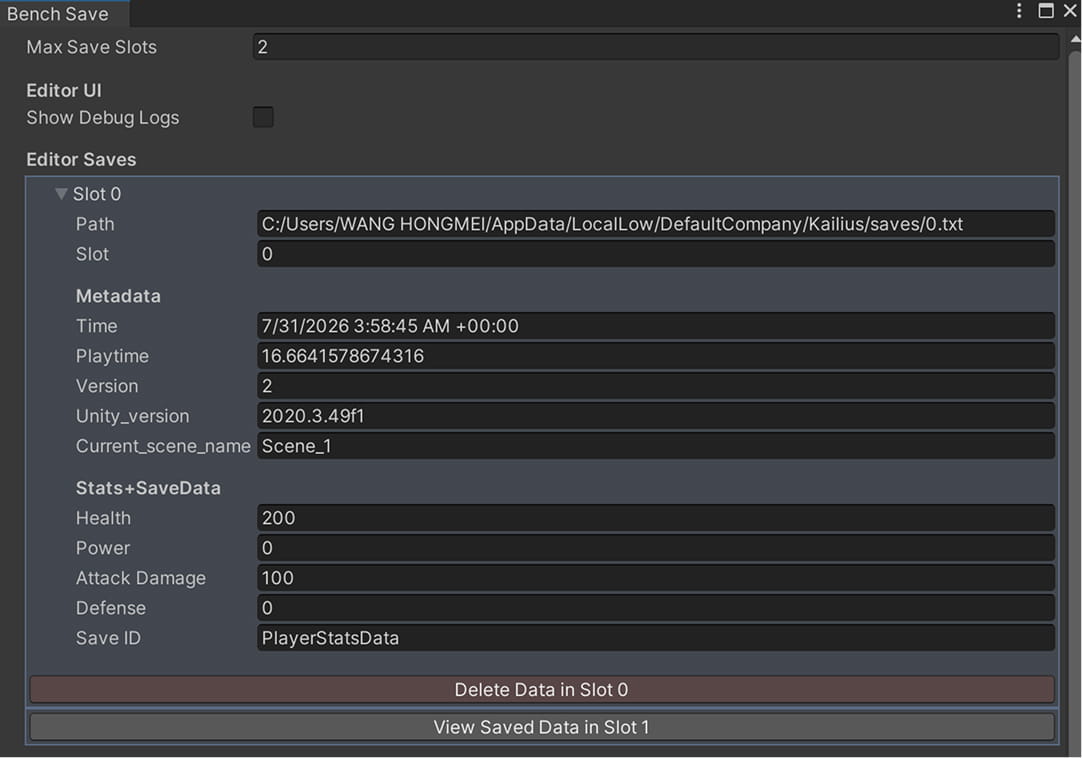
The save data viewer will show the data stored inside that save file. In this project, you should be able to find data from the objects that inherit from PersistentObject.
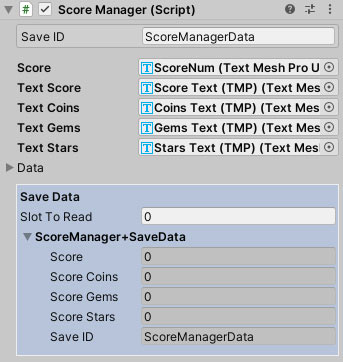
In each of your PersistentObjects on Scene, you will also be able to find their associated save data in the Inspector, under a blue box at the end of the component.
7. Conclusion
In this article, we integrated the Bench Universal Save System into an existing Unity 2D platformer.
By using components that inherit from PersistentObject, the game can now save and restore important player and score data.
If you would like to use this system in your own project, visit our Bench Universal Save System page on the Unity Asset Store to download and install it.