If you’re following our tutorial series in Unity 6, you may want to be using Unity’s new Input System, instead of the older Input Manager. This is a guide on how to implement that.
1. Introduction
To use the new Input System, we have to make sure a couple of things are set up in our project.
a. Active Input Handling
First, let’s make sure our project is allowed to use the new Input System.
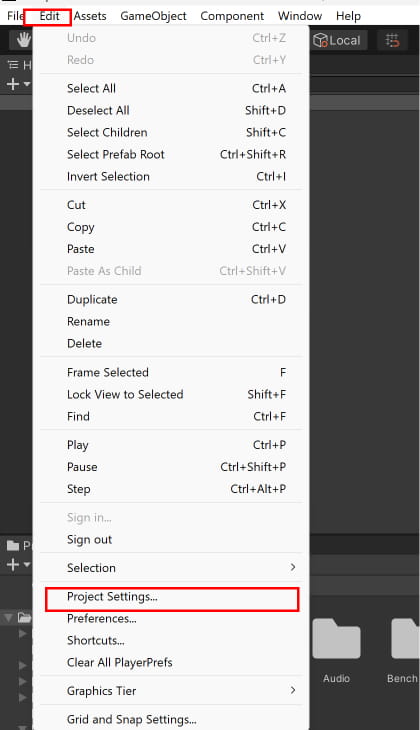
Go to Edit > Project Settings > Player.
Then, under Other Settings, find Active Input Handling and set it to either Both or Input System Package (New).
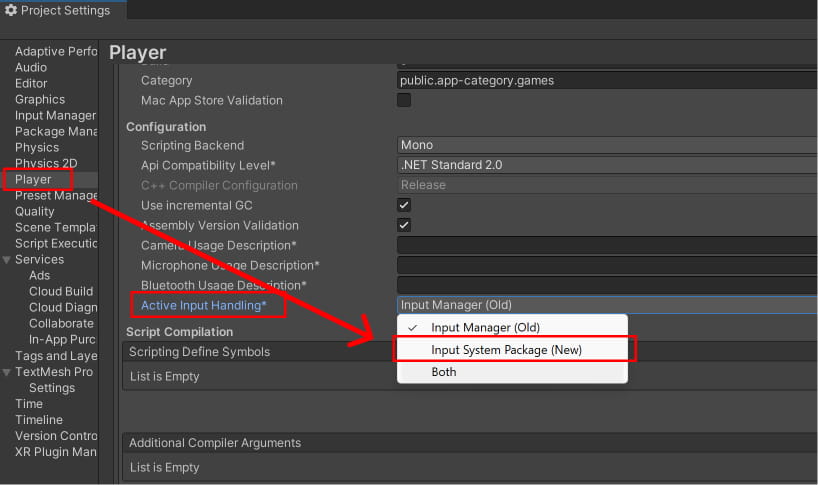
You can safely set the dropdown to Input System Package (New), as the PlayerMovement script that we are editing in this part is the only script where we handle player input. If this breaks any part of your project, you can set it to Both so that compatibility with the old Input Manager system is still maintained.
b. Package Manager (for versions older than Unity 6)
If you are on an older version of Unity 6, you will also need to ensure that the Input System package is installed on your project. To do so:
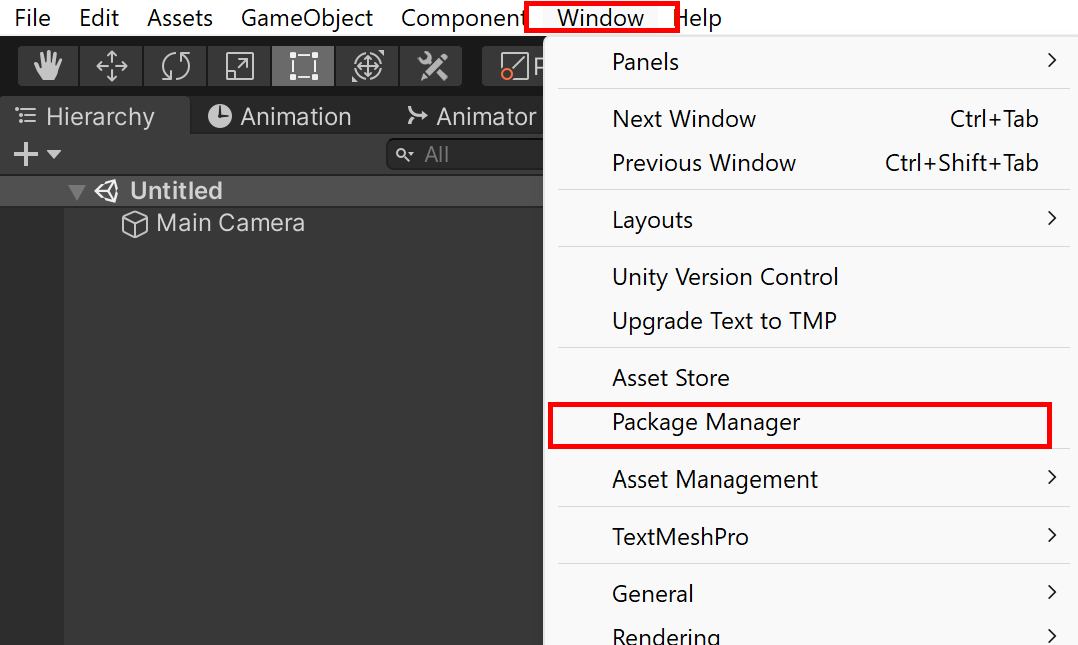
- Go to Window at the top of the Unity Editor.
- Select Package Manager to open the Package Manager window.
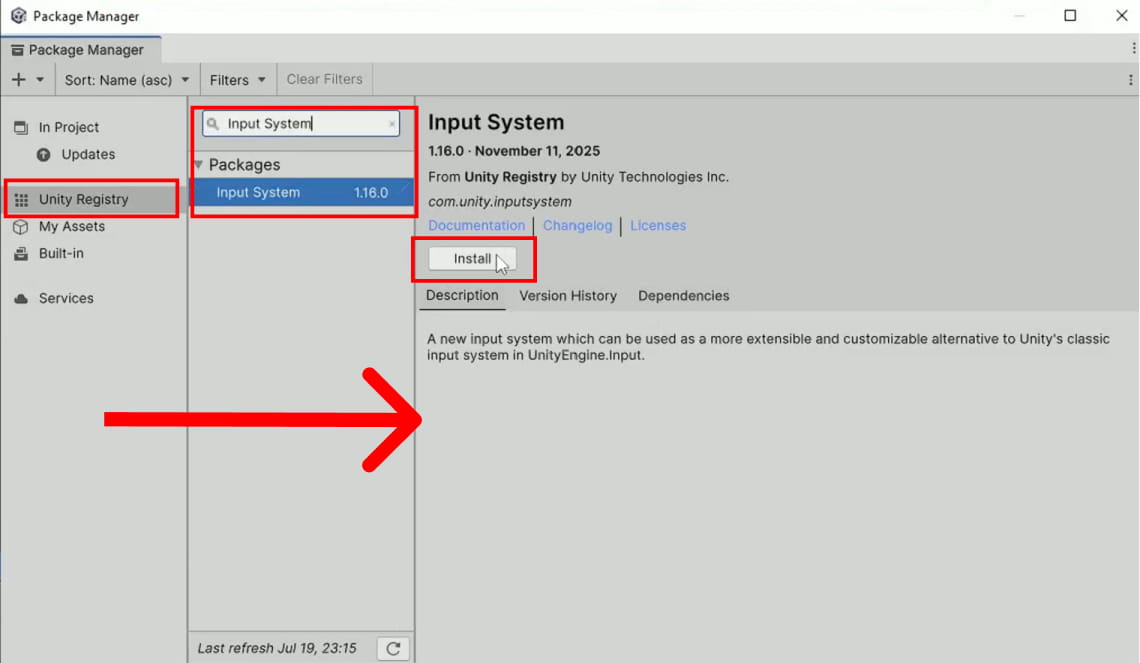
- In the top-left corner of the Package Manager window, make sure the package source is set to Unity Registry. Then, use the search bar on the top right to search for Input System.
- Select Input System from the list on the left, then click Install at the bottom right to install it.
2. Editing the PlayerMovement script
After the installation is complete, open the PlayerMovement script and add a new OnMove() function. We will hook this function onto the Input System package’s PlayerInput component:
PlayerMovement.cs
using System.Collections; using System.Collections.Generic; using UnityEngine; /// <summary> /// Controls all player movement /// </summary> public class PlayerMovement : MonoBehaviour { public float moveSpeed; Rigidbody2D rb; [HideInInspector] public Vector2 moveDir; //To preserve states [HideInInspector] public float lastHorizontalVector; [HideInInspector] public float lastVerticalVector; [HideInInspector] public Vector2 lastMovedVector; public enum ControlType { oldInputManager, newInputSystem }; public ControlType controlType = ControlType.oldInputManager; void Start() { rb = GetComponent<Rigidbody2D>(); lastMovedVector = new Vector2(1, 0f); //If we don't do this and game starts up and don't move, the projectile weapon will have no momentum } void Update() { if(controlType == ControlType.oldInputManager) InputManagement(); } void FixedUpdate() //Always calculate physics in fixed update { Move(); } void InputManagement() { float moveX = Input.GetAxisRaw("Horizontal"); float moveY = Input.GetAxisRaw("Vertical"); moveDir = new Vector2(moveX, moveY).normalized; //Use normalize as moving in diagonal generates a value > 1 so cap it to 1if(moveDir.x != 0) { lastHorizontalVector = moveDir.x; lastMovedVector = new Vector2(lastHorizontalVector, 0f); //Last moved X } if(moveDir.y != 0) { lastVerticalVector = moveDir.y; lastMovedVector = new Vector2(0f, lastVerticalVector); //Last moved Y } if(moveDir.x != 0 && moveDir.y != 0) { lastMovedVector = new Vector2(lastHorizontalVector, lastVerticalVector); //While moving }UpdateLastMovedVector(); } public void OnMove(InputValue value) { moveDir = value.Get<Vector2>().normalized; UpdateLastMovedVector(); } void UpdateLastMovedVector() { if (moveDir.x != 0) { lastHorizontalVector = moveDir.x; lastMovedVector = new Vector2(lastHorizontalVector, 0f); } if (moveDir.y != 0) { lastVerticalVector = moveDir.y; lastMovedVector = new Vector2(0f, lastVerticalVector); } if (moveDir.x != 0 && moveDir.y != 0) { lastMovedVector = new Vector2(lastHorizontalVector, lastVerticalVector); } } void Move() { rb.velocity = new Vector2(moveDir.x * moveSpeed, moveDir.y * moveSpeed); //Apply velocity } }
3. Setting Input Actions
Now that the script has been updated to support the new Input System, we will have to set up Input Actions and bind them to our script.
a. Creating the asset
To set input controls in the new input system, we will need to create an Input Action asset to store the controls. To do so, right-click the Project folder, then select Create > Input Actions.
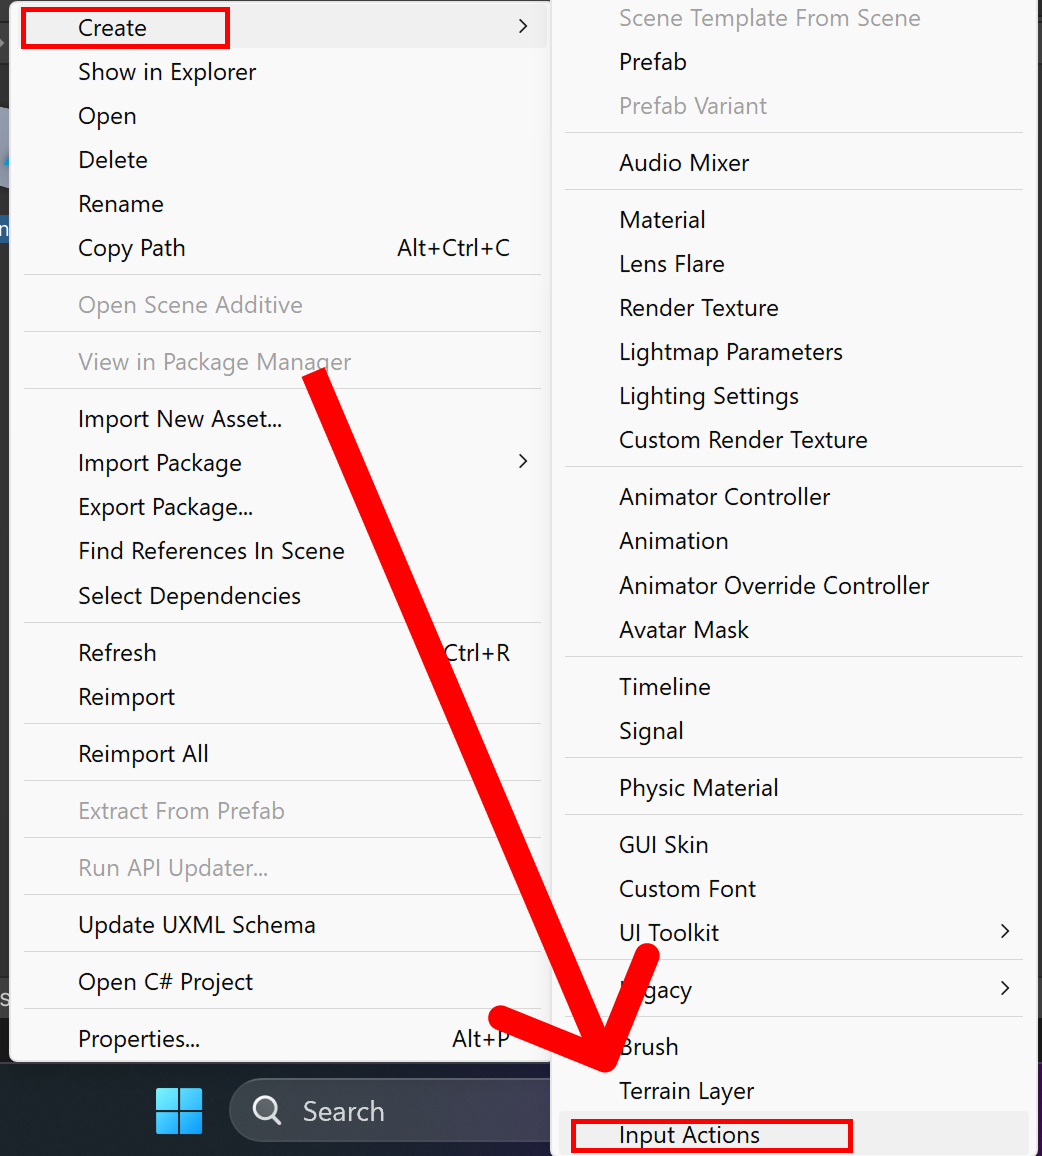
Once created, double-click on the newly-created asset to open the Input Actions editor window.
b. Creating the Move action
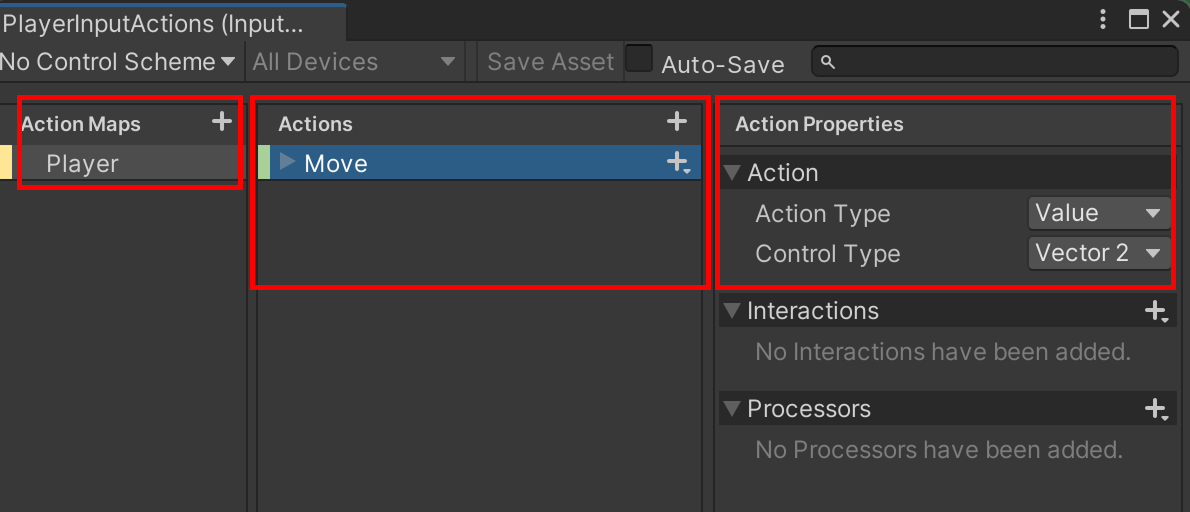
On the left side, under Action Maps, click the + button to create a new Action Map and name it Player. Then, in the Actions section, click the + button to create a new Action and name it Move.
Select Move, and set the following properties under Action Properties on the right side:
- Action Type: Value
- Control Type: Vector2
c. Adding the control buttons
Next, we need to bind the WASD controls to the Move Action. To do so, select Move, click the + button on the right, and choose Add 2D Vector Composite (or Add Up\Down\Left\Right Composite).
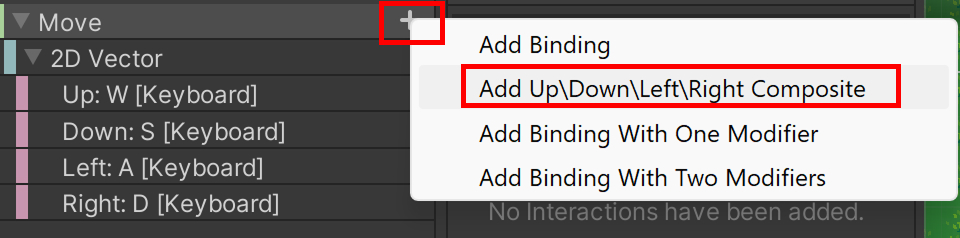
Then set the bindings like this:
- Up: W
- Down: S
- Left: A
- Right: D
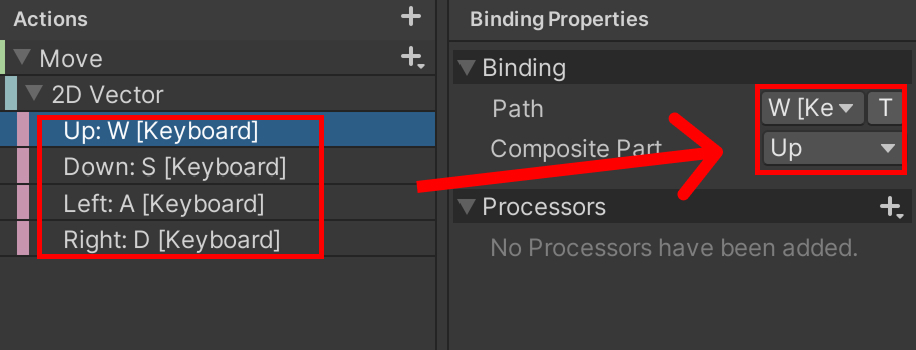
After finishing the bindings, save the Input Actions, then close the Input Actions editor window.
d. Supporting Joystick controls
At this point, the player can move using the WASD keys. However, since we are using the new Input System, we can also add joystick support to the same Move action.
To do this, open the PlayerInputActions asset again and select the Move action under the Player Action Map. This time, instead of adding another 2D Vector Composite, click the + button and choose Add Binding.
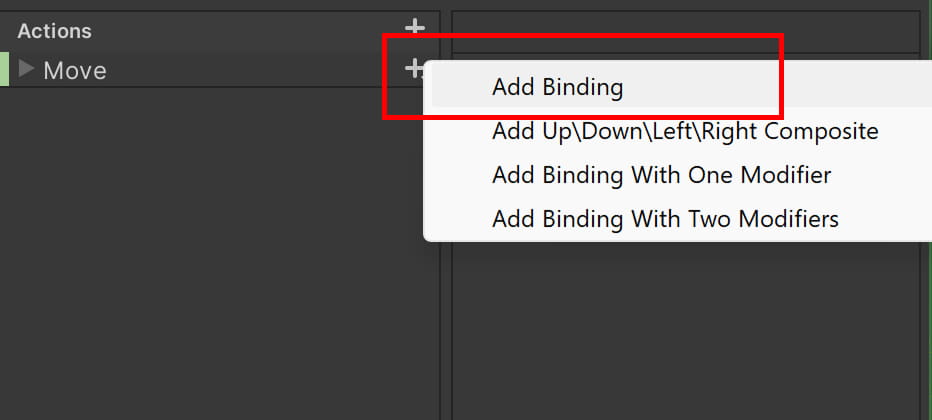
Select the new binding, then set its Path to: Stick [Joystick]
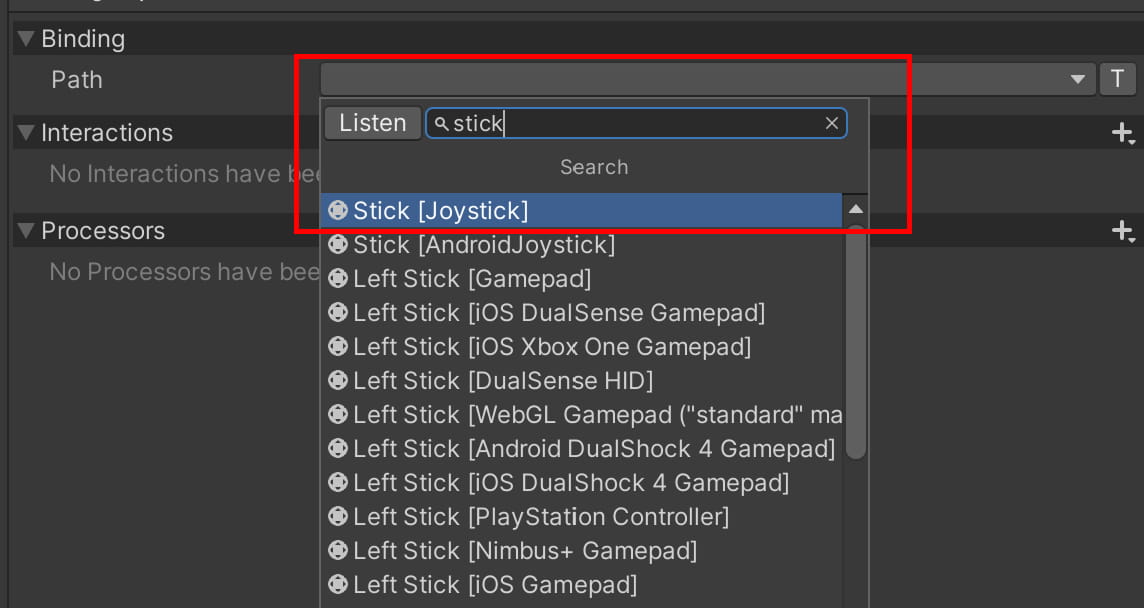
After that, do remember to save the Input Actions asset.
Now, the Move action can receive input from both WASD and a joystick stick. Since both inputs return a Vector2, the existing OnMove(InputValue value) function in the PlayerMovement script can handle them in the same way.
4. Setting up PlayerInput
Finally, to bind the controls to the player, we add the PlayerInput component to the player character. Specifically, we add it to the same GameObject that holds the PlayerMovement script.
Assign the Input Action asset we just created to the Actions field.
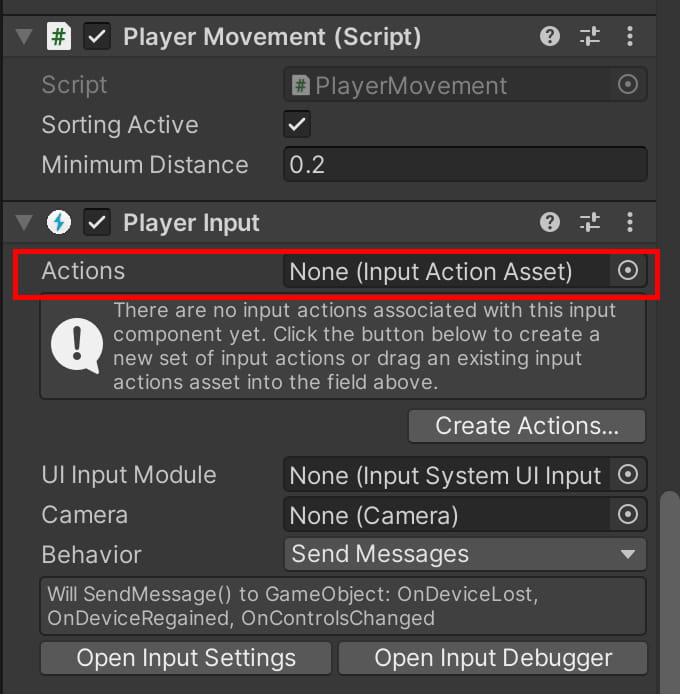
This should expose a new Default Map variable under it. Set it to Player (recall that we created an Action Map called Player previously).
Then, leave the Behavior field as Send Messages.
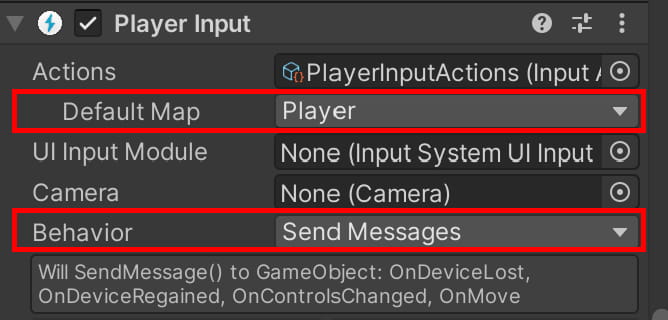
Because our action in the Input Actions asset was set to Move, the Send Messages behaviour automatically calls the OnMove() function on every script attached to the same GameObject as it is.
Thus, whenever you press a button, the PlayerInput component will detect it, and call the OnMove() function on the PlayerMovement component to move the player.
5. Common errors
Below, we document some common errors that users often run into.
a. Install errors
If Unity shows an error after installing the package, such as:
Copying assembly from 'Temp/Unity.PlasticSCM.Editor.dll' to 'Library/ScriptAssemblies/Unity.PlasticSCM.Editor.dll' failed. Detailed error: Sharing violation on path
Do not panic. This is usually caused by Unity or another process locking some temporary files. You can fix it with the following steps:
- Close Unity and Visual Studio. In Unity Hub, right-click your current project and select Show in Explorer. After that, close Unity Hub as well.
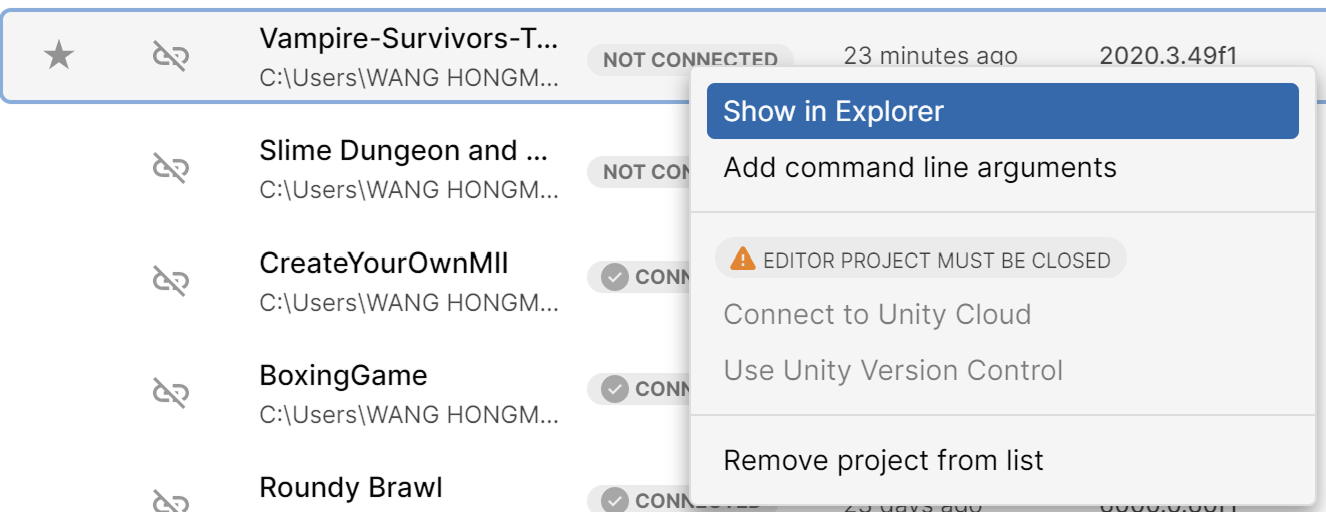
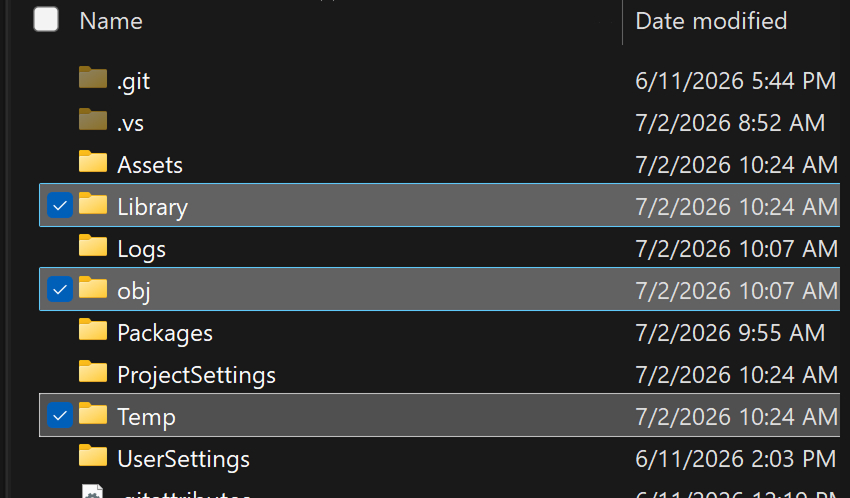
- In the project folder, delete the following folders if they exist:
- Library
- Temp
- obj
- .vs
- Reopen the project in Unity and wait for Unity to reimport and rebuild the project files. After a while, the project should return to normal.
6. Conclusion
Because of the simplicity of this game, moving it to the new Input System is a surprisingly simple task. Let us know in the comments below if you run into any issues while doing this.