Ever wanted to create a rogue-like shoot ’em up game like Vampire Survivors? In Part 2 of our guide, we will go through how to create infinite map generation. You can also find Part 1 of our guide here, where we went through how to create movement, animations and a camera for our player character.
A link to a package containing the project files up to Part 2 of this tutorial series can also be found at the end of this article.
Having trouble with fixing bugs for map generation? Check out this topic on our forums, where I document common map generation errors our users commonly run into: [Guide] Notable Map Generation Errors
- Introduction
- Terrain background set-up
- Creating a chunk
- Prop randomizer script
- Map controller script
- Accuracy improvements
- Optimization
- Conclusion
1. Introduction
So as you all know, in Vampire Survivors, every level map is infinitely generated in some way. What that means is that if you continuously travel in a certain direction, you will not loop around nor will you hit a roadblock; you will simply travel forever. So in this part, as the title of the article suggests, we will be tackling exactly that.
2. Terrain background set-up
Before we can get started with any code for our map, we first have to set up our terrain. We’ll begin with the background.
a. Slicing the sprite sheet
We will be using the LPC Terrain Repack as our terrain sprite sheet. It contains a variety of terrain tiles and props which will be helpful in populating our map later on. After extracting the folder, drag and drop this file into the Art folder and rename it to Terrain Sprite Sheet.

Tip: If you are struggling to find art/game assets for your game, I recommend checking out OpenGameArt as they have a lot of good and free game assets. This site has been my go-to for any prototype game assets and it is also where I found this terrain sprite sheet.
Once that’s done, the next thing we have to do is to slice the sprite sheet. Similar to how we sliced the player sprite sheet in the previous part, we first have to change a couple of settings in the Inspector window after clicking the terrain sprite sheet.
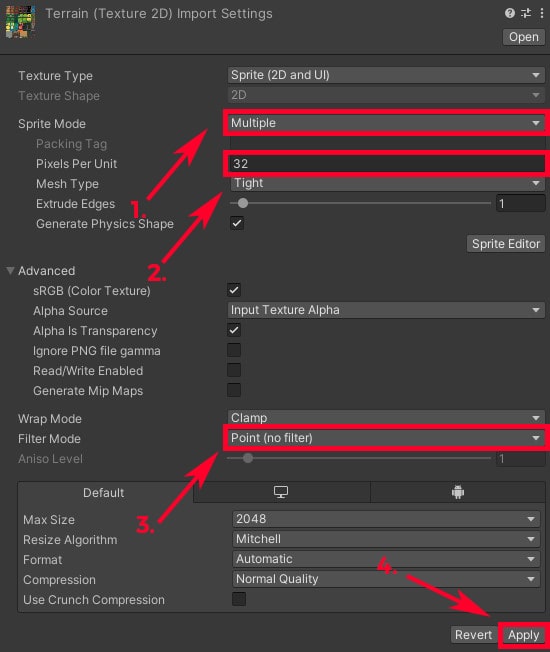
- Change the Sprite Mode to Multiple as we need to slice the sheet.
- Change the Pixels Per Unit to 32 to enlarge it.
- Change the Filter Mode to Point (no filter) to make our pixels blocky. (I always recommend using this option when you are working with pixel art)
After making sure your settings is the same as mine as shown below, scroll down and hit Apply to confirm the changes!
Now let’s head into the Sprite Editor by clicking on the button in the Inspector window.
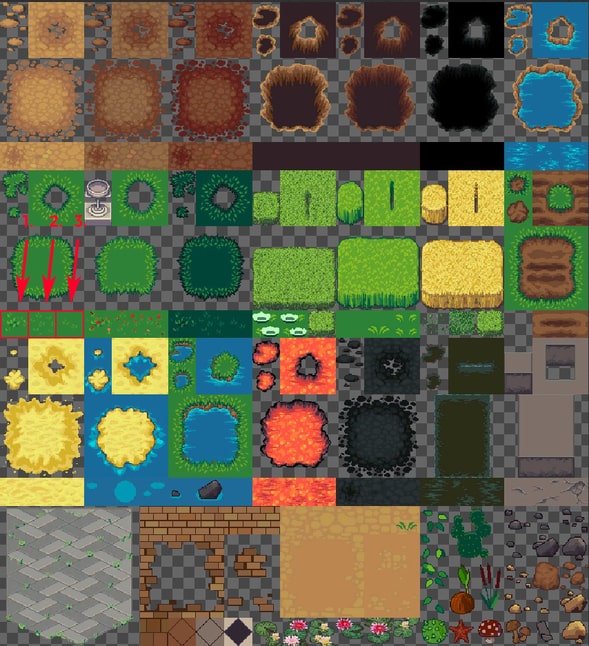
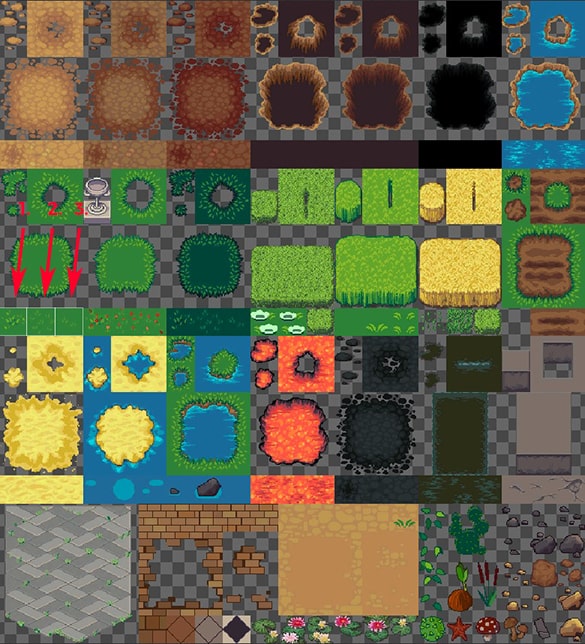
For now, we want to only slice out a few terrain tiles as shown below.
Here’s where things will start to differ from the player sprite sheet. If you recall previously, we had used the Automatic slice option located within the Slice pop-up at the top left of the Sprite Editor. However because all the sprites in our terrain sprite sheet are of different sizes, it’s better to manually slice them.
To do so, hold left click, drag anywhere on the Sprite Editor and release when you have the desired size of your slice. You should now be able to see a blue box with green coordinate points.
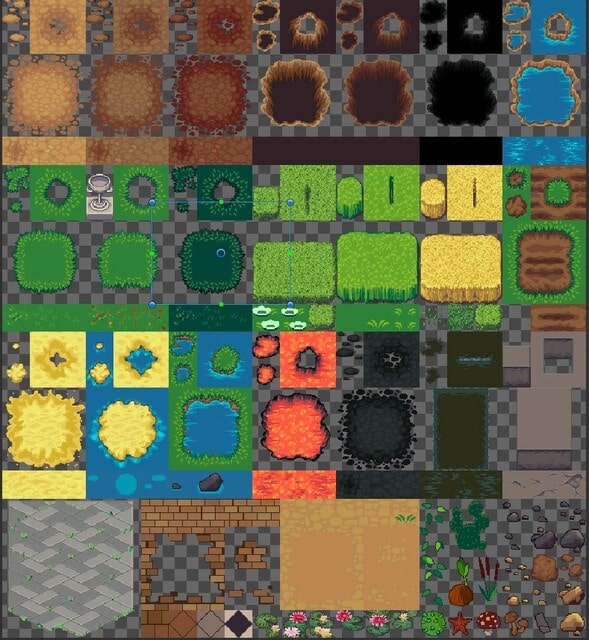
Don’t worry if the box is too big/small, you can always resize it by dragging the four blue dots at the corner of the box. Alternatively you can also use the pop-up menu that comes with creating a manual slice located at the bottom right corner to achieve maximum precision. We will use the latter.
Now all we have to do is resize our slice to be the exact same as the desired terrain tiles!
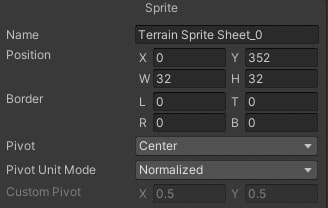
We can begin with number 1 as shown above. Follow my Position values as shown below.
Once you are done with creating the slice for number 1, do the same for 2 and 3.
- Position X: 0, Y: 352, W: 32, H: 32
- Position X: 32, Y: 352, W: 32, H: 32
- Position X: 64, Y: 352, W: 32, H: 32
Hit Apply at the top right to confirm the changes once all 3 terrain tiles have been sliced out!
Close out of the Sprite Editor and head back to your Editor. In your project window you should be able to see the sliced sprites.

b. Creating a tilemap
Let’s now create a background for our terrain. To accomplish this, we’ll be using a Tilemap.
Tip: When working with pixel art, I recommend to use Tilemaps when stylizing your environments as they can be beneficial in many ways. Brackeys has an amazing video explaining tilemaps and their benefits.
Right-click on empty space within the Hierarchy > 2D Object > Tilemap > Rectangular. You should now be able to see a Grid within your Scene view. Rename the Grid in your Hierarchy to be Background Grid and the Tilemap to be Background Tilemap. It’s always good to stay organized like this.
Before we can paint in our tilemap, we first have to create a Tile Palette. Navigate to the Art folder and create a folder called Tile Palettes. We’ll use this to store any future Tile Palettes.
There are 2 main ways to bring up the Tile Palette window. The first of which is to click on the Open Tile Palette button at the bottom right of the Scene view while having your Grid or Tilemap selected.

If you do not see this button, it might be because you are using an earlier Unity Editor version.
That brings us to the second way: which is to simply head to Window at the top of the Editor > 2D > Tile Palette. After your Tilemap window is open, drag and dock it however you like until you are satisfied.
Afterwards, click Create New Palette at the top of the window and it should bring up a pop-up.
Change the name of the Palette to be Background Tiles and make sure the Grid and Cell size is Rectangular and Automatic respectively.
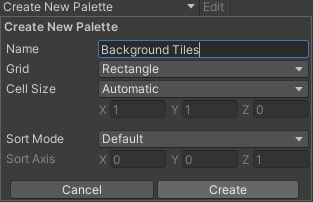
Once all the correct settings are in place, simply click Create. The explorer should now should now show up, now all we have to do is to navigate to our Tile Palettes folder that we created previously and select it.
Before we proceed further, let’s head into the Tile Palettes folder and create a subfolder called Tiles to store all our Tile assets.
Multiselect all of the sliced sprites before dragging and dropping them into the Tile Palette window. Navigate to the Tiles subfolder within the Tile Palettes folder and select it.
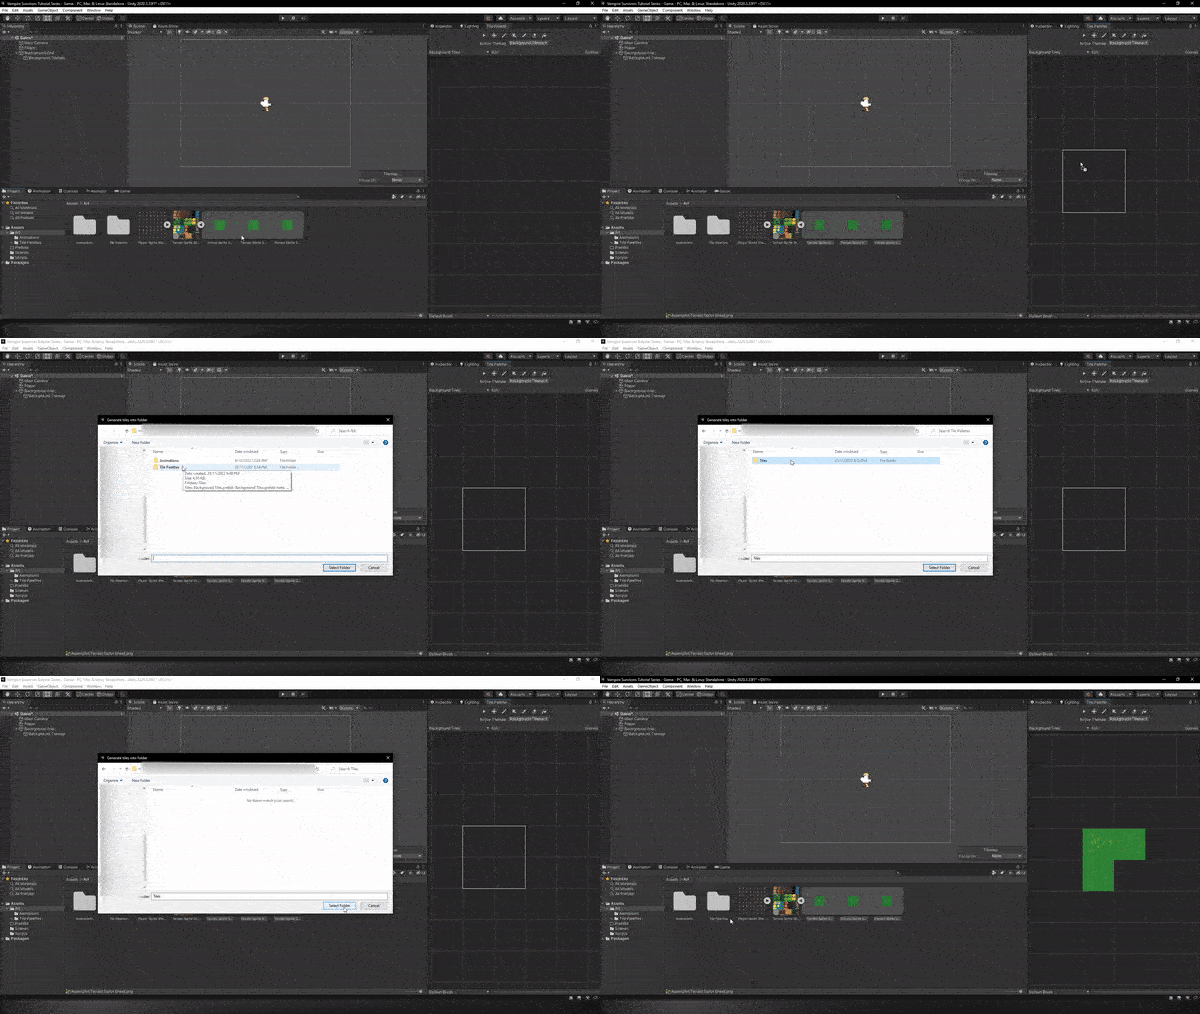
Alright great, let’s begin painting our tilemap!
Simply click on any of the tiles within the Tile Palette window we just created and head into the Scene view. To place the tiles all you have to do is left click on the desired cell. You can also click and drag to paint multiple cells in a short time instead of clicking each of them.
Make sure to paint until your entire Game view has been filled with tiles and more. Make sure to choose a good mixture of all 3 tiles so they don’t seem repetitive. For example I’ll paint mine with a 20×20 size so that it is big enough.
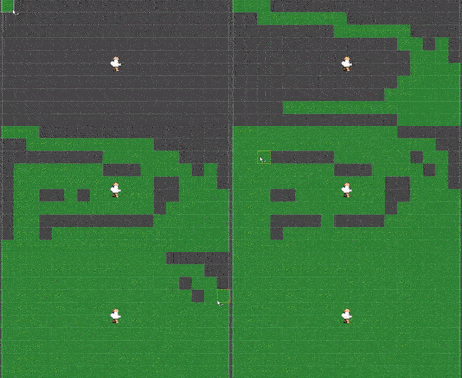
Now you can hit the Play button and as you can see, the entire game view should be filled up. If it is not, it may be because your player object is not reset.
c. Common tilemap problems
While painting, you might notice some common tilemap problems. If you did not encounter any of the following problems you may proceed to the next section.
- Gaps in between tiles.
- Lines in between tiles.
Gaps in between tiles like the example shown below usually mean that sizing of the tiles are not uniform.
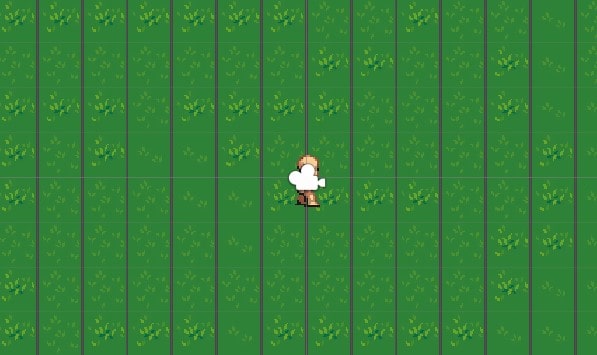
Double-check the sizing of the tiles and make sure they are the same before proceeding. You will find that the gaps will disappear after inputting the correct settings.
As for lines in between tiles, the problem usually stems from Anti Aliasing being enabled.
Navigate to the Project Settings window by clicking on Edit at the top left corner > Project Settings > Quality. Now under Anti Aliasing, set the dropdown to Disabled.
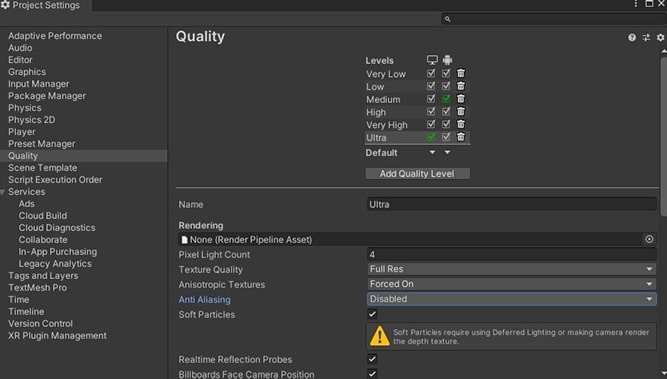
You should now see that the lines have disappeared!
3. Creating a chunk
Now it’s time for us to create our first chunk. By definition, a chunk is to divide (data) into separate sections. You’ve probably heard the word before from Minecraft or other sandbox games where they define a segment of the world, that’s the exact kind of concept we are aiming for.
These chunks that we will be creating will be used to define not only the background, but the props that are around the world which includes trees, rocks and powerups too.
Create an empty GameObject and rename it to be Terrain Chunk, make sure to also reset it’s Transform. You can do so by clicking on the three dots at the top right of the component and hitting Reset.
Next we want to drag our Background Grid onto the Terrain Chunk to make it a child and create another empty GameObject under the Terrain Chunk and name it Props. These will be used to store any background elements that the player will come across.
With that being said, create an empty GameObject with the name Prop Location 1 under the Props and give it an icon by clicking the cube icon next to the name, I’ll give mine a yellow icon. Make sure to reset the transform of this object as well and move it to anywhere within the bounds of the tilemap. If you can’t see the icon it might be because your Gizmos at the top of the Editor is disabled.
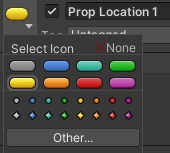
Tip: Icons are a great way of locating and managing empty GameObjects as they make these usually invisible objects, visible in the Scene view.
Create several more Prop Locations and do the same until the entire chunk has been populated enough. Make sure to space them out nicely such that no 2 Prop Locations are right next to each other.
Your Hierarchy and Scene should now look something like this.
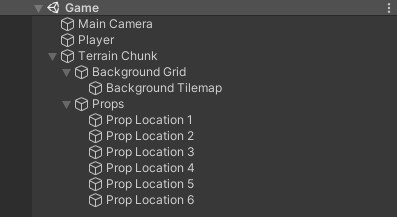
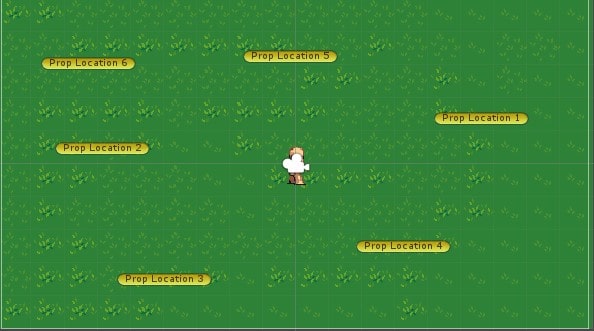
Now, you might have guessed it already, but the reason why we are creating these empty GameObjects instead of simply putting the props themselves in these locations is because these will be the spawn points of randomly chosen props.
This is so that every game feels different and it is effective in boosting replayability.
4. Prop randomizer script
We can now finally head into some code! Create a script called PropRandomizer inside the Scripts folder and add in onto the Terrain Chunk.
Open it, and in here, we want to start by creating a few things:
publicGameObjectListcalledpropSpawnPointsused to reference the prop locations we just created.publicGameObjectListcalledpropprefabsused to reference the prefabs of the props we are trying to spawn.- Function called
SpawnProps()that we will use to spawn the props.
PropRandomizer.cs
using System.Collections;
using System.Collections.Generic;
using UnityEngine;

public class PropRandomizer : MonoBehaviour
{
    public List<GameObject> propSpawnPoints;
    public List<GameObject> propPrefabs;


    void Start()
    {

    }

    void SpawnProps()
    {

    }
}
Now, inside our SpawnProps() we want to:
- Create a
foreachloop referencing thepropSpawnPoints. - Create an
intwithin theforeachloop calledrandand set it to a random number that has a value between 0 and the amount of objects in thepropPrefabs. Instantiatethe randompropPrefabsat the current position of thepropSpawnPointswe are looping through and set it to have no rotation when spawned.- Call the
SpawnProps()function on theStart()function.
PropRandomizer.cs
using System.Collections;
using System.Collections.Generic;
using UnityEngine;

public class PropRandomizer : MonoBehaviour
{
    public List<GameObject> propSpawnPoints;
    public List<GameObject> propPrefabs;


    void Start()
    {
        SpawnProps();
    }

    void SpawnProps()
    {
        //Spawn a random prop at every spawn point
        foreach (GameObject sp in propSpawnPoints)
        {
            int rand = Random.Range(0, propPrefabs.Count);
            Instantiate(propPrefabs[rand], sp.transform.position, Quaternion.identity);
        }
    }
}
Head back into the Editor and go to your Terrain Sprite Sheet, we now want to open up the Sprite Editor and begin slicing some props for our use.
I’ll be specifically using the props below, but you can choose any that you like. Most of the slice sizes are 32×32 but you can manually adjust the ones bigger than that.
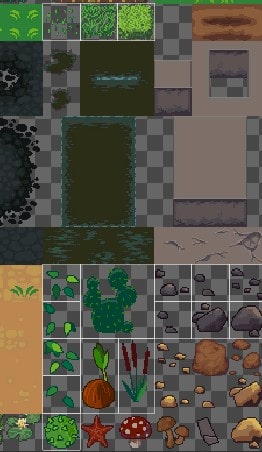
Next you are going to want to:
- Drag and drop each of the sprites we just sliced onto the Scene.
- Multiselect all of them and reset their transforms.
- Create a subfolder under the Prefabs folder and call it Props.
- Drag and drop all of the sprite GameObjects into the Props folder to make them a prefab.
- Delete the existing prop GameObjects on the Scene as we no longer need them.
This is how your project window should look like.

Let’s now drag and drop the prop locations and the prop prefabs respective fields of the PropRandomizer script on the Terrain Chunk.
Tip: To make it easier while dragging and dropping multiple items into inspector fields, simply lock the inspector at the top right corner of the inspector so that it won’t change when clicking on another item. Just remember to unlock it once you’re done.
Now when you hit Play, you will be able to see random props spawning at the prop locations!
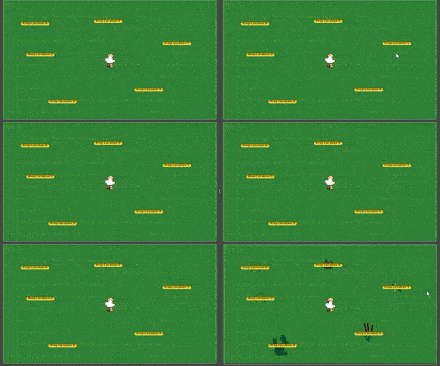
Although this is great, there is one thing we have to do before moving on.
If you look towards your Hierarchy once the props have spawned, you should be able to see that each prop spawns outside of the Terrain Chunk. What we want instead is for the props to be spawned as children of their respective prop location, this will help when we optimize in the future and is good for keeping organized.
Head back into the PropRandomizer script and now we have to do 2 things:
- Assign a GameObject to the newly spawned prop.
- Reference the GameObject’s parent and set it the current spawn point’s transform.
PropRandomizer.cs
using System.Collections;
using System.Collections.Generic;
using UnityEngine;

public class PropRandomizer : MonoBehaviour
{
    public List<GameObject> propSpawnPoints;
    public List<GameObject> propPrefabs;


    void Start()
    {
        SpawnProps();
    }

    void SpawnProps()
    {
        //Spawn a random prop at every spawn point
        foreach (GameObject sp in propSpawnPoints)
        {
            int rand = Random.Range(0, propPrefabs.Count);
            GameObject prop = Instantiate(propPrefabs[rand], sp.transform.position, Quaternion.identity);
            prop.transform.parent = sp.transform;  //Move spawned object into map
        }
    }
}
Now when you hit Play, the spawned props should be parented to the locations they spawned at.
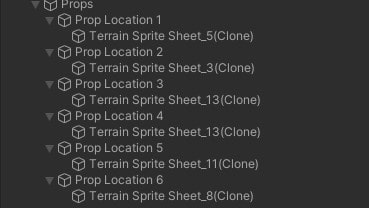
Alright awesome!
5. Map controller script
Now we’ll now create a way to spawn more chunks, such that whenever our player is about to move off a chunk, another chunk spawns, thus making the world infinite and random.
Create a new C# script called MapController and open it up.
Inside here, let’s create a few variables:
publicGameObjectListcalledterrainChunksto store the prefabs of the different Terrain Chunks.publicGameObjectcalledplayerto reference the position of our player.publicfloatcalledcheckerRadiusto store the radius of our checker.Vector3callednoTerrainPositionused to determine the next position where there isn’t a chunk.publicLayerMaskcalledterrainMaskused to track which layer is the terrain.PlayerMovementcalledpmused as a reference to access variables.
Let’s also create a function called ChunkChecker() and call it within the Update() function. This is where we’ll be doing the checking to see if we should spawn another chunk.
MapController.cs
using System.Collections;
using System.Collections.Generic;
using UnityEngine;

public class MapController : MonoBehaviour
{
    public List<GameObject> terrainChunks;
    public GameObject player;
    public float checkerRadius;
    Vector3 noTerrainPosition;
    public LayerMask terrainMask;
    PlayerMovement pm;


    void Start()
    {
        pm = FindObjectOfType<PlayerMovement>();
    }

    void Update()
    {
        ChunkChecker();
    }

    void ChunkChecker()
    {

    }
}
Head towards the ChunkChecker() function and inside there we want to start by checking the direction in which the player is moving, let’s begin by creating an if statement. This statement will be used to check if the player is moving right while not moving up or down.
To do so, we simply have to reference our moveDir vector within our PlayerMovement like so.
MapController.cs
using System.Collections;
using System.Collections.Generic;
using UnityEngine;

public class MapController : MonoBehaviour
{
    public List<GameObject> terrainChunks;
    public GameObject player;
    public float checkerRadius;
    Vector3 noTerrainPosition;
    public LayerMask terrainMask;
    PlayerMovement pm;


    void Start()
    {
        pm = FindObjectOfType<PlayerMovement>();
    }

    void Update()
    {
        ChunkChecker();
    }

    void ChunkChecker()
    {
        if (pm.moveDir.x > 0 && pm.moveDir.y == 0)
        {

        }
    }
}
Now inside of this if statement we are going to create another if statement. This time the condition will make use the Physics2D.OverlapCircle function to check if whether or not there is a chunk a distance away from the player. This is because we don’t want to spawn chunks continuously, but only just the areas that don’t have one. The distance in this case will be the length of our tilemap we created previously. As mine is a 20×20 square tilemap, the distance is naturally 20.
And of course, since we are moving right on the X axis while not moving on the Y axis, the distance of the point to check from the player would be new Vector3(20, 0, 0).
The other parameters we need to have to use Physics2D.OverlapCircle is the radius and layerMask, both of which we created as variables recently.
We must also put a !(Not operator) at the front of the condition because we are only trying to spawn a chunk if there isn’t any chunk on that specific point that we overlapped.
MapController.cs
using System.Collections;
using System.Collections.Generic;
using UnityEngine;

public class MapController : MonoBehaviour
{
    public List<GameObject> terrainChunks;
    public GameObject player;
    public float checkerRadius;
    Vector3 noTerrainPosition;
    public LayerMask terrainMask;
    PlayerMovement pm;


    void Start()
    {
        pm = FindObjectOfType<PlayerMovement>();
    }

    void Update()
    {
        ChunkChecker();
    }

    void ChunkChecker()
    {
        if (pm.moveDir.x > 0 && pm.moveDir.y == 0)
        {
            if (!Physics2D.OverlapCircle(player.transform.position + new Vector3(20, 0, 0), checkerRadius, terrainMask))
            {

            }
        }
    }
}
Inside of this if statement let’s do a couple of things:
- Set the
noTerrainPositionto be equal to ourpointparameter we used for theifstatement - Create a new function called
SpawnChunk()and call it.
Now within the SpawnChunk() function we just have to choose a random chunk and spawn it, very similar to how we did for the PropRandomizer.
MapController.cs
using System.Collections;
using System.Collections.Generic;
using UnityEngine;

public class MapController : MonoBehaviour
{
    public List<GameObject> terrainChunks;
    public GameObject player;
    public float checkerRadius;
    Vector3 noTerrainPosition;
    public LayerMask terrainMask;
    PlayerMovement pm;


    void Start()
    {
        pm = FindObjectOfType<PlayerMovement>();
    }

    void Update()
    {
        ChunkChecker();
    }

    void ChunkChecker()
    {
        if (pm.moveDir.x > 0 && pm.moveDir.y == 0)
        {
            if (!Physics2D.OverlapCircle(player.transform.position + new Vector3(18, 0, 0), checkerRadius, terrainMask))
            {
                noTerrainPosition = player.transform.position + new Vector3(20, 0, 0);
                SpawnChunk();
            }
        }
    }

    void SpawnChunk()
    {
        int rand = Random.Range(0, terrainChunks.Count);
        Instantiate(terrainChunks[rand], noTerrainPosition, Quaternion.identity);

    }
}
Now comes the tedious part. As you might have guessed already, we have to do this for not only the four cardinal directions, but all directions the player can move in, meaning we have to do it for: right, left, up, down, right up, right down, left up and left down.
The difference to look out for would be the point at which to check. Similar to how we counted the length of the tilemap using cells, up and down uses the count of the width of the tilemap. The width of my tilemap is 20.
Now when all is said and done you should have something like this.
MapController.cs
using System.Collections;
using System.Collections.Generic;
using UnityEngine;

public class MapController : MonoBehaviour
{
    public List<GameObject> terrainChunks;
    public GameObject player;
    public float checkerRadius;
    public Vector3 noTerrainPosition;
    public LayerMask terrainMask;
    PlayerMovement pm;


    void Start()
    {
        pm = FindObjectOfType<PlayerMovement>();
    }

    void Update()
    {
        ChunkChecker();
    }

    void ChunkChecker()
    {
        if (pm.moveDir.x > 0 && pm.moveDir.y == 0)
        {
            if (!Physics2D.OverlapCircle(player.transform.position + new Vector3(20, 0, 0), checkerRadius, terrainMask))
            {
                noTerrainPosition = player.transform.position + new Vector3(20, 0, 0);  //Right
                SpawnChunk();
            }
        }
        else if (pm.moveDir.x < 0 && pm.moveDir.y == 0)
        {
            if (!Physics2D.OverlapCircle(player.transform.position + new Vector3(-20, 0, 0), checkerRadius, terrainMask))
            {
                noTerrainPosition = player.transform.position + new Vector3(-20, 0, 0);    //Left
                SpawnChunk();
            }
        }
        else if (pm.moveDir.y > 0 && pm.moveDir.x == 0)
        {
            if (!Physics2D.OverlapCircle(player.transform.position + new Vector3(0, 20, 0), checkerRadius, terrainMask))
            {
                noTerrainPosition = player.transform.position + new Vector3(0, 20, 0); //Up
                SpawnChunk();
            }
        }
        else if (pm.moveDir.y < 0 && pm.moveDir.x == 0)
        {
            if (!Physics2D.OverlapCircle(player.transform.position + new Vector3(0, -20, 0), checkerRadius, terrainMask))
            {
                noTerrainPosition = player.transform.position + new Vector3(0, -20, 0);    //Down
                SpawnChunk();
            }
        }
        else if (pm.moveDir.x > 0 && pm.moveDir.y > 0)
        {
            if (!Physics2D.OverlapCircle(player.transform.position + new Vector3(20, 20, 0), checkerRadius, terrainMask))
            {
                noTerrainPosition = player.transform.position + new Vector3(20, 20, 0);   //Right up
                SpawnChunk();
            }
        }
        else if (pm.moveDir.x > 0 && pm.moveDir.y < 0)
        {
            if (!Physics2D.OverlapCircle(player.transform.position + new Vector3(20, -20, 0), checkerRadius, terrainMask))
            {
                noTerrainPosition = player.transform.position + new Vector3(20, -20, 0);  //Right down
                SpawnChunk();
            }
        }
        else if (pm.moveDir.x < 0 && pm.moveDir.y > 0)
        {
            if (!Physics2D.OverlapCircle(player.transform.position + new Vector3(-20, 20, 0), checkerRadius, terrainMask))
            {
                noTerrainPosition = player.transform.position + new Vector3(-20, 20, 0);  //Left up
                SpawnChunk();
            }
        }
        else if (pm.moveDir.x < 0 && pm.moveDir.y < 0)
        {
            if (!Physics2D.OverlapCircle(player.transform.position + new Vector3(-20, -20, 0), checkerRadius, terrainMask))
            {
                noTerrainPosition = player.transform.position + new Vector3(-20, -20, 0); //Left down
                SpawnChunk();
            }
        }
    }

    void SpawnChunk()
    {
        int rand = Random.Range(0, terrainChunks.Count);
        Instantiate(terrainChunks[rand], noTerrainPosition, Quaternion.identity);

    }
}
Alright great!
Now head back into the Editor and create a new empty game object called Map Controller make sure to attach the script on it.
Next, create a new layer by clicking on any game object and clicking on the Layer dropdown under its name and selecting Add Layer. Add a new layer called Terrain at which ever user layer you want, I’ll be using the User Layer 6.
Select your Terrain Chunk and change its layer to be Terrain, make sure to select change children on the prompt because we want all children to be part of the Terrain layer as well. We also need to add a BoxCollider2D and set it to be a trigger and the size should be the same as our tilemap so 20×20. We need this because Physics2D.OverlapCircle requires a collider.
Let’s now create some more chunks for variety! But before that we have to create a prefab of our current Terrain Chunk.
Create a new subfolder under the Prefabs folder and name it Chunks, then drag the Terrain Chunk into the folder. You can leave the Terrain Chunk in the Scene view as it will be our starting chunk.
Now, with the Terrain Chunk in the project window selected simply Ctrl + D to duplicate the Terrain Chunk, I’ll just do this twice to have 3 different Terrain Chunks. Configure the amount of prop locations you want and their positions within each of the Terrain Chunks.
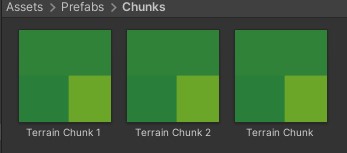
All we have to do now is fill in the MapController parameters:
- Drag and drop all Terrain Chunk prefabs into the
terrainChunksparameter. - Drag and drop the Player into the
playerparameter. - Set the
checkerRadiusto something small like 0.2. - Set the
TerrainMaskto be Terrain.
Now hit Play and now you should be able to see chunks forming around when you move! Awesome!
But as you can tell there are a couple a problems with this:
- The first and most noticeable being the gaps in between. Although we are using a using a fixed distance, this is happening because we are referencing the player position which is constantly moving, as such there will definitely be some gaps in between chunks.
- The second issue would be that some of the chunks are overlapping and the reason for that is same as the why the gaps are happening.
None of these are what we want so we have to make some improvements
6. Accuracy improvements
Before we begin making any improvements, we first have to understand what we are trying to achieve. In layman terms we are aiming to create static points of reference for every direction the player can move in (8 directions). These static points will be attached to the Terrain Chunk itself and will be the point of reference for spawning the next chunk.
a. Creating static points
Open up the Terrain Chunk prefab and create an empty game object under it and called it Right, this point will be used to determine where to spawn the chunk on the right of this chunk if there isn’t one.
Reset its Transform and set the X position to be 20 or whatever the length of your tilemap is. The reason why we are doing so is because if you duplicate this Terrain Chunk and place it at the exact same position of the Right game object, you will see that they align exactly. Make sure to also give it an icon so you can see it without having to select it.
Do the same for the other 7 positions:
- Right – Position X: 20, Y: 0
- Left – Position X: -20, Y: 0
- Up – Position X: 0, Y: 20
- Down – Position X: 0, Y: -20
- Right Up – Position X: 20, Y: 20
- Right Down – Position X: 20, Y: -20
- Left Up – Position X: -20, Y: 20
- Left Down – Position X: -20, Y:-20
Once you are done, copy the static points by multiselecting and heading over to the other chunks you have created.
b. Chunk trigger script
Now we have to create a way to reference what chunk the player standing on. This is because these static points are sitting on the chunk and we need to reference them to spawn the next chunk.
Head over to our MapController first and create a new variable called currentChunk. Then we simply want to return at the top of the ChunkChecker() function when there isn’t a currentChunk.
MapController.cs
using System.Collections;
using System.Collections.Generic;
using UnityEngine;

public class MapController : MonoBehaviour
{
    public List<GameObject> terrainChunks;
    public GameObject player;
    public float checkerRadius;
    public Vector3 noTerrainPosition;
    public LayerMask terrainMask;
    public GameObject currentChunk;
    PlayerMovement pm;


    void Start()
    {
        pm = FindObjectOfType<PlayerMovement>();
    }

    void Update()
    {
        ChunkChecker();
    }

    void ChunkChecker()
    {
        if(!currentChunk)
        {
            return;
        }

        if (pm.moveDir.x > 0 && pm.moveDir.y == 0)
        {
            if (!Physics2D.OverlapCircle(player.transform.position + new Vector3(20, 0, 0), checkerRadius, terrainMask))
            {
                noTerrainPosition = player.transform.position + new Vector3(20, 0, 0);  //Right
                SpawnChunk();
            }
        }
        else if (pm.moveDir.x < 0 && pm.moveDir.y == 0)
        {
            if (!Physics2D.OverlapCircle(player.transform.position + new Vector3(-20, 0, 0), checkerRadius, terrainMask))
            {
                noTerrainPosition = player.transform.position + new Vector3(-20, 0, 0);    //Left
                SpawnChunk();
            }
        }
        else if (pm.moveDir.y > 0 && pm.moveDir.x == 0)
        {
            if (!Physics2D.OverlapCircle(player.transform.position + new Vector3(0, 20, 0), checkerRadius, terrainMask))
            {
                noTerrainPosition = player.transform.position + new Vector3(0, 20, 0); //Up
                SpawnChunk();
            }
        }
        else if (pm.moveDir.y < 0 && pm.moveDir.x == 0)
        {
            if (!Physics2D.OverlapCircle(player.transform.position + new Vector3(0, -20, 0), checkerRadius, terrainMask))
            {
                noTerrainPosition = player.transform.position + new Vector3(0, -20, 0);    //Down
                SpawnChunk();
            }
        }
        else if (pm.moveDir.x > 0 && pm.moveDir.y > 0)
        {
            if (!Physics2D.OverlapCircle(player.transform.position + new Vector3(20, 20, 0), checkerRadius, terrainMask))
            {
                noTerrainPosition = player.transform.position + new Vector3(20, 20, 0);   //Right up
                SpawnChunk();
            }
        }
        else if (pm.moveDir.x > 0 && pm.moveDir.y < 0)
        {
            if (!Physics2D.OverlapCircle(player.transform.position + new Vector3(20, -20, 0), checkerRadius, terrainMask))
            {
                noTerrainPosition = player.transform.position + new Vector3(20, -20, 0);  //Right down
                SpawnChunk();
            }
        }
        else if (pm.moveDir.x < 0 && pm.moveDir.y > 0)
        {
            if (!Physics2D.OverlapCircle(player.transform.position + new Vector3(-20, 20, 0), checkerRadius, terrainMask))
            {
                noTerrainPosition = player.transform.position + new Vector3(-20, 20, 0);  //Left up
                SpawnChunk();
            }
        }
        else if (pm.moveDir.x < 0 && pm.moveDir.y < 0)
        {
            if (!Physics2D.OverlapCircle(player.transform.position + new Vector3(-20, -20, 0), checkerRadius, terrainMask))
            {
                noTerrainPosition = player.transform.position + new Vector3(-20, -20, 0); //Left down
                SpawnChunk();
            }
        }
    }

    void SpawnChunk()
    {
        int rand = Random.Range(0, terrainChunks.Count);
        Instantiate(terrainChunks[rand], noTerrainPosition, Quaternion.identity);

    }
}
Create a new C# script and call it ChunkTrigger.
Inside here we want to:
- Create a reference to the
currentChunkwe just created inMapController. - Create a
publicGameObjectcalledtargetChunkused to change thecurrentChunk. - Set the
currentChunkto betargetChunkif the player is within the boundaries of the chunk area. - Set the
currentChukto benullif the player exits the chunk area.
ChunkTrigger.cs
using System.Collections;
using System.Collections.Generic;
using UnityEngine;

public class ChunkTrigger : MonoBehaviour
{
    MapController mc;

    public GameObject targetMap;

    void Start()
    {
        mc = FindObjectOfType<MapController>();
    }

    private void OnTriggerStay2D(Collider2D col)
    {
        if (col.CompareTag("Player"))
        {
            mc.currentChunk = targetMap;
        }
    }

    private void OnTriggerExit2D(Collider2D col)
    {
        if (col.CompareTag("Player"))
        {
            if (mc.currentChunk == targetMap)
            {
                mc.currentChunk = null;
            }
        }
    }
}
Head back into the Editor and set the player object’s tag to the Player. Once that’s done, open up your Terrain Chunk again and create a new empty game object called Trigger. Make sure to reset the Transform as well.
Add the ChunkTrigger script onto the object and drag the Terrain Chunk itself into the targetMap parameter. Then add a BoxCollider2D and set it to trigger. Set the size to be the size of the grid you painted, with a little margin. In my case because mine is a 20×20 grid, it’ll be 18×18.
The reason why we need it to be smaller than the actual grid we have painted is because we need space and leeway for the OnTriggerExit2D to run. This is also the reason why we are creating a new game object and putting the trigger and script on top of it. We want to be able to change the size of the collider in the unlikely event that the player walks back and forth on the border of the chunk, nothing funky will happen. If we simply place this on the Terrain Chunk itself, it won’t work because OnTrigger will on detect the first collider and it will interfere with our MapController script.
Do the same for the other chunks you have created.
c. Map controller script improvements
Open up your MapController script once again and now we can start referencing the static points.
Similar to how we set the noTerrainPosition to be the player position + length/width of the tilemap in their respective axes, we can do the same with static points while omitting the player position for maximum precision.
Change the setting of the noTerrainPosition and condition of the if statements to be their respective static points. We can do that by simply referencing the transform of the needed point with its name by using the transform.Find function.
MapController.cs
using System.Collections;
using System.Collections.Generic;
using UnityEngine;

public class MapController : MonoBehaviour
{
    public List<GameObject> terrainChunks;
    public GameObject player;
    public float checkerRadius;
    public Vector3 noTerrainPosition;
    public LayerMask terrainMask;
    public GameObject currentChunk;
    PlayerMovement pm;


    void Start()
    {
        pm = FindObjectOfType<PlayerMovement>();
    }

    void Update()
    {
        ChunkChecker();
    }

    void ChunkChecker()
    {
        if(!currentChunk)
        {
            return;
        }

        if (pm.moveDir.x > 0 && pm.moveDir.y == 0)
        {
            if (!Physics2D.OverlapCircle(currentChunk.transform.Find("Right").position, checkerRadius, terrainMask))
            {
                noTerrainPosition = currentChunk.transform.Find("Right").position;  //Right
                SpawnChunk();
            }
        }
        else if (pm.moveDir.x < 0 && pm.moveDir.y == 0)
        {
            if (!Physics2D.OverlapCircle(currentChunk.transform.Find("Left").position, checkerRadius, terrainMask))
            {
                noTerrainPosition = currentChunk.transform.Find("Left").position;    //Left
                SpawnChunk();
            }
        }
        else if (pm.moveDir.y > 0 && pm.moveDir.x == 0)
        {
            if (!Physics2D.OverlapCircle(currentChunk.transform.Find("Up").position, checkerRadius, terrainMask))
            {
                noTerrainPosition = currentChunk.transform.Find("Up").position; //Up
                SpawnChunk();
            }
        }
        else if (pm.moveDir.y < 0 && pm.moveDir.x == 0)
        {
            if (!Physics2D.OverlapCircle(currentChunk.transform.Find("Down").position, checkerRadius, terrainMask))
            {
                noTerrainPosition = currentChunk.transform.Find("Down").position;    //Down
                SpawnChunk();
            }
        }
        else if (pm.moveDir.x > 0 && pm.moveDir.y > 0)
        {
            if (!Physics2D.OverlapCircle(currentChunk.transform.Find("Right Up").position, checkerRadius, terrainMask))
            {
                noTerrainPosition = currentChunk.transform.Find("Right Up").position;   //Right up
                SpawnChunk();
            }
        }
        else if (pm.moveDir.x > 0 && pm.moveDir.y < 0)
        {
            if (!Physics2D.OverlapCircle(currentChunk.transform.Find("Right Down").position, checkerRadius, terrainMask))
            {
                noTerrainPosition = currentChunk.transform.Find("Right Down").position;  //Right down
                SpawnChunk();
            }
        }
        else if (pm.moveDir.x < 0 && pm.moveDir.y > 0)
        {
            if (!Physics2D.OverlapCircle(currentChunk.transform.Find("Left Up").position, checkerRadius, terrainMask))
            {
                noTerrainPosition = currentChunk.transform.Find("Left Up").position;  //Left up
                SpawnChunk();
            }
        }
        else if (pm.moveDir.x < 0 && pm.moveDir.y < 0)
        {
            if (!Physics2D.OverlapCircle(currentChunk.transform.Find("Left Down").position, checkerRadius, terrainMask))
            {
                noTerrainPosition = currentChunk.transform.Find("Left Down").position; //Left down
                SpawnChunk();
            }
        }
    }

    void SpawnChunk()
    {
        latestChunk = Instantiate(terrainChunks[rand], noTerrainPosition, Quaternion.identity);
        spawnedChunks.Add(latestChunk);
    }
}
Now when you hit Play, you can see that the chunks spawn perfectly and are aligned with one another. Awesome!
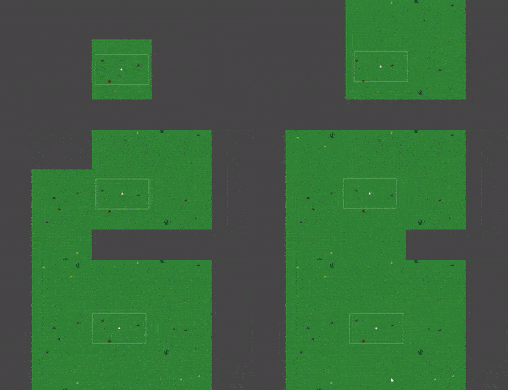
7. Optimization
Before we end of this part there is something very important we need to do, and that is optimization.
Since this game is infinitely generated there will definitely be heavy load due to the amount of chunks we are spawning especially in the later parts of the game. Therefore, we must create a way to minimize the amount of load. Our goal will be to remove the chunks that the player is far away from.
However, since we can’t just outright destroy the objects since they have to still be the same chunks when the player returns, we can just disable them.
Let’s start by creating a few things:
GameObjectListcalledspawnedChunksthat we will use to store the current chunks.GameObjectcalledlatestChunkused to reference the last chunk we just spawned.publicfloatcalledmaxOpDistused to set our max distance for each of the chunks from our player before we disable it.floatopDistused for referencing the current distance for each of the chunks from our player.
Next up we have to set lastestChunk to be the instantiated game object inside SpawnChunk() and then we need to add it into the spawnedChunks list.
MapController.cs
using System.Collections;
using System.Collections.Generic;
using UnityEngine;

public class MapController : MonoBehaviour
{
    public List<GameObject> terrainChunks;
    public GameObject player;
    public float checkerRadius;
    public Vector3 noTerrainPosition;
    public LayerMask terrainMask;
    public GameObject currentChunk;
    PlayerMovement pm;

    [Header("Optimization")]
    public List<GameObject> spawnedChunks;
    GameObject latestChunk;
    public float maxOpDist; //Must be greater than the length and width of the tilemap
    float opDist;


    void Start()
    {
        pm = FindObjectOfType<PlayerMovement>();
    }

    void Update()
    {
        ChunkChecker();
    }

    void ChunkChecker()
    {
        if(!currentChunk)
        {
            return;
        }

        if (pm.moveDir.x > 0 && pm.moveDir.y == 0)
        {
            if (!Physics2D.OverlapCircle(currentChunk.transform.Find("Right").position, checkerRadius, terrainMask))
            {
                noTerrainPosition = currentChunk.transform.Find("Right").position;  //Right
                SpawnChunk();
            }
        }
        else if (pm.moveDir.x < 0 && pm.moveDir.y == 0)
        {
            if (!Physics2D.OverlapCircle(currentChunk.transform.Find("Left").position, checkerRadius, terrainMask))
            {
                noTerrainPosition = currentChunk.transform.Find("Left").position;    //Left
                SpawnChunk();
            }
        }
        else if (pm.moveDir.y > 0 && pm.moveDir.x == 0)
        {
            if (!Physics2D.OverlapCircle(currentChunk.transform.Find("Up").position, checkerRadius, terrainMask))
            {
                noTerrainPosition = currentChunk.transform.Find("Up").position; //Up
                SpawnChunk();
            }
        }
        else if (pm.moveDir.y < 0 && pm.moveDir.x == 0)
        {
            if (!Physics2D.OverlapCircle(currentChunk.transform.Find("Down").position, checkerRadius, terrainMask))
            {
                noTerrainPosition = currentChunk.transform.Find("Down").position;    //Down
                SpawnChunk();
            }
        }
        else if (pm.moveDir.x > 0 && pm.moveDir.y > 0)
        {
            if (!Physics2D.OverlapCircle(currentChunk.transform.Find("Right Up").position, checkerRadius, terrainMask))
            {
                noTerrainPosition = currentChunk.transform.Find("Right Up").position;   //Right up
                SpawnChunk();
            }
        }
        else if (pm.moveDir.x > 0 && pm.moveDir.y < 0)
        {
            if (!Physics2D.OverlapCircle(currentChunk.transform.Find("Right Down").position, checkerRadius, terrainMask))
            {
                noTerrainPosition = currentChunk.transform.Find("Right Down").position;  //Right down
                SpawnChunk();
            }
        }
        else if (pm.moveDir.x < 0 && pm.moveDir.y > 0)
        {
            if (!Physics2D.OverlapCircle(currentChunk.transform.Find("Left Up").position, checkerRadius, terrainMask))
            {
                noTerrainPosition = currentChunk.transform.Find("Left Up").position;  //Left up
                SpawnChunk();
            }
        }
        else if (pm.moveDir.x < 0 && pm.moveDir.y < 0)
        {
            if (!Physics2D.OverlapCircle(currentChunk.transform.Find("Left Down").position, checkerRadius, terrainMask))
            {
                noTerrainPosition = currentChunk.transform.Find("Left Down").position; //Left down
                SpawnChunk();
            }
        }
    }

    void SpawnChunk()
    {
        int rand = Random.Range(0, terrainChunks.Count);
        latestChunk = Instantiate(terrainChunks[rand], noTerrainPosition, Quaternion.identity);
        spawnedChunks.Add(latestChunk);
    }
}
We are now done with the set-up, time to now create the optimization. Create a new function called ChunkOptimizer and create a foreach loop inside it with the spawnedChunk list as the condition.
Inside here we simply have to set the opDist to be the distance between the player and the chunk we are checking by using the Vector3.Distance() function. Afterwards we just need to check if it is more than the maxOpDist that we will set in the inspector and if it is disable the object and if not we can enable it.
Make sure to call the function inside Update() as well.
MapController.cs
using System.Collections;
using System.Collections.Generic;
using UnityEngine;

public class MapController : MonoBehaviour
{
    public List<GameObject> terrainChunks;
    public GameObject player;
    public float checkerRadius;
    public Vector3 noTerrainPosition;
    public LayerMask terrainMask;
    public GameObject currentChunk;
    PlayerMovement pm;

    [Header("Optimization")]
    public List<GameObject> spawnedChunks;
    GameObject latestChunk;
    public float maxOpDist; //Must be greater than the length and width of the tilemap
    float opDist;


    void Start()
    {
        pm = FindObjectOfType<PlayerMovement>();
    }

    void Update()
    {
        ChunkChecker();
        ChunkOptimzer();
    }

    void ChunkChecker()
    {
        if(!currentChunk)
        {
            return;
        }

        if (pm.moveDir.x > 0 && pm.moveDir.y == 0)
        {
            if (!Physics2D.OverlapCircle(currentChunk.transform.Find("Right").position, checkerRadius, terrainMask))
            {
                noTerrainPosition = currentChunk.transform.Find("Right").position;  //Right
                SpawnChunk();
            }
        }
        else if (pm.moveDir.x < 0 && pm.moveDir.y == 0)
        {
            if (!Physics2D.OverlapCircle(currentChunk.transform.Find("Left").position, checkerRadius, terrainMask))
            {
                noTerrainPosition = currentChunk.transform.Find("Left").position;    //Left
                SpawnChunk();
            }
        }
        else if (pm.moveDir.y > 0 && pm.moveDir.x == 0)
        {
            if (!Physics2D.OverlapCircle(currentChunk.transform.Find("Up").position, checkerRadius, terrainMask))
            {
                noTerrainPosition = currentChunk.transform.Find("Up").position; //Up
                SpawnChunk();
            }
        }
        else if (pm.moveDir.y < 0 && pm.moveDir.x == 0)
        {
            if (!Physics2D.OverlapCircle(currentChunk.transform.Find("Down").position, checkerRadius, terrainMask))
            {
                noTerrainPosition = currentChunk.transform.Find("Down").position;    //Down
                SpawnChunk();
            }
        }
        else if (pm.moveDir.x > 0 && pm.moveDir.y > 0)
        {
            if (!Physics2D.OverlapCircle(currentChunk.transform.Find("Right Up").position, checkerRadius, terrainMask))
            {
                noTerrainPosition = currentChunk.transform.Find("Right Up").position;   //Right up
                SpawnChunk();
            }
        }
        else if (pm.moveDir.x > 0 && pm.moveDir.y < 0)
        {
            if (!Physics2D.OverlapCircle(currentChunk.transform.Find("Right Down").position, checkerRadius, terrainMask))
            {
                noTerrainPosition = currentChunk.transform.Find("Right Down").position;  //Right down
                SpawnChunk();
            }
        }
        else if (pm.moveDir.x < 0 && pm.moveDir.y > 0)
        {
            if (!Physics2D.OverlapCircle(currentChunk.transform.Find("Left Up").position, checkerRadius, terrainMask))
            {
                noTerrainPosition = currentChunk.transform.Find("Left Up").position;  //Left up
                SpawnChunk();
            }
        }
        else if (pm.moveDir.x < 0 && pm.moveDir.y < 0)
        {
            if (!Physics2D.OverlapCircle(currentChunk.transform.Find("Left Down").position, checkerRadius, terrainMask))
            {
                noTerrainPosition = currentChunk.transform.Find("Left Down").position; //Left down
                SpawnChunk();
            }
        }
    }

    void SpawnChunk()
    {
        int rand = Random.Range(0, terrainChunks.Count);
        latestChunk = Instantiate(terrainChunks[rand], noTerrainPosition, Quaternion.identity);
        spawnedChunks.Add(latestChunk);
    }

    void ChunkOptimzer()
    {
        foreach (GameObject chunk in spawnedChunks)
        {
            opDist = Vector3.Distance(player.transform.position, chunk.transform.position);
            if (opDist > maxOpDist)
            {
                chunk.SetActive(false);
            }
            else
            {
                chunk.SetActive(true);
            }
        }
    }
}
Now head back into the Editor and set the maxOpDist parameter in the inspector. I’ll set mine to be 50.
Take note that it must be greater than both the length and width of the tilemap. This is because a lesser value will cause the MapController to spawn another chunk over the existing one because it will still be disabled.
Now if you hit Play and continuously move towards the left, after a while you should see that the furthest chunk will disable itself, and if you walk back, it will return.
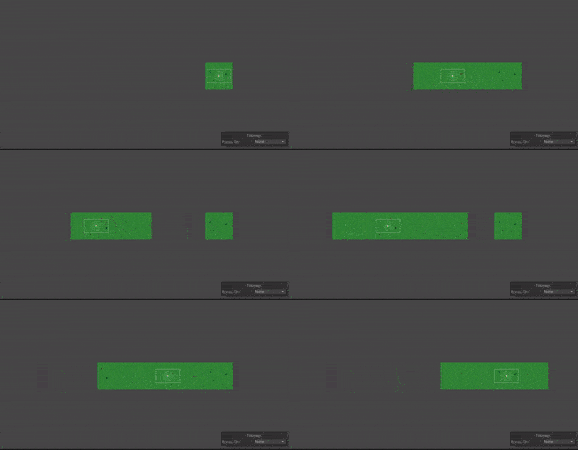
However, as you can see the original block doesn’t disappear and this is because it is not present in the list. We can leave it as it is because it won’t cause us trouble.
Before we end off, let’s also add a cooldown to this optimization since we don’t want to be continuously checking for the distance as the calculation uses up a lot of processing power.
Create a new public float called optimizerCooldown to track the current cooldown and optimizerCooldownDur. Then create a cooldown loop like so.
MapController.cs
using System.Collections;
using System.Collections.Generic;
using UnityEngine;

public class MapController : MonoBehaviour
{
    public List<GameObject> terrainChunks;
    public GameObject player;
    public float checkerRadius;
    public Vector3 noTerrainPosition;
    public LayerMask terrainMask;
    public GameObject currentChunk;
    PlayerMovement pm;

    [Header("Optimization")]
    public List<GameObject> spawnedChunks;
    GameObject latestChunk;
    public float maxOpDist; //Must be greater than the length and width of the tilemap
    float opDist;
    float optimizerCooldown;
    public float optimizerCooldownDur;


    void Start()
    {
        pm = FindObjectOfType<PlayerMovement>();
    }

    void Update()
    {
        ChunkChecker();
        ChunkOptimzer();
    }

    void ChunkChecker()
    {
        if(!currentChunk)
        {
            return;
        }

        if (pm.moveDir.x > 0 && pm.moveDir.y == 0)
        {
            if (!Physics2D.OverlapCircle(currentChunk.transform.Find("Right").position, checkerRadius, terrainMask))
            {
                noTerrainPosition = currentChunk.transform.Find("Right").position;  //Right
                SpawnChunk();
            }
        }
        else if (pm.moveDir.x < 0 && pm.moveDir.y == 0)
        {
            if (!Physics2D.OverlapCircle(currentChunk.transform.Find("Left").position, checkerRadius, terrainMask))
            {
                noTerrainPosition = currentChunk.transform.Find("Left").position;    //Left
                SpawnChunk();
            }
        }
        else if (pm.moveDir.y > 0 && pm.moveDir.x == 0)
        {
            if (!Physics2D.OverlapCircle(currentChunk.transform.Find("Up").position, checkerRadius, terrainMask))
            {
                noTerrainPosition = currentChunk.transform.Find("Up").position; //Up
                SpawnChunk();
            }
        }
        else if (pm.moveDir.y < 0 && pm.moveDir.x == 0)
        {
            if (!Physics2D.OverlapCircle(currentChunk.transform.Find("Down").position, checkerRadius, terrainMask))
            {
                noTerrainPosition = currentChunk.transform.Find("Down").position;    //Down
                SpawnChunk();
            }
        }
        else if (pm.moveDir.x > 0 && pm.moveDir.y > 0)
        {
            if (!Physics2D.OverlapCircle(currentChunk.transform.Find("Right Up").position, checkerRadius, terrainMask))
            {
                noTerrainPosition = currentChunk.transform.Find("Right Up").position;   //Right up
                SpawnChunk();
            }
        }
        else if (pm.moveDir.x > 0 && pm.moveDir.y < 0)
        {
            if (!Physics2D.OverlapCircle(currentChunk.transform.Find("Right Down").position, checkerRadius, terrainMask))
            {
                noTerrainPosition = currentChunk.transform.Find("Right Down").position;  //Right down
                SpawnChunk();
            }
        }
        else if (pm.moveDir.x < 0 && pm.moveDir.y > 0)
        {
            if (!Physics2D.OverlapCircle(currentChunk.transform.Find("Left Up").position, checkerRadius, terrainMask))
            {
                noTerrainPosition = currentChunk.transform.Find("Left Up").position;  //Left up
                SpawnChunk();
            }
        }
        else if (pm.moveDir.x < 0 && pm.moveDir.y < 0)
        {
            if (!Physics2D.OverlapCircle(currentChunk.transform.Find("Left Down").position, checkerRadius, terrainMask))
            {
                noTerrainPosition = currentChunk.transform.Find("Left Down").position; //Left down
                SpawnChunk();
            }
        }
    }

    void SpawnChunk()
    {
        int rand = Random.Range(0, terrainChunks.Count);
        latestChunk = Instantiate(terrainChunks[rand], noTerrainPosition, Quaternion.identity);
        spawnedChunks.Add(latestChunk);
    }

    void ChunkOptimzer()
    {
        optimizerCooldown -= Time.deltaTime;

        if (optimizerCooldown <= 0f)
        {
            optimizerCooldown = optimizerCooldownDur;   //Check every 1 second to save cost, change this value to lower to check more times
        }
        else
        {
            return;
        }

        foreach (GameObject chunk in spawnedChunks)
        {
            opDist = Vector3.Distance(player.transform.position, chunk.transform.position);
            if (opDist > maxOpDist)
            {
                chunk.SetActive(false);
            }
            else
            {
                chunk.SetActive(true);
            }
        }
    }
}
Head back into the Editor and set the optimizerCooldownDur to be something like 1.
Great! Now instead of calling every single frame, our optimizer now calls every second. This will definitely be of help in the future.
8. Conclusion
That’s all for this part! In this part we went through how to create infinite map generation. If you spot any errors or typos in this article, please highlight them in the comments below.
You can also download the project files for what we have done so far. To use the files, you will have to unzip the file (7-Zip can help you do that), and open the folder with Assets and ProjectSettings as a project using Unity.
If you are unsure on how to open downloaded Unity projects, check out our article and video here where we explain how to do so.
These are the final end results of all scripts we have worked with today:
PropRandomizer.cs
using System.Collections;
using System.Collections.Generic;
using UnityEngine;

public class PropRandomizer : MonoBehaviour
{
    public List<GameObject> propSpawnPoints;
    public List<GameObject> propPrefabs;


    void Start()
    {
        SpawnProps();
    }

    void SpawnProps()
    {
        //Spawn a random prop at every spawn point
        foreach (GameObject sp in propSpawnPoints)
        {
            int rand = Random.Range(0, propPrefabs.Count);
            GameObject prop = Instantiate(propPrefabs[rand], sp.transform.position, Quaternion.identity);
            prop.transform.parent = sp.transform;  //Move spawned object into map
        }
    }
}
ChunkTrigger.cs
using System.Collections;
using System.Collections.Generic;
using UnityEngine;

public class ChunkTrigger : MonoBehaviour
{
    MapController mc;

    public GameObject targetMap;

    void Start()
    {
        mc = FindObjectOfType<MapController>();
    }

    private void OnTriggerStay2D(Collider2D col)
    {
        if (col.CompareTag("Player"))
        {
            mc.currentChunk = targetMap;
        }
    }

    private void OnTriggerExit2D(Collider2D col)
    {
        if (col.CompareTag("Player"))
        {
            if (mc.currentChunk == targetMap)
            {
                mc.currentChunk = null;
            }
        }
    }
}
MapController.cs
using System.Collections;
using System.Collections.Generic;
using UnityEngine;

public class MapController : MonoBehaviour
{
    public List<GameObject> terrainChunks;
    public GameObject player;
    public float checkerRadius;
    public Vector3 noTerrainPosition;
    public LayerMask terrainMask;
    public GameObject currentChunk;
    PlayerMovement pm;

    [Header("Optimization")]
    public List<GameObject> spawnedChunks;
    GameObject latestChunk;
    public float maxOpDist; //Must be greater than the length and width of the tilemap
    float opDist;
    float optimizerCooldown;
    public float optimizerCooldownDur;


    void Start()
    {
        pm = FindObjectOfType<PlayerMovement>();
    }

    void Update()
    {
        ChunkChecker();
        ChunkOptimzer();
    }

    void ChunkChecker()
    {
        if(!currentChunk)
        {
            return;
        }

        if (pm.moveDir.x > 0 && pm.moveDir.y == 0)
        {
            if (!Physics2D.OverlapCircle(currentChunk.transform.Find("Right").position, checkerRadius, terrainMask))
            {
                noTerrainPosition = currentChunk.transform.Find("Right").position;  //Right
                SpawnChunk();
            }
        }
        else if (pm.moveDir.x < 0 && pm.moveDir.y == 0)
        {
            if (!Physics2D.OverlapCircle(currentChunk.transform.Find("Left").position, checkerRadius, terrainMask))
            {
                noTerrainPosition = currentChunk.transform.Find("Left").position;    //Left
                SpawnChunk();
            }
        }
        else if (pm.moveDir.y > 0 && pm.moveDir.x == 0)
        {
            if (!Physics2D.OverlapCircle(currentChunk.transform.Find("Up").position, checkerRadius, terrainMask))
            {
                noTerrainPosition = currentChunk.transform.Find("Up").position; //Up
                SpawnChunk();
            }
        }
        else if (pm.moveDir.y < 0 && pm.moveDir.x == 0)
        {
            if (!Physics2D.OverlapCircle(currentChunk.transform.Find("Down").position, checkerRadius, terrainMask))
            {
                noTerrainPosition = currentChunk.transform.Find("Down").position;    //Down
                SpawnChunk();
            }
        }
        else if (pm.moveDir.x > 0 && pm.moveDir.y > 0)
        {
            if (!Physics2D.OverlapCircle(currentChunk.transform.Find("Right Up").position, checkerRadius, terrainMask))
            {
                noTerrainPosition = currentChunk.transform.Find("Right Up").position;   //Right up
                SpawnChunk();
            }
        }
        else if (pm.moveDir.x > 0 && pm.moveDir.y < 0)
        {
            if (!Physics2D.OverlapCircle(currentChunk.transform.Find("Right Down").position, checkerRadius, terrainMask))
            {
                noTerrainPosition = currentChunk.transform.Find("Right Down").position;  //Right down
                SpawnChunk();
            }
        }
        else if (pm.moveDir.x < 0 && pm.moveDir.y > 0)
        {
            if (!Physics2D.OverlapCircle(currentChunk.transform.Find("Left Up").position, checkerRadius, terrainMask))
            {
                noTerrainPosition = currentChunk.transform.Find("Left Up").position;  //Left up
                SpawnChunk();
            }
        }
        else if (pm.moveDir.x < 0 && pm.moveDir.y < 0)
        {
            if (!Physics2D.OverlapCircle(currentChunk.transform.Find("Left Down").position, checkerRadius, terrainMask))
            {
                noTerrainPosition = currentChunk.transform.Find("Left Down").position; //Left down
                SpawnChunk();
            }
        }
    }

    void SpawnChunk()
    {
        int rand = Random.Range(0, terrainChunks.Count);
        latestChunk = Instantiate(terrainChunks[rand], noTerrainPosition, Quaternion.identity);
        spawnedChunks.Add(latestChunk);
    }

    void ChunkOptimzer()
    {
        optimizerCooldown -= Time.deltaTime;

        if (optimizerCooldown <= 0f)
        {
            optimizerCooldown = optimizerCooldownDur;   //Check every 1 second to save cost, change this value to lower to check more times
        }
        else
        {
            return;
        }

        foreach (GameObject chunk in spawnedChunks)
        {
            opDist = Vector3.Distance(player.transform.position, chunk.transform.position);
            if (opDist > maxOpDist)
            {
                chunk.SetActive(false);
            }
            else
            {
                chunk.SetActive(true);
            }
        }
    }
}

To avoid the tediousness of checking in every direction, couldn’t you normalize the player movement vector and use that in chunk checker?
Hi Tucker, yes. We’ve created a much-more improved
MapControllerscript here as well: https://blog.terresquall.com/community/topic/part-2-5-map-generation-on-roids-greatly-improved/Hello! I can’t make the chunks generate properly. It generates the chunks adjacent to the first tilemap, but after these, they don’t generate.
Also keep getting this error:
UnassignedReferenceException: The variable propSpawnPoints of PropRandomizer has not been assigned.
Also, if a prop is in Y = 0 or above the tilemap overlaps it, don’t appearing on the screen, but instantiates like normal. Can you help me?
Hi Rafael, sorry about missing your comment. Check out this topic in our forums to see if it helps fix your issue: https://blog.terresquall.com/community/topic/notable-map-generation-errors/
I have encountered that with the specified chunk size of 20×20, it is not always correctly created on the 16:9 2k screen, creating small intervals if the character is on the corner of the chunk. Did everything exactly according to the guide.
https://i.postimg.cc/0Qm2Hj7w/Screenshot-13.jpg
Hi Max. You could try increasing the chunk size to something more significant, for instance 100. However, I do believe that it might affect performance.