Ever wanted to create a rogue-like shoot ’em up game like Vampire Survivors? In Part 1 of our guide, we will go through how to create movement, animations and a camera for our player character.
A link to a package containing the project files up to Part 1 of this tutorial series can also be found at the end of this article.
1. Introduction
Vampire Survivors is a popular 2D rogue-like shoot ’em up game, and if you have clicked onto this article, it means you want to learn how to make something similar to it. Admittedly, I have spent far too much time on the game, and thus, I thought it would be a great idea to create a tutorial series as others out there might want to learn too.
Before we dive straight in and start our project, I want to explain a little bit of what this tutorial series aims to accomplish.
- The first goal for this tutorial series is to make it as easy to follow as possible. I want to allow anyone, from all skill levels to be able to follow this tutorial smoothly at their own pace without feeling overwhelmed.
- The second and arguably the more important goal is to make is as expandable and scalable as possible. This is such that when the tutorial series ends, you, the reader, won’t have any trouble with continuing the game by populating it with more weapons, enemies and even characters.
Without further ado, let’s dive right into the first part!
2. Setting up the project
Let’s first set-up our project.
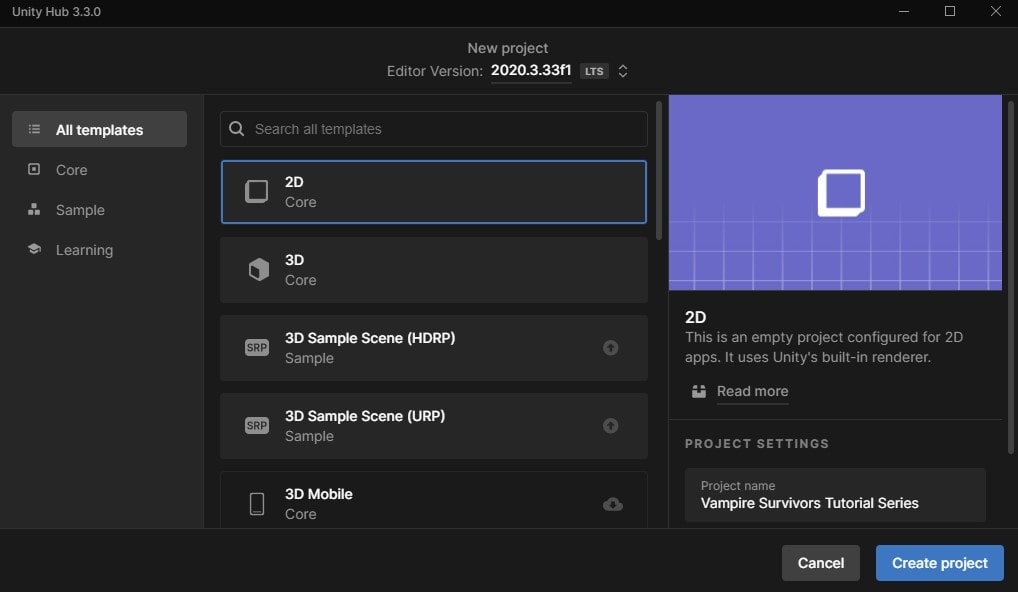
a. Creating the project
The first thing we have to do is open up Unity Hub and create a 2D project using the template. I’ll be using Unity Editor version 2020.3.33f1 for this tutorial series. I recommend using a version that is the same or later than the one I’m using, because some features might be missing if you are using an earlier version.
b. Folder set-up
Now that we have our project up and running, the first thing we want to do is create some structure to store our future files. As a start, let’s create the Art, Scripts and Prefabs folders.
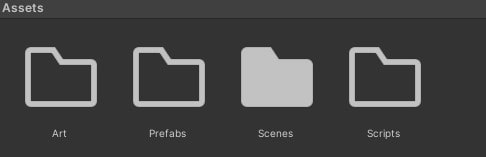
Tip: I always recommend creating folders whenever you set-up a new Unity project as it is a great way to cultivate a good habit of segregating project resources from code which is crucial in organization.
While, we’re here, let’s also go ahead and the rename our SampleScene file to a more appropriate name. I will call our main scene Game, as it is where the game will unfold.
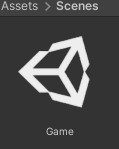
Remember to open the scene up afterwards.
3. Player movement
Now let’s create some movement for our player character!
a. Sprite set-up
Before we can get started with any code, we first have to download and set-up an asset.
We will be using the character sprite sheet located within the Mana seed character base as our player sprite sheet. Drag and drop this file into the Art folder in your Unity project that you created earlier and rename it to Player Sprite Sheet.
Once that’s done, the next thing we have to do is to slice the sprite sheet. To do that, click on the sprite sheet and look towards the Inspector window. Over here we have to change a couple of things:
- Change the Sprite Mode to Multiple as we need to slice the sheet.
- Change the Pixels Per Unit to 25 to enlarge it.
- Change the Filter Mode to Point (no filter) to make our pixels blocky (I always recommend using this option when you are working with pixel art).
You will find that we will have to do the above multiple times in the future.
Make sure your settings are the exact same by comparing them to mine below, and once everything looks good, scroll down and hit Apply!
Afterwards, click on Sprite Editor and it should bring up the Sprite Editor window.
At the top left corner, click on Slice and change the Type to Automatic if it isn’t already. Then hit Slice at the bottom of the pop-up.
Now you should be able to see that your sprites have been sliced. To confirm this change, click Apply at the top right and close out of the window afterwards.
If you have done everything correctly, now when you expand the arrow on the sprite sheet, you should be able to see the individual sliced sprites.

b. Player set-up
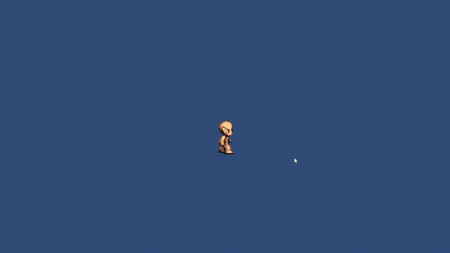
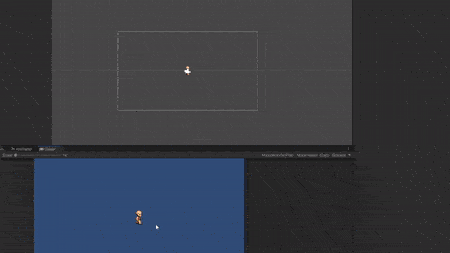
Drag and drop one of the sprites from our player sprite sheet onto the scene and rename it to Player. I’ll be using the right facing one, which is the 48th sprite called Player Sprite Sheet_48.
Afterwards, let’s head into our Scripts folder that we created previously and Right-click > Create > C# Script. Let’s call this script PlayerMovement.
There are a lot of ways to handle 2D movement in Unity. You can:
- Directly translate things;
- Use the built-in physics engine, or even;
- Use an external library from the asset store.
For this project, we are going to be Unity’s built-in physics engine, as I find it the most reliable. In order to do that, we need to add a Rigidbody2D to our player. And while we are here let’s also add a BoxCollider2D for the future and our PlayerMovement script we just created.
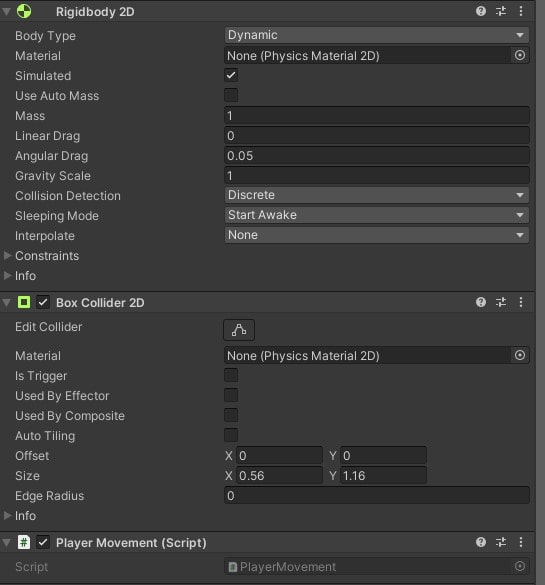
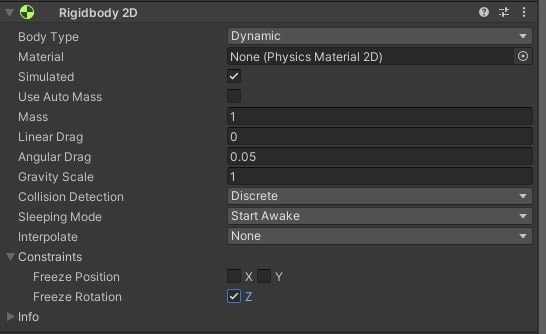
BoxCollider2D component to the GameObject.Let’s also expand the Constraints tab under the Rigidbody2D and make sure Freeze Rotation on the Z axis is checked. This will stop our player from spinning uncontrollably later on when they bump into objects like enemies in the future.
c. Disabling gravity
Now, when you hit the Play button, by default you should see that our player falls to the abyss. This is because the Gravity Scale of the Rigidbody2D is set to 1.
Usually, what we would do to disable gravity is to just set this number to 0, but since our entire game is top down and doesn’t need gravity anyway, instead of disabling the gravity for only our player, we can disable the gravity for our entire game such that future objects created with a Rigidbody2D won’t have gravity as well. This will save us the hassle of having to change it each time.
To do so, open up the Project Settings window by clicking on Edit at the top left corner > Project Settings > Physics 2D. Now, under the Physics 2D tab set the Gravity to 0.
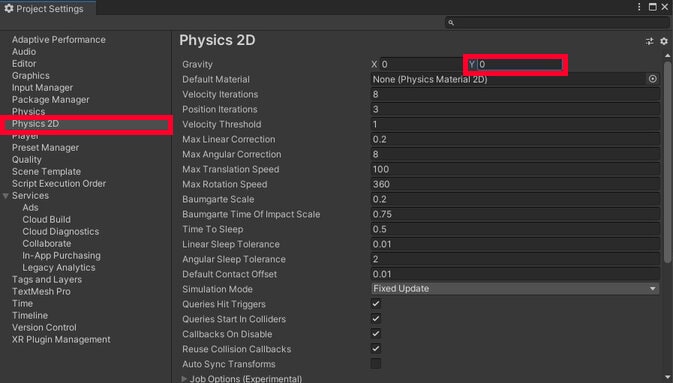
Now, when you exit out of the tab and hit the Play button once again, you can see that our player doesn’t fall even though the Rigidbody2D’s Gravity Scale is still 1.
Great! Now let’s proceed to some code.
d. Player movement script
Open up our PlayerMovement script we created previously.
In here, we want to start by creating a few variables:
publicfloatcalledmoveSpeedto define the speed of our player.RigidBody2Dcalledrbwhich we will use as reference.Vector2calledmoveDirwhich we will use to check the direction our player is moving.
Now, we want to create a reference to the Rigidbody2D component we placed on the player earlier. Let’s do so in the Start() function.
PlayerMovement.cs
using System.Collections;
using System.Collections.Generic;
using UnityEngine;

public class PlayerMovement : MonoBehaviour
{
    //Movement
    public float moveSpeed;
    Vector2 moveDir;

    //References
    Rigidbody2D rb;

    void Start()
    {
        rb = GetComponent<Rigidbody2D>();
    }

    void Update()
    {

    }
}
We now want to create 2 new functions:
InputManagement()to process all our inputs, and;Move()to handle our movement.
PlayerMovement.cs
using System.Collections;
using System.Collections.Generic;
using UnityEngine;

public class PlayerMovement : MonoBehaviour
{
    //Movement
    public float moveSpeed;
    Vector2 moveDir;

    //References
    Rigidbody2D rb;

    void Start()
    {
        rb = GetComponent<Rigidbody2D>();
    }

    void Update()
    {

    }

    void InputManagement()
    {

    }

    void Move()
    {

    }
}
In our InputManagement() function we basically want to check for the Horizontal and Vertical axes.
If you are not too sure what that means, you can head over to Edit at the top left corner of the Editor > Project Settings > Input Manager.
You can expand the Axes, and you will be able to see Horizontal and Vertical among a bunch of other axes. We’ll be using this to make our player move.
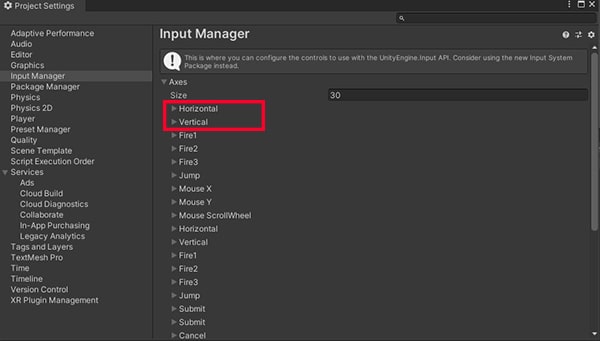
You can customize the buttons however you want over here, but for simplicity sake, let’s keep it the same.
Moving on, in our InputMangement() function, let’s create 2 floats: moveX and moveY, and set them to their respective axes. In this case we should use Input.GetAxisRaw() to get a value between -1 and 1 to find out which buttons are being pressed. Keyboard inputs should always be -1, 0 and 1.
Now, what we can do is set our moveDir after we process the inputs like so.
PlayerMovement.cs
using System.Collections;
using System.Collections.Generic;
using UnityEngine;

public class PlayerMovement : MonoBehaviour
{
    //Movement
    public float moveSpeed;
    Vector2 moveDir;

    //References
    Rigidbody2D rb;

    void Start()
    {
        rb = GetComponent<Rigidbody2D>();
    }

    void Update()
    {

    }

    void InputManagement()
    {
        float moveX = Input.GetAxisRaw("Horizontal");
        float moveY = Input.GetAxisRaw("Vertical");

        moveDir = new Vector2(moveX, moveY).normalized;
    }

    void Move()
    {

    }
}
Now in our Move() function we can apply the velocity to the rb.
PlayerMovement.cs
using System.Collections;
using System.Collections.Generic;
using UnityEngine;

public class PlayerMovement : MonoBehaviour
{
    //Movement
    public float moveSpeed;
    Vector2 moveDir;

    //References
    Rigidbody2D rb;

    void Start()
    {
        rb = GetComponent<Rigidbody2D>();
    }

    void Update()
    {

    }

    void InputManagement()
    {
        float moveX = Input.GetAxisRaw("Horizontal");
        float moveY = Input.GetAxisRaw("Vertical");

        moveDir = new Vector2(moveX, moveY).normalized;
    }

    void Move()
    {
        rb.velocity = new Vector2(moveDir.x * moveSpeed, moveDir.y * moveSpeed);
    }
}
In our Update() function we can now call the InputManagement() function. As for the Move() function, we first have to create a FixedUpdate() function and call it in there.
The reason we are using FixedUpdate() and not Update() for the Move() function is simply because FixedUpdate() is more suited for physics calculation as it calls in regular intervals and is not based on framerate like with Update().
PlayerMovement.cs
using System.Collections;
using System.Collections.Generic;
using UnityEngine;

public class PlayerMovement : MonoBehaviour
{
    //Movement
    public float moveSpeed;
    Vector2 moveDir;

    //References
    Rigidbody2D rb;

    void Start()
    {
        rb = GetComponent<Rigidbody2D>();
    }

    void Update()
    {
        InputManagement();
    }

    void FixedUpdate()
    {
        Move();
    }

    void InputManagement()
    {
        float moveX = Input.GetAxisRaw("Horizontal");
        float moveY = Input.GetAxisRaw("Vertical");

        moveDir = new Vector2(moveX, moveY).normalized;
    }

    void Move()
    {
        rb.velocity = new Vector2(moveDir.x * moveSpeed, moveDir.y * moveSpeed);
    }
}
Let’s head back into the Editor and before hitting the Play button, be sure to set the moveSpeed parameter in the inspector.
Now, using the W A S D keys you should be able to move your player around!
4. Player animation
In this section we’ll be handling player animation.
a. Creating an animation
The first thing we want to do is to create a new script under our Scripts folder called PlayerAnimator, we’ll be using this to handle all our player animations. Don’t forget to add the script onto the player as well.
Now we need to create some animations for our player. In our Art folder, let’s create a subfolder called Animations to hold all our animations.
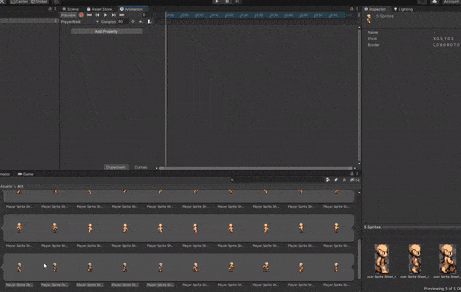
Open up the Animation and Animator windows by heading to Window at the top of the Editor > Animation > Animation / Animator. Once they are open, head over to the Animation window and select the player in your hierarchy. Click the Create button that shows up on the window and the explorer should show up.
Navigate to our Animations folder that we created previously and once there, create an animation with the name PlayerWalk.
Drag and drop sprites 48 to 52 onto the animation timeline.
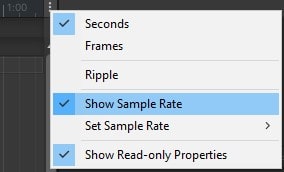
Now when you click on the Play button within the Animation window. you should be able to see that the player is now walking, albeit a bit too fast. To fix this, let’s change the Samples to 12.
Note: If you don’t see the Samples option, head over to the three dots at the top right of the Animation window and click it. Make sure Show Sample Rate is enabled.
b. Configuring the animator
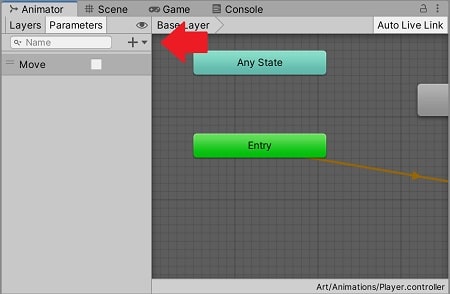
Open up your Animator window, still with your player selected. Then right-click on the empty space within the window > Create State > Empty. Rename this empty state to Idle before right-clicking it > Set as Layer Default State. This state will be used whenever our player isn’t walking around.
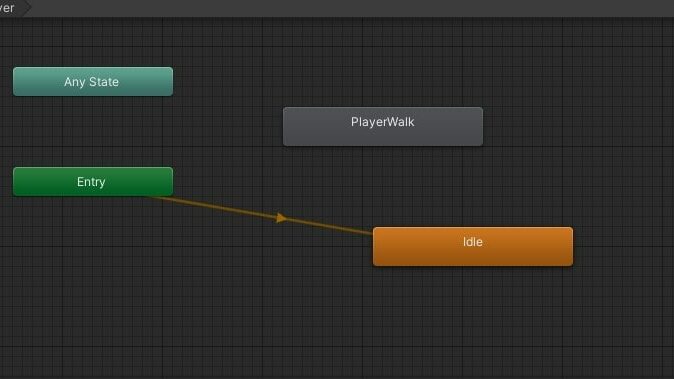
Next, right click on the Idle state and Create Transition, with the arrow, click on PlayerWalk. Do the same for the opposite.
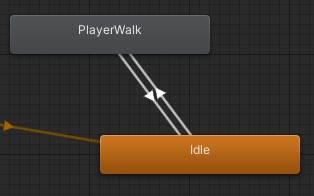
Head over to the left side of the window, hit the plus sign and create a Bool called Move. We will use this to track whether or not our player is moving and if the PlayerWalk animation should play.
Click on the arrow transitioning from the Idle to PlayerWalk state and add a new Condition. Make sure the Move condition is currently set to true, we only want the animation to play when then player is moving.
Next let’s disable Has Exit Time and expand the Settings tab. Follow my settings as shown below to eliminate all exit time. This is done in order to make movement as snappy as possible.
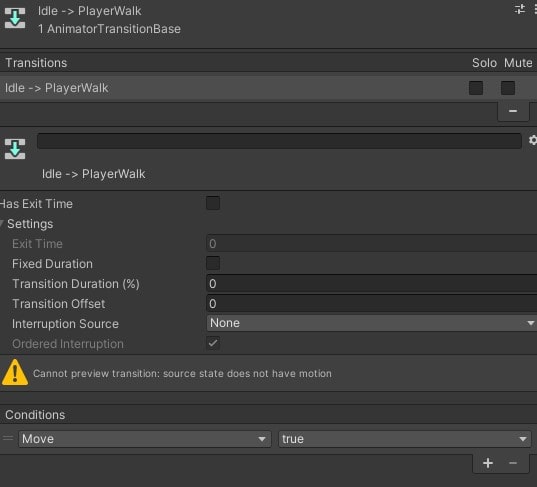
Let’s also do the same for the other transition arrow from PlayerWalk to Idle, just make sure the Move condition is set to false.
Great! Now let’s proceed to the code.
c. Player animator script
First off, we need 3 references:
- Reference to the Animator component.
- Reference to our
PlayerMovementscript. - Reference to the SpriteRenderer component.
PlayerAnimator.cs
using System.Collections;
using System.Collections.Generic;
using UnityEngine;

public class PlayerAnimator : MonoBehaviour
{
    //References
    Animator am;
    PlayerMovement pm;
    SpriteRenderer sr;

    void Start()
    {
        am = GetComponent<Animator>();
        pm = GetComponent<PlayerMovement>();
        sr = GetComponent<SpriteRenderer>();
    }

    void Update()
    {

    }
}
Next, in the Update() function we should check if the X or Y values of the moveDir in PlayerMovement is 0. But in order to do so, we need to public the variable first to access it.
Head into our PlayerMovement script and set moveDir to public, we should also add a [HideInInspector] attribute so that we don’t get confused and assume it’s a parameter we need to set in the inspector. It’s also good practice to keep our inspector clean.
PlayerMovement.cs
using System.Collections;
using System.Collections.Generic;
using UnityEngine;

public class PlayerMovement : MonoBehaviour
{
    //Movement
    public float moveSpeed;
    [HideInInspector]
    public Vector2 moveDir;

    //References
    Rigidbody2D rb;

    void Start()
    {
        rb = GetComponent<Rigidbody2D>();
    }

    void Update()
    {
        InputManagement();
    }

    void FixedUpdate()
    {
        Move();
    }

    void InputManagement()
    {
        float moveX = Input.GetAxisRaw("Horizontal");
        float moveY = Input.GetAxisRaw("Vertical");

        moveDir = new Vector2(moveX, moveY).normalized;
    }

    void Move()
    {
        rb.velocity = new Vector2(moveDir.x * moveSpeed, moveDir.y * moveSpeed);
    }
}
Head back into our PlayerAnimator script.
What we want to do is to check whether or not our player is moving by checking if the X or Y values of the moveDir vector are 0. If they are, that means they are not moving, and if they are not it means they are moving and we should turn on our animation.
PlayerAnimator.cs
using System.Collections;
using System.Collections.Generic;
using UnityEngine;

public class PlayerAnimator : MonoBehaviour
{
    //References
    Animator am;
    PlayerMovement pm;
    SpriteRenderer sr;

    void Start()
    {
        am = GetComponent<Animator>();
        pm = GetComponent<PlayerMovement>();
        sr = GetComponent<SpriteRenderer>();
    }

    void Update()
    {
        if (pm.moveDir.x != 0  || pm.moveDir.y != 0)
        {
            am.SetBool("Move", true);
        }
        else
        {
            am.SetBool("Move", false);
        }
    }
}
Now when you play the game, you will be able to see that the player animation turns on while the player is moving and turns off when it’s not. Great!
But if you couldn’t tell already, there’s a huge issue. Currently, our sprite and animation is only facing the right even when we are walking towards the left.
Let’s create another function inside our PlayerAnimator and name it SpriteDirectionChecker(). Call it under the animation SetBool true. We will be using this function to flip the player sprite and make it face the correct direction.
PlayerAnimator.cs
using System.Collections;
using System.Collections.Generic;
using UnityEngine;

public class PlayerAnimator : MonoBehaviour
{
    //References
    Animator am;
    PlayerMovement pm;
    SpriteRenderer sr;

    void Start()
    {
        am = GetComponent<Animator>();
        pm = GetComponent<PlayerMovement>();
        sr = GetComponent<SpriteRenderer>();
    }

    void Update()
    {
        if (pm.moveDir.x != 0 || pm.moveDir.y != 0)
        {
            am.SetBool("Move", true);

            SpriteDirectionChecker();
        }
        else
        {
            am.SetBool("Move", false);
        }
    }

    void SpriteDirectionChecker()
    {

    }
}
Inside this function we should check where our sprite is facing using the X value of the moveDir and flip it to face the correct direction. If the X value is more than 0 it means the player is facing right, and if it is less than that, it means the player is facing left.
PlayerAnimator.cs
using System.Collections;
using System.Collections.Generic;
using UnityEngine;

public class PlayerAnimator : MonoBehaviour
{
    //References
    Animator am;
    PlayerMovement pm;
    SpriteRenderer sr;

    void Start()
    {
        am = GetComponent<Animator>();
        pm = GetComponent<PlayerMovement>();
        sr = GetComponent<SpriteRenderer>();
    }

    void Update()
    {
        if (pm.moveDir.x != 0 || pm.moveDir.y != 0)
        {
            am.SetBool("Move", true);

            SpriteDirectionChecker();
        }
        else
        {
            am.SetBool("Move", false);
        }
    }

    void SpriteDirectionChecker()
    {
        if (pm.moveDir.x < 0)
        {
            sr.flipX = true;
        }
        else
        {
            sr.flipX = false;
        }
    }
}
Now when you move left and right, you can see that the player faces the correct direction! Awesome!
But there’s still one issue with this. If you are walking upwards or downwards, the sprite immediately flips back to the right.
The problem is because moveDir depends on the moveX and moveY variables that reads the input every single frame. That means, when there isn’t any input, the X value for moveDir becomes 0 and defaults.
To fix this, we have to create a way to store out last input. Create 2 variables called lastHorizontalVector and lastVerticalVector and set them to public. Like with the moveDir let’s also set them to be hidden within the inspector.
PlayerMovement.cs
using System.Collections;
using System.Collections.Generic;
using UnityEngine;

public class PlayerMovement : MonoBehaviour
{
    //Movement
    public float moveSpeed;
    [HideInInspector]
    public Vector2 moveDir;
    [HideInInspector]
    public float lastHorizontalVector;
    [HideInInspector]
    public float lastVerticalVector;

    //References
    Rigidbody2D rb;

    void Start()
    {
        rb = GetComponent<Rigidbody2D>();
    }

    void Update()
    {
        InputManagement();
    }

    void FixedUpdate()
    {
        Move();
    }

    void InputManagement()
    {
        float moveX = Input.GetAxisRaw("Horizontal");
        float moveY = Input.GetAxisRaw("Vertical");

        moveDir = new Vector2(moveX, moveY).normalized;
    }

    void Move()
    {
        rb.velocity = new Vector2(moveDir.x * moveSpeed, moveDir.y * moveSpeed);
    }
}
Now all we have to do is to set these variables to be equal to their respective values as long as they are not 0. This is very important because we want to store the last value input before the movement stops.
PlayerMovement.cs
using System.Collections;
using System.Collections.Generic;
using UnityEngine;

public class PlayerMovement : MonoBehaviour
{
    //Movement
    public float moveSpeed;
    [HideInInspector]
    public Vector2 moveDir;
    [HideInInspector]
    public float lastHorizontalVector;
    [HideInInspector]
    public float lastVerticalVector;

    //References
    Rigidbody2D rb;

    void Start()
    {
        rb = GetComponent<Rigidbody2D>();
    }

    void Update()
    {
        InputManagement();
    }

    void FixedUpdate()
    {
        Move();
    }

    void InputManagement()
    {
        float moveX = Input.GetAxisRaw("Horizontal");
        float moveY = Input.GetAxisRaw("Vertical");

        moveDir = new Vector2(moveX, moveY).normalized;

        if (moveDir.x != 0)
        {
            lastHorizontalVector = moveDir.x;
        }

        if (moveDir.y != 0)
        {
            lastVerticalVector = moveDir.y;
        }
    }

    void Move()
    {
        rb.velocity = new Vector2(moveDir.x * moveSpeed, moveDir.y * moveSpeed);
    }
}
Now head back into our PlayerAnimator and change from using moveDir.x in the SpriteDirectionChecker() to lastHorizontalVector.
PlayerAnimator.cs
using System.Collections;
using System.Collections.Generic;
using UnityEngine;

public class PlayerAnimator : MonoBehaviour
{
    //References
    Animator am;
    PlayerMovement pm;
    SpriteRenderer sr;

    void Start()
    {
        am = GetComponent<Animator>();
        pm = GetComponent<PlayerMovement>();
        sr = GetComponent<SpriteRenderer>();
    }

    void Update()
    {
        if (pm.moveDir.x != 0 || pm.moveDir.y != 0)
        {
            am.SetBool("Move", true);

            SpriteDirectionChecker();
        }
        else
        {
            am.SetBool("Move", false);
        }
    }

    void SpriteDirectionChecker()
    {
        if (pm.lastHorizontalVector < 0)
        {
            sr.flipX = true;
        }
        else
        {
            sr.flipX = false;
        }
    }
}
Play the game and start walking around, everything should work just fine!
5. Player camera
So far we’ve created movement and animation for the player, so it’s time we get to the last order of business for this part: Camera.
So, since this is a top down game, you could drag the Main Camera onto the player to make it a child and call it a day. But I don’t really like this because you are actually limiting the camera in the long run and it is always good practice to never put the Main Camera under the player unless it is for a very good reason.
With that said let’s start by creating a script called CameraMovement and adding it onto our Main Camera.
Inside there, we only really need to do 3 things:
- Create a
publicTransformcalled target to reference whatever we are tracking (in this case, it is our player). - Create a
publicVector3called offset to give our camera some flexibility. - Set the position of the camera to be the
target.position + offset.
CameraMovement.cs
using System.Collections;
using System.Collections.Generic;
using UnityEngine;

public class CameraMovement : MonoBehaviour
{
    public Transform target;
    public Vector3 offset;

    void Update()
    {
        transform.position = target.position + offset;
    }
}
Back in the Editor, make sure to set the target to be the player. Now when you hit play, you will immediately see that your player kinda just disappears.
This is because the Main Camera’s Z position is now set to 0, which means it is 0 units away from our player so it won’t show up on camera. To fix this, all we have to do is modify the offset parameter we created in the inspector and set the Z to -10.
And now when we hit play, you can see that the camera follows the player around nicely. If you’d like, you could even tweak the X and Y values of the offset to get it suited to your liking.
6. Conclusion
That’s all for this part! In this part we went through how to create movement, animation and camera for our player.
If you are a Patreon supporter, you can download the project files for what we have done so far. To use the files, you will have to unzip the file (7-Zip can help you do that), and open the folder with Assets and ProjectSettings as a project using Unity.
If you are unsure on how to open downloaded Unity projects, check out our article and video here where we explain how to do so.
These are the final end results of all scripts we have worked with today:
PlayerMovement.cs
using System.Collections;
using System.Collections.Generic;
using UnityEngine;

public class PlayerMovement : MonoBehaviour
{
    //Movement
    public float moveSpeed;
    [HideInInspector]
    public Vector2 moveDir;
    [HideInInspector]
    public float lastHorizontalVector;
    [HideInInspector]
    public float lastVerticalVector;

    //References
    Rigidbody2D rb;

    void Start()
    {
        rb = GetComponent<Rigidbody2D>();
    }

    void Update()
    {
        InputManagement();
    }

    void FixedUpdate()
    {
        Move();
    }

    void InputManagement()
    {
        float moveX = Input.GetAxisRaw("Horizontal");
        float moveY = Input.GetAxisRaw("Vertical");

        moveDir = new Vector2(moveX, moveY).normalized;

        if (moveDir.x != 0)
        {
            lastHorizontalVector = moveDir.x;
        }

        if (moveDir.y != 0)
        {
            lastVerticalVector = moveDir.y;
        }
    }

    void Move()
    {
        rb.velocity = new Vector2(moveDir.x * moveSpeed, moveDir.y * moveSpeed);
    }
}
PlayerAnimator.cs
using System.Collections;
using System.Collections.Generic;
using UnityEngine;

public class PlayerAnimator : MonoBehaviour
{
    //References
    Animator am;
    PlayerMovement pm;
    SpriteRenderer sr;

    void Start()
    {
        am = GetComponent<Animator>();
        pm = GetComponent<PlayerMovement>();
        sr = GetComponent<SpriteRenderer>();
    }

    void Update()
    {
        if (pm.moveDir.x != 0 || pm.moveDir.y != 0)
        {
            am.SetBool("Move", true);

            SpriteDirectionChecker();
        }
        else
        {
            am.SetBool("Move", false);
        }
    }

    void SpriteDirectionChecker()
    {
        if (pm.lastHorizontalVector < 0)
        {
            sr.flipX = true;
        }
        else
        {
            sr.flipX = false;
        }
    }
}
CameraMovement.cs
using System.Collections;
using System.Collections.Generic;
using UnityEngine;

public class CameraMovement : MonoBehaviour
{
    public Transform target;
    public Vector3 offset;

    void Update()
    {
        transform.position = target.position + offset;
    }
}