If you’re developing a game for Android on Unity, Unity Remote is an irreplaceable tool that allows you to quickly test your game on your Android device using Unity’s built-in Play-in-Editor feature. Unfortunately, it can also be pretty difficult to get Unity Remote to work, since it requires some very specific configurations on both your Android device and your computer.
Available solutions online are often incomplete, inaccurate, or outdated (Unity Remote was released more than 4 years ago, and the Android development scene is very different from how it was then), so you often have to piece solutions from multiple sources to get one that works. After grappling for hours to get Unity Remote working on multiple computers (and a lot of frustration), I’ve decided to write a set of articles to save you the same frustration. Hopefully, this will save you from 9000 Google searches and a damaged keyboard.
If you want a more convenient solution for testing your mobile games, you can also check out Unity’s Device Simulator. Though much more convenient, you may not be able to properly test your mobile games unless the computer you are running the Device Simulator on has touch screen support.
Alternatively, if you are using Unity Remote with iOS device, you may want to check out that article instead.
For ease of access, this article has been separated into multiple sections and sub-sections, which are listed below. If you’ve already gone through some steps to set up Unity Remote, and don’t want to read through the whole article, you can jump straight to the Connecting and basic troubleshooting section, or to our other article for more advanced troubleshooting tricks.
1. Preparing your device
For Unity Remote to work, you need to make sure your Android device has:
Update 20 May 2023: If your Android device is too new, the Play Store may not allow you to download the Unity Remote 5 installer, even though it still works perfectly on newer Android devices. No worries though, you can still manually install it:
- Use this download link from APKPure to get the APK file.
- Upload the APK file onto your Android device and open it to install Unity Remote 5 manually.
a. Enabling USB debugging
To enable USB debugging on your Android device, you first need to un-hide the Developer Options tab in your device settings by finding and tapping the Build number sub-tab 7 times.
The location Build number is slightly different for every Android device, so you need to do a bit of searching. For most devices, it should be found somewhere inside Settings > About phone or Settings > About device.
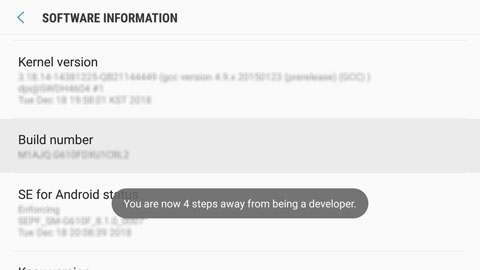
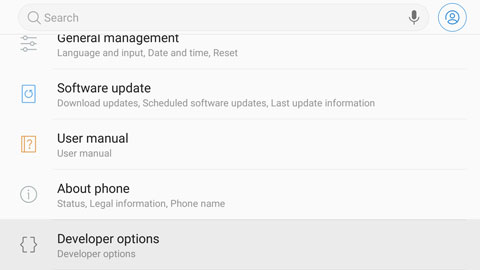
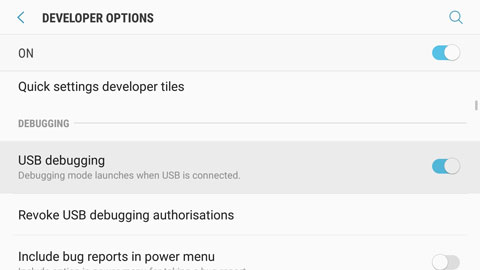
Once that is done, find your way into the newly-revealed Developer Options tab under your device settings, and enable USB debugging.
b. Installing Unity Remote 5
Remember to also install the Unity Remote 5 app onto your Android device. Once you are done with that, you can move on to configuring your computer.
2. Preparing your computer
For Unity Remote to work with your computer (and Unity installation), you’ll need to make sure that:
- Android Build Support for Unity is installed (with Unity-native Android SDK and NDK Tools, and OpenJDK)
- The NDK, SDK and JDK are linked in the Editor
- Unity Remote is enabled in Project Settings
a. Installing Android Build Support for Unity
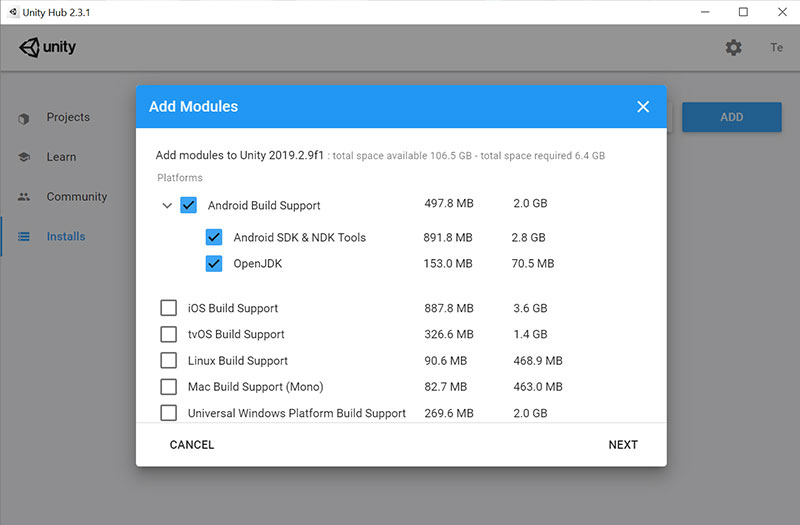
Android Build Support is a Unity Editor extension that adds a suite of features for designing games on Android devices. To add it to an existing Unity installation, open Unity Hub and head to the Installs tab. Click on the dropdown of the Unity version you want to install Android Build Support for, then select Add Modules.
If your version of Unity was not installed with Unity Hub, you’ll want to uninstall it and re-install it using Unity Hub. You won’t be able to add modules onto independent installations of Unity, as Unity has phased that feature out with the release of Unity Hub.
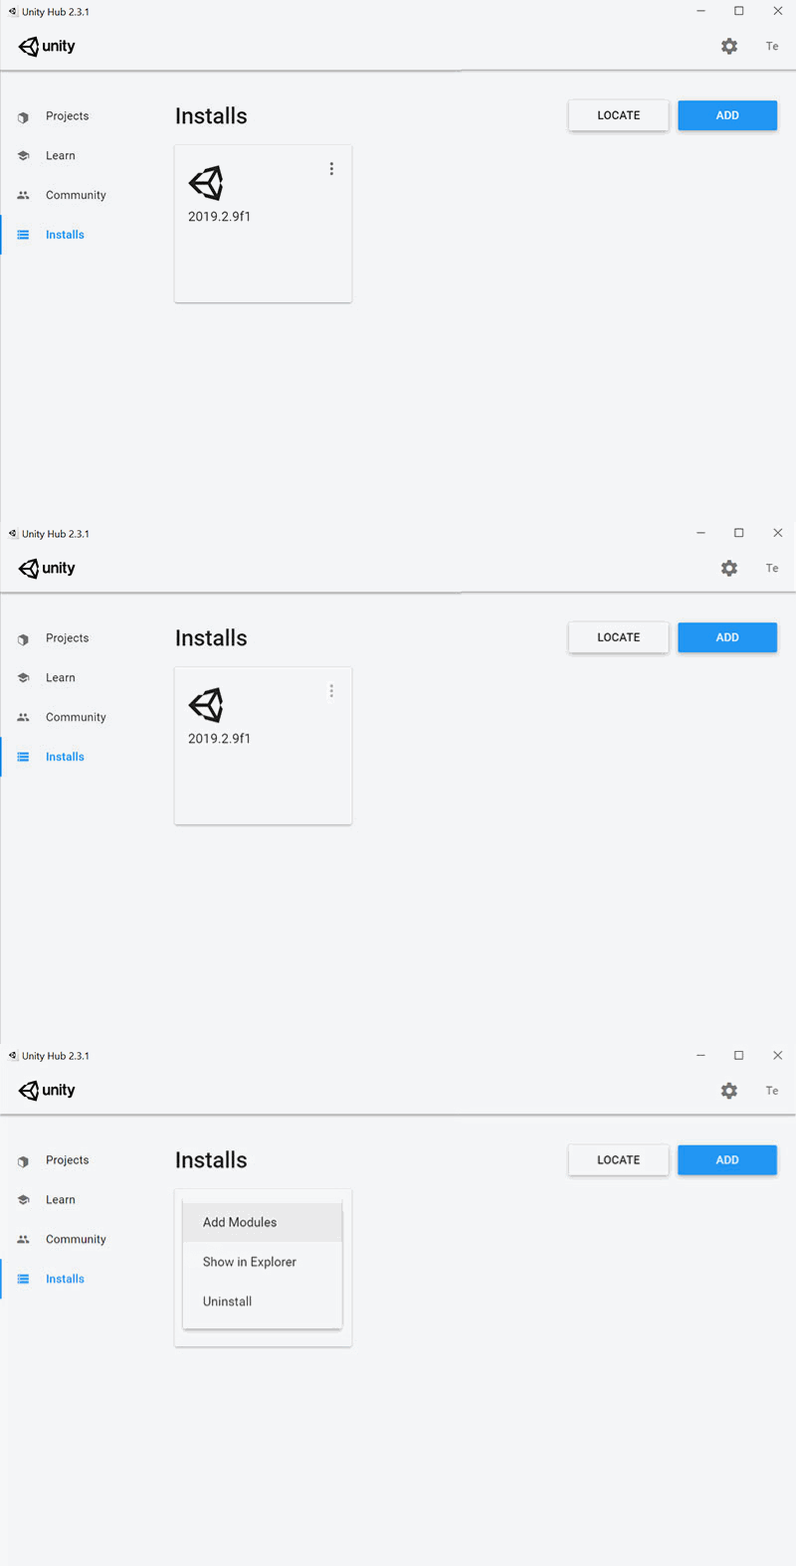
Check the Android Build Support, then click on the dropdown beside it to make sure that Unity’s native Android SDK and NDK Tools, as well as OpenJDK, are checked too. Once that is done, click on Next and agree to the terms and conditions pop-up to start installing these extensions.
Android SDK and NDK Tools and OpenJDK are only available to Unity 2019.1 and above. If you are using an older version of Unity, you will have to download these packages yourself and link them to Unity under Edit > Preferences > External Tools. Consider upgrading, as Unity is very specific with the versions of the SDK and JDK its Android Build Support module can work with.
b. Ensuring the JDK, SDK and NDK are linked
Once installation for Android Build Support is complete, open your project in Unity (use the same version you’ve installed Android Build Support for). Then, go to Edit > Preferences and click on the External Tools tab.
Under the Android section of the tab, make sure that you have the following checkboxes marked (shown in the image below):
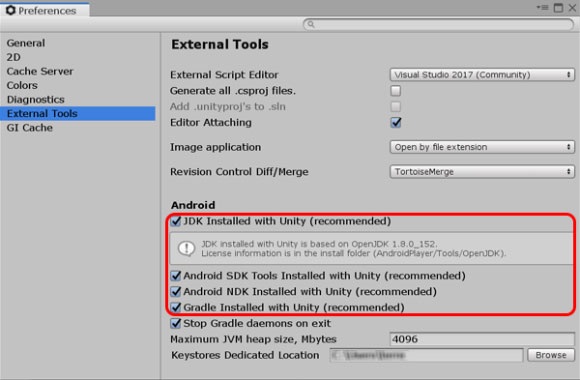
Avoid using your own SDK, NDK or JDK installations. If there are incompatibility issues, it will stop Unity Remote from working.
c. Enabling Unity Remote in the Editor
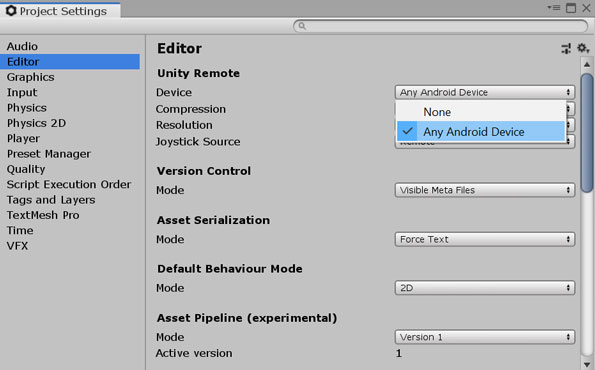
Finally, head to the window at Edit > Project Settings, and select the Editor tab (refer to the image below).
In the tab, set the Device field to Any Android Device. This will enable the Unity Editor to interface with the Unity Remote app on your phone.
Your Unity Editor is now ready for Unity Remote (hopefully). Keep your fingers crossed as you scroll down to the next section.
Looking for the section on installing Google USB Driver? We’ve actually found that it was not necessary for some computers to get Unity Remote working, so we’ve moved it to our other article. Here’s a direct link.
3. Connecting and basic troubleshooting
a. Allow USB debugging
To connect Unity Remote to your Editor, fire up the Unity Remote, and connect it to your computer using a USB cable. If you get an Allow USB debugging prompt on your Android device, consider yourself extremely lucky, because that means Unity has detected it.
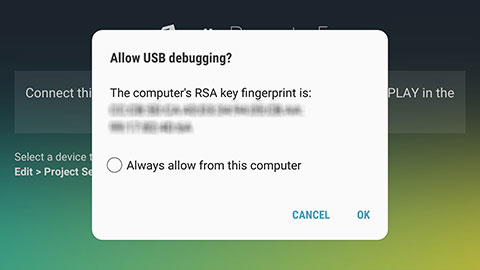
Press OK to allow USB debugging. Then, enter Play Mode in the Editor. You should get some lag the first time you do it (on your desktop, Android device, or both), but Unity Remote should eventually mirror your Game screen.
If that happens, you’re done. You can close this article now.
Sometimes, it takes entering Play Mode a couple of times before Unity Remote starts working. If you have the USB debugging prompt, it is very likely that Unity will start working after a few tries.
Otherwise, if you’ve got…
b. No USB debugging prompt
That means that your Android device is unable to connect to the Unity Editor. There are a plethora of reasons that can be the cause of this, and a whole gamut of methods that can potentially fix this. Before we try the more complex methods, however, you’d want to:
- Double-check that you have set Unity Editor to use Any Android device. Refer to this section above if you don’t know what I’m talking about.
- Make sure you are in the Unity Remote app on your Android device. It only works if the app is on. Yes, it’s an obvious point — I’m just making sure.
- Try a different USB wire and / or a different USB port. Some USB wires and ports are for charging only, and aren’t able to transmit data.
- Disconnect and re-connect your USB wire a couple of times. Your computer might not have detected your Android device the first (few) time.
If the above didn’t work, then I’ll recommend you head over to our other article blow. It is about the various things you can tweak or troubleshoot to get the USB debugging prompt to register.
Alternatively, you can also try the following methods. People have reported that some of these worked for them. It has never worked for me, however:
- Close and re-open Unity on your computer. Sometimes this does the trick.
- Restart Unity Remote on your Android device. Other times, this does the trick.
- Restart your computer and / or your Android device. If you’re really unfortunate, this is what will do the trick.
- Do (5), (6) and (7) in random order for several times. Sometimes, the order in which the apps are opened can affect whether the connection is detected.
- Restart both the Unity Editor (on the computer) and Unity Remote (on your device), then plug in your device with both applications on. Some computers are very particular about this sequence.
- Try using a different device, then restart your original device and try it again. If it works on the other device, it means you are doing something right!
- Try running Unity Remote on a different Unity project, then go back to your original one. Weird, but this has worked for people too.
Another helpful note: If you notice that when your device is connected but not detecting, or it is only charging but not connecting (i.e. you can’t access the files on your device), check out this article from another site.
4. Afterword
I hope that this article has been helpful to you in some way. If not, you can head over to our other article for more things you can try to get Unity Remote working, or read the comments section to see what has worked for other people.
Lastly, if you:
- Find any errors in this article, or;
- Find a method that gets Unity Remote to work, that is not listed in this article (or the other one);
Please leave a comment with the details! This article will be constantly updated with new findings, and you’ll be doing a public service to everyone else who is or will be going through the same battle of getting Unity Remote to work.
Thanks for the guide! The only additional step I needed (on Unity 2019.4.8f1) was to set the Game View’s aspect ratio setting to “Remote (Not Connected)”. After setting that and hitting Play, the remote connection worked great, and continued to work fine even if I changed the aspect ratio to something else.
Project settings – Editor – Device = Any android device. Worked for me. 11/04/2022.
Thank you for this tutorial, works as of 2/2/2022
thanks for the hints !
worked after
-changing unity settings to target android in
–target platform
–editor-unity remote device
–jdk sdk ndk update
-android studio installation
Hey Terence, thank you so so so much for this article. I hadn’t looked in the one with more tricks, so this might not be necessary, but I got mine to work by going into unity hub and changing the target platform to android. Hope this is new info that helps! Again, thank you so so so so so so much I do not know what I could have done without you
Hey Ben, I’ve added your tip to our other article: https://blog.terresquall.com/2020/05/more-tricks-to-get-unity-remote-for-android-working-on-windows/#setting-your-target-platform-on-unity-hub
Thank you so much for taking time out to post!
Hi all,
great work with all the tips here, but nothing here worked for me. Device showed up in adb devices, etc. but no response from the unity remote.
In a desperate attempt I switched in build settings from PC to Android and: it worked perfectly.
Strange to me, because I thought Unity and unity remote is just exchanging pictures and doesn’t need any compilation for the target platform ????
I’m using
a) 2020.3.1f1 and installed everything with the hub.
b) Samsung Galaxy Tab S2.
c) In developer options I have “stay awake”, “USB-Debugging” and “only charge”
Hope this saves some of you some hours I’ve spent with that
Hi Claus,
Thank you for sharing what worked for you. I’ve added your tip onto our other article here: https://blog.terresquall.com/2020/05/more-tricks-to-get-unity-remote-for-android-working-on-windows/#setting-your-platform-in-build-settings
lifesaver thank you soooo much for putting this together!
Thank you for this very well-written post and the companion post on ADB! I couldn’t get Remote to work, but following these posts gave me hope that I was close. I think what finally did the trick was something not mentioned here, though, so I wanted to share.
I went to Preferences and the Android section checkboxes were checked. BUT, I tried unchecking them and the path boxes were blank. I clicked the Browse button, and it filled in paths. BUT, I looked at the paths and they were not correct. SO, I manually pasted in the paths to the JDK/SDK/NDK installed by Unity. In my case, all 3 are here: C:\Program Files\Unity\Hub\Editor\[editor version]\Editor\Data\PlaybackEngines\AndroidPlayer. AFTER THAT, I closed the Unity editor on my PC, unplugged my phone, restarted Unity Remote on my phone, plugged it back in to my PC, restarted Unity editor on my PC, and Remote started working! I must say, the streaming experience is a bit underwhelming for so much headache, but it is better than nothing. :)
Glad this post was of help to you. Thanks for contributing your tip too! I run Unity on multiple computers, and Unity Remote absolutely refuses to work on one of them (ironic, isn’t it, me being the author of this article and all). I’m going to try your tip on it and see if that is the trick that finally makes it work.
I’ve managed to get my Unity Remote on the other computer working with your trick. Thanks so much! I’ve added your tips on the More tricks article.
That’s great, I’m so glad it helped! Never a dull moment with Unity Remote.
Just wanted to add that sometimes you will find your mobile in Device Manager > Universal Serial Bus Devices instead of Portable Devices.
I’ve updated the article with this information. Thanks for pointing this out.
Thank to you for your great effort! I would have given up if it hadn´t been for these two articles of yours. I finally managed to make it work after having trying all kind of stuff without no luck. I think, in my case, installing ADB drivers via SDK Manager (instead of through other means) was the key; it started to work after doing that and rebooting and haven’t stopped yet. You saved me thousands of hours, so thank you again :D.
Regarding Device Manager, I think you will find your Android device in a different category depending on the USB Configuration mode (PTP, MIDI, No transfer data, etc). By the way, in my case, Unity Remote works regardless of this Configuration mode, even with “No transfer data” mode; I don’t need Stay Awake either.
I’m glad this article helped! I’ll update your new factoids into the article when I find the time. Really appreciate you taking the time to write all this out.
I needed to read the “More tricks” guide. I stuck at “… adb devices” and found no device. That means my phone (Samsung) could not be found.
I did NOT get an output “You are in the debug-mode, now”, but I found a solution.
Go to developer options -> USB configuration. There is the MTP-protocol activated. Change that to MIDI and voilá, I gout the “debug-mode”-output. “… adb devices” found my device, too.
Ok, It still doesn’t work, but I think I am a step further. … and very annoyed
Let me know if you managed to get it to work in the end! I have a computer that absolutely refuses to work with Unity Remote too, even though the connection is detected. Some computers are just really difficult.
Thank you so much, I spent so much time searching up tutorials on google to fix it and I finally found this post. You go through each step posting pictures and I can’t imagine how long it must have taken to make this.
I’m glad you found it useful. It was tedious to collate / create the resources, but its easier to write than some of the other articles here because the content is pretty straightforward!
Hi,
I managed to get this blasted thing ‘working’ after hours of trying EVERYTHING but it only works for a second or two on my android device.
I hit play in the Unity Editor and the game flashes up on my android device for only a second or two.
Whyyy??
Hi Mika,
I suspect that you might have multiple versions of adb running on that existing computer, or your USB port / wire may be faulty. It’s pretty difficult to troubleshoot these, as its hard to get feedback on Unity’s adb’s status, or on the USB ports / wires.
You may have better luck trying to get Unity Remote working on another computer.