This article is a continuation of our Getting Unity Remote for Android to work on Windows. If you’re here, that’s probably because you couldn’t get USB debugging to show on your Android device, and the simpler tricks we shared in our article didn’t work for you.
For ease-of-use, here are quick links to the respective sections in this article:
- Manually setting Android file paths
- Installling Google USB Driver
- Setting your target platform in Build Settings
- Setting your target platform on Unity Hub
- Using Android Debug Bridge (adb)
- Enabling other Developer Options
- SDK, NDK and JDK installation issues
- Bonus: Hiding Developer Options again
- Afterword
1. Manually setting Android file paths
24 August 2020 Update: This section was added after one of the readers from another article posted this helpful tip. It got Unity Remote working on one of my computers!
By default, if you’re using the SDK, NDK and JDK provided by Unity’s Android Build Support installation, going to Edit > Preferences > External Tools should give you the following window.
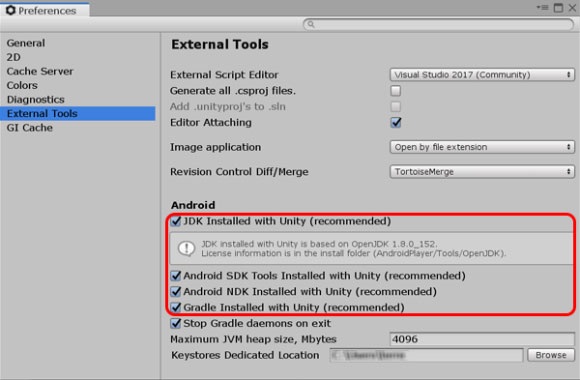
What has worked for some people (including myself), is:
- Unchecking the JDK, SDK and NDK fields (the first three checkboxes in the red box), then;
- Manually setting the paths to Unity’s JDK, SDK and NDK files.
Yes, we’re basically using the JDK, SDK and NDK files provided by Unity, but manually linking them to Unity instead of checking the checkboxes and allowing Unity to do it for us.
Once you uncheck each of the checkboxes, you should see a text field and a Browse button right beside. Clicking on each Browse button should automatically fill up the accompanying text field with the path to the Unity installed NDK, SDK and JDK respectively.
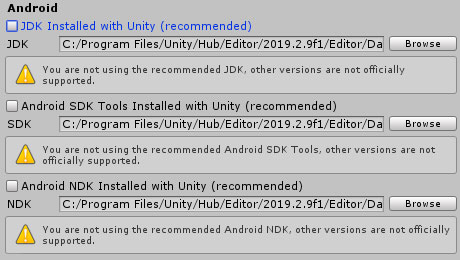
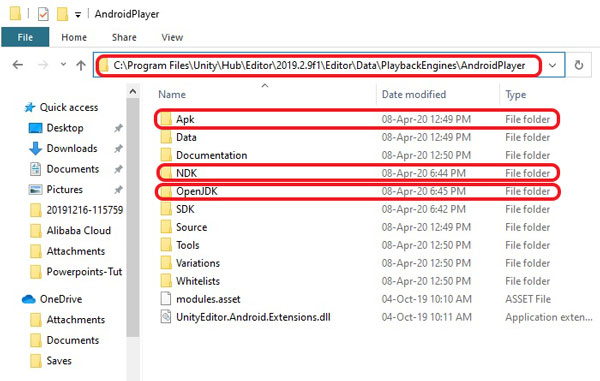
If clicking on the Browse button doesn’t work for you, you’ll have to find the files manually. They should be in either of these folders:
C:\Program Files\Unity\Hub\Editor\[YOUR_UNITY_VERSION]\Editor\Data\PlaybackEngines\AndroidPlayerC:\Program Files\Unity\Editor[YOUR_UNITY_VERSION]\Editor\Data\PlaybackEngines\AndroidPlayer
The SDK and NDK are in the SDK and NDK folders respectively, but the JDK is in OpenJDK\Windows.
After this is done, you might also want to restart Unity Editor and Unity Remote, and then reconnect your mobile device, before trying again.
2. Installing Google USB Driver
For some computers, the Google USB Driver seems to be the magic component that gets Unity Remote working. There are two ways of installing the Google USB Driver:
For most modern computers, only (2) works, but you should give (1) a try first, as (2) requires installing Android Studio, which is more work.
a. Direct installation
To install the Google USB Driver on your computer, you will need to head to this page, click on the download link and accept the terms & conditions pop-up. The downloaded file is a ZIP, which you’ll need to unzip.
To make use of the unzipped files, you’ll need to connect your Android device to your computer and open the Computer Management application. If you can’t find it, click on Start and type in the app’s name to search for it.
When inside the application, select Device Manager and find your attached Android device under Portable Devices. Right-click and select Update driver.
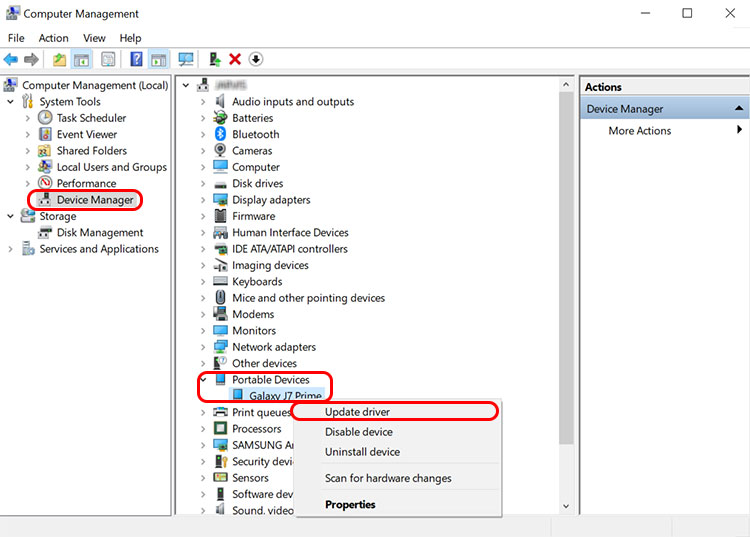
Note: Sometimes you will find your mobile in Device Manager > Universal Serial Bus Devices instead of Portable Devices. Thanks to fibrizo for the heads up.
In the pop-up that appears, select Browse my computer for driver software on the window that pops up. Then, select the unzipped Google USB Driver folder (making sure to check Include subfolders) to install.
b. Through Android Studio’s SDK Manager
If the above steps do not work for you, you can also install Android Studio, then install Google USB Driver using its SDK Manager.
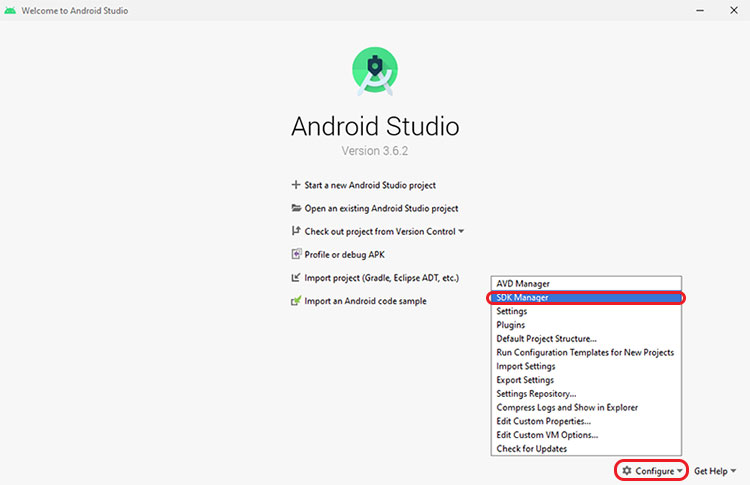
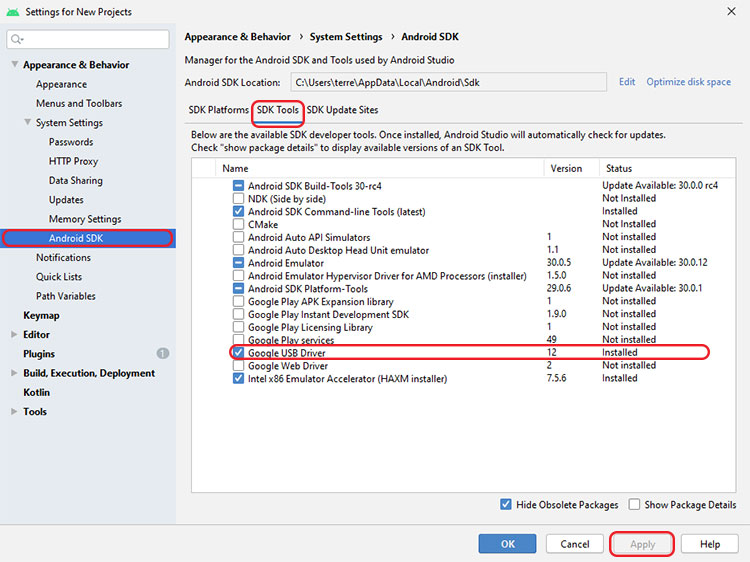
If the SDK Manager window does not show, you can click on Settings below it to access the same window. Then, do a search for SDK Manager to find the window (as pictured below). If you can’t access the window, check if the Android SDK Location (again, as pictured below) is set.
The SDK Manager looks like the image below. You’ll find the Google USB Driver under Android SDK > SDK Tools.
3. Setting your target platform in Build Settings
30 March 2021 Update: This section was added after one of the readers left this comment on the other article for Unity Remote.
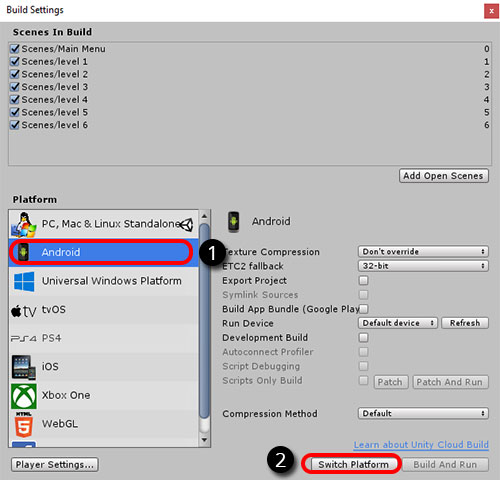
For some readers, switching their build platform over to Android in File > Build Settings worked. Note that to do so, you’ll need to have Android Build Support installed on the Unity version you are using.
4. Setting your target platform on Unity Hub
19 June 2021 Update: This section was added after one of the readers left this comment on the other article for Unity Remote.
If setting your target platform on the editor’s Build Settings window didn’t work, you can try setting your project platform on Unity Hub before opening the project.
Refer to the GIF below to see where to find the dropdown.
5. Using Android Debug Bridge (adb)
In some cases, you’ll find that regardless of what you do, Unity Remote just doesn’t seem to work. In this case, it might be because your computer is unable to detect your Android device. adb.exe is a command-line tool included with Android SDKs, and it can help with that.
If you are using Unity 2019.1 and above, you don’t have to download anything to access adb.exe — it comes with Unity’s Android Build Support module, if you installed the Android SDK included with it. You should be able to find adb.exe in C:\Program Files\Unity\Hub\Editor\[YOUR_UNITY_VERSION]\Editor\Data\PlaybackEngines\AndroidPlayer\SDK\platform-tools, unless you installed Unity in a custom folder.
A possible alternative location for the file is C:\Program Files\Unity\Editor\[YOUR_UNITY_VERSION]\Editor\Data\PlaybackEngines\AndroidPlayer\SDK\platform-tools. Alternatively, you can search your drive for adb.exe to find the folder.
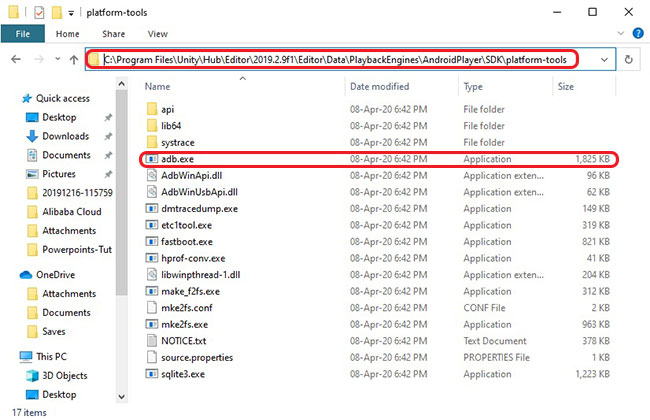
adb.exe in the folder, then you’re on the right track.If you try clicking adb.exe to run it, you will find that nothing much happens. That’s because adb.exe is a command line application, which means you need to run it in Window’s Command Prompt to use it.
- To open the Command Prompt, press Windows + R on your computer to open the Run dialog. Type in
cmd, and instead of pressing Enter, press Ctrl + Shift + Enter to run the program as an Administrator. - We will need to navigate to the folder where
adb.exeis in the Command Prompt before we can access the program. Typecdinto the Command Prompt, followed by the path of the directoryadb.exeis in, i.e.cd C:\Program Files\Unity\Hub\Editor\[YOUR_UNITY_VERSION]\Editor\Data\PlaybackEngines\AndroidPlayer\SDK\platform-tools.
Execute the adb devices command once you are in the platform-tools folder containing adb.exe. The adb devices command runs adb.exe and lists all the devices that the Android SDK is currently detecting.
C:\Program Files\..\platform-tools>adb devices
List of devices attached
* daemon not running; starting now at tcp:5037
* daemon started successfully
a1b2c3d4e5f6g7    device
If you get an output similar to the green highlighted section above, restart 1) the Unity Editor and; 2) your Unity Remote, then; 3) unplug and plugin your Android device, then try running Unity Remote again. If it still doesn’t work, try the instructions on the next paragraph.
If you don’t get an output, it means that your Android device is not being read, and this is probably what is causing Unity Remote to not work. You might want to try a different USB cable, a different USB port, or a different device altogether.
Alternatively, you can run the following on adb to restart it, and then run adb devices again.
C:\Program Files\..\platform-tools>adb kill-server
C:\Program Files\..\platform-tools>adb start-server
* daemon not running; starting now at tcp:5037
* daemon started successfully
C:\Program Files\..\platform-tools>adb devices
List of devices attached
a1b2c3d4e5f6g7    device
6. Enabling other Developer Options
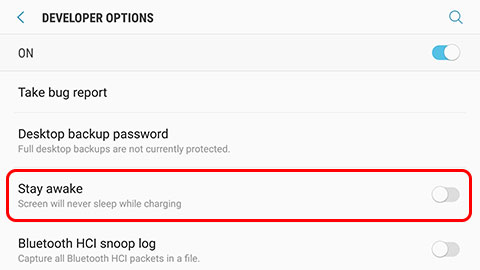
For some people, Unity Remote has managed to work after they’ve enabled the Stay awake option in Developer Options.
For others, it started working after they changed their USB configuration (again, in Developer Options) from MTP (Media Transfer Protocol) to PTP (Picture Transfer Protocol).
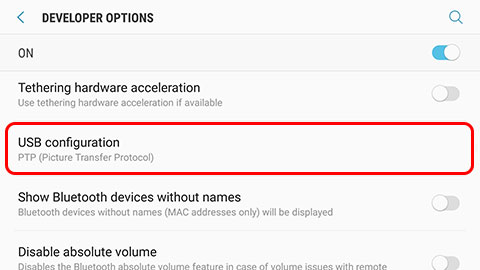
Depending on your device model, the USB configuration setting might be found in another tab instead of Developer Options.
If you can’t find the option that allows you to change your connection to PTP, take a look at this article from another site.
7. SDK, NDK or JDK installation issues
While installing the Android SDK, NDK and JDK alongside Unity’s Android Build Support, some people have reported the following issues:
- OpenJDK installs halfway and stops without any notice. You can look at this Unity Forum topic about this issue.
- The Unity-native SDK or NDK is not compatible with the current project. If you get this, you’re just plain unlucky.
If you run into this issue, one way to go around it is to find people who have managed to get Unity Remote working on their computers and devices, or, at the very least, has a working Android Build Support module with the SDK, NDK and JDK installed.
Why? So that you can copy the SDK, NDK and / or JDK files on their Unity installation over. By the way, only copy the ones that don’t work — you probably don’t need all 3!
8. Bonus: Hiding Developer Options again
For some of you, when you’re done messing with Unity Remote, you might want to hide Developer Options again on your device. You know, what with cybersecurity being a buzzword nowadays and all.
Just head into Developer Options again, and tap the knob on the top right. This will also turn off USB debugging and set the rest of your Developer Options back to their defaults.

9. Afterword
As with our previous Unity Remote article, if you:
- Find any errors in this article, or;
- Find a method that gets Unity Remote to work, that is not listed in this article;
Please leave a comment with the details! This article will be constantly updated with new findings, and you’ll be doing a public service to everyone else who is or will be going through the same battle of getting Unity Remote to work.
Going to File>Build Settings>Android and selecting my phone as the run device are the extra steps that worked for me!
Thanks for this guide, you are a legend.
You are very welcome Kevin. Glad this article helped. If it is not too much to ask, I’ll appreciate if you can subscribe to our Youtube channel. Our channel has videos for similar issues to this, as well as Unity tutorials for making games.
merci pour ce tuto très bien réalisé. le Romote 5 et unity fonctione bien ensemble.
Vous êtes les bienvenus! Nous apprécierions si vous pouviez vous abonner à notre chaîne Youtube ou à notre page Patreon pour nous aider.
Going to Build Settings, setting it to my phone, clicking “Switch Platform” (nothing happened this time), then restarting Unity, and going to Build Settings again and finding a more descriptive option of my phone in there the second time (???) and clicking “Switch Platform” made it install something big for like 5 minutes. Then I started up the remote app and clicked Play and it worked!! After 2 hours of troubleshooting.
The other poster who said Terence is a Chad and deserves all the girls is telling the absolute truth. Thank you SO MUCH man!!!
same clicking copy file path uncheck box for default path then past in same path you get the warning they showed but now working for me.
PS.
On further insight, the JDK path must be wrong, because it pops up a build error. I’ve changed it to Unity default for now, it seems to work fine.
Author is a chad. He deserves all the girls.
What worked for me:
1. Enabling developer mode on my device and enabling USB debugging.
2. Installing google usb driver via Android Studio (device manager said all is well and refused to install the driver I think).
3. Manually setting android SDK etc. paths in Unity (Edit – Preferences). I’m using files provided by Unity by default. My paths are:
JDK: C:\Program Files\Unity\Hub\Editor\2020.1.2f1\Editor\Data\PlaybackEngines\AndroidPlayer\OpenJDK\bin
SKD: C:\Program Files\Unity\Hub\Editor\2020.1.2f1\Editor\Data\PlaybackEngines\AndroidPlayer\SDK
NDK: C:\Program Files\Unity\Hub\Editor\2020.1.2f1\Editor\Data\PlaybackEngines\AndroidPlayer\NDK
I’m convinced point 3. was crucial.
Best wishes!
Thanks jakub, a Chad like me is always happy to help incels with their daily problems. Just kidding, I’m glad this article helped!
Thank you, at last it works, i resisted the urge to throw it through the window and in the end it was unchecking the tick boxes that did it for me
I’m glad it’s working Tim. Unchecking the tick boxes was what did it for me too.