
A common point of confusion amongst beginners in Unity is how to transfer a Unity project from one computer to another, as there are many ways this can be done. In this article, we will be exploring these methods, as well as their pros and cons.
1. Sharing for project collaboration
Before we start, it is important to note that the methods outlined here for transferring your Unity projects should not be employed if your primary purpose of doing so is for collaboration (i.e. sharing and synchronising your project files with members of your team). For that purpose, you will be better-served by using one of the many source-control tools available for managing your Unity project.
We have some articles on this blog that can guide you in setting up your Unity project on GitHub, as well as on Unity’s native Plastic SCM:
2. Using the unitypackage
The more “official” way of sharing your Unity project files, Unity Packages (.unitypackage) are compressed files that can be exported from the Unity Editor. They are specially made to contain the imported assets of a Unity project — i.e. everything from scripts, models, textures, animations, audio files, and more.
Unity Packages are often used when you want to transfer a part of a Unity project, instead of the entire thing; and when you import an asset from the Unity Asset Store, the files are downloaded to (and processed as) a Unity Package by Unity.
a. Exporting a unitypackage
To export a Unity Package, head to Assets > Export Package… This will bring up a new Window that will ask you to select the files and folders in your project you want to export.
Select all the files and folders you want to export, then click on the Export… button to start the process. Before you do so, however, make sure the Include dependencies checkbox is checked, as this will also include all the files in your project that your selected files files depend on.
When you start the export, you will be prompted to select a folder where you want to save your file to. Do pick an easily-recognisable location, such as your Desktop, so that you will be able to find your Unity Package later.
b. Importing a unitypackage
There are 2 ways to go about importing your Unity Package:
- Double-click on the
unitypackagefile without a Unity Editor open, and (if the prompt appears) choose to use the Unity Hub program to open it. Select the project that you want to import the Unity Package’s file into; the Unity project should then take some time to open, together with a prompt asking you which files from the Unity Package you want to import into.
- With a Unity Editor open, you can either use Assets > Import Package > Custom Package, or double-click on the
unitypackagefile directly.
3. Zipping the project files
If you are looking to transfer an entire project from one computer to another, then you will want to use this method to transfer your project instead, as this will also transfer your Project Settings (e.g. input bindings for your game) along with your assets.
a. Finding the files to ZIP
- To begin, go to your Project window, then right-click anywhere within and select Show in Explorer (or Show in Finder for Mac devices). This will open the folder that contains your project files.
- Select the Assets, Packages and ProjectSettings folders by holding Ctrl and clicking on each of them, then right-click and compress them (see the image below).
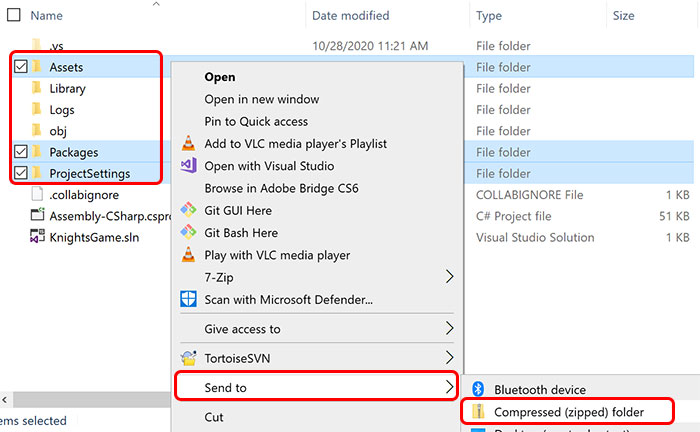
- This will give you a ZIP file that you can send to the computer you want to transfer your project to. Unzip the file on your other computer, and open the project in Unity. You can refer to the article below for more details on how to do so.
b. Limitations of using unitypackage
While exporting a unitypackage is the “official” way of transferring a Unity project, there are a few benefits to transferring the project using the method described above.
- Your Project Settings are not exported together with the
unitypackage. This means that settings that are unique to your project (e.g. input bindings, physics settings) will not be packed into theunitypackage. Hence, you may run into scenarios where input bindings are missing, or your global physics gravity vector being wrong. - Not all dependencies are exported with a
unitypackage. Every Unity project depends on a set of specific additional packages to run, and these packages are listed in the Packages folder. Depending on the version of Unity you use to export theunitypackage, not all of these packages may be included properly. unitypackagefiles are not backwards-compatible with older versions of Unity. This means that if you export from a newer version of Unity, the package may not be compatible with older versions of the engine.
4. Conclusion
Did we miss out any important information in this article? Let us know in the comments below. We hope this article helped you!