When working with projects, it is common practice to use source control repositories to house our code, so that we can synchronize project files across multiple team members, and perform version control. Game development projects are no different.
If you have been using Unity for some time now, you may remember Unity Collaborate — a source control repository service built into the Unity Editor. In November of 2021, they replaced the Unity Collaborate service with Plastic SCM, and Unity users across the world went through a collective struggle trying to re-learn (or learn, if you are a first-time user — Plastic SCM is harder to use than Unity Collaborate) how to use the new service.
If you are one of these people, then this guide is for you.
1. Getting started
Before we begin, I would just to say that this guide only covers the use of Plastic SCM with these following Editor versions. I’ll also be using the latest Unity Hub version as of writing this guide which is 3.30.
- 2019.4.29f1 or later
- 2020.3.15f1 or later
- 2021.1.15f1 or later
- 2021.2.0b6 or later
- Any version beyond 2022.1.0a4
If a teammate has already created a Plastic SCM repository for you, and you are just interested in learning how to access it, you can skip right to this section.
a. Creating a Unity Organization
Before we get into Plastic SCM, we first have to complete the prerequisite of creating a Unity Organization.
Unity Organizations are a way of organizing your Projects and licenses through the Unity website. They also serve other functions such as holding your subscription purchases, but we won’t be delving into them as we mainly want to create an Organization for the sake of our Plastic SCM server. This will be where we will be creating our Plastic SCM repository.
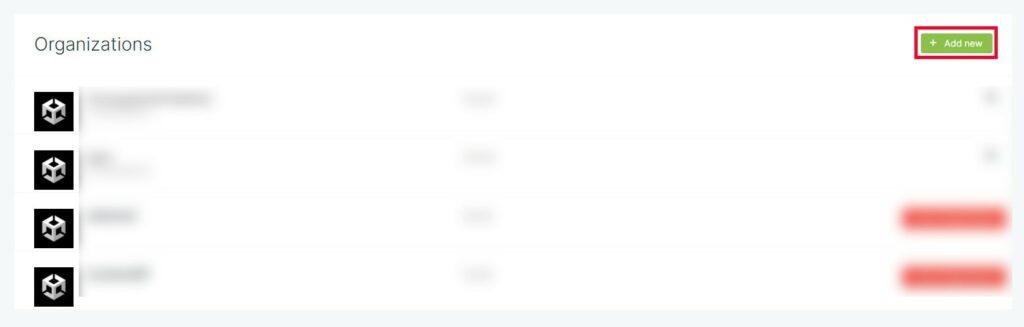
To create a Unity Organization, head over to the Unity Teams Organization tab and click the green Add new button stationed at the top right corner.
Note: If you are not already logged in to Unity Teams, please do so by logging in with your Unity ID.
Afterwards, simply enter your desired name for your new Organization and select the Industry dropdown on the right.
Note that when choosing a name, it is recommended to choose one that is unique. Unity will not allow you to create an Organization using a taken name.
Once that is done, press Create, and there you go! You have now created a Unity Organization.
b. Logging into your Unity Account
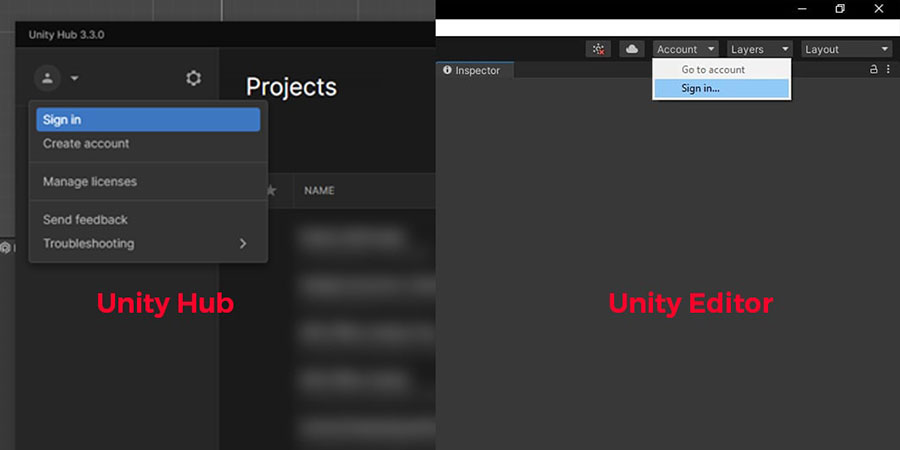
As Plastic SCM is a Unity service, the first thing we have to do is to log into our Unity account. You can either do so from Unity Hub, or from the Editor itself.
c. Opening the Plastic SCM window
The next thing we have to do is open up Unity. For this guide I shall be using Unity Editor version 2020.3.33f1 to demonstrate, but feel free to use any of the versions mentioned above.
There are 2 ways mainly used for accessing Plastic SCM within the Unity Editor.
The first way is by clicking on the Plastic SCM icon on the top right. The second is by clicking the Window button at the top and selecting Plastic SCM. Both of these ways are illustrated below.
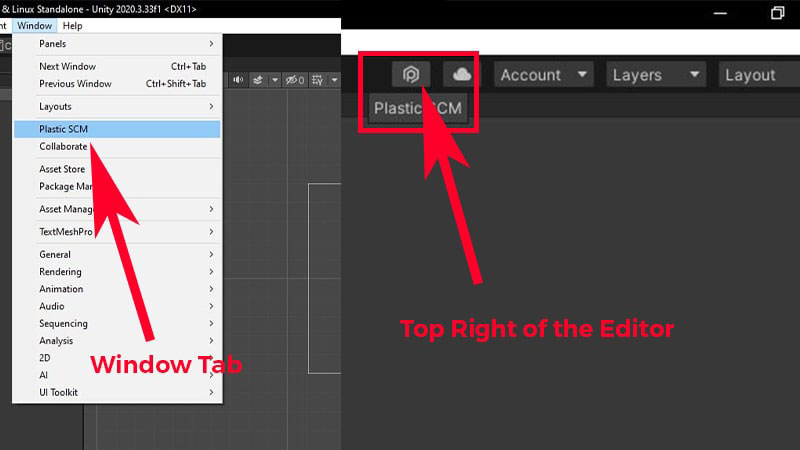
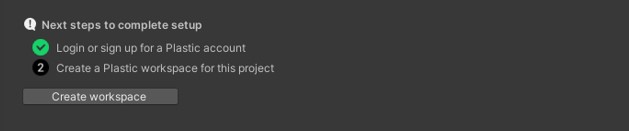
After you do this, you should find a new window open up at the bottom of your Editor named Plastic SCM.
d. Creating a workspace — Setting up a new repository
Let’s now create a workspace as described in the window. Simply click Create workspace and that should bring up the workspace creation menu.
Over here we can define our Repository Name as well as the Workspace name. By default the existing project path and name are used for both of them.
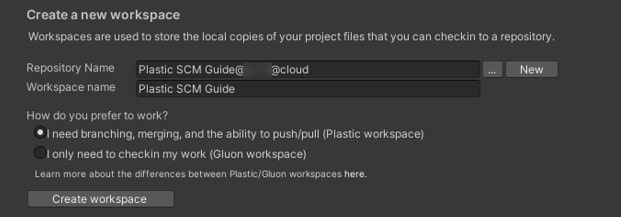
You might be wondering: what is the difference between your repository and workspace? To put it simply, the repository is the cloud where all your shared files (the current version, as well as all past versions) are stored, while the workspace is the existing local copy you are working with on your computer now.
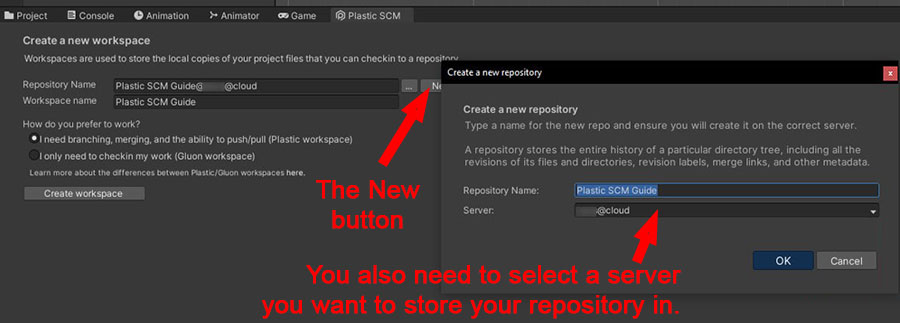
If this is your first time using Unity, or if you are creating a repository for a brand new project, you will need to create a new repository to store your project. To do so, click on the New button pictured below, right beside the ellipsis ….
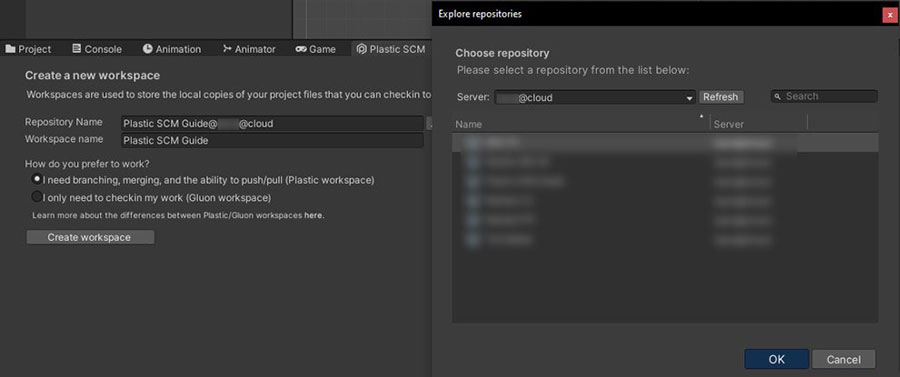
e. Creating a workspace — Linking an existing repository
Now, if you wish to link the project to an existing repository — either one that you have created in the past, or one that you have been added to — click on the ellipsis … beside the Repository Name field. This will open a window, where you will be able to choose from one of your existing Unity repositories on Plastic SCM.
f. Plastic or Gluon workspace?
Next, we have to choose between 2 types of workspaces, the Plastic workspace or the Gluon workspace. The workspace you choose will depend on the type of work that you are going to be doing on the project:
- The Plastic workspace is for programmers, game / level designers, and (occasionally) technical artists. If you see yourself working on the Unity Editor a lot, you will want to use the Plastic workspace, as it downloads the entire project onto your local drive and handles file merging better. The Plastic workspace also allows for greater collaboration between team members as it provides features catered to branching.
- The Gluon workspace is a workflow tool specifically for artists, artists who wish to quickly make changes to certain files and submit them, all while not having to deal with merging or branching files. If you work on the Unity Editor a lot, you will want to avoid using this, as you will have to manually download each of the files you want to work on manually from the Project window. The Gluon workspace is great for
If you’re still not sure what workspace to use, we recommend selecting the Plastic workspace, as it will generally create less issues.
g. Checking if the workspace is set up
Once you’ve selected your workspace, it’s finally time to create our workspace! Click on Create workspace to create both our repository and our workspace!
To check if our workspace has been successfully created, let’s head back into Unity Hub.
Over here let’s check if our project name has a SOURCE CONTROL label beside the name like so.

2. Inviting members
Inviting members is the most crucial part of any Plastic SCM project so let’s take a look at how we can do so!
a. Adding a new user
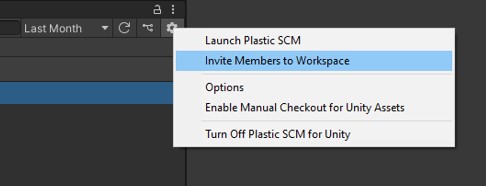
First off, to invite new members to our project, we must first click on the gear icon at the top right of the Plastic SCM window and then select Invite Members to Workspace.
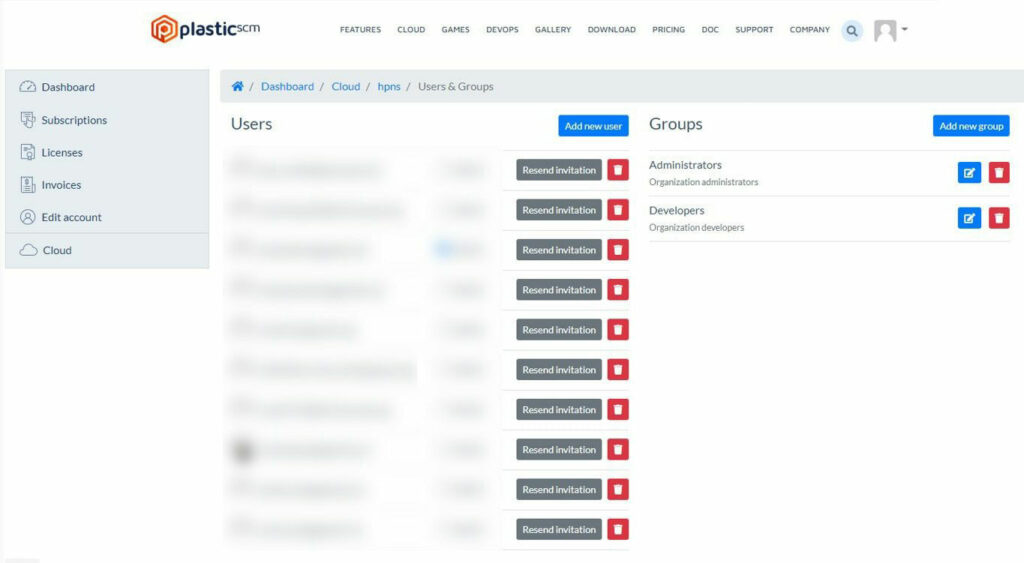
We will be brought to the Plastic SCM cloud dashboard of the server (Refer back to 1a.) we created the repository under. Here, we can add new users (invite), resend invitations and set permissions.
Note: If you are not already logged in to Plastic SCM, please do so by logging in with your Unity ID.
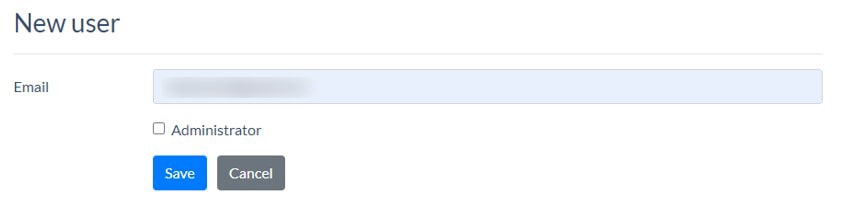
Let’s click on Add a new user to begin inviting a new user. Over here, we have to input the email of the user we wish to invite. We can also set them as an Administrator which will grant them full access to all controls in your server, not just the newly created repository.
Note: Make sure the email you are inviting has a Unity ID, i.e. they have signed up for a Unity account with that email.
Once done, click on Save and you should be brought back to the dashboard if the invite was successful! Please look under the Users list and make sure your invitee’s email is listed there.
Your invitee should also receive an email similar to the one shown below which confirms that the invite was successful. If they happen to not receive such an email, please hit the Resend invitation beside their name in the User list.
As you might have seen from the email above, it suggests installing the Plastic SCM application onto your machine. You don’t have to worry about downloading it, however, as Unity’s Plastic SCM window is capable of handling most of what we need to do for our repository. The Plastic SCM application can be useful for more advanced version control functionality, but we won’t be covering that in this guide.which is beyond the scope of this guide.

b. Accessing the Plastic SCM Project for invitees
Next we’ll be going through how new users can access the project you have invited them to.
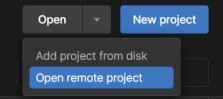
First up, your invitee needs to open up their Unity Hub and select the dropdown menu beside the Open button. Once there, click on Open remote project.
Now, they will be able to see the list of all the projects in all the organizations they have been invited to (or all the remote projects they have created on another computer)!
Simply click on the project you have just created and hit Next. They will then be prompted on where to install the project and what editor version they wish to open it with.
And Viola! Your invitee can now access the project and collaboration can now begin!
3. Basics of using Plastic SCM in Unity
It’s time we take a look at what Plastic SCM in Unity has to offer in terms of features.
a. Pending changes
Let’s first take a look at the Pending Changes tab under the window. The Pending Changes tab is where we can view any changes made to our local version of the project before publishing them with the Checkin Changes button.
When you first create the workspace, you should be greeted with several files already under the Pending Changes tab. It is recommended to always do a check-in first with these files as it may contain important config settings or folders.
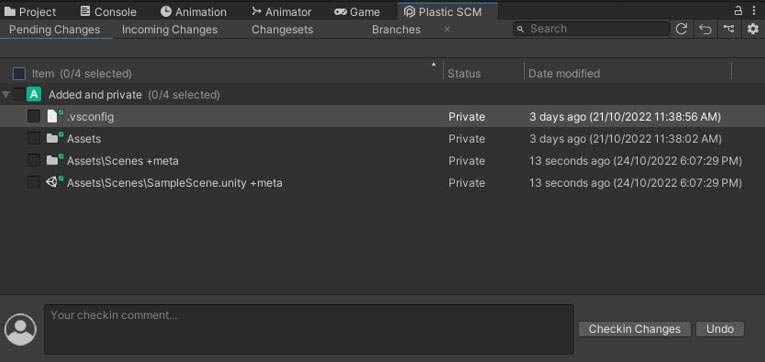
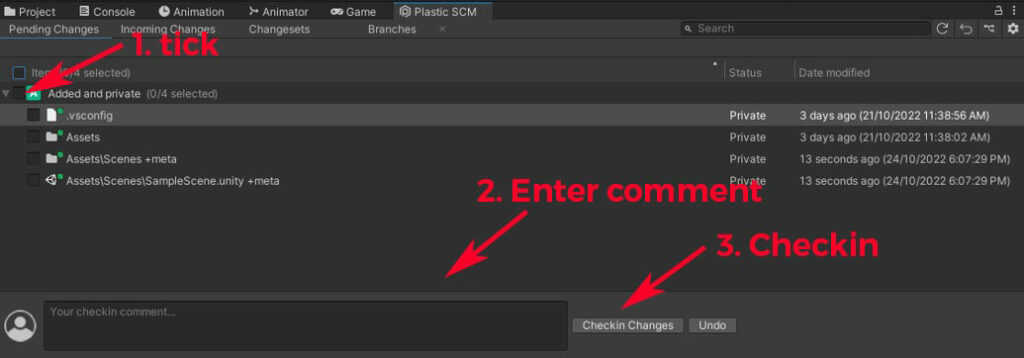
Tick the checkbox beside the Added and private list and type in your check-in comment in the text field below. Once that’s done we can click Checkin Changes to publish our change. If the check-in is performed successfully you should be able to see a note from the tab.
Congrats! You’ve made your first Plastic SCM check-in!
Tip: If you have made a mistake and accidentally added / modified a file and have not yet published your check-in, right-click on the change and click Undo changes. Similarly if you wish to undo every change made so far, click on the Undo button next to the Checkin Changes button.
b. Changesets
Now let’s say we want validate and make sure that this change made it into our repository. What we can do is click on the Changesets tab in order to view our project history.
The Changesets tab will show you the project history of changes made to the repository and who made each change.
As you can see here, the change that we have made earlier is shown right here. We can also view the files impacted in the Changeset on the right side of the tab.
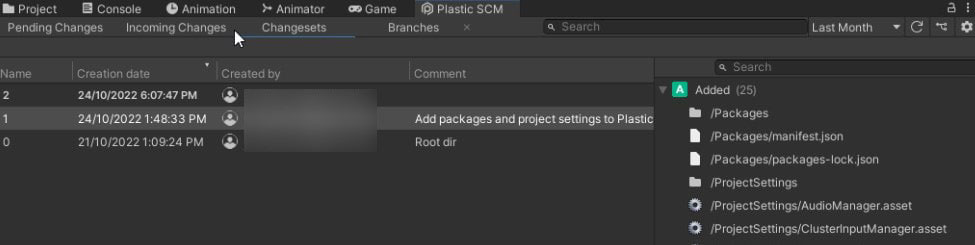
You may have noticed already, but there seem to be other changes made besides the one we have just published. Well, that is because Plastic SCM will automatically perform a Checkin for appropriate folders and files — such as package files and project settings — when it’s set-up from the Unity Editor.
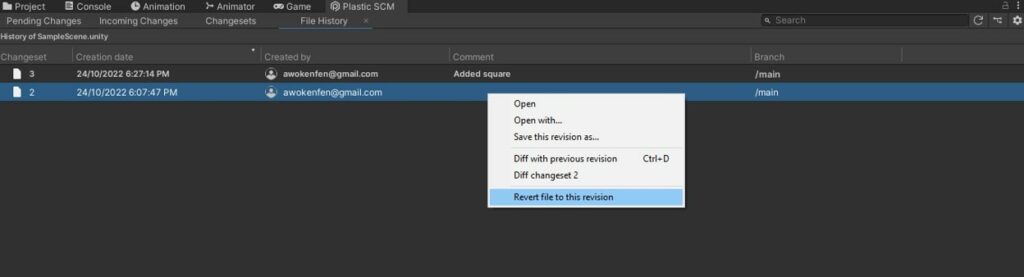
Now let’s say we made a mistake and would like to rollback a file to an earlier version. We can do so by selecting the file we would like to rollback, right-clicking and selecting View file history.
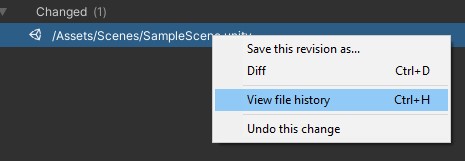
A new tab should pop-up with the history of your file in whichever Changeset it was modified in. Simply right-click on the file version you wish to rollback to and select Revert file to this revision.
c. Incoming changes
Now let’s take a look at what happens when a team member makes a change and you wish to update your project to the latest set of changes.
As shown below, a notification will be displayed at the bottom of the Plastic SCM window to notify you that new changes are available for your project.

Let’s click on the Incoming Changes tab to view the new Changesets. Here we can see which files have been added/modified as well as other relevant information.
Click on Update workspace at the bottom of the tab to update our workspace and make sure we are using the latest changes.

d. Tab customization
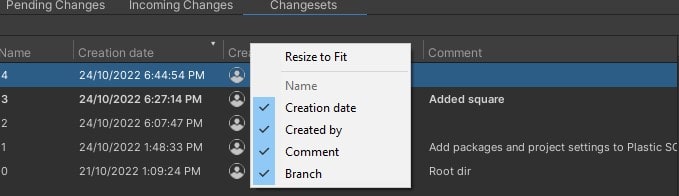
In each of the Plastic SCM tabs we have just covered, we have seen that they contain multiple types of information displayed in columns. For instance, the Changesets tab we just looked at contains the Name, Creation date, Author and Comment of each changeset.
But did you know we can actually configure the types of information we want to see on every Plastic SCM tab?
Simply right-click one of the many columns whilst in the desired tab. This will bring up a selection menu where we are free to select the type of information we want to keep.
4. Troubleshooting common issues
As Plastic SCM isn’t perfect, sometimes you may run into minor issues.
a. Invitee can’t view project after invitation
If it turns out your invitee cannot view the remote project from Unity Hub after the invitation is sent, I encourage you to check out our troubleshooting guide on what to do if you Can’t find Plastic SCM remote project in Unity Hub. It covers everything you need to do know about the issue along with solutions to guide you.
b. Can’t create a new repository
If you are unable to create a new repository the way we have covered above, it might be due to the naming convention of your repository.
Double-check the format of the name you have given your repository and make sure it looks like the following.
NameOfRepository@OrganizationName@cloud
Any other format will not be accepted and will prompt an error.
If you are attempting to create the repository under another organization there is also the possibility of you not having the relevant permissions to do so. Please seek out the organization owner and ask them to give you the relevant permissions (Administrator) in order for you to create a new repository under their organization.
c. Plastic SCM is not showing in the Unity Editor
If you are not able to access Plastic SCM via the 2 ways shown above, it may be because you are using an unsupported version of the Unity Editor to access Plastic SCM. Please double-check your Editor version against the ones shown above.
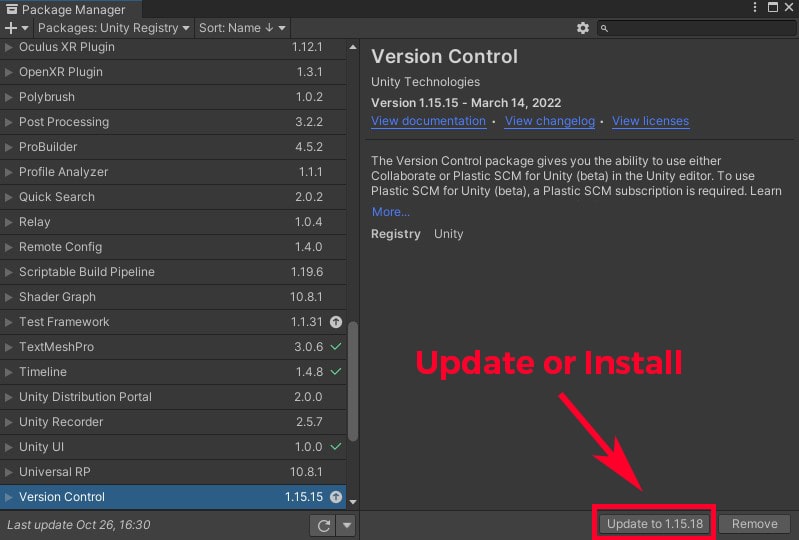
If you are using a supported version, then the problem may lie in an outdated Version Control package.
Open up the Package Manager and search for the Version Control package, once done, proceed to install/update it to the latest version.
d. Repository not found
If you encounter the “Repository not found” error whilst trying to access your workspace, it may be because the repository tied to your workspace has been unlinked. This usually happens when renaming the repository on the Plastic SCM dashboard, after creating the workspace.
If that happens, all you have to do is delete the existing Plastic SCM workspace and simply create a new workspace that links to the desired repository the way we have covered above.
5. Afterword
I hope you managed to set-up your first Plastic SCM repository in Unity and add in team members!
If we missed anything in this guide, or if you have troubleshooting tips you want to share for common problems people run into when setting up Plastic SCM in Unity, do leave us a comment below.