XAMPP is a great tool for web developers because it packages a couple of applications used for web hosting into one program, and it allows websites to be tested locally on a computer. Unfortunately, because it links multiple applications together, it is pretty error-prone.
One of the errors that might happen is that you might not be able to access XAMPP’s phpMyAdmin, which provides users with an interface to modify the local SQL database. In this article, we go through the various reasons why this might occur, as well as how you can fix them.
1. Possible causes
a. You didn’t start MySQL on XAMPP
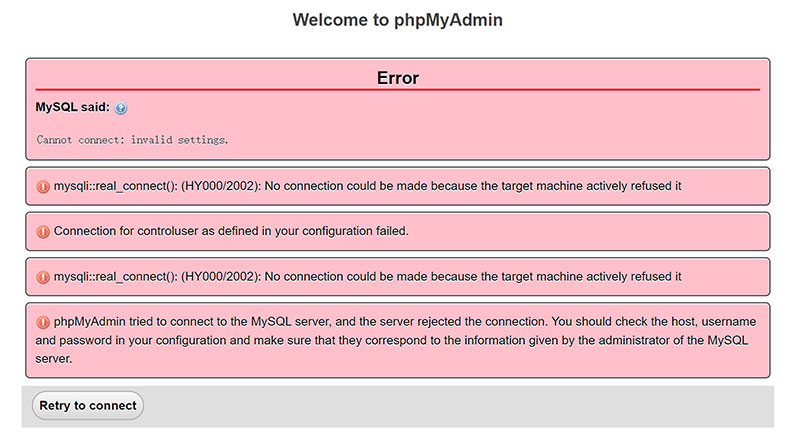
If you see a screenshot like that when you access phpMyAdmin, then it’s likely because you didn’t start MySQL on XAMPP. Go start it and try again!
If you are unable to start MySQL on XAMPP, check out our other article on it:
b. You changed XAMPP’s default MySQL login credentials
If you see something like this, that means that you might have changed XAMPP MySQL’s default login credentials:
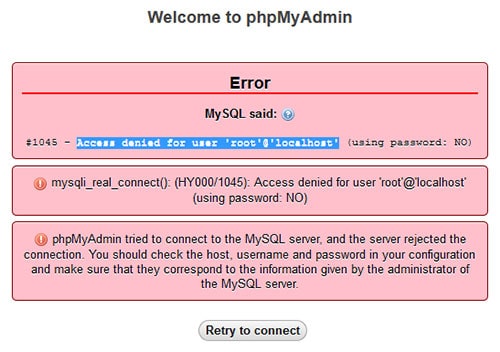
For phpMyAdmin to work, it has to interface with MySQL using a set of login credentials. By default, the login credentials for XAMPP’s MySQL is root with no password. If you have tinkered with MySQL on your machine previously, you might have updated MySQL’s root login credentials.
If you remember or know the updated login credentials, and have installed XAMPP in the default installation directory, you can find it at C:\xampp\phpMyAdmin\config.inc.php. The lines highlighted below are the ones you want to update:
C:\xampp\phpMyAdmin\config.inc.php
<?php
/*
 * This is needed for cookie based authentication to encrypt password in
 * cookie
 */
$cfg['blowfish_secret'] = 'xampp'; /* YOU SHOULD CHANGE THIS FOR A MORE SECURE COOKIE AUTH! */

/*
 * Servers configuration
 */
$i = 0;

/*
 * First server
 */
$i++;

/* Authentication type and info */
$cfg['Servers'][$i]['auth_type'] = 'config';
$cfg['Servers'][$i]['user'] = 'root';
$cfg['Servers'][$i]['password'] = '';
$cfg['Servers'][$i]['extension'] = 'mysqli';
$cfg['Servers'][$i]['AllowNoPassword'] = true;
$cfg['Lang'] = '';

/* Bind to the localhost ipv4 address and tcp */
$cfg['Servers'][$i]['host'] = '127.0.0.1';
$cfg['Servers'][$i]['connect_type'] = 'tcp';

/* User for advanced features */
$cfg['Servers'][$i]['controluser'] = 'pma';
$cfg['Servers'][$i]['controlpass'] = '';

/* Advanced phpMyAdmin features */
$cfg['Servers'][$i]['pmadb'] = 'phpmyadmin';
$cfg['Servers'][$i]['bookmarktable'] = 'pma__bookmark';
$cfg['Servers'][$i]['relation'] = 'pma__relation';
$cfg['Servers'][$i]['table_info'] = 'pma__table_info';
$cfg['Servers'][$i]['table_coords'] = 'pma__table_coords';
$cfg['Servers'][$i]['pdf_pages'] = 'pma__pdf_pages';
$cfg['Servers'][$i]['column_info'] = 'pma__column_info';
$cfg['Servers'][$i]['history'] = 'pma__history';
$cfg['Servers'][$i]['designer_coords'] = 'pma__designer_coords';
$cfg['Servers'][$i]['tracking'] = 'pma__tracking';
$cfg['Servers'][$i]['userconfig'] = 'pma__userconfig';
$cfg['Servers'][$i]['recent'] = 'pma__recent';
$cfg['Servers'][$i]['table_uiprefs'] = 'pma__table_uiprefs';
$cfg['Servers'][$i]['users'] = 'pma__users';
$cfg['Servers'][$i]['usergroups'] = 'pma__usergroups';
$cfg['Servers'][$i]['navigationhiding'] = 'pma__navigationhiding';
$cfg['Servers'][$i]['savedsearches'] = 'pma__savedsearches';
$cfg['Servers'][$i]['central_columns'] = 'pma__central_columns';
$cfg['Servers'][$i]['designer_settings'] = 'pma__designer_settings';
$cfg['Servers'][$i]['export_templates'] = 'pma__export_templates';
$cfg['Servers'][$i]['favorite'] = 'pma__favorite';

/*
 * End of servers configuration
 */
Otherwise, you are going to have to uninstall and reinstall XAMPP. Before you do that however, make sure that your computer does not have any other MySQL applications running, as they can interfere with the normal functioning of XAMPP.
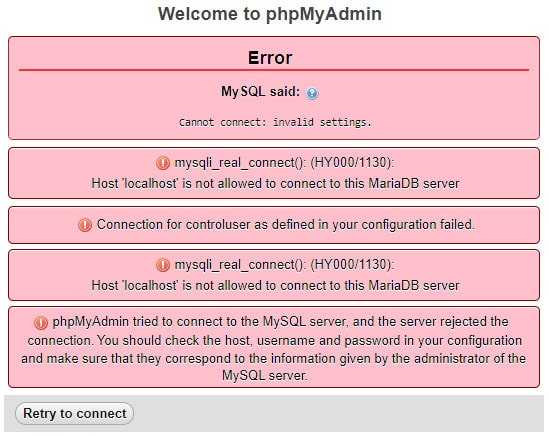
c. ‘localhost’ not allowed to connect
If you see something like this, then it is possible that your MySQL user table has corrupted data.
In such a case, you have to log in to phpMyAdmin to repair the table. To do so, follow the steps below:
- First, you’ll need to update your MySQL configuration so that you can get into phpMyAdmin. Access
my.cnfby clicking on Config → my.ini.
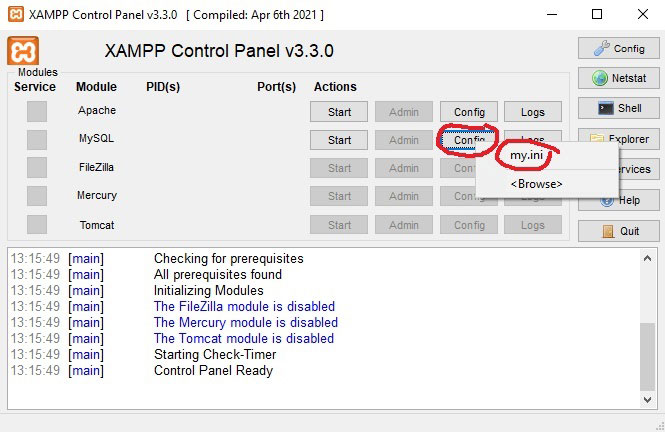
my.cnf.- Next, you’ll need to add
skip-grant-tablesunder the[mysqld]section:
my.cnf
# Example MySQL config file for small systems.
#
# This is for a system with little memory (<= 64M) where MySQL is only used
# from time to time and it's important that the mysqld daemon
# doesn't use much resources.
#
# You can copy this file to
# C:/xampp/mysql/bin/my.cnf to set global options,
# mysql-data-dir/my.cnf to set server-specific options (in this
# installation this directory is C:/xampp/mysql/data) or
# ~/.my.cnf to set user-specific options.
#
# In this file, you can use all long options that a program supports.
# If you want to know which options a program supports, run the program
# with the "--help" option.

# The following options will be passed to all MySQL clients
[client]
# password       = your_password
port=3306
socket="C:/xampp/mysql/mysql.sock"


# Here follows entries for some specific programs

# The MySQL server
default-character-set=utf8mb4
[mysqld]
skip-grant-tables
port=3306
socket="C:/xampp/mysql/mysql.sock"
basedir="C:/xampp/mysql"
tmpdir="C:/xampp/tmp"
datadir="C:/xampp/mysql/data"
pid_file="mysql.pid"
# enable-named-pipe
key_buffer=16M
max_allowed_packet=1M
sort_buffer_size=512K
net_buffer_length=8K
read_buffer_size=256K
read_rnd_buffer_size=512K
myisam_sort_buffer_size=8M
log_error="mysql_error.log"

# Change here for bind listening
# bind-address="127.0.0.1"
# bind-address = ::1          # for ipv6

# Where do all the plugins live
plugin_dir="C:/xampp/mysql/lib/plugin/"

# Don't listen on a TCP/IP port at all. This can be a security enhancement,
# if all processes that need to connect to mysqld run on the same host.
# All interaction with mysqld must be made via Unix sockets or named pipes.
# Note that using this option without enabling named pipes on Windows
# (via the "enable-named-pipe" option) will render mysqld useless!
#
# commented in by lampp security
#skip-networking
#skip-federated

# Replication Master Server (default)
# binary logging is required for replication
# log-bin deactivated by default since XAMPP 1.4.11
#log-bin=mysql-bin

# required unique id between 1 and 2^32 - 1
# defaults to 1 if master-host is not set
# but will not function as a master if omitted
server-id	=1

# Replication Slave (comment out master section to use this)
#
# To configure this host as a replication slave, you can choose between
# two methods :
#
# 1) Use the CHANGE MASTER TO command (fully described in our manual) -
#    the syntax is:
#
#    CHANGE MASTER TO MASTER_HOST=<host>, MASTER_PORT=<port>,
#    MASTER_USER=<user>, MASTER_PASSWORD=<password> ;
#
#    where you replace <host>, <user>, <password> by quoted strings and
#    <port> by the master's port number (3306 by default).
#
#    Example:
#
#    CHANGE MASTER TO MASTER_HOST='125.564.12.1', MASTER_PORT=3306,
#    MASTER_USER='joe', MASTER_PASSWORD='secret';
#
# OR
#
# 2) Set the variables below. However, in case you choose this method, then
#    start replication for the first time (even unsuccessfully, for example
#    if you mistyped the password in master-password and the slave fails to
#    connect), the slave will create a master.info file, and any later
#    change in this file to the variables' values below will be ignored and
#    overridden by the content of the master.info file, unless you shutdown
#    the slave server, delete master.info and restart the slaver server.
#    For that reason, you may want to leave the lines below untouched
#    (commented) and instead use CHANGE MASTER TO (see above)
#
# required unique id between 2 and 2^32 - 1
# (and different from the master)
# defaults to 2 if master-host is set
# but will not function as a slave if omitted
#server-id       = 2
#
# The replication master for this slave - required
#master-host     =   <hostname>
#
# The username the slave will use for authentication when connecting
# to the master - required
#master-user     =   <username>
#
# The password the slave will authenticate with when connecting to
# the master - required
#master-password =   <password>
#
# The port the master is listening on.
# optional - defaults to 3306
#master-port     =  <port>
#
# binary logging - not required for slaves, but recommended
#log-bin=mysql-bin


# Point the following paths to different dedicated disks
#tmpdir = "C:/xampp/tmp"
#log-update = /path-to-dedicated-directory/hostname

# Uncomment the following if you are using BDB tables
#bdb_cache_size = 4M
#bdb_max_lock = 10000

# Comment the following if you are using InnoDB tables
#skip-innodb
innodb_data_home_dir="C:/xampp/mysql/data"
innodb_data_file_path=ibdata1:10M:autoextend
innodb_log_group_home_dir="C:/xampp/mysql/data"
#innodb_log_arch_dir = "C:/xampp/mysql/data"
## You can set .._buffer_pool_size up to 50 - 80 %
## of RAM but beware of setting memory usage too high
innodb_buffer_pool_size=16M
## Set .._log_file_size to 25 % of buffer pool size
innodb_log_file_size=5M
innodb_log_buffer_size=8M
innodb_flush_log_at_trx_commit=1
innodb_lock_wait_timeout=50

## UTF 8 Settings
#init-connect=\'SET NAMES utf8\'
#collation_server=utf8_unicode_ci
#character_set_server=utf8
#skip-character-set-client-handshake
#character_sets-dir="C:/xampp/mysql/share/charsets"
sql_mode=NO_ZERO_IN_DATE,NO_ZERO_DATE,NO_ENGINE_SUBSTITUTION
log_bin_trust_function_creators=1

character-set-server=utf8mb4
collation-server=utf8mb4_general_ci
[mysqldump]
max_allowed_packet=16M

[mysql]
# Remove the next comment character if you are not familiar with SQL
#safe-updates

[isamchk]
key_buffer=20M
sort_buffer_size=20M
read_buffer=2M
write_buffer=2M

[myisamchk]
key_buffer=20M
sort_buffer_size=20M
read_buffer=2M
write_buffer=2M

[mysqlhotcopy]
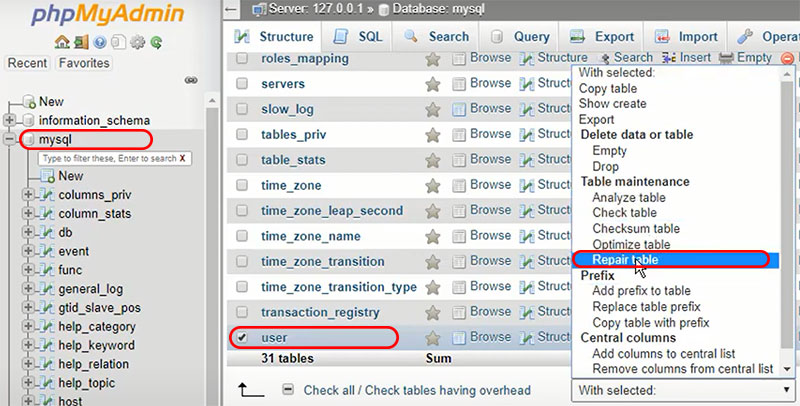
- This will allow you to access phpMyAdmin from
http://localhost/phpMyAdmin. While in there, you will want to access the mysql database, and check the user table. Then, select the Repair table option on the dropdown. Refer to the image below:
d. Port 3306 is occupied
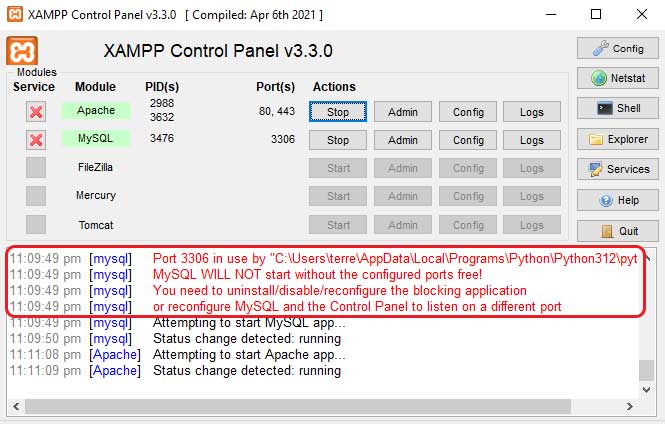
Usually, when port 3306 is occupied, you will not even be able to start MySQL on XAMPP. In rare cases, however, MySQL will actually start with a warning:
This will not only leave you unable to access phpMyAdmin. You will not be able to access any website on XAMPP that needs a database connection as well.
To rectify this problem, you will need to find the program that is currently blocking or using port 3306, and stop the program. In such a case, XAMPP will pinpoint the program for you:
11:09:49 pm  [mysql] 	Port 3306 in use by "C:\Users\terre\AppData\Local\Programs\Python\Python312\python.exe"!
11:09:49 pm  [mysql] 	MySQL WILL NOT start without the configured ports free!
11:09:49 pm  [mysql] 	You need to uninstall/disable/reconfigure the blocking application
11:09:49 pm  [mysql] 	or reconfigure MySQL and the Control Panel to listen on a different port
2. Conclusion
If you have an error that is not covered in this article, do let us know in the comments below. We will like to document these different scenarios where phpMyAdmin doesn’t work, so that this document can be a time-saver for developers all over the world.
After the last windows 11 update I’ve found two issues:
1. Do not start the index.php. The browser is waiting for the initial page
2. By clicking on “phpMyAdmin” also in this case the browser is waiting and I do not have access to the DB
Both Apache and MySQL are green and no error is shown.
Did someone have the same problem and found a solution?
Hi Massimo, if you manage to find a solution for this, I will appreciate it if you can take some of your time to share it here.
I have the same issue, this morning. Yesterday evening, everything worked fine… Apache and MySQL green, localhost/dashboard/ functioning, but phpMyAdmin not loading, website not loading, localhost/dashboard/website/wp-admin not loading.