XAMPP is a great tool for web developers who need to host websites locally on their own computers. Unfortunately, because it uses ports and services that are commonly used by other applications, conflicts can happen, causing certain applications on XAMPP to be unable to run.
In this article, we will be exploring what you can do if XAMPP’s Apache service does not run on Windows.
Note that if you are using XAMPP on macOS, please refer to the following article instead.
If you prefer to watch a video as opposed to reading, we have a YouTube video as well:
1. Identifying the problem
Most of the time, when MySQL is unable to start, you will get an error message that looks something like this on the XAMPP Control Panel:
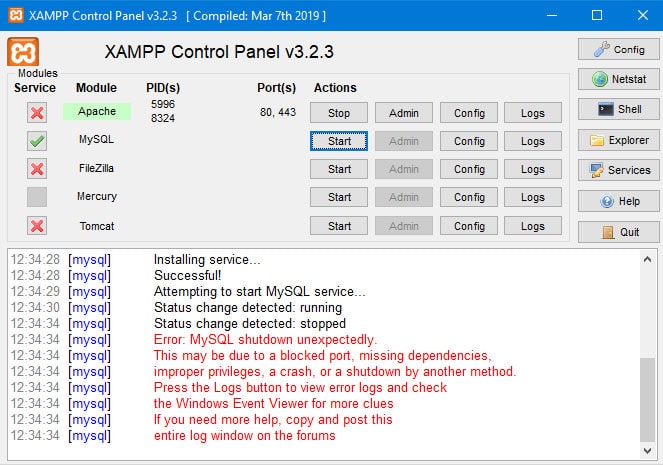
Which isn’t very helpful, because it basically says that anything could be causing the issue.
[mysql] Attempting to start MySQL service...
[mysql] Status change detected: running
[mysql] Status change detected: stopped
[mysql] Error: MySQL shutdown unexpectedly
[mysql] This may be due to a blocked port, missing dependencies,
[mysql] improper priviliges, a crash, or a shutdown by another method.
In such a case, you will want to refer to XAMPP’s MySQL error log, which can be found under Logs > mysql_error.log.
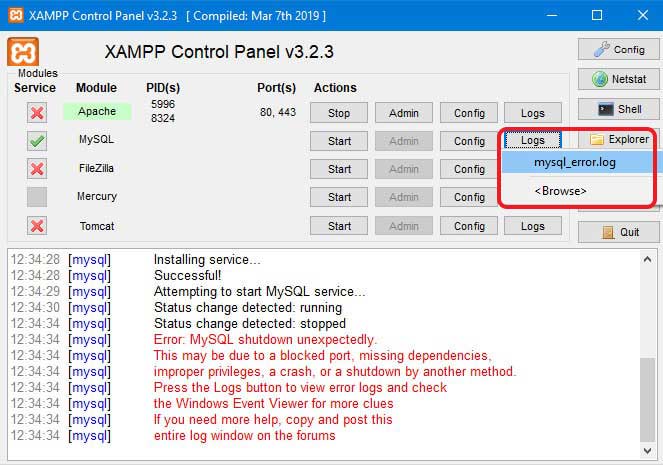
Scroll all the way down to the bottom of the log file, and you should find a couple of lines that roughly explain why the MySQL service stopped. This can sometimes help to pinpoint you to the source of the issue.
2. Possible causes and fixes
If you’ve managed to pinpoint source of the issue on the mysql_error.log, you can scroll down to see if you are able to find a fix that vaguely resembles the issue you have.
Otherwise, we have ordered the fixes in the order that most people run into, so you can read them in the order that we present.
a. Port 3306 is used by another process
The most likely reason that XAMPP’s MySQL service is unable to start is because port 3306 is already used by a different program that is currently running on your computer. By default, XAMPP’s MySQL service binds to port 3306 when started, and it can only do so if another program is not already using it.
To ascertain whether this is the case, you can click on the Netstat button to open up a window with a list of all the ports that are being used on your computer currently. If port 3306 is in the list when you haven’t started MySQL on XAMPP, this means that another program is using it.
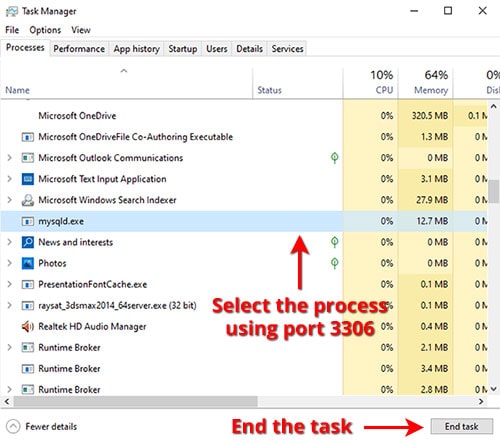
To remedy this, you will need to find the process that is using port 3306 and end the process. In the example above, a process called mysqld.exe is using port 3306. To stop it, I will have to use Ctrl + Alt + Delete to open up the Task Manager, then find and end the mysqld.exe process.
Once this is done, you can try starting MySQL on XAMPP again. Depending on the program that was occupying port 3306, this might or might not work. If it doesn’t work, you will have to find the program that was creating the process and uninstall it. In most cases, this should be another installation of MySQL on your computer, such as:
…or some other variation of MySQL, since it is one of the few programs that use port 3306.
After uninstalling the other program(s), you may need to restart your computer before trying to start MySQL again.
In some cases, it is still possible for XAMPP to successfully start even with port 3306 blocked. In such a case, XAMPP will start with an error message:
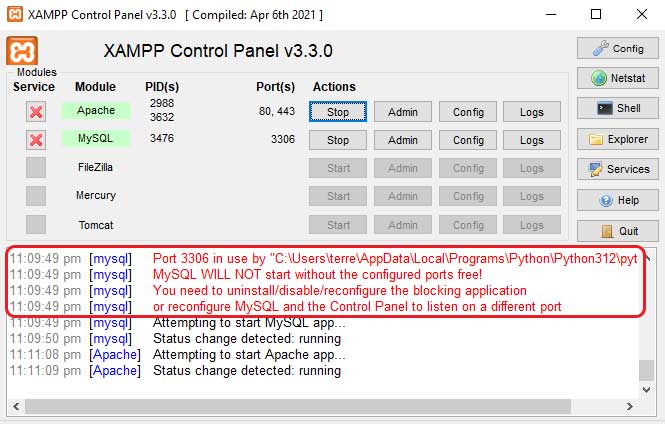
In such a case, however, you will not be able to:
- Access any website on XAMPP that needs a database connection, or;
- Access phpMyAdmin on XAMPP
To fix this, you simply need to find the program that XAMPP lists as being the culprit blocking port 3306 (see the first line of the error text in the image above).
b. Changing the port used by XAMPP MySQL
If you don’t want to uninstall the program that is using port 3306, or if you can’t find the process using the instructions above, you can also configure XAMPP MySQL to use a different port. Do note that if another MySQL program is using port 3306, there is a chance that this doesn’t work, as 2 seperate installations of MySQL can interfere with each other.
Regardless, below are the steps to change the port of XAMPP’s MySQL:
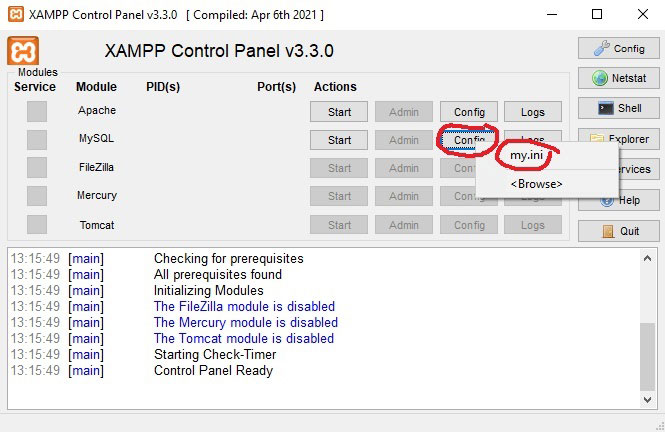
- In the XAMPP control panel, click on the Config button of the MySQL module.
- In the popped window, select my.ini.
my.cnf.- Inside the file, go down and find the section that contains the following line:
# The MySQL server. Below this line, you should find the port number, which saysport=3306by default. - Change to a different port. You can use any unused port on your computer between 1 to 65535, but I usually use port 3307.
- Save the changes to the file, and try to start MySQL on XAMPP again.
Below is a snapshot of my my.cnf file, with the part that you need to change highlighted:
my.cnf
# Example MySQL config file for small systems.
#
# This is for a system with little memory (<= 64M) where MySQL is only used
# from time to time and it's important that the mysqld daemon
# doesn't use much resources.
#
# You can copy this file to
# C:/xampp/mysql/bin/my.cnf to set global options,
# mysql-data-dir/my.cnf to set server-specific options (in this
# installation this directory is C:/xampp/mysql/data) or
# ~/.my.cnf to set user-specific options.
#
# In this file, you can use all long options that a program supports.
# If you want to know which options a program supports, run the program
# with the "--help" option.

# The following options will be passed to all MySQL clients
[client]
# password       = your_password
port=3306
socket="C:/xampp/mysql/mysql.sock"


# Here follows entries for some specific programs

# The MySQL server
default-character-set=utf8mb4
[mysqld]
port=33063307
socket="C:/xampp/mysql/mysql.sock"
basedir="C:/xampp/mysql"
tmpdir="C:/xampp/tmp"
datadir="C:/xampp/mysql/data"
pid_file="mysql.pid"
# enable-named-pipe
key_buffer=16M
max_allowed_packet=1M
sort_buffer_size=512K
net_buffer_length=8K
read_buffer_size=256K
read_rnd_buffer_size=512K
myisam_sort_buffer_size=8M
log_error="mysql_error.log"

# Change here for bind listening
# bind-address="127.0.0.1"
# bind-address = ::1          # for ipv6

# Where do all the plugins live
plugin_dir="C:/xampp/mysql/lib/plugin/"

# Don't listen on a TCP/IP port at all. This can be a security enhancement,
# if all processes that need to connect to mysqld run on the same host.
# All interaction with mysqld must be made via Unix sockets or named pipes.
# Note that using this option without enabling named pipes on Windows
# (via the "enable-named-pipe" option) will render mysqld useless!
#
# commented in by lampp security
#skip-networking
#skip-federated

# Replication Master Server (default)
# binary logging is required for replication
# log-bin deactivated by default since XAMPP 1.4.11
#log-bin=mysql-bin

# required unique id between 1 and 2^32 - 1
# defaults to 1 if master-host is not set
# but will not function as a master if omitted
server-id	=1

# Replication Slave (comment out master section to use this)
#
# To configure this host as a replication slave, you can choose between
# two methods :
#
# 1) Use the CHANGE MASTER TO command (fully described in our manual) -
#    the syntax is:
#
#    CHANGE MASTER TO MASTER_HOST=<host>, MASTER_PORT=<port>,
#    MASTER_USER=<user>, MASTER_PASSWORD=<password> ;
#
#    where you replace <host>, <user>, <password> by quoted strings and
#    <port> by the master's port number (3306 by default).
#
#    Example:
#
#    CHANGE MASTER TO MASTER_HOST='125.564.12.1', MASTER_PORT=3306,
#    MASTER_USER='joe', MASTER_PASSWORD='secret';
#
# OR
#
# 2) Set the variables below. However, in case you choose this method, then
#    start replication for the first time (even unsuccessfully, for example
#    if you mistyped the password in master-password and the slave fails to
#    connect), the slave will create a master.info file, and any later
#    change in this file to the variables' values below will be ignored and
#    overridden by the content of the master.info file, unless you shutdown
#    the slave server, delete master.info and restart the slaver server.
#    For that reason, you may want to leave the lines below untouched
#    (commented) and instead use CHANGE MASTER TO (see above)
#
# required unique id between 2 and 2^32 - 1
# (and different from the master)
# defaults to 2 if master-host is set
# but will not function as a slave if omitted
#server-id       = 2
#
# The replication master for this slave - required
#master-host     =   <hostname>
#
# The username the slave will use for authentication when connecting
# to the master - required
#master-user     =   <username>
#
# The password the slave will authenticate with when connecting to
# the master - required
#master-password =   <password>
#
# The port the master is listening on.
# optional - defaults to 3306
#master-port     =  <port>
#
# binary logging - not required for slaves, but recommended
#log-bin=mysql-bin


# Point the following paths to different dedicated disks
#tmpdir = "C:/xampp/tmp"
#log-update = /path-to-dedicated-directory/hostname

# Uncomment the following if you are using BDB tables
#bdb_cache_size = 4M
#bdb_max_lock = 10000

# Comment the following if you are using InnoDB tables
#skip-innodb
innodb_data_home_dir="C:/xampp/mysql/data"
innodb_data_file_path=ibdata1:10M:autoextend
innodb_log_group_home_dir="C:/xampp/mysql/data"
#innodb_log_arch_dir = "C:/xampp/mysql/data"
## You can set .._buffer_pool_size up to 50 - 80 %
## of RAM but beware of setting memory usage too high
innodb_buffer_pool_size=16M
## Set .._log_file_size to 25 % of buffer pool size
innodb_log_file_size=5M
innodb_log_buffer_size=8M
innodb_flush_log_at_trx_commit=1
innodb_lock_wait_timeout=50

## UTF 8 Settings
#init-connect=\'SET NAMES utf8\'
#collation_server=utf8_unicode_ci
#character_set_server=utf8
#skip-character-set-client-handshake
#character_sets-dir="C:/xampp/mysql/share/charsets"
sql_mode=NO_ZERO_IN_DATE,NO_ZERO_DATE,NO_ENGINE_SUBSTITUTION
log_bin_trust_function_creators=1

character-set-server=utf8mb4
collation-server=utf8mb4_general_ci
[mysqldump]
max_allowed_packet=16M

[mysql]
# Remove the next comment character if you are not familiar with SQL
#safe-updates

[isamchk]
key_buffer=20M
sort_buffer_size=20M
read_buffer=2M
write_buffer=2M

[myisamchk]
key_buffer=20M
sort_buffer_size=20M
read_buffer=2M
write_buffer=2M

[mysqlhotcopy]
c. MySQL’s data has been corrupted
If you have had multiple copies of MySQL installed on your device at one point, or had a separate installation of XAMPP, it is possible that the data in your current installation might have been corrupted. In such a scenario, you can try:
- Ensuring that all other installations of MySQL are removed on your computer, then uninstalling and reinstalling XAMPP, or;
- Restoring your existing XAMPP’s MySQL installation with backup data.
If you would like to try option B before reinstalling XAMPP, you can follow the steps below:
- Go to your XAMPP MySQL directory. By default, it is located under Local Disk → XAMPP → MySQL (e.g. if you installed it under the default C-drive, you will find the folder in
C:\xampp\mysql). Here you will be seeing different folders — the ones that we need to use are thedataandbackupfolders - Rename the
datafolder todata_old. - Create a new folder with the name
data. This is the new folder that MySQL will use to replace the old one. Now, we need to fill this folder with certain files. - Go to the
backupfolder and copy all the files inside it. Paste them into the newdatafolder. - Now, we need to paste databases into our new
datafolder. In order to do so, inside thedata_oldfolder, copy themySQLfolder, as well as all the folders under thephpmyadminfolder. If you have only one folder, it is totally okay, just make sure you paste it. There is NO need to copy theperformance_schemaandphpmyadminfolders. - Last but not least, we need to copy the
ibdata1file. Go to yourdata_oldfolder, find theibdata1file, and past it into thedatafolder.
Are the above steps above confusing to read? Click here to watch the part of our video that demonstrates the steps above.
3. Unable to access phpMyAdmin
There can also be cases where you are able to start MySQL on XAMPP, but are unable to access the http://localhost/phpmyadmin URL. This can be caused by a multitude of reasons, and we explore this in a separate article:
4. Conclusion
As with the other articles on the blog, we’d love if you leave a comment below, especially if you:
- Find any errors in this article.
- Find a problem causing this issue that is not described in this article.
We will periodically upload this article with new solutions and issues that we find, and we will credit you if you share your issues and / or solutions! Your comments will add to the information that is already here, and help other future readers!
Option c worked for me, thank you.
Thanks you!! My data was also corruptes, option B worked for me!
thank you soo much it worked the 2nd option the corrupted data was my issue
but am glad it is solved
I’m glad the article managed to help you Betty.
thanks a lot this is worked for me from the first time and the first option of solving
thank you bro.i watch many video but your blog solve this problem
You are welcome emon. I am glad this helped you.