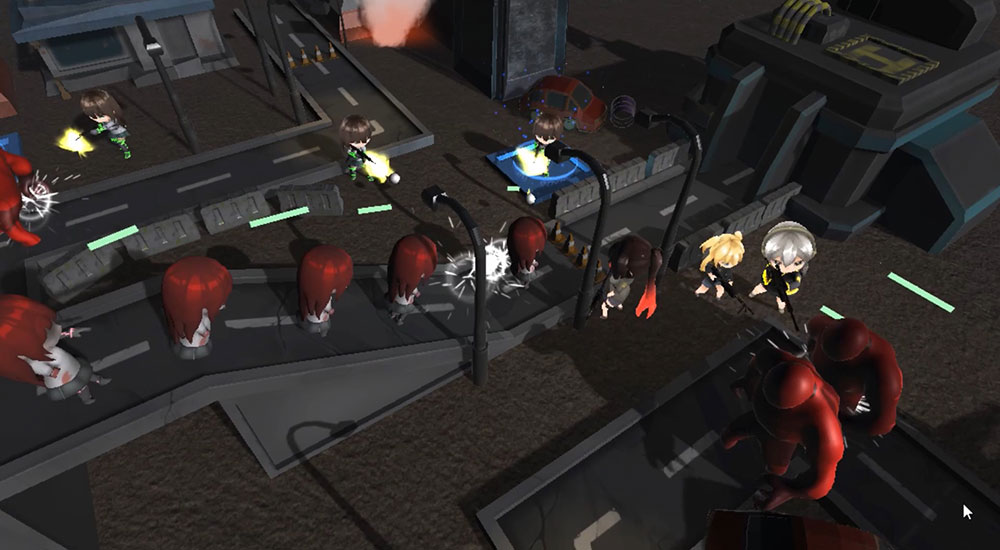
As part of a school assignment in the past year, my team and I created Apoca Force, a tower defense game where WAIFUs (World Apocalypse Intercepting Frontline Units) are deployed onto a battlefield to combat an undead horde. To provide some variation (and eye candy) in gameplay, the game provides a variety of different WAIFUs for players to deploy.
To display the different stats WAIFUs have, we decided to include a radar graph on our build interface to illustrate the stats of each type of WAIFU. In this article, I will talk about the technicalities involved in making that happen.
I have previously written an article about how we rendered Unity’s NavMesh to show our WAIFUs’ walkable areas. Check it out!

Drawing a mesh onto the UI
Essentially, the yellow triangle (in the picture above) depicting a WAIFU’s stats is a dynamically-generated mesh, drawn onto a CanvasRenderer component using its SetMesh() method.
To understand how to dynamically generate a mesh, let’s take a look at a piece of code that generates the simple, right-angled triangle pictured below:
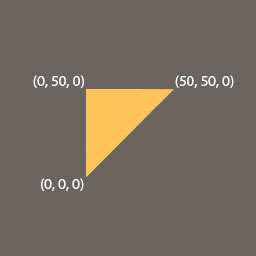
// Creates a new mesh.
Mesh mesh = new Mesh();

// Creates the 3 points pictured on the image above.
Vector3[] vertices = new Vector3[3];
vertices[0] = Vector3.zero;
vertices[1] = new Vector3(0, 50, 0);
vertices[2] = new Vector3(50, 50, 0);

// Assigns the vertices to form triangles in the mesh.
int[] triangles = new int[3];
triangles[0] = 0;
triangles[1] = 1;
triangles[2] = 2;

// Assigns the vertices and triangle array to the mesh.
mesh.vertices = vertices;
mesh.triangles = triangles;

// Try to find a canvas renderer to attach the mesh to.
CanvasRenderer c = GetComponentInChildren<CanvasRenderer>();
c.SetMesh(mesh);
c.SetMaterial(new Material(Shader.Find("UI/Unlit/Detail")), null);
c.SetColor(new Color(1, 0.8f, 0.34f, 0.7f));
A couple of things are happening in the code below:
- We are creating a new
Meshobject and a set of vertices representing the points of the triangle. The vertices are represented by theVector3array calledvertices. - We are creating an integer array that represents how the points in the
verticesarray link together to form triangles. In this array, every 3 items represent 1 triangle, and the number of each item represents an index in theverticesarray. Since we are drawing a mesh with only 1 triangle, thetrianglesarray is pretty straightforward. - We are finding a
CanvasRenderercomponent to attach our mesh to. To make sure the mesh shows up, we also dynamically generate a material and set a colour to attach to theCanvasRenderer. This last part was added in so that if you copy-paste the code above without reading, it will still work.
Our mesh-drawing script
With understanding of the concepts outlined above, we can expand upon our code to create a more complex script that draws the mesh for us, and allows us to toggle a few properties.
UIRadarChart.cs
using UnityEngine;
public class UIRadarChart : MonoBehaviour {
public int[] stats; // The values of the stats that we want to display.
public float unitsPerStat = 2f; // Size of the graph. Increase to make mesh bigger.
public Color color = new Color(1, 0.8f, 0.34f, 0.7f); // Colour of the mesh.
CanvasRenderer canvasRenderer; // Dynamically-generated mesh renderer.
Material material; // Dynamically-generated material for the mesh.
void GenerateMesh() {
Mesh mesh = new Mesh();
// Don't draw mesh if there are less than 3 stats.
int len = stats.Length;
if(len < 3) {
Debug.LogWarning("Unable to draw mesh as there are only 2 stats.");
return;
}
// Create the vertices.
Vector3[] vertices = new Vector3[len];
// Count the number of triangles we need, and generate the array.
int triangleCount = len - 2;
int[] triangles = new int[triangleCount * 3];
// Calculate the angle between each stat.
float angleIncrement = 360f / len;
// Set the verticles of each stat.
for(int i = 0; i < len; i++) {
vertices[i] = Quaternion.Euler(0, 0, angleIncrement * i) * Vector3.up * unitsPerStat * stats[i];
}
// Draws the triangles.
for(int i = 0; i < triangleCount; i++) {
int start = i * 3;
triangles[start] = 0;
triangles[start+1] = 1+i;
triangles[start+2] = 2+i;
}
mesh.vertices = vertices;
mesh.triangles = triangles;
canvasRenderer.SetMesh(mesh);
canvasRenderer.SetMaterial(material, null);
canvasRenderer.SetColor(color);
}
void Start() {
// Generates the material for the mesh.
material = new Material(Shader.Find("UI/Default"));
// Create the GameObject containing the mesh renderer.
GenerateCanvasRenderer();
// Create the mesh.
GenerateMesh();
}
// Dynamically generates a child GameObject on where this script is attached to,
// then create a CanvasRenderer component for it (which we will use to draw the mesh).
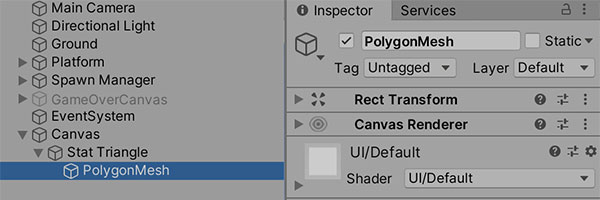
void GenerateCanvasRenderer() {
GameObject go = new GameObject("PolygonMesh");
RectTransform r = go.AddComponent<RectTransform>();
canvasRenderer = go.AddComponent<canvasrenderer>();
r.SetParent(transform);
r.localPosition = Vector3.zero;
}
}
This copypasta code is what you’re here for, isn’t it? So let’s talk about how you should use it.
Using the code
Ideally, you’ll attach the script to a UI GameObject (i.e. an object on a Canvas). The position of the GameObject that this script is attached to will determine the position of your generated mesh.
To control the attributes of the mesh, modify the properties that are exposed:
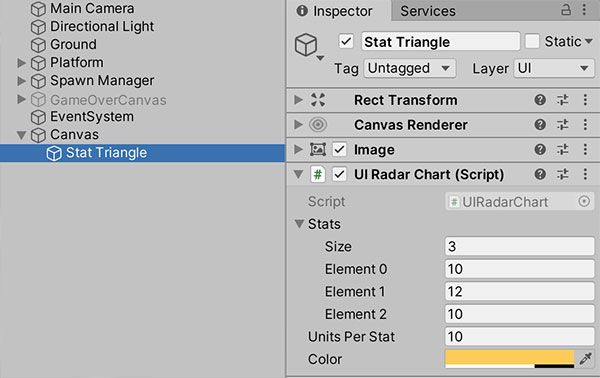
- Stats: Is an array that contains as many stats as you want to display. Note that this script can display more than 3 stats (the mesh will take the shape of an n-gon).
- Units Per Stat: The larger the number, the more space each stat point will take up.
- Color: This is the colour that the mesh will be drawn with. ‘Nuff said.
During runtime, the script will generate a child GameObject containing the CanvasRenderer that the mesh is drawn on.
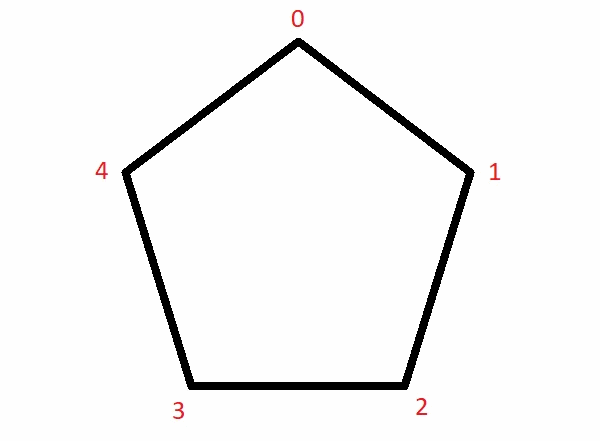
How we triangulate the mesh
You don’t need to read this section if you’re just interested in grabbing the code. This section just explains the part of the code that assigns the indices to the triangles array (the snippet shown below):
// Draws the triangles.
for(int i = 0; i < triangleCount; i++) {
    int start = i * 3;
    triangles[start] = 0;
    triangles[start+1] = 1+i;
    triangles[start+2] = 2+i;
}
Since a picture speaks a thousand words, here’s a GIF that demonstrates the code in action:
Conclusion
This section is just here for customary reasons. Why are you still reading? Go copypasta the code and use it.
Oh yeah, please feel free to comment below if you have anything valuable or critical to add.
Thanks, I loved this article!