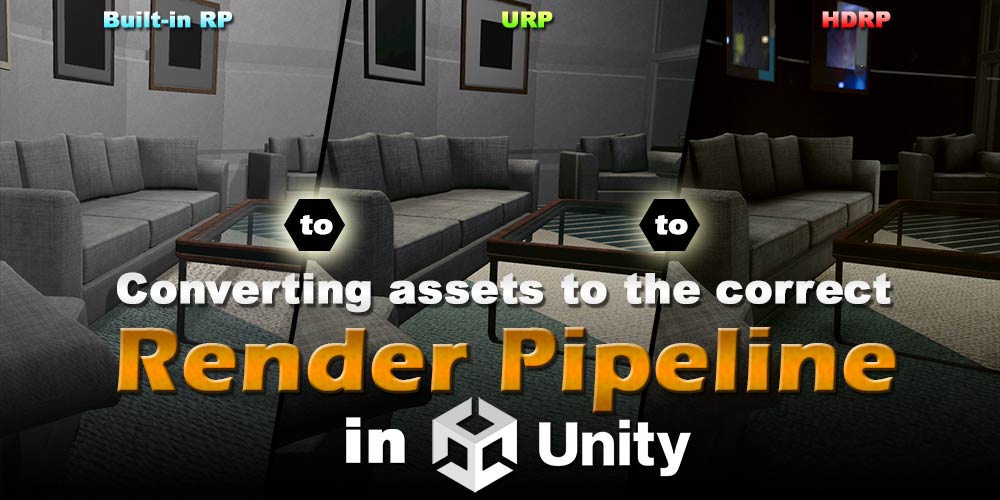
Unity offers you the opportunity to use three different pre-built pipelines suited for different purposes:
- The Built-In Render Pipeline, which all assets use initially, is a general-use pipeline that has limited customisation.
- Universal Render Pipeline (or URP) is a quick and easy-to-customise pipeline that allows you to create optimised graphics suitable for lower-end devices like mobile phones.
- Conversely, the High Definition Render Pipeline (or HDRP) is a pipeline is meant for creating cutting-edge high-quality graphics for higher-end devices.
Because of all these different pipelines, when you’re buying assets from the Unity Asset Store, these files may not always be in the right format for the render pipeline your project is using.
- Are your files in the wrong format?
- Converting from the Built-In Render Pipeline to URP
- Converting from Built-In Pipeline to HDRP
- Converting Assets from URP to HDRP and vice versa
1. Are your files in the wrong format?
Whenever you import a new Model from the Unity Asset Store into your Project, you need to make sure that the materials that come with it are compatible with the current Render Pipeline of your project. If the materials are incompatible and you try to put your Model into the scene, you’ll notice that it won’t look like what you saw on the Asset Store! All objects using incompatible materials will be coloured bright pink (or purple).

Whenever there’s something wrong with your materials, it’ll most likely look like this. For example, you may have imported a Model whose materials are compatible with the URP but your project is currently using the Built-In Render Pipeline. As a result, it will look like this. However, it’s quite easy to fix this problem, and in this article we’ll be showing you how to convert materials to be compatible from one pipeline to the other.
2. Converting from the Built-In Render Pipeline to URP
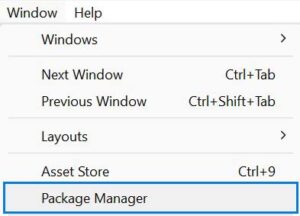
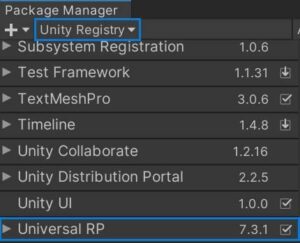
First, open your Unity Project, go to the top of the tool bar and click on Window > Package Manager. Select Unity Registry from the Packages Drop Down menu at the top of the window (I drew a box in blue). Scroll down until you find the Universal RP package (the packages are listed alphabetically from A-Z), then download it in your project.
Afterwards, the process is as easy as a button click! Once again at the top of the tool bar, click on Edit. Near the bottom of the drop down menu, there is a new option called Render Pipeline. Select Render Pipeline > Universal Render Pipeline, then select Upgrade Project Materials to UniversalRP Materials; Unity will then automatically convert all compatible materials to UniversalRP Materials for you to use.

If your materials become bright pink, that’s because your new URP materials do not match the Render Pipeline you’re using – in this case, the Built-In Render Pipeline. To fix that, right-click in your Assets folder and select Create > Rendering > Universal Render Pipeline > Pipeline Asset (Forward Renderer). Afterwards, two new assets will be created, one of which is the Pipeline Asset.
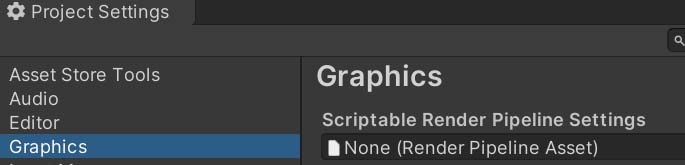
Then, select Edit > Project Settings. Under the Graphics tab, there is a field to choose Scriptable Render Pipeline Settings. Drag in your newly created Pipeline Asset into this field. Select the Quality tab in Project Settings and drag this same asset into the Rendering field, and your new materials should now render properly in the scene.
3. Converting from Built-In Pipeline to HDRP
The steps for converting from the Built-In Pipeline to HDRP are very similar to the previous section with URP, but with some minor differences. Once again, go to your Package Manager and download the High Definition RP Package into your project.
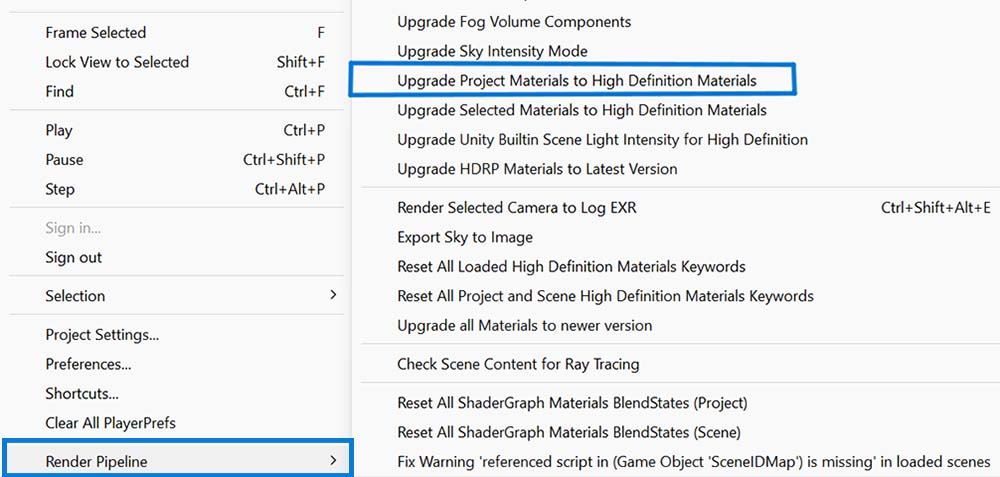
Then, select Render Pipeline > Upgrade Project Materials to High Definition Materials. Unity will then automatically convert all compatible materials in your project to HDRP Materials. This process also automatically generates a MaskMap material for each material that was upgraded.
Similar to URP, in order for Unity to properly render our HDRP materials, we need to create a pipeline asset for HDRP. In your Assets folder, right-click and select Create > Rendering > High Definition Render Pipeline Asset.

Then, open your Project Settings, and drag under the Graphics and Quality tabs, select the High Definition Render Pipeline Asset and select it for the Scriptable Render Pipeline and Rendering settings, respectively.
4. Converting Assets from URP to HDRP and vice versa
Further along in development, you may decide to change the Render Pipeline used by your game from URP to HDRP, or vice versa. However, trying to automatically upgrade your materials from either pipeline (similar to the previous sections) to the other will yield this error.

This is because Unity is trying to look for materials using a certain shader before it upgrades them to a different pipeline – the Standard shader. It will not automatically upgrade materials using other Shaders or Materials, so it appears that it is impossible to directly convert materials from URP to HDRP. Or is it?
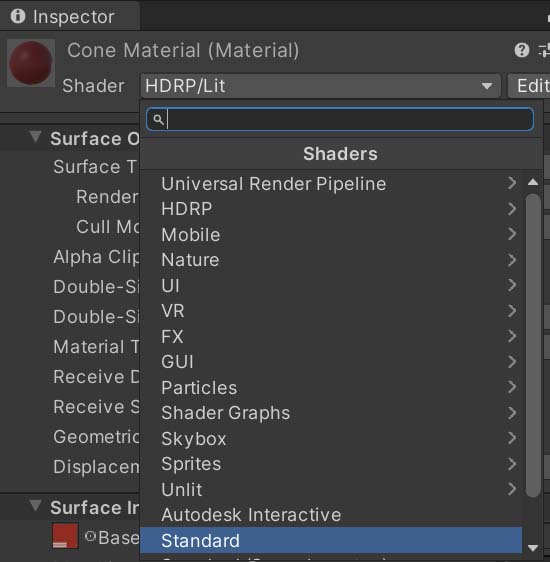
Although Unity (at the time this article was written) cannot do this conversion automatically, we can manually change the Shader used by the materials we want to change from either URP/HDRP to the Standard shader, which can then be automatically converted by Unity.
Select all the materials that you wish to change. In the Inspector tab, look for the Standard shader and select it for all the materials.
From here, you can follow the same steps in Sections 1 and 2 to convert your materials to the Render Pipeline you wish to use. Don’t forget to change the Render Pipeline Asset selected in the Graphics and Quality tabs! Also, if you are converting your materials from HDRP to URP, the MaskMap materials generated earlier will not be automatically deleted; You’ll need to delete those yourself.
5. Conclusion
Did I miss anything out in the article? Let me know about it in the comments below!