Ever wanted to create a Metroidvania like Hollow Knight? In Part 1 of our guide, we will explore how to create movement, animations and a camera for our player character.
Update 30 July 2024: We have improved the article with the fixes outlined in these two videos. If you prefer to read what is in these 2 videos, you can also check out this forum post.
Table of Contents:
- Introduction
- Setting up the project
- Player Movement
- Animating the player
- Getting the camera to follow the player
- Conclusion
1. Introduction
In this particular article, we will focus on creating the core mechanics of:
- The player’s movement
- The animations for those movements
- A camera that follows the player.
Metroidvania games are known for their exploration-heavy gameplay, challenging platforming, and intricate world design. Hollow Knight, in particular, is a beloved indie game that has captured the hearts of many gamers with its gorgeous visuals, haunting soundtrack, and immersive world.
Creating a Metroidvania-style game can seem like a daunting task, but with Unity, it’s easier than you might think. In this tutorial, we will go step by step, exploring each element of the game’s mechanics and how to implement them in Unity.
Without further ado, let’s dive right into the first part!
I would like to add that I strongly encourage you to change any of the values that I’ve used in the video to fit the needs of your particular game. In my opinion, the best way to learn from a tutorial is to do what it teaches and recontextualise them to fit your needs.
2. Setting up the project
Let’s first set up our project.
a. Creating the project
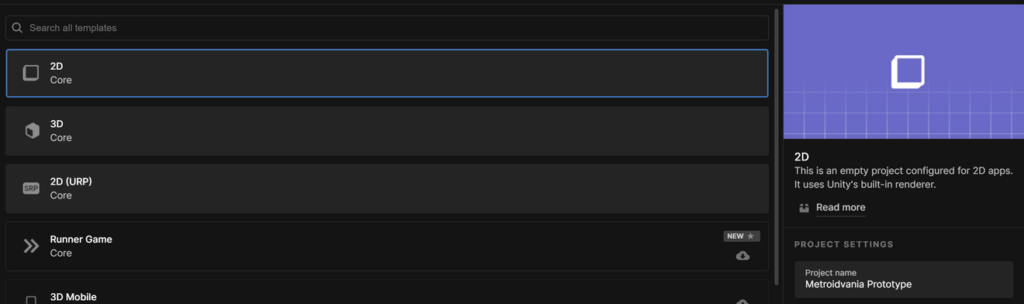
When starting a new Unity project, the first step is to click on the New Project button located in the top right-hand corner of the screen. For this particular tutorial, we will be using Unity version 2021.3.0f1. Keep in mind that if you choose to use a different version of Unity, certain features that we will be implementing may need to be done differently, as the Unity interface is slightly different across versions. Some features may also be unavailable, though this is unlikely if you are .
For this tutorial, we will be using the Core 2D Unity template. Once you have selected the template, give your Unity project a name and click on the Create Project button to begin. This will create a new project in Unity with the settings and assets needed to get started on creating your own Metroidvania-style game like Hollow Knight.
b. Setting up the scene
After creating the project, the first step is to navigate to the Hierarchy tab and right-click to access the menu. From there, select 2D Objects -> Sprites -> Square. This action generates a square in the scene, which will serve as our floor.
To ensure easy identification and manipulation of this object, we can rename it to Floor and then proceed to adjust its x-scale to 1000, providing ample space for the player to move and jump on.
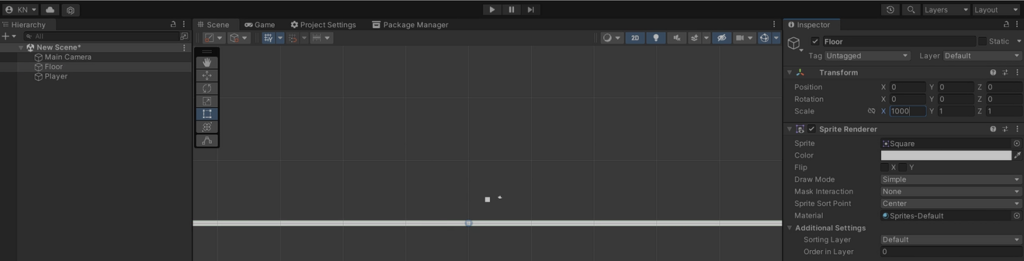
Next, we will create another square for our player and name it Player.
We can then:
- Add a Box Collider 2D component to both objects, allowing them to interact with each other during gameplay.
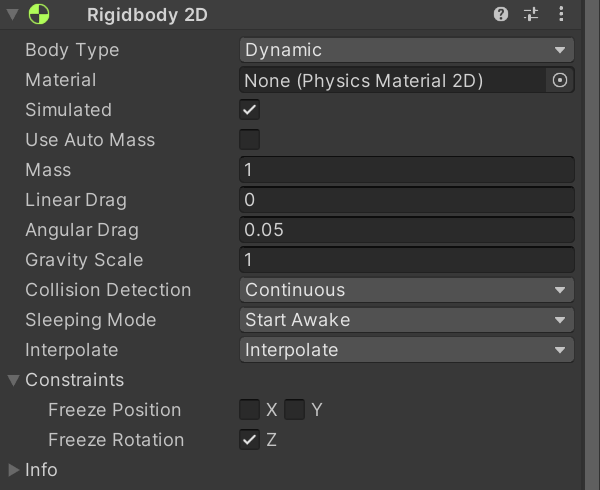
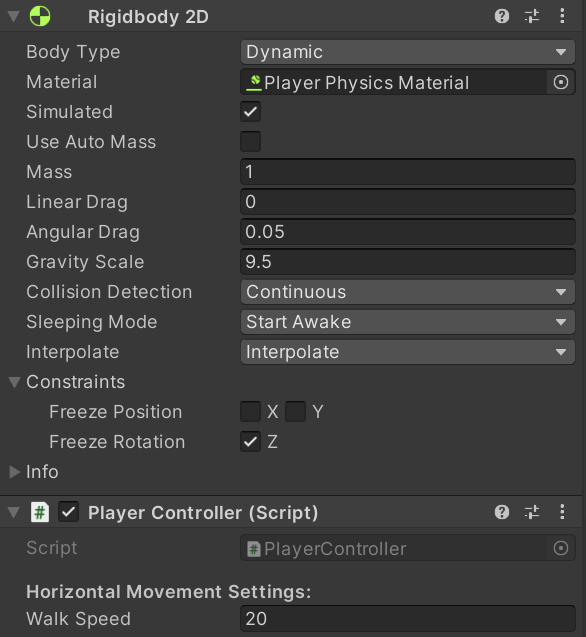
- Add a Rigidbody 2D component to the player, enabling the player square to interact with Unity’s Physics systems and giving it weight.
Let’s then set its Collision Detection to Continuous so it will not tunnel at high speeds, it’s Interpolate mode to Interpolate so that its movement will not be jittery when we attach a camera to it, and freeze its rotation in Constraints so it doesn’t rotate while the player is platforming.
Upon playing the game at this point, the player will fall onto the floor as expected. The next step is to create the PlayerController script, which we will use to control the player’s movement. To access the script, we will open it up and begin making the necessary adjustments.
3. Player Movement
Now let’s create some movement for our player character!
a. Creating the Player walk
Here, we want to start by creating a few variables:
- A
privatefloatcalledwalkSpeedto define the speed of our player. - A RigidBody2D variable called
rbwhich we will use as a reference. - A
privatefloatcalledxAxiswhich we will use to check the direction our player is moving.
Now, we want to create a reference to the Rigidbody2D component we placed on the player earlier. Let’s do so in the Start() function.
PlayerController.cs
using System.Collections;
using System.Collections.Generic;
using UnityEngine;

public class PlayerController : MonoBehaviour
{
 //Movement
    private float walkSpeed = 1;
    private float xAxis;

    //References
    Rigidbody2D rb;

    void Start()
    {
        rb = GetComponent<Rigidbody2D>();
    }

    void Update()
    {

    }
}
We now want to create 2 new functions:
GetInput()to process all our inputs, and;Move()to handle our movement.
PlayerController.cs
using System.Collections;
using System.Collections.Generic;
using UnityEngine;

public class PlayerController : MonoBehaviour
{
    //Movement
    private float walkSpeed = 1;
    private float xAxis;

    //References
    Rigidbody2D rb;

    void Start()
    {
        rb = GetComponent<Rigidbody2D>();
    }

    void Update()
    {

    }

    void GetInput()
    {

    }

    void Move()
    {

    }
In our GetInput() function we basically want to check for the Horizontal axes.
If you are not too sure what that means, you can head over to Edit at the top left corner of the Editor -> Project Settings -> Input Manager.
You can expand the Axes, and you will be able to see the Horizontal axis among a bunch of other axes. We’ll be using this to make our player move.
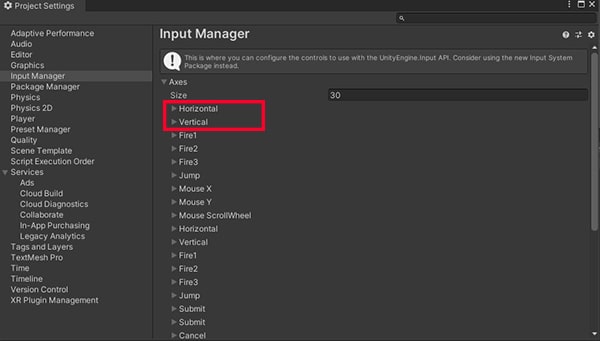
You can customize the button bindings however you want over here, but let’s keep it the same for simplicity’s sake.
Moving on, in our GetInputs() function, let’s create a private float: xAxis, and set them to the Horizontal axis. In this case, we should use Input.GetAxisRaw() to get a value between -1 and 1 to find out which buttons are being pressed. Keyboard inputs should always be -1, 0 and 1.
PlayerController.cs
using System.Collections;
using System.Collections.Generic;
using UnityEngine;

public class PlayerController : MonoBehaviour
{
    //Movement
    private float walkSpeed = 1;
    private xAxis;

    //References
    Rigidbody2D rb;

    void Start()
    {
        rb = GetComponent<Rigidbody2D>();
    }

    void Update()
    {

    }

    void GetInputs()
    {
        xAxis = Input.GetAxisRaw("Horizontal");
    }

    void Move()
    {

    }
}
Now in our Move() function we can apply the velocity to the rb.
PlayerController.cs
using System.Collections;
using System.Collections.Generic;
using UnityEngine;

public class PlayerController : MonoBehaviour
{
    //Movement
    private float walkSpeed = 1;
    private xAxis;

    //References
    Rigidbody2D rb;

    void Start()
    {
        rb = GetComponent<Rigidbody2D>();
    }

    void Update()
    {
        Move();
        GetInputs();
    }

    void GetInputs()
    {
        xAxis = Input.GetAxisRaw("Hroizontal");
    }

    void Move()
    {
        rb.velocity = new Vector2(walkSpeed * xAxis, rb.velocity.y);
    }
}
In our Update() function we can now call the GetInputs() and Move() functions.
Now if we return to our Unity project and click play, we’ll see that our player square can now move around. His movement right now is quite slow so we’ll want to increase the value of walkSpeed.
However, jumping back and forth between the script and unity is a tedious process so what we want to do is to make walkSpeed editable in our Inspector window.
There are 2 ways to do this from the inspector window:
- Making
walkSpeedserializable. - Making
walkSpeedpublic.
We will be making the walkSpeed variable serializable in the PlayerController script as it would be much cleaner to simply make walkSpeed serializable rather than making it accessible to all other scripts by making it public.
Let’s also clean up our variables by adding a header at the top which helps us organise our Inspector window.
Now let’s now set the player’s walkSpeed to about 20. Let’s also increase the Gravity Scale of the player’s RigidBody2D component to 9.5 so the player falls faster.
b. Creating the Player’s jump
PlayerController.cs
using System.Collections;
using System.Collections.Generic;
using UnityEngine;

public class PlayerController : MonoBehaviour
{
    [Header("Horizontal Movement
    Settings:")]
    [SerializeField] private float walkSpeed = 1;

    //References
    Rigidbody2D rb;
    private float xAxis;

    [SerializeField] private float jumpForce = 45;

    //References
    Rigidbody2D rb;
    private float xAxis;

    void Start()
    {
        rb = GetComponent<Rigidbody2D>();
    }

    void Update()
    {
        GetInputs();
        Move();
    }

    void GetInputs()
    {
        xAxis = Input.GetAxisRaw("Horizontal");
    }

    void Move()
    {
        rb.velocity = new Vector2(walkSpeed * xAxis, rb.velocity.y);
    }
}
Next, we’ll give the player the ability to jump. Go back to the PlayerController Script and add a serialized private float jumpForce and set its default value to 45.
Now when making a jump for the player, we need to make sure that the player is only jumping when it’s on the ground if we allow it to jump while it’s in the air the player would be able to jump upwards indefinitely and essentially start flying.
i. Detecting whether the player is grounded
Detecting whether the player is standing on the ground is a critical aspect of many games, and implementing it correctly is essential. In this tutorial, we will go over how to create a simple yet effective ground detection system using raycasts in Unity.
In Unity, a raycast is a physics tool that projects a line from a starting point in a specified direction and length and detects any objects intersecting with that line. It can be used to determine if an object is obstructed by another object or if it is within a certain distance of a specific point.
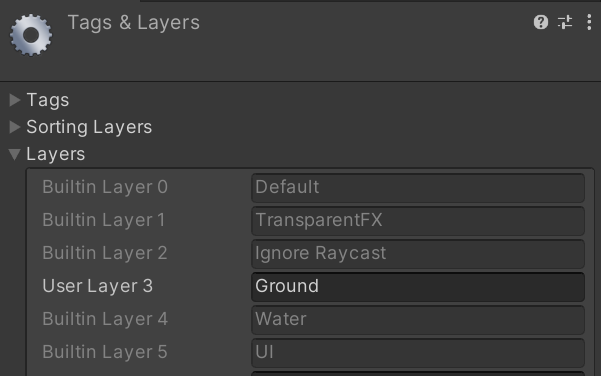
To begin, we will shoot a raycast from the bottom of the player and check if it hits any game object on the ground layer. To set this up, we need to first create a new layer in Unity and name it Ground. We can then assign this layer to the appropriate game objects, such as the floor or terrain. For now, we’ll assign the layer of our Floor object to Ground
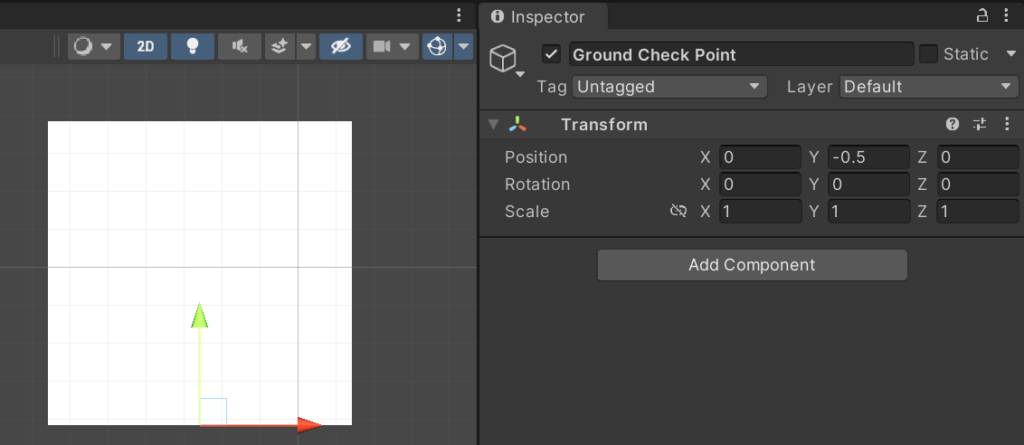
Next, we need to add an empty game object as a child to the player, which we’ll call Ground Check Point. This point will be where the raycast originates from. We can position this object at the bottom of the player’s Box Collider 2D.
In the script, we’ll create:
- A
serializabletransformvariable calledgroundedCheckPoint, which we’ll set in the Unity editor. - A serializable
private floatvariable calledgroundCheckY, which will represent the distance the raycast will travel. Set this to 0.2f. - A serializable
LayerMaskvariable calledwhatIsGround, which we’ll also set in the Unity editor.
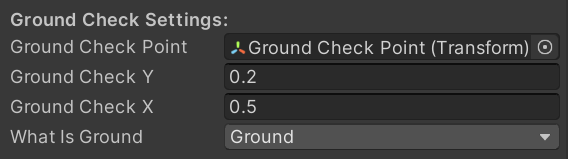
To organize our variables, we’ll create a Header called Ground Check Settings.
PlayerController.cs
using System.Collections;
using System.Collections.Generic;
using UnityEngine;

public class PlayerController : MonoBehaviour
{
    [Header("Horizontal Movement Settings:")]
    [SerializeField] private float walkSpeed = 1;

    [SerializeField] private float jumpForce = 45f;

    [Header("Ground Check Settings:")]
    [SerializeField] private Transform groundCheckPoint;
    [SerializeField] private float groundCheckY = 0.2f;
    [SerializeField] private float groundCheckX = 0.5f;
    [SerializeField] private LayerMask whatIsGround;

    //References
    Rigidbody2D rb;
    private float xAxis;

    void Start()
    {
        rb = GetComponent<Rigidbody2D>();
    }

    void Update()
    {
        GetInputs();
        Move();
    }

    void GetInputs()
    {
        xAxis = Input.GetAxisRaw("Horizontal");
    }

    void Move()
    {
        rb.velocity = new Vector2(walkSpeed * xAxis, rb.velocity.y);
    }
}
Then, we’ll add a public bool function in our PlayerController script called Grounded(). In this function, we’ll add an if statement that checks if the raycast hits any game object on the ground layer.
To set up the raycast, we’ll need to define its:
- Origin: We’ll use the g
roundedCheckPointtransformas the origin - Direction: Cast the ray downwards by setting the direction to
Vector2.down - Distance: We’ll use the
groundCheckYvariable to define the distance of the ray - LayerMask: We’ll use the
whatIsGroundLayerMask to only detect game objects on the ground layer
However, we also want to detect if the player is standing near the edge of a platform or a slope. To do this, we’ll create another serializable private float variable called groundCheckX, which we’ll set to 0.5f. We’ll then add two more raycasts to our if statement that add and subtract the groundCheckX value to the x position of the groundedCheckPoint position.
We’ll separate these raycasts with an or operator so that if even one of these raycasts hits a game object on the ground layer, the function will return true.
If none of the raycasts hit a game object on the ground layer, we’ll add an else statement that returns false.
With this setup, we now have a reliable way of detecting whether the player is standing on the ground, even if the player is near the edges of platforms or slopes.
PlayerController.cs
using System.Collections;
using System.Collections.Generic;
using UnityEngine;

public class PlayerController : MonoBehaviour
{
    [Header("Horizontal Movement Settings:")]
    [SerializeField] private float walkSpeed = 1;

    [SerializeField] private float jumpForce = 45f;

    [Header("Ground Check Settings:")]
    [SerializeField] private Transform groundCheckPoint;
    [SerializeField] private float groundCheckY = 0.2f;
    [SerializeField] private float groundCheckX = 0.5f;
    [SerializeField] private LayerMask whatIsGround;

    //References
    Rigidbody2D rb;
    private float xAxis;

    void Start()
    {
        rb = GetComponent<Rigidbody2D>();
    }

    void Update()
    {
        GetInputs();
        Move();
    }

    void GetInputs()
    {
        xAxis = Input.GetAxisRaw("Horizontal");
    }

    void Move()
    {
        rb.velocity = new Vector2(walkSpeed * xAxis, rb.velocity.y);
    }

    public bool Grounded()
    {
        if (Physics2D.Raycast(groundCheckPoint.position, Vector2.down, groundCheckY,              whatIsGround)
            || Physics2D.Raycast(groundCheckPoint.position + new Vector3(groundCheckX, 0, 0), Vector2.down, groundCheckY, whatIsGround)
            || Physics2D.Raycast(groundCheckPoint.position + new Vector3(-groundCheckX, 0, 0), Vector2.down, groundCheckY, whatIsGround))
        {
            return true;
        }
        else
        {
            return false;
        }
    }
}
To use this ground detection system, we need to call the Grounded() function from our PlayerController script whenever we need to check if the player is on the ground. For example, we might call this function every time the player presses the jump button to check if the player is grounded.
ii. Creating the player’s jump ability
Now that we can detect if the player is on the ground, we can get the player to jump. First, let’s create a function called Jump() and add it to Update().
Next, we’ll add if(Input.GetButtonDown && Grounded()) rb.velocity = new Vector2(rb.velocity.x, jumpForce).
This sets our vertical velocity to the jumpForce variable value and send the player upwards when:
- The jump button is pressed
- And when the player is on the ground
PlayerController.cs
using System.Collections;
using System.Collections.Generic;
using UnityEngine;

public class PlayerController : MonoBehaviour
{
    [Header("Horizontal Movement Settings:")]
    [SerializeField] private float walkSpeed = 1;

    [SerializeField] private float jumpForce = 45;

    [Header("Ground Check Settings:")]
    [SerializeField] private Transform groundCheckPoint;
    [SerializeField] private float groundCheckY = 0.2f;
    [SerializeField] private float groundCheckX = 0.5f;
    [SerializeField] private LayerMask whatIsGround;

    //References
    Rigidbody2D rb;
    private float xAxis;

    void Start()
    {
        rb = GetComponent<Rigidbody2D>();
    }

    void Update()
    {
        GetInputs();
        Move();
        Jump();
    }

    void GetInputs()
    {
        xAxis = Input.GetAxisRaw("Horizontal");
    }

    void Move()
    {
        rb.velocity = new Vector2(walkSpeed * xAxis, rb.velocity.y);
    }

    public bool Grounded()
    {
        if (Physics2D.Raycast(groundCheckPoint.position, Vector2.down, groundCheckY, whatIsGround)
            || Physics2D.Raycast(groundCheckPoint.position + new Vector3(groundCheckX, 0, 0), Vector2.down, groundCheckY, whatIsGround)
            || Physics2D.Raycast(groundCheckPoint.position + new Vector3(-groundCheckX, 0, 0), Vector2.down, groundCheckY, whatIsGround))
        {
            return true;
        }
        else
        {
            return false;
        }
     }

    void Jump()
    {
        if (Input.GetButtonDown("Jump") && Grounded())
        {
            rb.velocity = new Vector3(rb.velocity.x, jumpForce);
        }
    }
}
Now if we play our game, the player should be able to jump.
iii. Creating variable jump height
In many platformer games, giving the player control over their character’s jump is essential for creating a satisfying and immersive experience. So we’ll be giving the player the ability to control their jump height by letting them cancel their jump.
To do this, we’ll add:
PlayerController.cs
using System.Collections;
using System.Collections.Generic;
using UnityEngine;

public class PlayerController : MonoBehaviour
{
    [Header("Horizontal Movement Settings:")]
    [SerializeField] private float walkSpeed = 1;

    [SerializeField] private float jumpForce = 45;

    [Header("Ground Check Settings:")]
    [SerializeField] private Transform groundCheckPoint;
    [SerializeField] private float groundCheckY = 0.2f;
    [SerializeField] private float groundCheckX = 0.5f;
    [SerializeField] private LayerMask whatIsGround;

    //References
    Rigidbody2D rb;
    private float xAxis;

    void Start()
    {
        rb = GetComponent<Rigidbody2D>();
    }

    void Update()
    {
        GetInputs();
        Move();
        Jump();
    }

    void GetInputs()
    {
        xAxis = Input.GetAxisRaw("Horizontal");
    }

    void Move()
    {
        rb.velocity = new Vector2(walkSpeed * xAxis, rb.velocity.y);
    }

    public bool Grounded()
    {
        if (Physics2D.Raycast(groundCheckPoint.position, Vector2.down, groundCheckY,              whatIsGround)
            || Physics2D.Raycast(groundCheckPoint.position + new Vector3(groundCheckX, 0, 0), Vector2.down, groundCheckY, whatIsGround)
            || Physics2D.Raycast(groundCheckPoint.position + new Vector3(-groundCheckX, 0, 0), Vector2.down, groundCheckY, whatIsGround))
        {
            return true;
        }
        else
        {
            return false;
        }
     }

    void Jump()
    {
        if(Input.GetButtonUp("Jump") && rb.velocity.y > 0)
        {
            rb.velocity = new Vector2(rb.velocity.x, 0);
        }

        if (Input.GetButtonDown("Jump") && Grounded())
        {
            rb.velocity = new Vector3(rb.velocity.x, jumpForce);
        }
    }
}
This sets the player’s vertical velocity to 0 when the player lifts the jump button while the player is jumping upwards.
After implementing the jump cancel and playtesting, we’ll notice that the player will stick to the sides of the platforms when colliding with them. This is because the Friction value of the player’s Box Collider 2D was too high. To fix this, we’ll create a new Physics Material 2D in Unity’s asset folder and set its Friction value to 0. We’ll then assign this material to the player’s Rigidbody2D component.

With these changes, players can now cancel their jump mid-air, giving them more control over their movement. Additionally, the player will no longer stick to the sides of the platforms, creating a smoother and more natural movement experience. As always, it’s important to test and iterate on your game mechanics to ensure that they feel fun and engaging for players.
4. Animating the player
Now let’s start animating our player character. As game developers, we want our characters to look and move in a way that’s visually appealing and engaging for players. One of the key ways we can achieve this is through creating and animating sprites.
The sprite assets I’m using are from the Knight Sprite sheet asset pack. Here’s how to download the asset pack:
- Head to Knight Sprite sheet asset pack in the Unity Asset Store.
- Log in to your Unity account and click Save to Assets.
- Head back to your Unity application and enter your Package Manager window.
- Set the shown packages to My Assets and select Knight Sprite Sheet (Free).
- Download the package and Import the assets into Unity.
a. Configure sprite settings
To start, let’s configure all of our sprites for the player character.
First, we want to configure our sprite settings so that our sprites don’t appear blurry and compressed. What we want to do is:
- Set its Wrap Mode to Clamp.
- Set its Filter Mode to Point (no filter).
- Set its Compression Mode to None.
Once we’ve done this, we can change the player sprite to one of the Knight Idle sprites of our knight. We’ll also need to adjust the Box Collider 2D and Ground Check Point to match the new sprite.
b. Creating animations for our player
Next, we’ll open up an animation window and select our player game object and create our first animation.
- Click Create on the animation window to create a new Animation Clip.
- Name the new animation clip Player_Idle.
- Drag the idle keyframe sprites into the Animation Timeline In order.
- adjust the timing and position of the keyframes to create an animation you like.
Once we’ve created the idle animation, we can move on to creating the Player_Walk and Player_Jump animations. We’ll use the same process as before, dragging in the appropriate keyframe sprites and adjusting the keyframes to create a smooth and natural animation.

c. Configuring the animator controller
If you’ve been following along with our game development tutorial, you may have noticed that when you hit play, only the Idle animation plays. This is because we haven’t added transitions between our animations yet.
To fix this, we’ll need to select our player and open the Animator Controller by opening it from the player’s Animator component. This will open the Animator tab, where you can see all of the animations in animation states. By default, only Player_Idle is connected on entry.
Now let’s start transitioning between our animations.
- Create two-way connections between all of our animation states.
- Right-Clicking -> Make Transition, then drag from one animation state to another
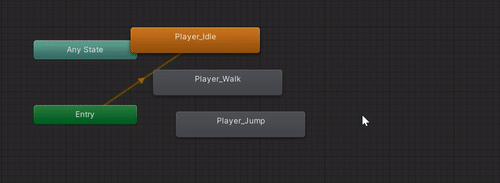
- Disable Has Exit Time and set Transition Duration to 0 for each transition.
- Ensures that the transitions happen instantly and without delay

Once that’s done we need a way to tell the Animator Controller to transition between these states. To do that we need to set the conditions for when these transitions should happen.
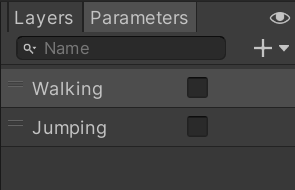
First, we need to create parameters on which the conditions will be based. We’ll create two Bool parameters, one called Walking and the other called Jumping. Remember to keep in mind how you spell these parameters as it will be important later.
Now go to your PlayerController and create an Animator variable called anim and set it in the start function to the player’s animator component just like how you created a reference for the Rigidbody2D component.
d. Activating the animations
Next in our Move() function, we’ll add:
PlayerController.cs
using System.Collections;
using System.Collections.Generic;
using UnityEngine;

public class PlayerController : MonoBehaviour
{
    [Header("Horizontal Movement Settings:")]
    [SerializeField] private float walkSpeed = 1;

    [SerializeField] private float jumpForce = 45;

    [Header("Ground Check Settings:")]
    [SerializeField] private Transform groundCheckPoint;
    [SerializeField] private float groundCheckY = 0.2f;
    [SerializeField] private float groundCheckX = 0.5f;
    [SerializeField] private LayerMask whatIsGround;

    //References
    Rigidbody2D rb;
    private float xAxis;
    private Animator anim;

    void Start()
    {
        rb = GetComponent<Rigidbody2D>();
        anim = GetComponent<Animator>();
    }

    void Update()
    {
        GetInputs();
        Move();
        Jump();
    }

    void GetInputs()
    {
        xAxis = Input.GetAxisRaw("Horizontal");
    }

    void Move()
    {
        rb.velocity = new Vector2(walkSpeed * xAxis, rb.velocity.y);

        anim.SetBool("Walking", rb.velocity.x != 0 && Grounded());
    }

    public bool Grounded()
    {
        if (Physics2D.Raycast(groundCheckPoint.position, Vector2.down, groundCheckY,                   whatIsGround)
            || Physics2D.Raycast(groundCheckPoint.position + new Vector3(groundCheckX, 0, 0), Vector2.down, groundCheckY, whatIsGround)
            || Physics2D.Raycast(groundCheckPoint.position + new Vector3(-groundCheckX, 0, 0), Vector2.down, groundCheckY, whatIsGround))
        {
            return true;
        }
        else
        {
            return false;
        }
     }

    void Jump()
    {
        if(Input.GetButtonUp("Jump") && rb.velocity.y > 0)
        {
            rb.velocity = new Vector2(rb.velocity.x, 0);
        }

        if (Input.GetButtonDown("Jump") && Grounded())
        {
            rb.velocity = new Vector3(rb.velocity.x, jumpForce);
        }
    }
}
This sets the Walking parameter to true only when the player is on the ground and moving horizontally, otherwise set it to false.
Next, in our Jump() function, we’ll add:
PlayerController.cs
using System.Collections;
using System.Collections.Generic;
using UnityEngine;

public class PlayerController : MonoBehaviour
{
    [Header("Horizontal Movement Settings:")]
    [SerializeField] private float walkSpeed = 1;

    [SerializeField] private float jumpForce = 45;

    [Header("Ground Check Settings:")]
    [SerializeField] private Transform groundCheckPoint;
    [SerializeField] private float groundCheckY = 0.2f;
    [SerializeField] private float groundCheckX = 0.5f;
    [SerializeField] private LayerMask whatIsGround;

    //References
    Rigidbody2D rb;
    private float xAxis;
    private Animator anim;

    void Start()
    {
        rb = GetComponent<Rigidbody2D>();
        anim = GetComponent<Animator>();
    }

    void Update()
    {
        GetInputs();
        Move();
        Jump();
    }

    void GetInputs()
    {
        xAxis = Input.GetAxisRaw("Horizontal");
    }

    void Move()
    {
        rb.velocity = new Vector2(walkSpeed * xAxis, rb.velocity.y);

        anim.SetBool("Walking", rb.velocity.x != 0 && Grounded());
    }

    public bool Grounded()
    {
        if (Physics2D.Raycast(groundCheckPoint.position, Vector2.down, groundCheckY,              whatIsGround)
            || Physics2D.Raycast(groundCheckPoint.position + new Vector3(groundCheckX, 0, 0), Vector2.down, groundCheckY, whatIsGround)
            || Physics2D.Raycast(groundCheckPoint.position + new Vector3(-groundCheckX, 0, 0), Vector2.down, groundCheckY, whatIsGround))
        {
            return true;
        }
        else
        {
            return false;
        }
     }

    void Jump()
    {
        if(Input.GetButtonUp("Jump") && rb.velocity.y > 0)
        {
            rb.velocity = new Vector2(rb.velocity.x, 0);
        }

        if (Input.GetButtonDown("Jump") && Grounded())
        {
            rb.velocity = new Vector3(rb.velocity.x, jumpForce);
        }

        anim.SetBool("Jumping", !Grounded());

    }
}
This makes it so that our Player_Jump animation plays any time the player isn’t on the ground.
Remember to check that the spelling of your parameters in SetBool and the Animator tab are the exact same.
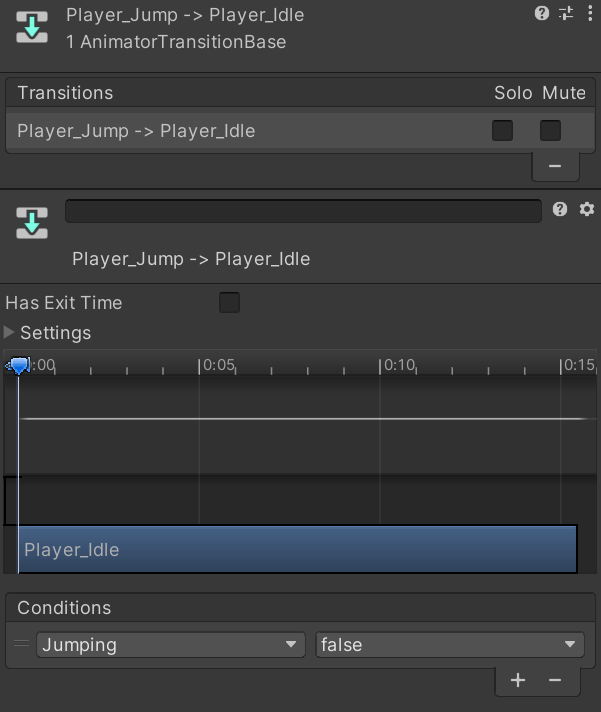
Finally, we’ll set our conditions for the transition. If Walking is true we’ll transition from Player_Idle -> Player_Walk and from Player_Walk -> Player_Idle if the Walking Bool is false.
Then for Player_Walk -> Player_Jump and Player_Walk-> Player_Jump, we’ll want to set the conditions to if Jumping is true. And vice versa, we’ll set the condition to if Jumping is false for Player_Walk -> Player_Jump and Player_Jump -> Player_Idle.
e. Flipping the player
Now, when we play test our game, our player should be fully animated… except for the fact that he can moonwalk.

To put a stop to this moonwalking chicanery, we need to get our player to face the direction he’s moving in. To do this, let’s go back to our PlayerController, and add a Flip() function.
Then in the Flip() function, let’s add,
PlayerController.cs
using System.Collections;
using System.Collections.Generic;
using UnityEngine;

public class PlayerController : MonoBehaviour
{
    [Header("Horizontal Movement Settings:")]
    [SerializeField] private float walkSpeed = 1;

    [SerializeField] private float jumpForce = 45;

    [Header("Ground Check Settings:")]
    [SerializeField] private Transform groundCheckPoint;
    [SerializeField] private float groundCheckY = 0.2f;
    [SerializeField] private float groundCheckX = 0.5f;
    [SerializeField] private LayerMask whatIsGround;

    //References
    Rigidbody2D rb;
    private float xAxis;
    private Animator anim;

    void Start()
    {
        rb = GetComponent<Rigidbody2D>();
        anim = GetComponent<Animator>();

    }

    void Update()
    {
        GetInputs();
        Move();
        Jump();
        Flip();
    }

    void GetInputs()
    {
        xAxis = Input.GetAxisRaw("Horizontal");
    }

    void Flip()
    {
        if (xAxis < 0)
        {
            transform.localScale = new Vector2(-Mathf.Abs(transform.localScale.x), transform.localScale.y);
        }
        else if (xAxis > 0)
        {
            transform.localScale = new Vector2(Mathf.Abs(transform.localScale.x), transform.localScale.y);
        }
    }

    void Move()
    {
        rb.velocity = new Vector2(walkSpeed * xAxis, rb.velocity.y);

        anim.SetBool("Walking", rb.velocity.x != 0 && Grounded());
    }

    public bool Grounded()
    {
        if (Physics2D.Raycast(groundCheckPoint.position, Vector2.down, groundCheckY,              whatIsGround)
            || Physics2D.Raycast(groundCheckPoint.position + new Vector3(groundCheckX, 0, 0), Vector2.down, groundCheckY, whatIsGround)
            || Physics2D.Raycast(groundCheckPoint.position + new Vector3(-groundCheckX, 0, 0), Vector2.down, groundCheckY, whatIsGround))
        {
            return true;
        }
        else
        {
            return false;
        }
     }

    void Jump()
    {
        if(Input.GetButtonUp("Jump") && rb.velocity.y > 0)
        {
            rb.velocity = new Vector2(rb.velocity.x, 0);
        }

        if (Input.GetButtonDown("Jump") && Grounded())
        {
            rb.velocity = new Vector3(rb.velocity.x, jumpForce);
        }

        anim.SetBool("Jumping", !Grounded());

    }

}
What this does is if the player is pressing the left button, it sets the player character’s x scale
to it’s negative value and when the player presses the right button, then his x scale will be set to it’s positive value and he’ll flip to face the right.
5. Getting the camera to follow the player
So far, we’ve learned how to create a player character that can walk, jump, and cancel their jump mid-air. But what good is a game if you can’t even see the action? We’ll now be making the camera follow the player.
To get started, we’ll need to create a new script called CameraFollow. Open up the Main Camera object in your Unity Hierarchy, click Add Component, and select New Script. Name the script CameraFollow and open it up.
a. Creating a singleton of PlayerController
Next, we want to create a singleton of our PlayerController script. This ensures that there is only one class instance in the game at any given time. To do this, we’ll:
- Create a
publicstaticPlayerControllervariable calledInstancein our PlayerController script. - Create an
Awake()function. - In the
Awake()function, we’ll check:- If the
Instancevariable has already been set - If the
Instancevariable is not thisPlayerControllerinstance.
- If the
- If
Instancehas already been set and thisPlayerControlleris not the one set asInstance, we destroy this game object. - Else, we’ll set the
Instancevariable to thisPlayerControllerinstance.
PlayerController.cs
using System.Collections;
using System.Collections.Generic;
using UnityEngine;

public class PlayerController : MonoBehaviour
{
    [Header("Horizontal Movement Settings:")]
    [SerializeField] private float walkSpeed = 1;

    [SerializeField] private float jumpForce = 45f;

    [Header("Ground Check Settings:")]
    [SerializeField] private Transform groundCheckPoint;
    [SerializeField] private float groundCheckY = 0.2f;
    [SerializeField] private float groundCheckX = 0.5f;
    [SerializeField] private LayerMask whatIsGround;


    private Rigidbody2D rb;
    private float xAxis;
    Animator anim;


    public static PlayerController Instance;

    private void Awake()
    {
        if(Instance != null && Instance != this)
        {
            Destroy(gameObject);
        }
        else
        {
            Instance = this;
        }
    }


    // Start is called before the first frame update
    void Start()
    {
        rb = GetComponent<Rigidbody2D>();

        anim = GetComponent<Animator>();
    }

    // Update is called once per frame
    void Update()
    {
        GetInputs();
        Move();
        Jump();
        Flip();
    }

    void GetInputs()
    {
        xAxis = Input.GetAxisRaw("Horizontal");
    }

    void Flip()
    {
        if (xAxis < 0)
        {
            transform.localScale = new Vector2(-Mathf.Abs(transform.localScale.x), transform.localScale.y);
        }
        else if (xAxis > 0)
        {
            transform.localScale = new Vector2(Mathf.Abs(transform.localScale.x), transform.localScale.y);
        }
    }

    private void Move()
    {
        rb.velocity = new Vector2(walkSpeed * xAxis, rb.velocity.y);
        anim.SetBool("Walking", rb.velocity.x != 0 && Grounded());
    }

    public bool Grounded()
    {
        if (Physics2D.Raycast(groundCheckPoint.position, Vector2.down, groundCheckY, whatIsGround)
            || Physics2D.Raycast(groundCheckPoint.position + new Vector3(groundCheckX, 0, 0), Vector2.down, groundCheckY, whatIsGround)
            || Physics2D.Raycast(groundCheckPoint.position + new Vector3(-groundCheckX, 0, 0), Vector2.down, groundCheckY, whatIsGround))
        {
            return true;
        }
        else
        {
            return false;
        }
    }

    void Jump()
    {
        if(Input.GetButtonUp("Jump") && rb.velocity.y > 0)
        {
            rb.velocity = new Vector2(rb.velocity.x, 0);
        }

        if (Input.GetButtonDown("Jump") && Grounded())
        {
            rb.velocity = new Vector3(rb.velocity.x, jumpForce);
        }

        anim.SetBool("Jumping", !Grounded());
    }
}
b. Creating camera follow and offset
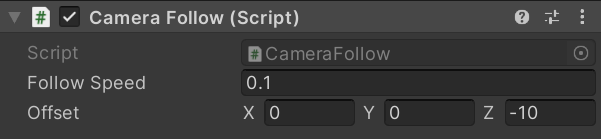
Now, let’s go back to our CameraFollow script. We’ll create a serializable private float variable called followSpeed with a default value of 0.1f. This will act as the speed at which the camera moves towards the player.
CameraFollow.cs
using System.Collections;
using System.Collections.Generic;
using UnityEngine;

public class CameraFollow : MonoBehaviour
{
    [SerializeField] private float followSpeed = 0.1f;

    // Start is called before the first frame update
    void Start()
    {

    }

    // Update is called once per frame
    void Update()
    {

    }
}
In the Update() function, we’ll add the following code:
CameraFollow.cs
using System.Collections;
using System.Collections.Generic;
using UnityEngine;

public class CameraFollow : MonoBehaviour
{
    [SerializeField] private float followSpeed = 0.1f;

    // Start is called before the first frame update
    void Start()
    {

    }

    // Update is called once per frame
    void Update()
    {
        transform.position = Vector3.Lerp(transform.position, PlayerController.Instance.transform.position, followSpeed);
    }
}
This code will move the camera’s position towards the player’s position at the speed set by followSpeed. However, if we playtest this, you’ll notice that the camera can’t see the player. This is because the camera has moved right on top of the player and the player is not in its field of view anymore. To counteract this, we want to move the camera back to move the player back into its field of view.
To do this, we’ll create a serializable private Vector3 variable called offset and we’ll add this offset to the player’s transform.position.
CameraFollow.cs
using System.Collections;
using System.Collections.Generic;
using UnityEngine;

public class CameraFollow : MonoBehaviour
{
    [SerializeField] private float followSpeed = 0.1f;

    [SerializeField] private Vector3 offset;

    // Start is called before the first frame update
    void Start()
    {

    }

    // Update is called once per frame
    void Update()
    {
        transform.position = Vector3.Lerp(transform.position, PlayerController.Instance.transform.position + offset, followSpeed);
    }
}
Next, we’ll set the offset in our Inspector. To move the camera back, we’ll simply set the z value of our offset variable to -10. You may also edit the x and y values of the offset to position your camera as you desire.
And that’s it! Now if you playtest the game, you should have a walking, jumping, and animated player, with a camera that follows him around. With this new feature, your game will feel much more immersive and engaging.
6. Conclusion
And that concludes this part. In the next part, we’ll take our player’s movement to the next level by introducing the dash and double jump abilities and enhancing the player’s jump by adding an input buffer and coyote time.
If you enjoyed this article and would like to support us, please consider becoming a Patron. As a Patron, you’ll gain access to project files for our tutorials and receive exclusive posts on our blog. Your support means a lot to us, as it helps us to sustain our content creation efforts. Currently, we’re earning only 20 cents on every dollar we invest in creating content, so your patronage would go a long way in helping us to continue making high-quality tutorials.
If you feel that you’ve encountered an issue while following this tutorial you can check if it relates to any of the common issues experienced in this post. If you find that you have a different or unique problem, please create a forum post here for further assistance on the matter.
You can also download the project files of whatever we have done so far.
Here are the final end results of all scripts we have worked with today:
PlayerController.cs
using System.Collections;
using System.Collections.Generic;
using UnityEngine;

public class PlayerController : MonoBehaviour
{
    [Header("Horizontal Movement Settings:")]
    [SerializeField] private float walkSpeed = 1;

    [SerializeField] private float jumpForce = 45f;

    [Header("Ground Check Settings:")]
    [SerializeField] private Transform groundCheckPoint;
    [SerializeField] private float groundCheckY = 0.2f;
    [SerializeField] private float groundCheckX = 0.5f;
    [SerializeField] private LayerMask whatIsGround;


    private Rigidbody2D rb;
    private float xAxis;
    Animator anim;


    public static PlayerController Instance;

    private void Awake()
    {
        if(Instance != null && Instance != this)
        {
            Destroy(gameObject);
        }
        else
        {
            Instance = this;
        }
    }


    // Start is called before the first frame update
    void Start()
    {
        rb = GetComponent<Rigidbody2D>();

        anim = GetComponent<Animator>();
    }

    // Update is called once per frame
    void Update()
    {
        GetInputs();
        Move();
        Jump();
        Flip();
    }

    void GetInputs()
    {
        xAxis = Input.GetAxisRaw("Horizontal");
    }

    void Flip()
    {
        if (xAxis < 0)
        {
            transform.localScale = new Vector2(-Mathf.Abs(transform.localScale.x), transform.localScale.y);
        }
        else if (xAxis > 0)
        {
            transform.localScale = new Vector2(Mathf.Abs(transform.localScale.x), transform.localScale.y);
        }
    }

    private void Move()
    {
        rb.velocity = new Vector2(walkSpeed * xAxis, rb.velocity.y);
        anim.SetBool("Walking", rb.velocity.x != 0 && Grounded());
    }

    public bool Grounded()
    {
        if (Physics2D.Raycast(groundCheckPoint.position, Vector2.down, groundCheckY, whatIsGround)
            || Physics2D.Raycast(groundCheckPoint.position + new Vector3(groundCheckX, 0, 0), Vector2.down, groundCheckY, whatIsGround)
            || Physics2D.Raycast(groundCheckPoint.position + new Vector3(-groundCheckX, 0, 0), Vector2.down, groundCheckY, whatIsGround))
        {
            return true;
        }
        else
        {
            return false;
        }
    }

    void Jump()
    {
        if(Input.GetButtonUp("Jump") && rb.velocity.y > 0)
        {
            rb.velocity = new Vector2(rb.velocity.x, 0);
        }

        if (Input.GetButtonDown("Jump") && Grounded())
        {
            rb.velocity = new Vector3(rb.velocity.x, jumpForce);
        }

        anim.SetBool("Jumping", !Grounded());
    }
}
CameraFollow.cs
using System.Collections;
using System.Collections.Generic;
using UnityEngine;

public class CameraFollow : MonoBehaviour
{
    [SerializeField] private float followSpeed = 0.1f;

    [SerializeField] private Vector3 offset;

    // Start is called before the first frame update
    void Start()
    {

    }

    // Update is called once per frame
    void Update()
    {
        transform.position = Vector3.Lerp(transform.position, PlayerController.Instance.transform.position + offset, followSpeed);
    }
}