When using Unity to develop games, many people may choose to use Plastic SCM to collaborate with their team. However, with multiple people working on the same project, a merge conflict may sometimes occur.

Having been through my fair share of merge conflicts and lost progress whilst working on my projects, I put this article together to help anyone else struggling with the same issues.
Update: Don’t like to read? We’ve made a video on this topic as well:
- Merging conflicting files
- Resolving directory conflicts
- Avoiding merge conflicts in the future
- Afterword
1. Merging conflicting files
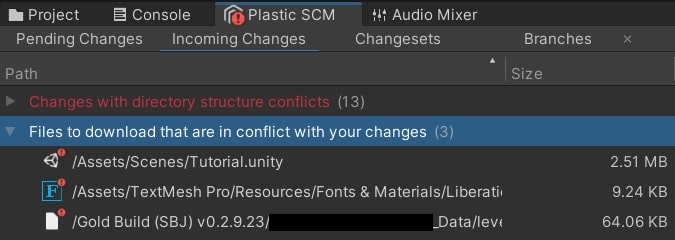
Through the Unity Editor, resolving merge conflicts becomes quite simple. Firstly, in the Unity Editor, navigate to the Incoming Changes tab, which lists all the incoming changes from the Plastic SCM repository.

To resolve this, select the conflicting file(s) and right-click on them to select how you would like to merge them.

You are given a set of options, but the most important ones are the ones highlighted in the image above:
a. Merge keeping the incoming changes (head/source)
This option causes the local files on your computer to be replaced with the files uploaded in the repository. This means that any changes made to the file(s) on this device are lost.
b. Merge keeping workspace changes (yours/destination)
This option causes the files uploaded to the repository to be replaced with your local files. This means that any conflicting changes made to the file(s) in the repository are lost.
Selecting one of these should resolve the merge conflict. It is advisable to keep the changes that are more significant. If you are unable to merge the files, you may be experiencing a directory conflict.
2. Resolving directory conflicts
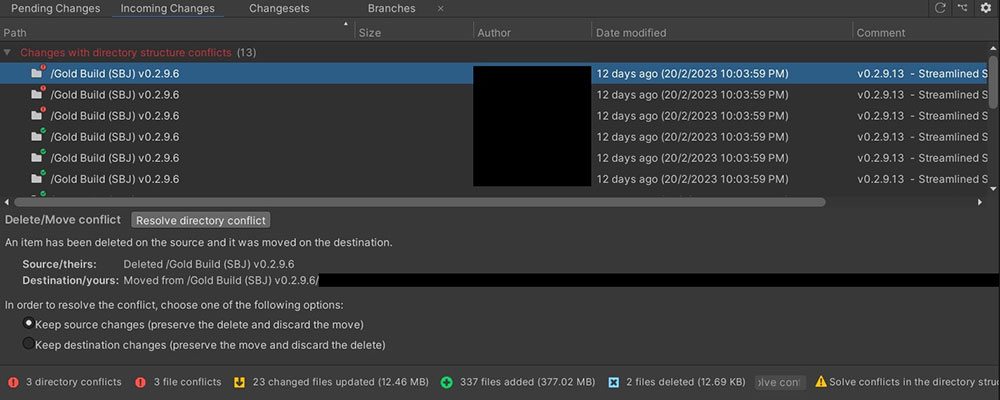
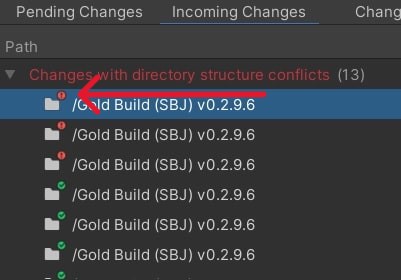
If you are unable to merge conflicting files, this may be due to a directory conflict. A directory conflict may occur when folders in your project folder do not match the folders in the repository.
In order to fix this, you will need to select each individual directory conflict and proceed with the following.

Firstly, select one of the following options:
a. Keep source changes
This option causes the local files on your computer to be replaced with the files uploaded in the repository. This means that any changes made to the file(s) on this device are lost.
b. Keep destination changes
This option causes the files uploaded to the repository to be replaced with your local files. This means that any conflicting changes made to the file(s) in the repository are lost.
After selecting the changes you want to keep, click on the Resolve directory conflict button. This should solve the directory conflict. Note that each directory conflict needs to be resolved individually.

Once all of the directory conflicts have been solved, you can proceed to merge any conflicting file(s) and update your workspace.
3. Avoiding merge conflicts in the future
Merge conflicts can be frustrating and can cause work to be lost. In order to prevent this from happening in the future, here are some tips that can help.
a. Why merge conflicts occur
Merge conflicts occur when two or more devices make changes to a project file, and someone checks in changes. Then, when another person who has also made changes to the same project file tries to update their workspace, they encounter a merge conflict.
This is because the file uploaded to the repository has different changes made to it compared to the file on the person’s computer, and Plastic SCM does not know which changes to keep and which to discard. Here are some tips to prevent this from happening:
b. Do not work on the same files on multiple devices
If multiple people are working on the project at the same time, be sure not to work on the same files so as to avoid merge conflicts. The file most prone to merge conflicts, in my experience, are Scene files. When multiple people work on the same scene and move the same objects around, this causes a merge conflict. Prefabs and scripts can also be prone to merge conflicts.
To make sure this does not happen, communicate to make sure only one person is working on a particular Scene, Prefab or script at a time.
c. Checkin changes frequently
Although this does not necessarily prevent merge conflicts, it helps to mitigate the damage caused by any potential merge conflicts as less progress may be lost in the event of a merge conflict.
Hence, I suggest you checkin changes frequently, for example, whenever a feature is implemented or any work is completed.
d. Ensure your workspace is always up to date
By updating your workspace frequently, you can reduce the chances of a merge conflict as you would be making changes to the most recent repository changeset instead of an outdated one. It is important to at least update your workspace with any incoming changes before you start making changes and before you checkin changes.
4. Afterword
I hope that this article has helped you in some way. Although it seems simple, this issue can be frustrating to solve. If none of the solutions worked for you, it will be great if you can leave us a comment to tell us how you fixed it.
If I have missed anything in this article, or if you have found other solutions you would like to share for people running into the same issue, please leave us a comment below too, as it may help others with the same problem as well!
