
When working on a website, it is not uncommon for developers to locally host websites on their own computers first, as it is often a good idea to run and test your website before you publish it online, so that you avoid having your live website run into errors and bugs.
If you are a Windows user, one of the several local web hosting softwares you have available to you is WampServer, which normally runs on the localhost URL when it is started up.
Fun fact: Wamp stands for Windows, Apache, MySQL and PHP. It is a play on the term LAMP (where L stands for Linux, and the rest of the letters mean the same as those in Wamp), as almost all web servers in the early days of the web ran on such a set-up. Today, LAMP stacks are still widely used to host many websites.
While running on localhost gives us the benefit of using root-relative URL paths, it still has a distinct drawback — it is a hassle to run multiple websites off the localhost URL, as it will still cause the aforementioned root-relative URL paths to break.
Fortunately for us, it is possible to set up what I call “local domains” on WampServer, so that you can use URLs outside of localhost to access your websites on WampServer.
- Installing WampServer
- Looping web traffic back with the
hostsfile - Setting up an Apache
VirtualHostfor your site - Troubleshooting common issues
- Conclusion
1. Installing WampServer
Before you begin, we will be assuming that you have already installed and set up your own WampServer. If you haven’t, check out this article on how to set up your WampServer.
2. Looping web traffic back with the hosts file
For your “local domain” to be set up, you first need to redirect the URL of your domain back to your computer. This means that whenever you try to access the URL, instead of going to the Internet, the request routes back to your own computer, so that the browser will be attempting to read the files on your own computer.
To do so, you will first need to find the hosts file on your computer. The hosts file is a DNS lookup table that matches IP addresses to domain names, and it basically tells your computer which IP addresses to go to when certain domain names are accessed.
a. Finding the hosts file
The file is typically located in C:\Windows\system32\drivers\etc\hosts, and it can be easily-accessed from the Command Prompt running as administrator, because this starts the Command Prompt from the C:\Windows\system32 folder.
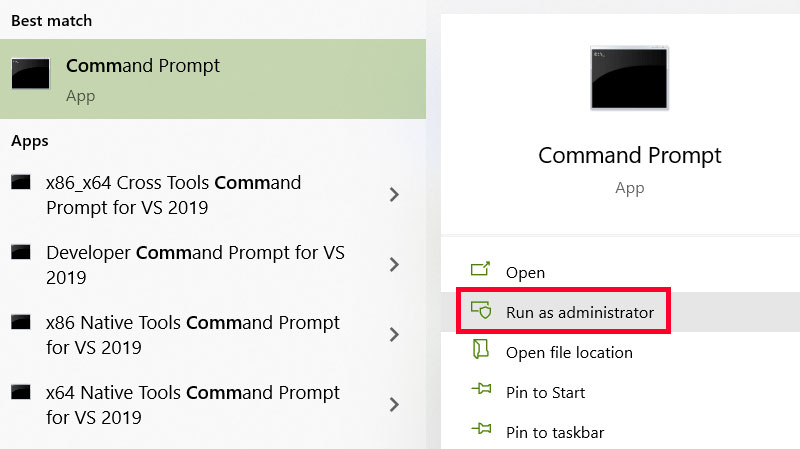
- Click on Start ⊞, and search for Command Prompt.
- Right-click on it, and click on Run as administrator.
- Run the following command to move to the
drivers/etcfolder:
cd drivers/etc
- Then, run this command to open the file in Notepad.
notepad hosts
The hosts file should then open in Notepad.
C:\Windows\system32\drivers\etc\hosts
# Copyright (c) 1993-2009 Microsoft Corp.
#
# This is a sample HOSTS file used by Microsoft TCP/IP for Windows.
#
# This file contains the mappings of IP addresses to host names. Each
# entry should be kept on an individual line. The IP address should
# be placed in the first column followed by the corresponding host name.
# The IP address and the host name should be separated by at least one
# space.
#
# Additionally, comments (such as these) may be inserted on individual
# lines or following the machine name denoted by a '#' symbol.
#
# For example:
#
#      102.54.94.97     rhino.acme.com          # source server
#       38.25.63.10     x.acme.com              # x client host

# localhost name resolution is handled within DNS itself.
#	127.0.0.1       localhost
#	::1             localhost
b. Adding the loopback addresses
Now, you need to enter 2 lines into the name of your local domain into the hosts file, prefixing the IP 127.0.0.1 behind one line, and the ::1 IP behind another line, like so:
C:\Windows\system32\drivers\etc\hosts
# Copyright (c) 1993-2009 Microsoft Corp.
#
# This is a sample HOSTS file used by Microsoft TCP/IP for Windows.
#
# This file contains the mappings of IP addresses to host names. Each
# entry should be kept on an individual line. The IP address should
# be placed in the first column followed by the corresponding host name.
# The IP address and the host name should be separated by at least one
# space.
#
# Additionally, comments (such as these) may be inserted on individual
# lines or following the machine name denoted by a '#' symbol.
#
# For example:
#
#      102.54.94.97     rhino.acme.com          # source server
#       38.25.63.10     x.acme.com              # x client host

# localhost name resolution is handled within DNS itself.
#	127.0.0.1       localhost
#	::1             localhost
127.0.0.1 www.YourSiteNameHere.com
::1 www.YourSiteNameHere.com
Note that you will need to change the domain from www.YourSiteNameHere.com to whatever you want the URL of your site to be. If you want to have multiple sites looping back, you can also add these sites to the hosts file.
Both 127.0.0.1 and ::1 are loopback addresses, which means they route traffic back to your own computer. 127.0.0.1 is the IPv4 loopback, while ::1 is the IPv6 loopback. We use both because some computers support only IPv4, while others support only IPv6.
c. Testing the loopback
Save the hosts file and close it. When you try to go to the site with the loopback, your browser should say that it cannot reach the site.
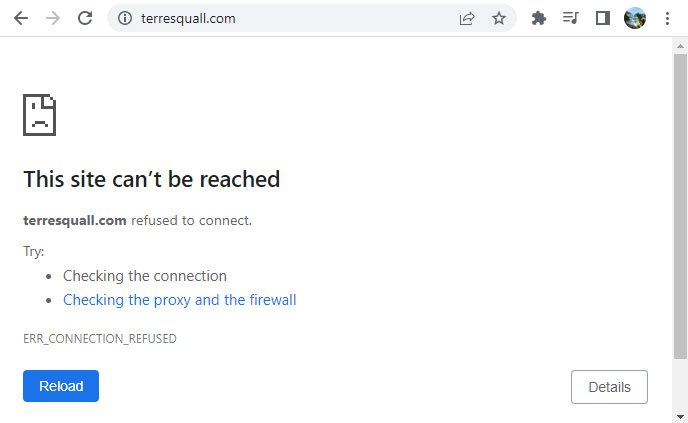
If you do not have a live site, you can test that the hosts file is working by adding a different site that is live, like www.terresquall.com or www.coolmathgames.com. I do not recommend testing with the Terresquall Blog site (blog.terresquall.com), however, since that will deny you access to this article.
Here is an article to help with troubleshooting if updating the hosts file does not work:
3. Setting up an Apache VirtualHost for your site
So your chosen domain now links back to your own computer. What now?
We need to create a new VirtualHost in WampServer’s Apache. In WampServer (and most other website hosting programs), Apache is responsible for serving content over HTTP, and a VirtualHost has to be created for every domain that Apache is expected to serve.
a. Creating a VirtualHost
To create a new VirtualHost, we need to:
- Find WampServer’s Apache configuration files for
VirtualHosts, which, for my computer, is atC:\wamp64\bin\apache\apache2.4.51\conf\extra\httpd-vhosts. Your install directory may be slightly different, depending on where you install it, as well as the Apache version that is installed. - Specify the domain that we just made a loopback for, and point it to the URL’s webroot.
To open the httpd-vhosts file, we need to open the file with a suitable text editor. If you have a dedicated code editor like Notepad++, Sublime Text or Visual Studio Code, you can open the file with these programs (via Right-click > Open with, then selecting the program). Otherwise, you can also use Notepad to open the file.
Add the following lines below to define a new VirtualHost in Apache. Remember to also replace the highlighted sections with your own website domain:
C:\wamp64\bin\apache\apache2.4.51\conf\extra\httpd-vhosts
<VirtualHost *:80>
  ServerName YourSiteNameHere.com
  ServerAlias www.YourSiteNameHere.com
  DocumentRoot "${INSTALL_DIR}/www"
  <Directory "${INSTALL_DIR}/www/">
    Options +Indexes +Includes +FollowSymLinks +MultiViews
    AllowOverride All
    Require local
  </Directory>
</VirtualHost>
Below is a table explaining what each of the lines mean:
| Instruction | Description |
|---|---|
<VirtualHost *:80> | Creates a new VirtualHost that responds to all (*) IP addresses on port 80 (HTTP port). |
ServerName | Specifies the main domain that this VirtualHost responds to. |
ServerAlias | Specifies any other domains that this VirtualHost responds to. You can put multiple domains here, separated by a space, or leave this out if you don’t have any other aliases. This is usually used to specify which other domains should also direct to your VirtualHost. |
DocumentRoot | Specify the webroot (which folder the VirtualHost look for files in) of the VirtualHost. ${INSTALL_DIR} is where WampServer is installed (by default, it is at C:\wamp64) |
<Directory "${INSTALL_DIR}/www/"> | Specify rules that control how Apache manages the stated folder. The rules within the tag here maximise the accessibility of the files in the stated folder, but makes it accessible only if you are connecting to the server locally (i.e. 127.0.0.1, ::1 or localhost). |
b. Having multiple VirtualHosts
You can add as many VirtualHost entries as you want; if you want your WampServer to handle a lot of sites, you can add multiple VirtualHost entries to it.
<VirtualHost *:80>
  ServerName YourSiteNameHere.com
  ServerAlias www.YourSiteNameHere.com
  DocumentRoot "${INSTALL_DIR}/www"
  <Directory "${INSTALL_DIR}/www/">
    Options +Indexes +Includes +FollowSymLinks +MultiViews
    AllowOverride All
    Require local
  </Directory>
</VirtualHost>

<VirtualHost *:80>
  ServerName MySiteNameThere.com
  DocumentRoot "${INSTALL_DIR}/www"
  <Directory "${INSTALL_DIR}/www/">
    Options +Indexes +Includes +FollowSymLinks +MultiViews
    AllowOverride All
    Require local
  </Directory>
</VirtualHost>
Remember to add a loopback entry for the additional domains into the hosts file too.
4. Troubleshooting common issues
Sometimes, after setting up your configurations, you will run into some issues.
a. WampServer can no longer start
If WampServer was starting before you added these configurations, but is unable to start now, then it is likely that you have syntax errors in your httpd-vhosts file. Double-check the file and see if you are missing any closing brackets or tags, or if you have misspelled any of the terms.
It is also possible that WampServer is unable to start because another application is using one of the ports that WampServer usually uses, like ports 80, 443 or 3306, but this is unlikely unless WampServer was already not starting before you configured your VirtualHost file. If you want to check if your ports are closed, you can refer to this article that troubleshoots for XAMPP’s Apache, or this article that troubleshoots for XAMPP’s MySQL not starting, as they cover how to release the ports that these 2 applications (which WampServer also uses) need.
b. The hosts file cannot be edited
If you are unable to save to your hosts file, or if the file is not updating even after you save the file, that means your hosts file cannot be edited. In such a case, you need to open the file from Command Prompt run as an administrator to edit the file. If you access the file via the File Explorer, you will run into issues when trying to edit the file.
To check that the Command Prompt is being run as an administrator, check that the default directory of the Command Prompt is as follows:
C:\Windows\system32>
If you open your Command Prompt and this is displayed, that means it is being run as administrator. Now you can follow the steps in the earlier segment to find and edit the hosts file.
c. Loopback is not working after domain is added in the hosts file
The hosts file usually updates instantly, but in some computers, it may not immediately register for various reasons. If you can still access the site after the hosts file has been updated, try these steps:
- Double-check the
hostsfile. Make sure you have entered both the127.0.0.1and::1lines, and make sure your website URL is entered correctly. - Sometimes, there may be a DNS cache preventing the hosts file from updating. In order to get rid of the cache, you can try entering the following line in your Command Prompt to get rid of any potential DNS cache:
ipconfig /flushdns - If the above 2 tips do not work, I recommend the classic trick, restarting your computer.
If restarting also did not work, you can have a look at this Stack Overflow topic, which contains many more tricks you can use to troubleshoot what is wrong with your hosts file.
5. Conclusion
If we missed anything in this article, or if you have troubleshooting tips you want to share for common problems people run into when working with WampServer, do leave us a comment below.