If you’re managing a WordPress site that you’ve developed yourself, or one that has been created by a developer and handed over to you, this is a handy guide that you should read. It covers how to optimise your images, so that:
- Your site loads as fast as possible, and;
- Your images are optimised for crawling and indexing by search engines like Google
Broadly speaking, this article is divided into 2 sections:
1. Reducing the image size
Images often account for most of the downloaded bytes on a web page and also often occupy a significant amount of visual space. As a result, optimizing images can often yield some of the largest byte savings and performance improvements for your website…
Quote from a Google Developers article on Image Optimisation
So how do you get started optimising your images? Resizing them to the correct resolution for the web is a good start, and it’s something that many people who manage websites forget, or don’t know about.
a. Resizing images
Properly-sized images will make the site load faster, which means a better user experience and more favourable SEO score from Google. If you don’t know how to resize your images, here are some soft rules you can follow:
- For splash (i.e. full screen) images, you should be able to get away with them being no more than 1920 pixels across. Nowadays though, with 4k screens and long monitors becoming more and more widespread, it has become reasonable to use higher resolution images for such images, though they shouldn’t need to exceed 4000 pixels.
- Regular images should not be more than 1320 pixels across, because most of your site’s content will fit within a container, which is typically no more than 1320px — even on the largest screens.
- Image should be resized based on the amount of screen covered. An image expected to cover about 50% of the screen should be no more than 680 pixels across.
Below is an image that illustrates the difference between a splash image and a regular image:
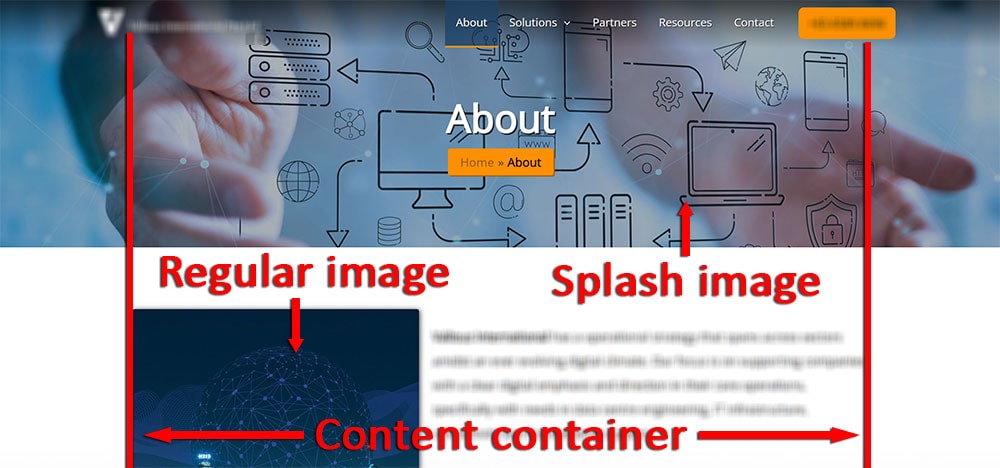
A splash image takes up the entire width of the screen, so it requires a higher resolution to prevent it from looking pixelated. On the other hand, regular images sit in a container on most websites, and do not need as high of a resolution as a result.
b. Image formatting
The image should also have an appropriate format according to its needs. The default is having the image saved in JPG format. Only if the image contains alpha (or transparency), then it should be kept as a PNG as JPG does not support transparent images.
If your images are animated, you will need to save them as GIFs instead. A great (and free) software for editing GIFs is ScreenToGif, a program that allows you to record, edit and convert GIF files. The program even helps you convert your GIFs into video files!
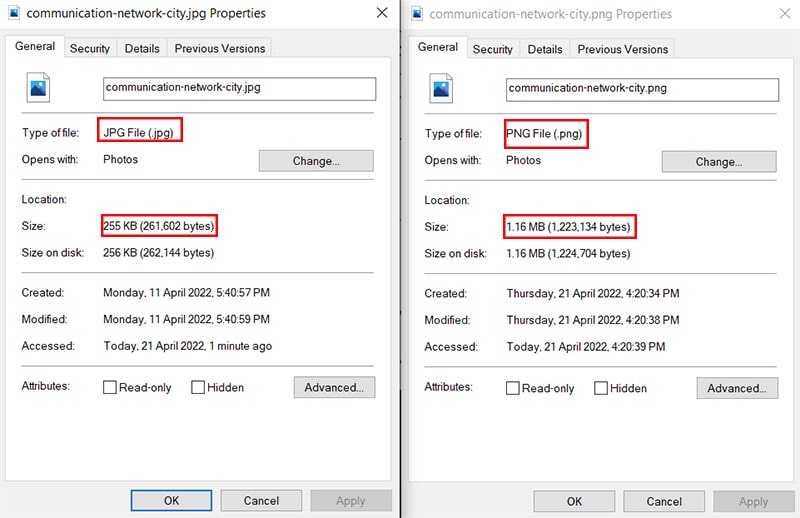
This image comparison highlights the main reason why JPG is favoured for websites. Although PNG images provide better image quality, the smaller file size of JPG images gives the advantage of faster loading time and saves more space on the server’s storage.
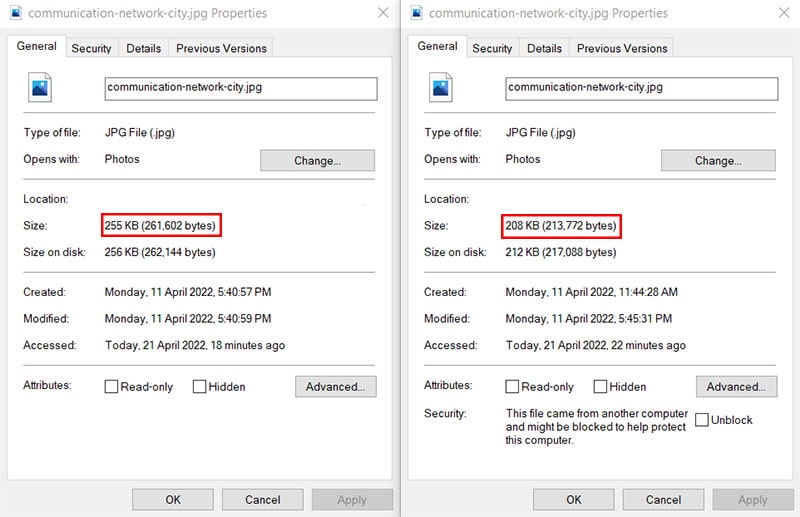
c. Image compression
The last step is compressing the images to further reduce the file size. Depending on the file type of your images, you will have to use different websites to compress them:
- JPG / JPEG files: CompressJPG
- PNG files: CompressPNG
- GIF files: EZGIF GIF optimiser
Recently, Google has been encouraging websites to shift to the use of next-gen image formats WebP and AVIF. Both images formats are able to handle transparent, as well as animated images while offering better compression rates than their traditional counterparts (i.e. JPG, PNG and GIF).
WordPress currently supports the WebP format, and plugins exist to automatically convert images on your site to use the WebP format. These plugins also help you create and serve fallback images, for browsers that do not support the format.
WebP is supported by most modern browsers (not including Internet Explorer). AVIF, on the other hand, is not well-supported at the time of writing (2022) — only Chrome and Opera fully-support it as of now.
2.Proper naming and tagging of images
Proper naming and tagging of images allows them to be optimised for crawling and indexing by search engines like Google.
a. Naming conventions
Before uploading image files onto WordPress, it is a good practice to name them using the same convention as web pages, so that they will get a web-friendly URL:
- All the words in the name should use lowercase letters
- Remove special characters
- All spaces and underscores are replaced with dashes -
- Image names should be descriptive
Here is a table to compare good and bad examples for each convention:
| Convention | Bad example | Good example |
|---|---|---|
| Using lowercase letters | WhatsApp-QR-Code-for-office.jpg | whatsapp-qr-code-for-office.jpg |
| Remove special characters | $25-book-advert-#picture.png | 25-dollar-book-advert-picture.png |
| All spaces replaced with dashes | tall building with blue background.jpg | tall–building-with-blue-background.jpg |
| Image names should be descriptive | DSC20190723.jpg | wolf-pack-group-photo.jpg |
These convention make it so that search engines have an easier time gleaning information from your images, so that they can properly index them.
Using descriptive names for your images will also allow you to make better use of the search function in the WordPress Media library, which allows you to search for media using keywords.
b. Image tagging
After uploading the images, tag them with an appropriate description in both the Alt Text and Title fields when using them.
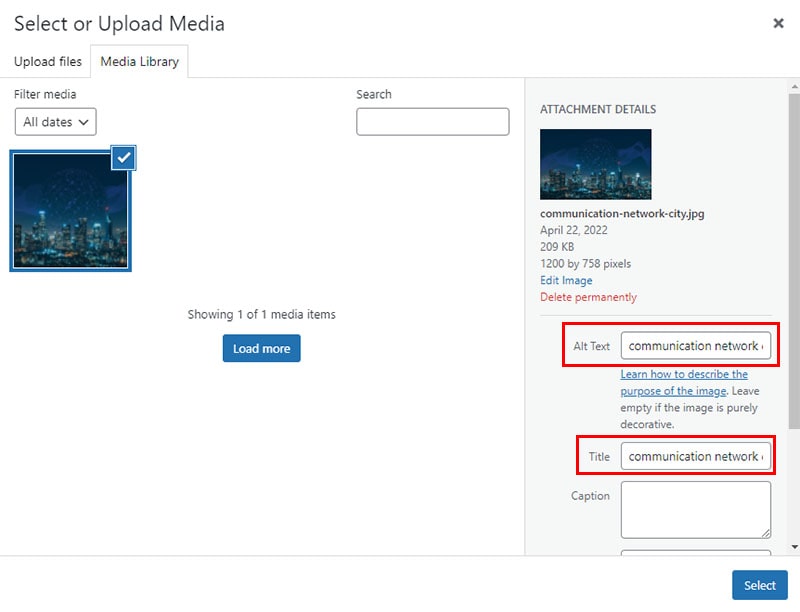
These fields add additional information to your images that are read by search engines and screen readers, and many search engines reward sites that consistently fill up these 2 attributes for their images.
- You will generally want to have descriptions that are more detailed than the file names of the images, as there are almost no restrictions to what you can enter into these fields.
- Traditionally, the Alt Text has been seen as being more important than the Title text. Search engines give much more weight to the Alt Text, as do screen readers.
- The Title text determines the tooltip that pops up when a user hovers their mouse over an image. Generally, search engines do not care if you use them, but they can add to the overall experience.
- You can enter the same values for both Title and Alt Text without penalty.
Conclusion
To summarise, resize, convert and compress your images before giving each of them a unique and descriptive name that follows the correct naming convention. After uploading to WordPress, tag each image with an Alt and Title before use.
Did we miss out anything that you feel are essential to note when uploading images onto WordPress? Let us know in the comments below!
This guide nails it on image optimization. You really can’t skip resizing and compressing. Check out this tool for quick image compression—it’s a lifesaver! https://www.image2kb.com
Bump