Ever wanted to create a game like Harvest Moon in Unity? Check out Part 7 of our guide here, where we go through how to grow and harvest crops. You can also find Part 6 of our guide here, where we went through how to create an in-game time management system.
A link to a package containing the project files up to Part 7 of this tutorial series can also be found at the end of this article, exclusive to Patreon supporters only.
Disclaimer: There was a bug that came out in this part. See the fix here.
1. Getting farm assets to work with
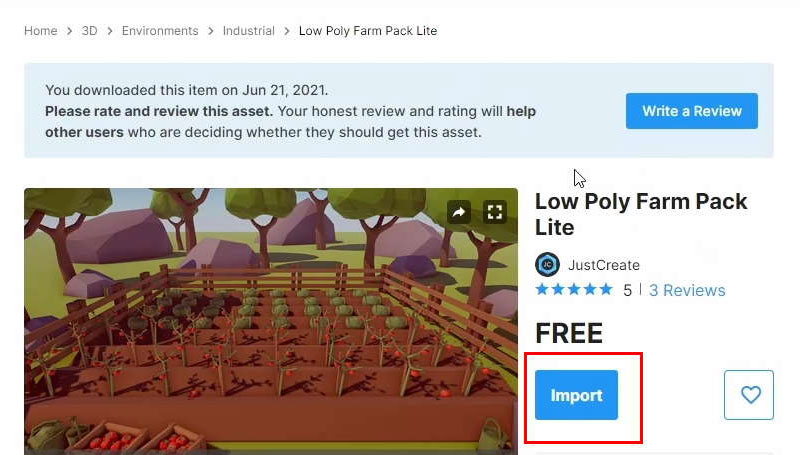
Get the Low Poly Farm Pack Lite package from the asset store.
If you’re feeling generous, you can also get the full version of the Low Poly Farm Pack to support the creator!
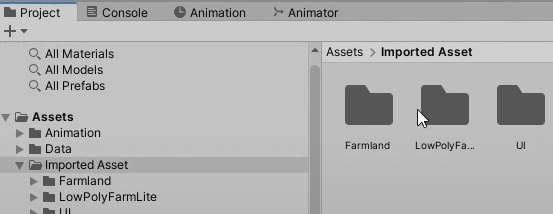
Move the downloaded package folder down to Imported Asset.
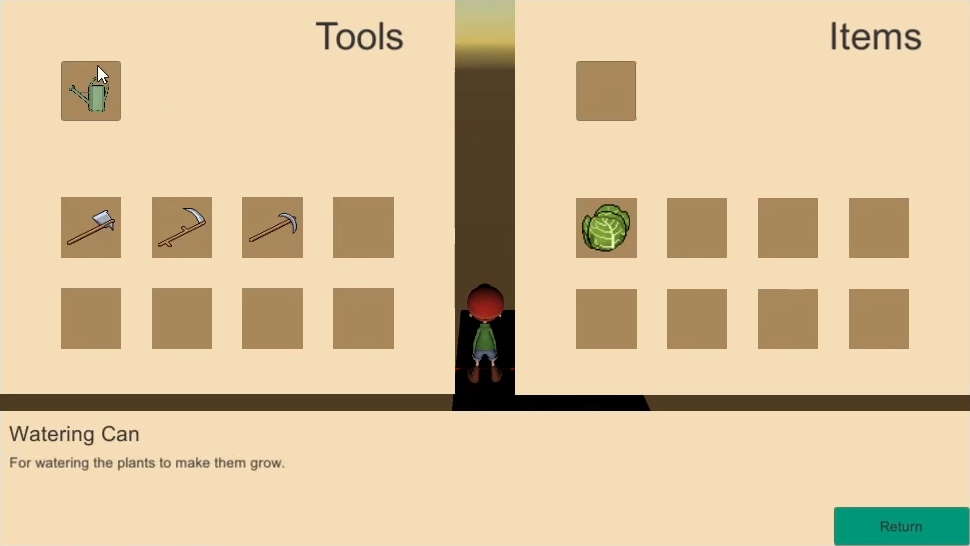
a. Giving the watering can a sprite
For the past 2 parts, we did not have a sprite for the watering can. That ends today.
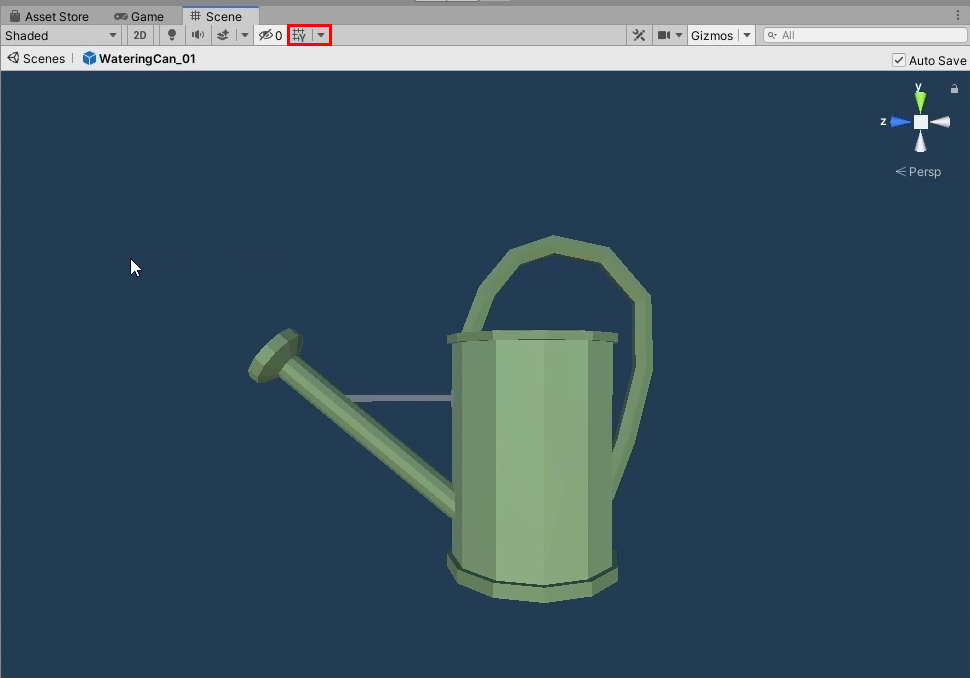
Open the package’s watering can prefab from Assets/Imported Asset/LowPolyFarmLite/WateringCan_01
Disable grids, and take a screenshot of the watering can.
Open an image editing software and give it a transparent background, with an outline layer to match the style of the other icons. The steps to do this might vary depending on what software you use. Save this as a PNG image.
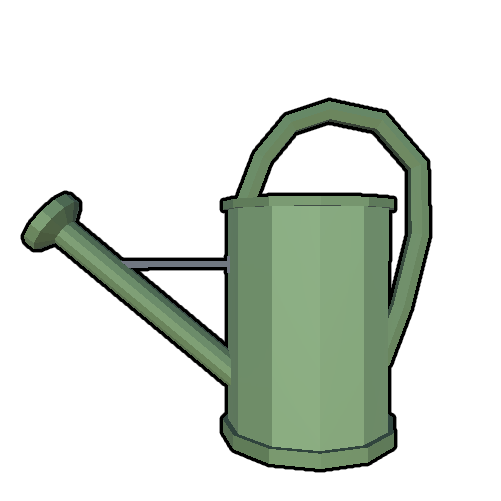
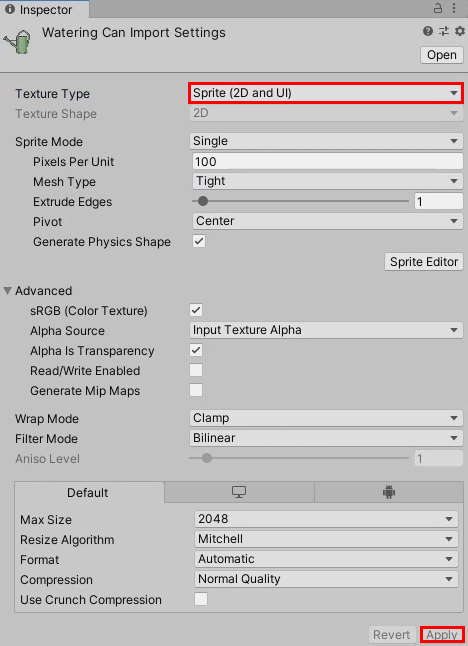
Save this as Assets/Imported Asset/UI/ Watering Can.png. On the Import Settings, set the Texture Type to Sprite (2D and UI) and click Apply.
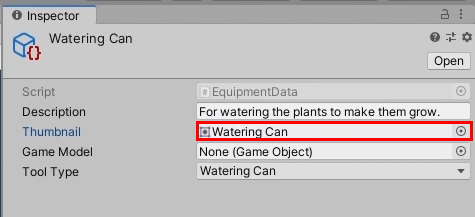
Edit the EquipmentData from Assets/Data/Tools/Watering Can and assign the newly-added sprite to the Thumbnail.
It should now look like this in-game.
b. Assigning models for crops
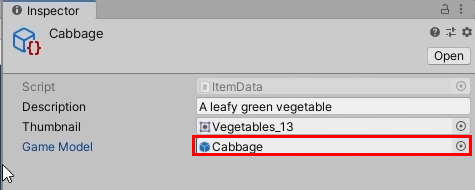
Move the Cabbage_01 prefab from Assets/Imported Asset/LowPolyFarmLite/ to Assets/Prefabs and rename it to Cabbage.
Assign the prefab to the Game Model field of the Cabbage ItemData we created in Assets/Data/Items
A crop has at least 3 stages:
- Seed: When it is just planted
- Seedling: After the seed germinates and grows
- Harvestable: Fully grown and ready for harvest
We need models for the other 2 stages, so import the Cartoon Farm Crops from the Asset Store.
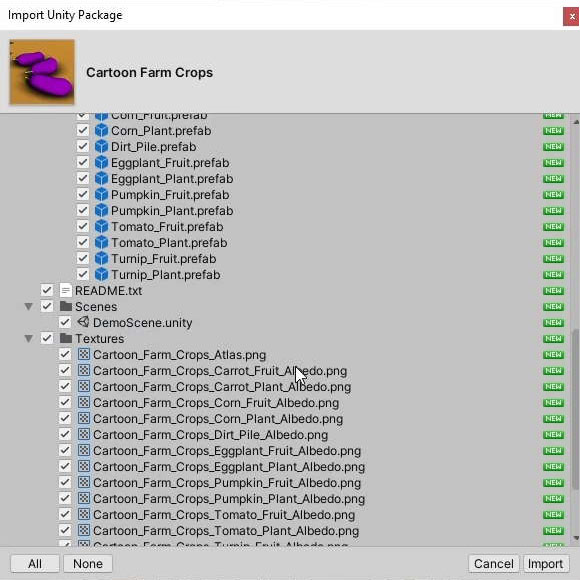
It will give you 2 folders: Cartoon_Farm_Crops and Standard Assets. Move the Standard Assets folder into Cartoon Farm Crops and move the whole thing to Assets/Imported Asset.
2. Crop planting and growing system
Currently, the pieces we have to set up a farming system are the following:
- SeedData: Contains the information of the seed to be planted
- ItemData: The information of items in general. In this context it is used to store the information of what will be harvested when the crop from SeedData matures.
As you can see, we have only created the data containers for what the player can plant. Hence, we need to also create a system to translate this information to the player’s actions(i.e. planting, growing, harvesting).
a. Setting up the Crop Prefab
Let’s create a generic prefab to be instantiated when the player plants a seed.
Create a new GameObject in the scene and name it Crop.
From Assets/Imported Asset/Cartoon_Farm_Crops/Prefabs, drag Dirt_Pile into the scene as a child of the Crop GameObject. In the same folder, duplicate Carrot_Plant, move it to Assets/Prefabs and rename it to ‘Cabbage Seedling‘
Add the Cabbage Seedling and Cabbage prefabs to the Crop GameObject.
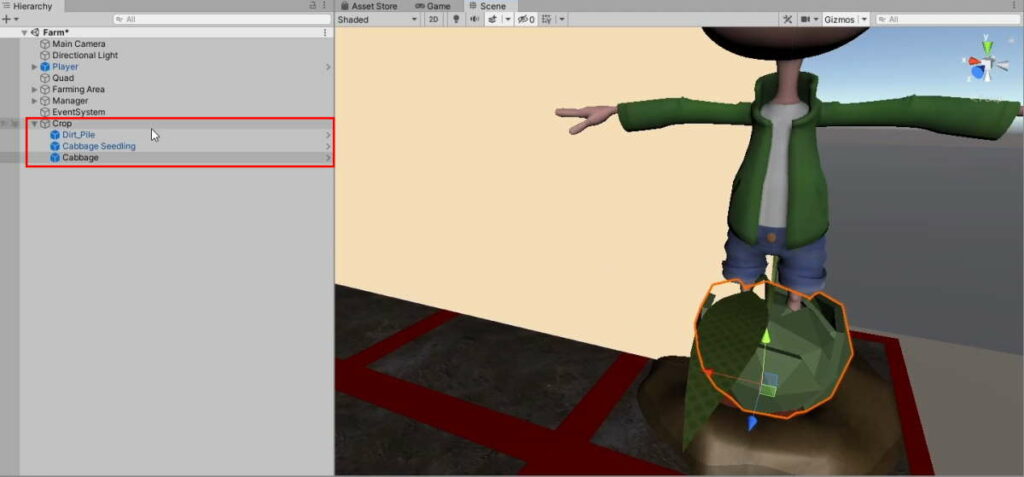
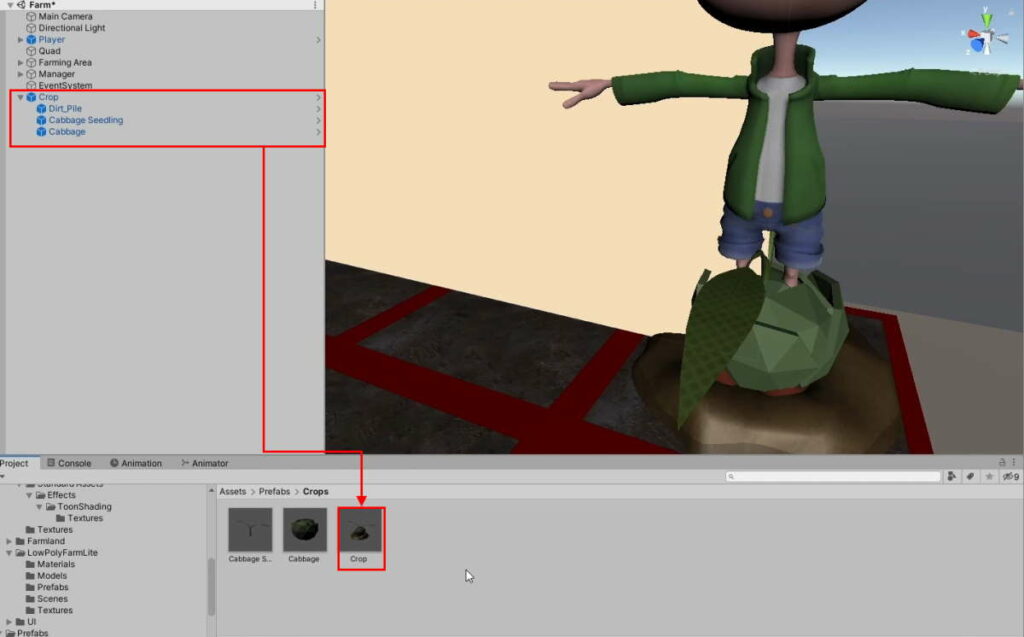
In Assets/Prefabs, create a folder named Crops and move Cabbage Seedling and Cabbage into it. Convert the Crop GameObject into a Prefab in that folder.
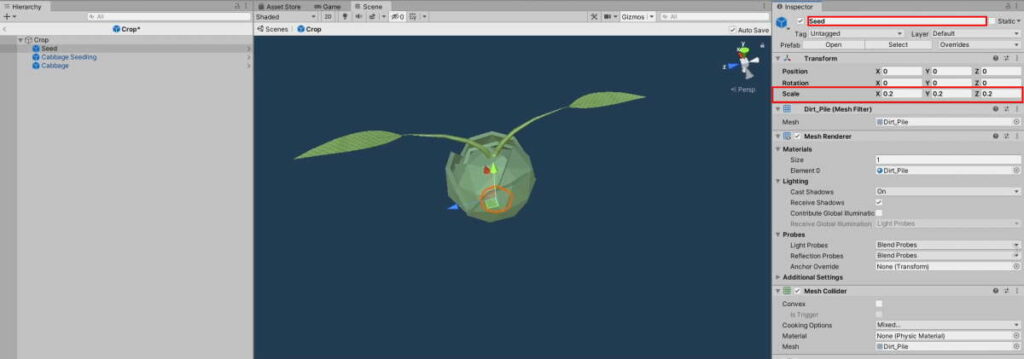
The 3 models in the prefab represent the 3 stages of growth of the crop. Out of the 3, the model for the Seed will remain consistently the same for all crops. The seedling and harvestable models will change based on the SeedData.
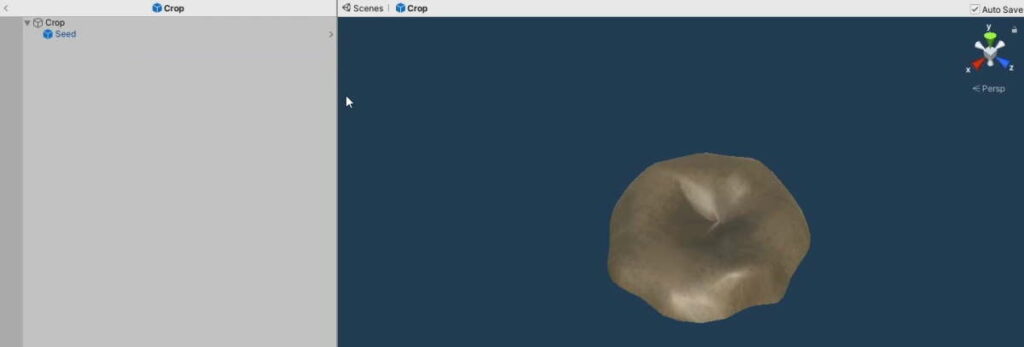
Hence, we can change the scale for the Dirt_Pile prefab within the Crop prefab. Rename it to Seed and change its scale to 0.2:
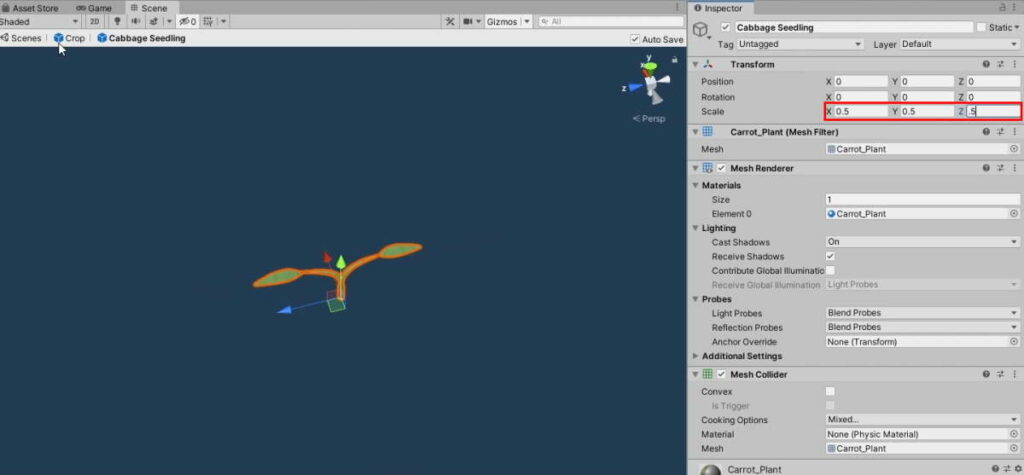
The seedling should not too big. Go into the Cabbage Seedling prefab and change its scale to 0.5:
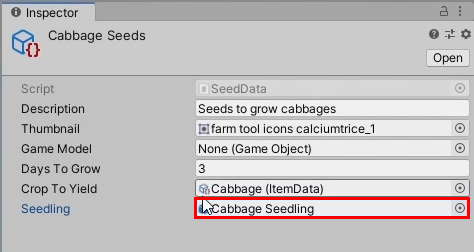
As mentioned before, the models for Seedling and the Harvestable stages are determined by the information given in SeedData. The Harvestable stage is determined by cropToYield, but we do not have one for the Seedling stage. Thus, add one for it in SeedData:
SeedData.cs
using System.Collections;
using System.Collections.Generic;
using UnityEngine;

[CreateAssetMenu(menuName ="Items/Seed")]
public class SeedData : ItemData
{
    //Time it takes before the seed matures into a crop
    public int daysToGrow;

    //The crop the seed will yield
    public ItemData cropToYield;

    //The seedling GameObject
    public GameObject seedling;
}
In the Cabbage Seeds entry under Assets/Data/Tools/Seed, assign the Cabbage Seedling prefab to the newly declared field:
b. Planting the crop
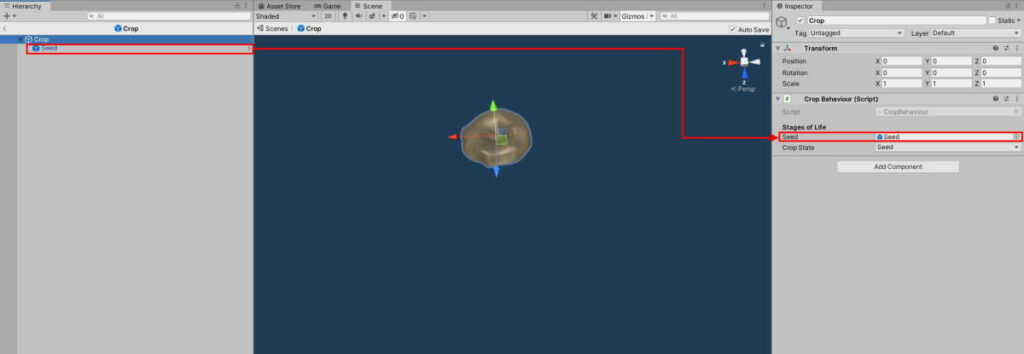
As the other 2 stages will be instantiated separately, delete those GameObjects from the Crop prefab. The prefab should look like this now:
To make the prefab work, we need a class to handle the crop’s behaviour in the game. Here’s an outline of how it should work:
- Initialization: When it is planted, it will need to store information on what it is supposed to grow into. Hence, we need to make a function of our own to handle it instead of
Start. - Life Cycle: The crop will have 3 states: Seed, Seedling and Harvestable. We need an enum to keep track of the states in the script, and a GameObject for each of them for feedback in the scene.
- Growth: It should grow whenever the land is watered so instead of checking at every frame in
Updatewe should make a function that can be called when those conditions are met.
To this end, create a new script, CropBehaviour.cs with the following:
CropBehaviour.cs
using System.Collections;
using System.Collections.Generic;
using UnityEngine;

public class CropBehaviour : MonoBehaviour
{
    //Information on what the crop will grow into
    SeedData seedToGrow;

    [Header("Stages of Life")]
    public GameObject seed;
    private GameObject seedling;
    private GameObject harvestable;

    public enum CropState
    {
        Seed, Seedling, Harvestable
    }
    //The current stage in the crop's growth
    public CropState cropState;

    //Initialisation for the crop GameObject
    //Called when the player plants a seed
    public void Plant(SeedData seedToGrow)
    {
        //Save the seed information
        this.seedToGrow = seedToGrow;

    }

    //The crop will grow when watered
    public void Grow()
    {

    }
    // Start is called before the first frame update
    void Start()
    {

    }


    // Update is called once per frame
    public void Update()
    {

    }
}
Add CropBehaviour as a component to the Crop prefab. As the seed GameObject will be obtained from the prefab itself, assign it in the inspector:
For the other 2 states, the GameObject will be instantiated and assigned in the Plant function:
CropBehaviour.cs
    //Initialisation for the crop GameObject
    //Called when the player plants a seed
    public void Plant(SeedData seedToGrow)
    {
        //Save the seed information
        this.seedToGrow = seedToGrow;

        //Instantiate the seedling and harvestable GameObjects
        seedling = Instantiate(seedToGrow.seedling, transform);

        //Access the crop item data
        ItemData cropToYield = seedToGrow.cropToYield;

        //Instantiate the harvestable crop
        harvestable = Instantiate(cropToYield.gameModel, transform);

    }
As usual, we will need a function to handle the state changes in the class. Add this function to CropBehaviour:
CropBehaviour.cs
    //Function to handle the state changes
    void SwitchState(CropState stateToSwitch)
    {
        //Reset everything and set all GameObjects to inactive
        seed.SetActive(false);
        seedling.SetActive(false);
        harvestable.SetActive(false);

        switch (stateToSwitch)
        {
            case CropState.Seed:
                //Enable the Seed GameObject
                seed.SetActive(true);
                break;
            case CropState.Seedling:
                //Enable the Seedling GameObject
                seedling.SetActive(true);
                break;
            case CropState.Harvestable:
                //Enable the Harvestable GameObject
                harvestable.SetActive(true);
                break;
        }

        //Set the current crop state to the state we're switching to
        cropState = stateToSwitch;
    }
Call this function to switch to the Seed CropState in Plant():
CropBehaviour.cs
    //Initialisation for the crop GameObject
    //Called when the player plants a seed
    public void Plant(SeedData seedToGrow)
    {
        //Save the seed information
        this.seedToGrow = seedToGrow;

        //Instantiate the seedling and harvestable GameObjects
        seedling = Instantiate(seedToGrow.seedling, transform);

        //Access the crop item data
        ItemData cropToYield = seedToGrow.cropToYield;

        //Instantiate the harvestable crop
        harvestable = Instantiate(cropToYield.gameModel, transform);

        //Set the initial state to Seed
        SwitchState(CropState.Seed);

    }
Since we handle all interaction between the Player’s Tools and the Land on Land‘s Interact(), we will also call the Crop’s Plant() from it. The logic will be similar to how we did the interactions with the other tools, except the player needs to meet 3 conditions to plant a seed on the Land:
- The tool he is holding is of type
SeedData - The Land’s state must be farmable (Either Farmland or Watered)
- There isn’t already a crop on the land.
When these conditions are met, we can instantiate the Crop prefab.
Hence, declare the following variables on Land:
Land.cs
    [Header("Crops")]
    //The crop prefab to instantiate
    public GameObject cropPrefab;

    //The crop currently planted on the land
    CropBehaviour cropPlanted = null;
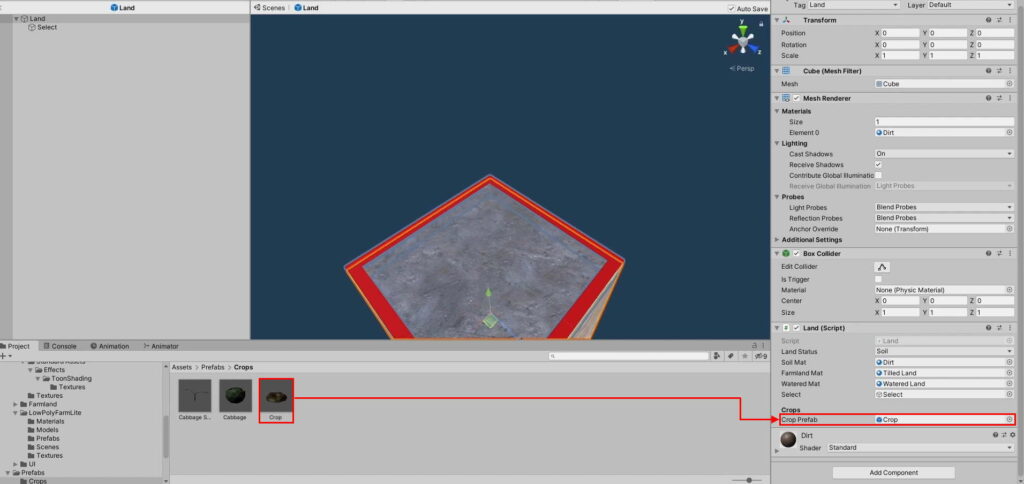
Assign the Crop prefab to its reference:
Add the following to the Interact() function:
Land.cs
    //When the player presses the interact button while selecting this land
    public void Interact()
    {
        //Check the player's tool slot
        ItemData toolSlot = InventoryManager.Instance.equippedTool;

        //If there's nothing equipped, return
        if (toolSlot == null)
        {
            return;
        }

        //Try casting the itemdata in the toolslot as EquipmentData
        EquipmentData equipmentTool = toolSlot as EquipmentData;

        //Check if it is of type EquipmentData
        if(equipmentTool != null)
        {
            //Get the tool type
            EquipmentData.ToolType toolType = equipmentTool.toolType;

            switch (toolType)
            {
                case EquipmentData.ToolType.Hoe:
                    SwitchLandStatus(LandStatus.Farmland);
                    break;
                case EquipmentData.ToolType.WateringCan:
                    SwitchLandStatus(LandStatus.Watered);
                    break;
            }

            //We don't need to check for seeds if we have already confirmed the tool to be an equipment
            return;
        }

        //Try casting the itemdata in the toolslot as SeedData
        SeedData seedTool = toolSlot as SeedData;

        ///Conditions for the player to be able to plant a seed
        ///1: He is holding a tool of type SeedData
        ///2: The Land State must be either watered or farmland
        ///3. There isn't already a crop that has been planted
        if(seedTool != null && landStatus != LandStatus.Soil && cropPlanted == null)
        {
            //Instantiate the crop object parented to the land
            GameObject cropObject = Instantiate(cropPrefab, transform);

            //Access the CropBehaviour of the crop we're going to plant
            cropPlanted = cropObject.GetComponent<CropBehaviour>();
            //Plant it with the seed's information
            cropPlanted.Plant(seedTool);

        }
    }
The problem with just instantiating the prefab directly as a child of the Land GameObject is that it will be buried in the heart of the GameObject. Hence, we need to change its position on the y-axis to be directly above it. Add the following to Interact():
Land.cs
    //When the player presses the interact button while selecting this land
    public void Interact()
    {
        //Check the player's tool slot
        ItemData toolSlot = InventoryManager.Instance.equippedTool;

        //If there's nothing equipped, return
        if (toolSlot == null)
        {
            return;
        }

        //Try casting the itemdata in the toolslot as EquipmentData
        EquipmentData equipmentTool = toolSlot as EquipmentData;

        //Check if it is of type EquipmentData
        if(equipmentTool != null)
        {
            //Get the tool type
            EquipmentData.ToolType toolType = equipmentTool.toolType;

            switch (toolType)
            {
                case EquipmentData.ToolType.Hoe:
                    SwitchLandStatus(LandStatus.Farmland);
                    break;
                case EquipmentData.ToolType.WateringCan:
                    SwitchLandStatus(LandStatus.Watered);
                    break;
            }

            //We don't need to check for seeds if we have already confirmed the tool to be an equipment
            return;
        }

        //Try casting the itemdata in the toolslot as SeedData
        SeedData seedTool = toolSlot as SeedData;

        ///Conditions for the player to be able to plant a seed
        ///1: He is holding a tool of type SeedData
        ///2: The Land State must be either watered or farmland
        ///3. There isn't already a crop that has been planted
        if(seedTool != null && landStatus != LandStatus.Soil && cropPlanted == null)
        {
            //Instantiate the crop object parented to the land
            GameObject cropObject = Instantiate(cropPrefab, transform);
           //Move the crop object to the top of the land gameobject
            cropObject.transform.position = new Vector3(transform.position.x, 0, transform.position.z);

            //Access the CropBehaviour of the crop we're going to plant
            cropPlanted = cropObject.GetComponent<CropBehaviour>();
            //Plant it with the seed's information
            cropPlanted.Plant(seedTool);

        }
    }
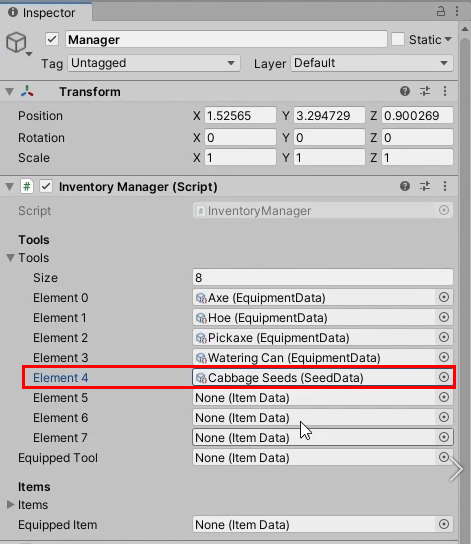
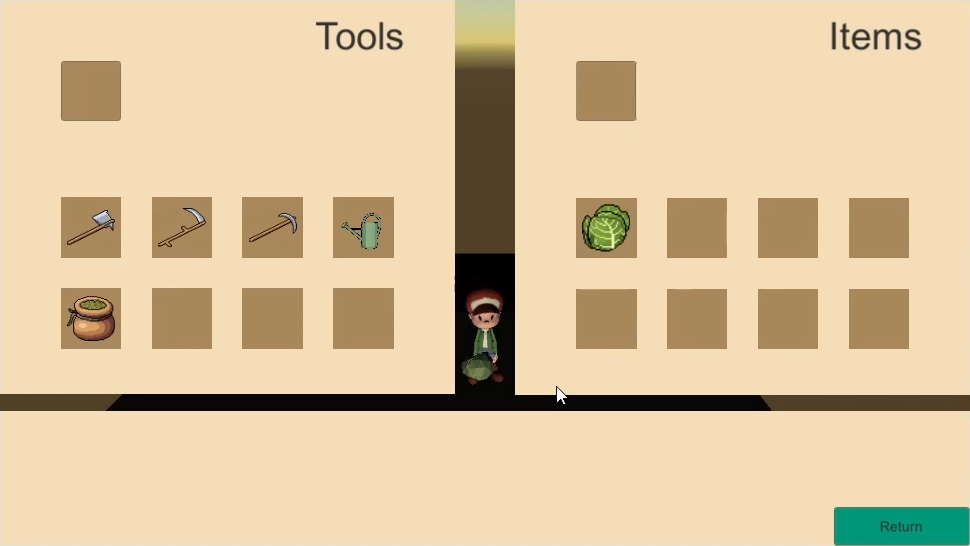
Add the cabbage seeds to the Tools section of the inventory:
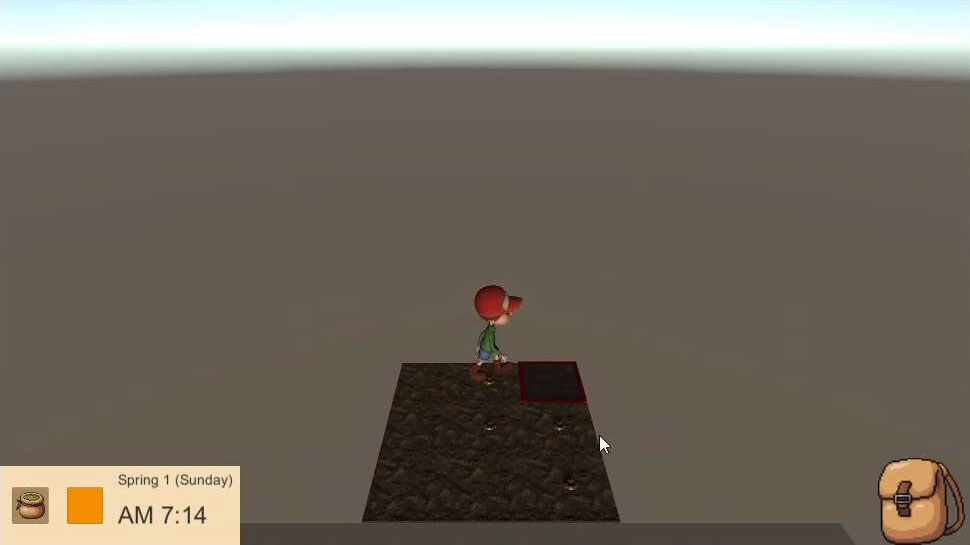
Test the game:
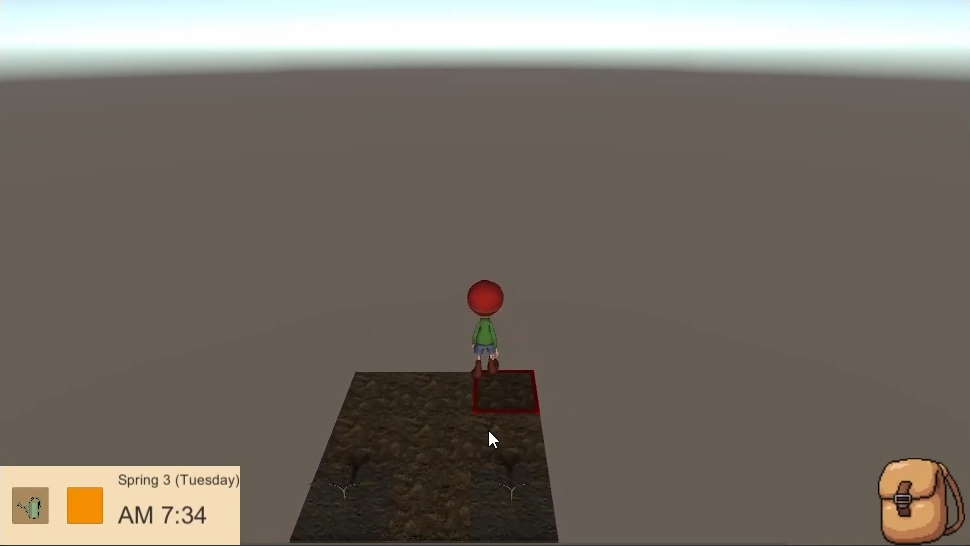
- Use a Hoe to till the land
- Use the Cabbage Seeds to plant the new seeds
y=0 and work your way up from there. c. Growing the crop
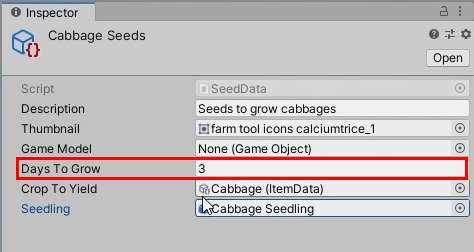
The amount of time it takes for the seed to mature is determined by the field Days To Grow in SeedData:
For now, we want the cabbage to grow on the condition that the Land is watered. The logic is as follows:
- For every minute the
Landis watered, theGrow()function inCropBehaviouris called. - The total minutes in which
Landis watered will be tracked inGrow() - When the minutes reach the total number of days required to mature, it will switch its state to Harvestable.
Let’s declare the needed variables in CropBehaviour:
CropBehaviour.cs
    //The growth points of the crop
    int growth;
    //How many growth points it takes before it becomes harvestable
    int maxGrowth;
maxGrowth would be SeedData‘s daysToGrow converted to minutes. Calculate this in Plant:
CropBehaviour.cs
    //Initialisation for the crop GameObject
    //Called when the player plants a seed
    public void Plant(SeedData seedToGrow)
    {
        //Save the seed information
        this.seedToGrow = seedToGrow;

        //Instantiate the seedling and harvestable GameObjects
        seedling = Instantiate(seedToGrow.seedling, transform);

        //Access the crop item data
        ItemData cropToYield = seedToGrow.cropToYield;

        //Instantiate the harvestable crop
        harvestable = Instantiate(cropToYield.gameModel, transform);

        //Convert Days To Grow into hours
        int hoursToGrow = GameTimestamp.DaysToHours(seedToGrow.daysToGrow);
        //Convert it to minutes
        maxGrowth = GameTimestamp.HoursToMinutes(hoursToGrow);

        //Set the initial state to Seed
        SwitchState(CropState.Seed);

    }
Now on to handle Growth(). Before the seed matures into a harvestable crop, it has to be a seedling first. For now, we will make the seed change to a seedling when it reaches 50% maturity.
You can make up your own formula or explicitly control it by adding 1 more variable in SeedData.
Add the following to Grow():
CropBehaviour.cs
    //The crop will grow when watered
    public void Grow()
    {
        //Increase the growth point by 1
        growth++;

        //The seed will sprout into a seedling when the growth is at 50%
        if(growth >= maxGrowth / 2 && cropState == CropState.Seed)
        {
            SwitchState(CropState.Seedling);
        }

        //Grow from seedling to harvestable
        if(growth >= maxGrowth && cropState == CropState.Seedling)
        {
            SwitchState(CropState.Harvestable);
        }
    }
Finally, call this function under ClockUpdate() in Land:
CropBehaviour.cs
    public void ClockUpdate(GameTimestamp timestamp)
    {
        //Checked if 24 hours has passed since last watered
        if(landStatus == LandStatus.Watered)
        {
            //Hours since the land was watered
            int hoursElapsed = GameTimestamp.CompareTimestamps(timeWatered, timestamp);
            Debug.Log(hoursElapsed + " hours since this was watered");

            //Grow the planted crop, if any
            if(cropPlanted != null)
            {
                cropPlanted.Grow();
            }

            if(hoursElapsed > 24)
            {
                //Dry up (Switch back to farmland)
                SwitchLandStatus(LandStatus.Farmland);
            }
        }
    }
It should work when you play the game now, but there are two small issues:
- The player should be able to walk through the seedling (but he ends up climbing it up instead).
- It isn’t facing the direction we want

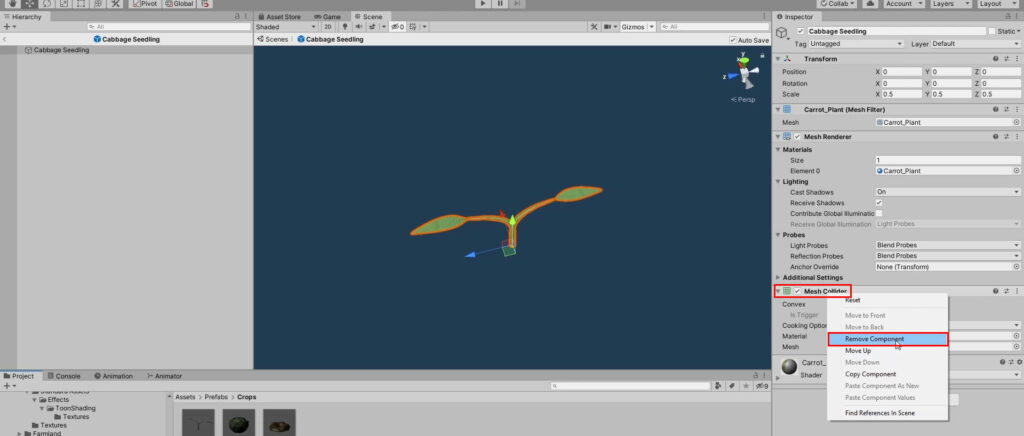
We have no business colliding with the seedling anyway so remove the Mesh Collider component from the Cabbage Seedling prefab:
Set the y-rotation to 90:
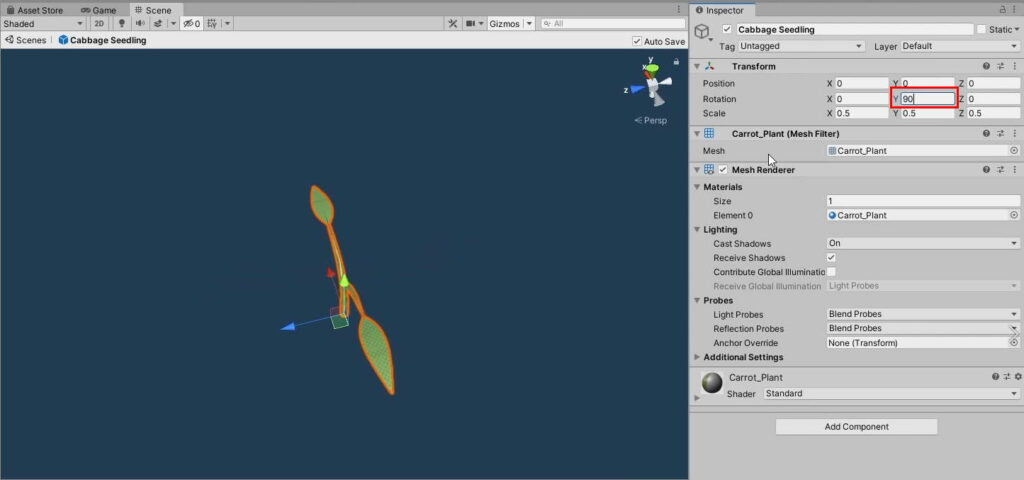
This should fix the directional issues:
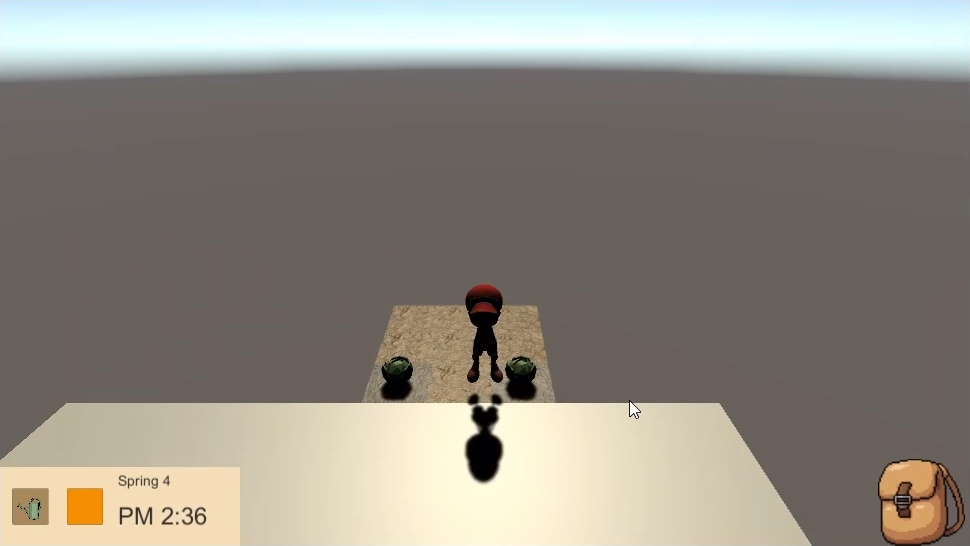
After it has been watered for 3 days, it should grow into cabbages:
When the crop is fully grown, we have no need for the Crop prefab or the CropBehaviour script anymore. Hence, when it is fully grown, it should Destroy everything but the Harvestable crop. Add the following to SwitchState() in CropBehaviour:
CropBehaviour.cs
    //Function to handle the state changes
    void SwitchState(CropState stateToSwitch)
    {
        //Reset everything and set all GameObjects to inactive
        seed.SetActive(false);
        seedling.SetActive(false);
        harvestable.SetActive(false);

        switch (stateToSwitch)
        {
            case CropState.Seed:
                //Enable the Seed GameObject
                seed.SetActive(true);
                break;
            case CropState.Seedling:
                //Enable the Seedling GameObject
                seedling.SetActive(true);
                break;
            case CropState.Harvestable:
                //Enable the Harvestable GameObject
                harvestable.SetActive(true);
                //Unparent it to the crop
                harvestable.transform.parent = null;

                Destroy(gameObject);
                break;
        }

        //Set the current crop state to the state we're switching to
        cropState = stateToSwitch;
    }
3. Harvesting and picking up items
When the crop is fully grown, it can’t be interacted with. Hence, we need to set up the interactions for it.
a. Rendering the items in the scene
In Part 5, we mentioned that the information on what the player is holding will be conveyed diegetically, that is by looking at the model he’s holding in the game.
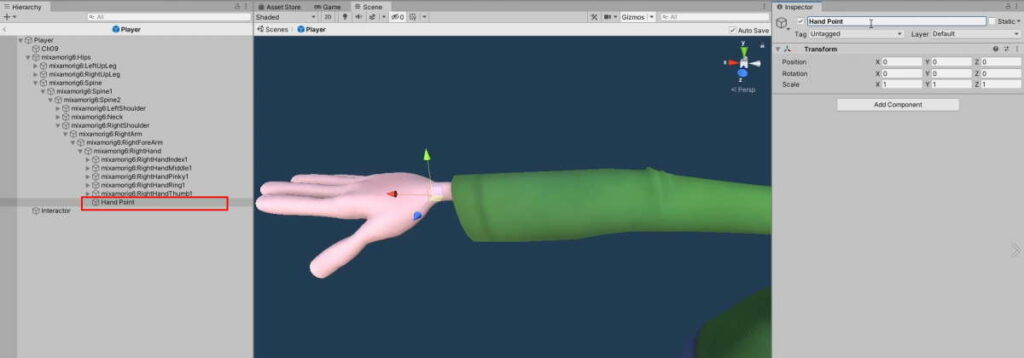
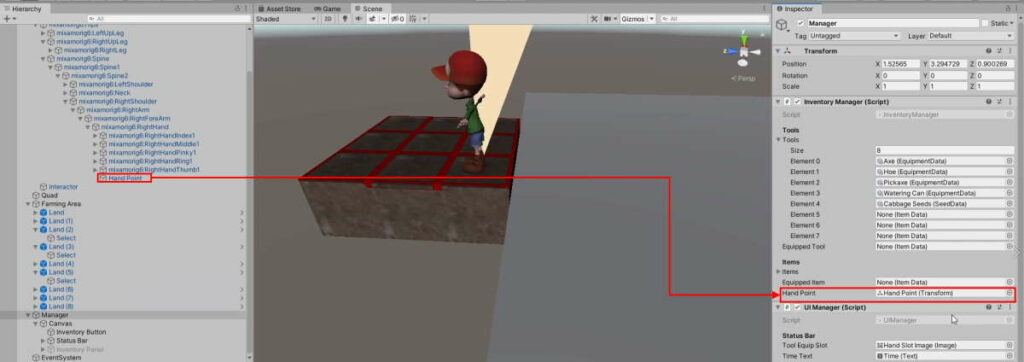
Define the point the player will be holding the item at, by going into the Right Hand of the model’s rig and creating an empty GameObject Hand Point, parented to it:
Declare a reference to it under the Items header in InventoryManager:
InventoryManager.cs
    [Header("Items")]
    //Item Slots
    public ItemData[] items = new ItemData[8];
    //Item in the player's hand
    public ItemData equippedItem = null;

    //The transform for the player to hold items in the scene
    public Transform handPoint;
Assign the Hand Point to the newly declared reference in the scene.
To display the items in the scene, we will simply Instantiate the game model of the equipped item on the player’s hand in the scene. In InventoryManager, add the following function to do that:
InventoryManager.cs
    //Render the player's equipped item in the scene
    public void RenderHand()
    {
        //Check if the player has anything equipped
        if(equippedItem != null)
        {
            //Instantiate the game model on the player's hand and put it on the scene
            Instantiate(equippedItem.gameModel, handPoint);
        }

    }
This function should be called whenever a change occurs within the Item section of the inventory. Hence, call the function at the following places in InventoryManager:
InventoryManager.cs
    //Equipping

    //Handles movement of item from Inventory to Hand
    public void InventoryToHand(int slotIndex, InventorySlot.InventoryType inventoryType)
    {
        if(inventoryType == InventorySlot.InventoryType.Item)
        {
            //Cache the Inventory slot ItemData from InventoryManager
            ItemData itemToEquip = items[slotIndex];

            //Change the Inventory Slot to the Hand's
            items[slotIndex] = equippedItem;

            //Change the Hand's Slot to the Inventory Slot's
            equippedItem = itemToEquip;

            //Update the changes in the scene
            RenderHand();

        } else
        {
            //Cache the Inventory slot ItemData from InventoryManager
            ItemData toolToEquip = tools[slotIndex];

            //Change the Inventory Slot to the Hand's
            tools[slotIndex] = equippedTool;

            //Change the Hand's Slot to the Inventory Slot's
            equippedTool = toolToEquip;
        }

        //Update the changes to the UI
        UIManager.Instance.RenderInventory();


    }

    //Handles movement of item from Hand to Inventory
    public void HandToInventory(InventorySlot.InventoryType inventoryType)
    {
        if(inventoryType == InventorySlot.InventoryType.Item)
        {
            //Iterate through each inventory slot and find an empty slot
            for(int i =0; i < items.Length; i++)
            {
                if(items[i] == null)
                {
                    //Send the equipped item over to its new slot
                    items[i] = equippedItem;
                    //Remove the item from the hand
                    equippedItem = null;
                    break;
                }
            }

            //Update the changes in the scene
            RenderHand();

        } else
        {
            //Iterate through each inventory slot and find an empty slot
            for (int i = 0; i < tools.Length; i++)
            {
                if (tools[i] == null)
                {
                    //Send the equipped item over to its new slot
                    tools[i] = equippedTool;
                    //Remove the item from the hand
                    equippedTool = null;
                    break;
                }
            }

        }
        //Update changes in the inventory
        UIManager.Instance.RenderInventory();
    }
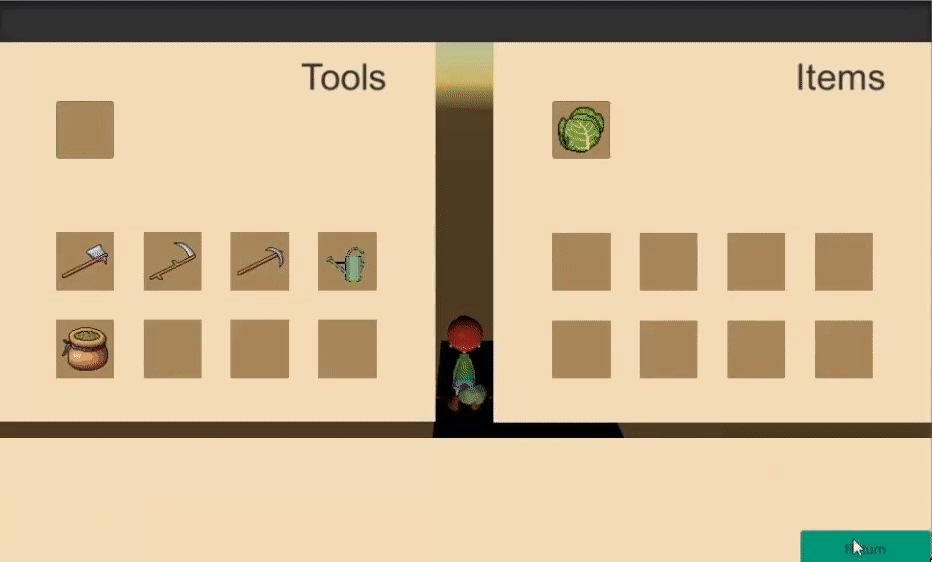
A cabbage should appear on the Player’s hand when you equip it from the Inventory screen. However, once you unequip the Cabbage, it remains there.
In the future, when we have more items, equipping another item would just result in 2 items being on the player’s hand at the same time in the scene. Hence, we need to properly reset the hand each time by destroying all items parented to it beforehand. Add the following to the RenderHand() function:
InventoryManager.cs
    //Render the player's equipped item in the scene
    public void RenderHand()
    {
        //Reset objects on the hand
        if(handPoint.childCount > 0)
        {
            Destroy(handPoint.GetChild(0).gameObject);
        }

        //Check if the player has anything equipped
        if(equippedItem != null)
        {
            //Instantiate the game model on the player's hand and put it on the scene
            Instantiate(equippedItem.gameModel, handPoint);
        }

    }
b. Keeping items
Currently, Tool Interactions happen when the player makes a Left-click. Hence, we will set up Item Interactions when the player makes a Right-click. It will do the following:
- If the player is holding something, keep it in his inventory
- If the player’s hands are empty and there is an item on the ground, pick it up
Declare a new function to handle these interactions in PlayerInteraction:
PlayerInteraction.cs
    //Triggered when the player presses the item interact button
    public void ItemInteract()
    {
        //If the player is holding something, keep it in his inventory


        //If the player isn't holding anything, pick up an item

    }
And call it when the player makes a Right-click (Mapped to Fire2 by default in Unity’s Input Manager) in PlayerController. Hence, add the following in its Interact() function:
    public void Interact()
    {
        //Tool interaction
        if (Input.GetButtonDown("Fire1"))
        {
            //Interact
            playerInteraction.Interact();
        }

        //Item interaction
        if (Input.GetButtonDown("Fire2"))
        {
            playerInteraction.ItemInteract();
        }
    }
To keep the item, simply use InventoryManager‘s HandToInventory() function. Add the following in PlayerInteraction‘s ItemInteract():
    //Triggered when the player presses the item interact button
    public void ItemInteract()
    {
        //If the player is holding something, keep it in his inventory
        if(InventoryManager.Instance.equippedItem != null)
        {
            InventoryManager.Instance.HandToInventory(InventorySlot.InventoryType.Item);
            return;
        }

        //If the player isn't holding anything, pick up an item


    }
Now you should be able to keep the equipped item from the scene with Right-click.
c. Picking up the items
Before we get into selecting and picking up an item, we have a problem. How does the game know what Item is a GameObject supposed to represent in the scene?
Thus, create a new script InteractableObject with an ItemData reference:
InteractableObject.cs
using System.Collections;
using System.Collections.Generic;
using UnityEngine;

public class InteractableObject : MonoBehaviour
{
    //The item information the GameObject is supposed to represent
    public ItemData item;

   void Start()
    {

    }

   public void Update()
    {

    }

}
Add the script as a component to the Cabbage prefab and assign the Cabbage ItemData to its item reference:
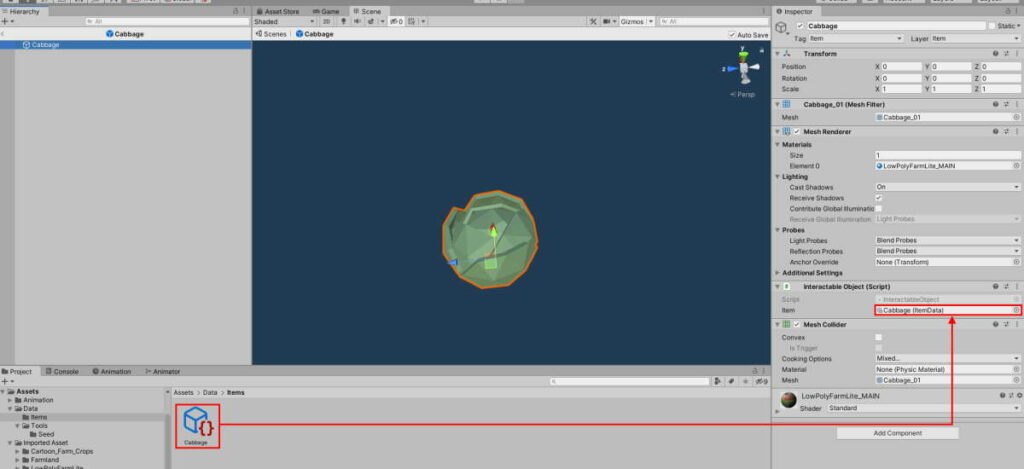
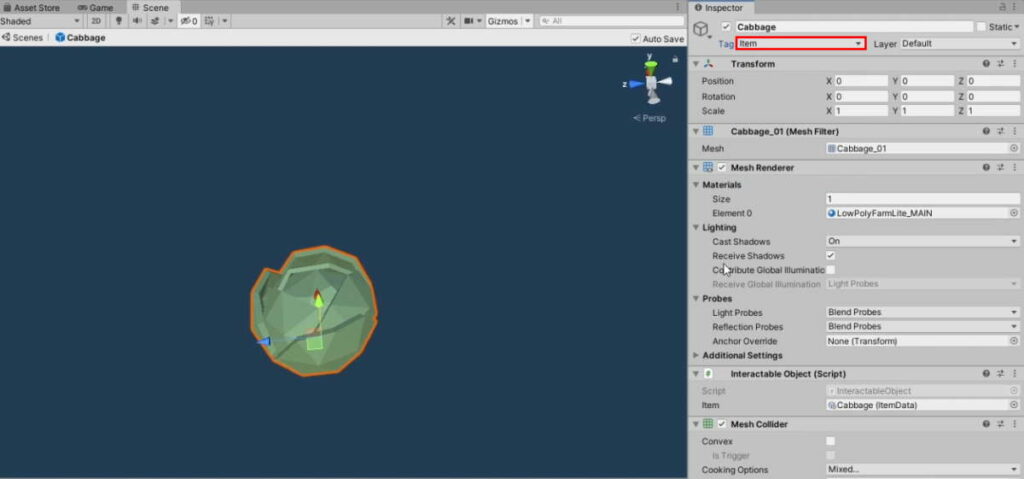
Before the player is able to pick up the item, we have to set up a way for it to be selected. Create a new tag called ‘Item‘.
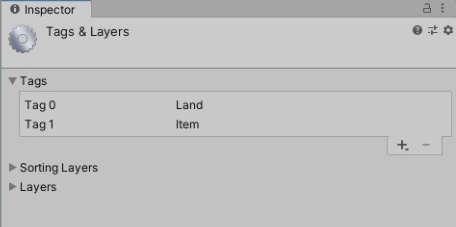
Set the Cabbage prefab’s Tag to this new tag.
Much like the selection system for Land, we begin by storing the selected InteractableObject as a variable. Declare the following in PlayerInteraction:
PlayerInteraction.cs
    PlayerController playerController;

    //The land the player is currently selecting
    Land selectedLand = null;

    //The interactable object the player is currently selecting
    InteractableObject selectedInteractable = null;
Likewise, add the item selection logic to its OnInteractableHit():
PlayerInteraction.cs
    //Handles what happens when the interaction raycast hits something interactable
    void OnInteractableHit(RaycastHit hit)
    {
        Collider other = hit.collider;

        //Check if the player is going to interact with land
        if(other.tag == "Land")
        {
            //Get the land component
            Land land = other.GetComponent<Land>();
            SelectLand(land);
            return;
        }

        //Check if the player is going to interact with an Item
        if(other.tag == "Item")
        {
            //Set the interactable to the currently selected interactable
            selectedInteractable = other.GetComponent<InteractableObject>();
            return;
        }

        //Deselect the interactable if the player is not standing on anything at the moment
        if(selectedInteractable != null)
        {
            selectedInteractable = null;
        }

        //Deselect the land if the player is not standing on any land at the moment
        if(selectedLand != null)
        {
            selectedLand.Select(false);
            selectedLand = null;
        }
    }
To pick up the item, we just have to set the equipped item in InventoryManager to the ItemData stored in InteractableObject.
We don’t have to check for whether the player is already holding an item as we made the Item Interact function keep whatever the player is holding if he is holding anything.
Add the following function to InteractableObject:
InteractableObject.cs
using System.Collections;
using System.Collections.Generic;
using UnityEngine;

public class InteractableObject : MonoBehaviour
{
    //The item information the GameObject is supposed to represent
    public ItemData item;

    public void Pickup()
    {
        //Set the player's inventory to the item
        InventoryManager.Instance.equippedItem = item;
        //Update the changes in the scene
        InventoryManager.Instance.RenderHand();
        //Destroy this instance so as to not have multiple copies
        Destroy(gameObject);
    }
}
And finally, call this function on the selected item in PlayerInteraction:
PlayerInteraction.cs
    //Triggered when the player presses the item interact button
    public void ItemInteract()
    {
        //If the player is holding something, keep it in his inventory
        if(InventoryManager.Instance.equippedItem != null)
        {
            InventoryManager.Instance.HandToInventory(InventorySlot.InventoryType.Item);
            return;
        }

        //If the player isn't holding anything, pick up an item

        //Check if there is an interactable selected
        if (selectedInteractable != null)
        {
            //Pick it up
            selectedInteractable.Pickup();
        }

    }
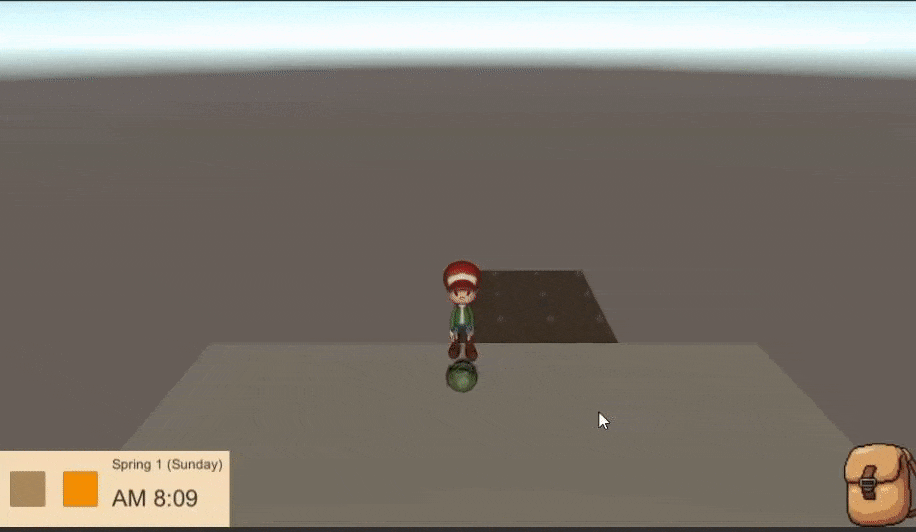
With that, we are able to pick up cabbages
d. Final touches
It would not make sense for the player to walk around with his hands full of cabbages and still be able to use his farming tools. For that reason, we should stop any tool interaction when an item is equipped. Add the following to the Interact() function of PlayerInteraction:
PlayerInteraction.cs
    //Triggered when the player presses the tool button
    public void Interact()
    {
        //The player shouldn't be able to use his tool when he has his hands full with an item
        if(InventoryManager.Instance.equippedItem != null)
        {
            return;
        }

        //Check if the player is selecting any land
        if(selectedLand != null)
        {
            selectedLand.Interact();
            return;
        }

        Debug.Log("Not on any land!");
    }
One issue resolved. We’re finally left with the same problem with the cabbage as 2c: The player ends up climbing over the cabbage. This time we cannot just disable the collider for the GameObject we need it to interact with the item.

On the Cabbage prefab, go to the Layer dropdown and select Add Layer…
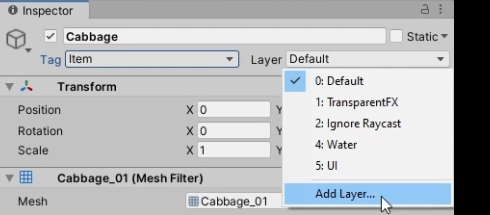
Add new layers called Item and Player:
Set the Cabbage prefab’s layer to Item.

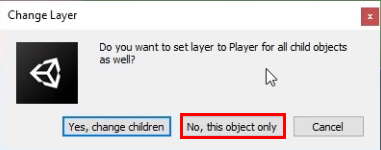
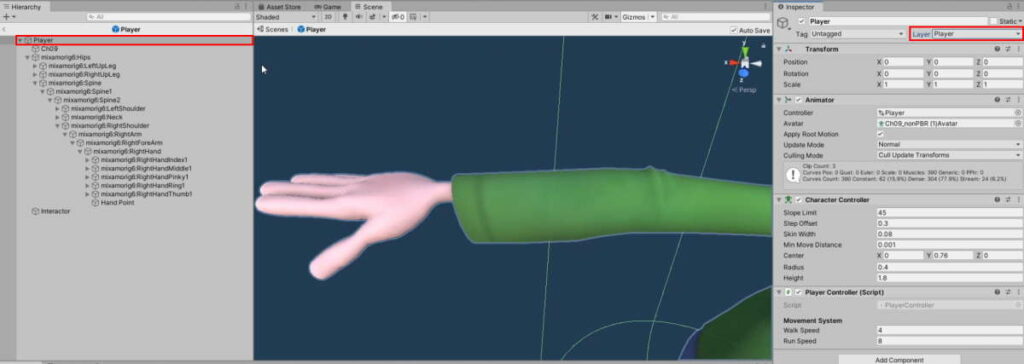
Go into the Player prefab. Set only the parent object’s layer to Player. You will get a prompt asking if you would like to change all child objects:
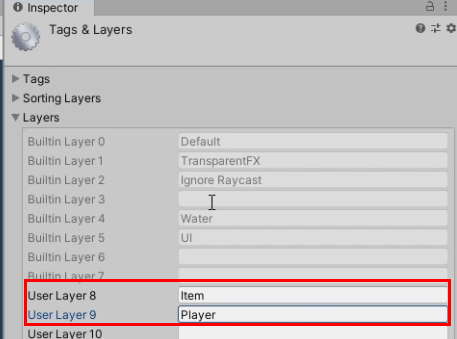
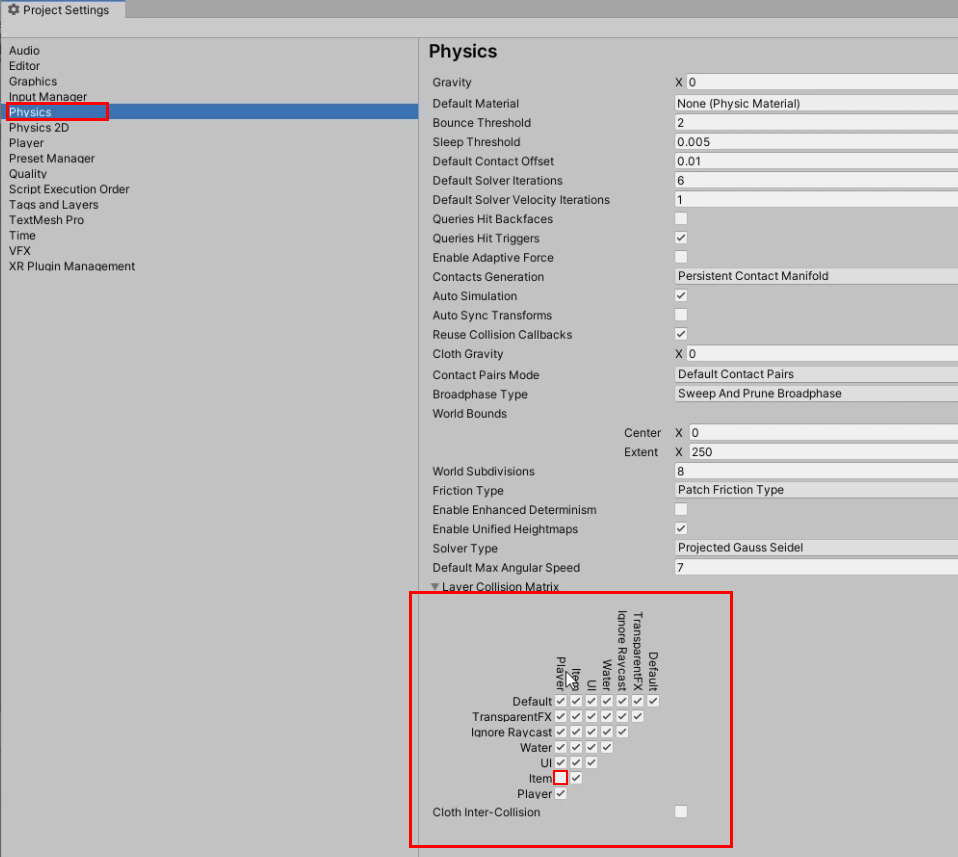
Finally, go to Edit > Project Settings.
We solved this problem by disabling collision, but depending on what you want, there are other solutions you can explore such as giving the item prefabs a larger collider, changing the CharacterController’s slope limit, or just giving the player gravity.
On the Physics tab, disable collisions between Player and Item:
Conclusion

With this, the foundation of the game has been laid. With the systems in place, it is easy to build on them to expand the gameplay. Here are some suggestions:
- Obstacle generation
- Plant wilt and death
- Consuming and using up items
- Rearing animals
- Entering and exiting buildings
- NPC relationships
- Currency and shop system
- Annual festivals and special events
- Crafting and cooking
- Crafting
- Handling game saves
We might continue the series with these expansions sometime in the future. For now, if you are a Patreon supporter, you can download the project files for what we’ve done so far. To use the files, you will have to unzip the file (7-Zip can help you do that), and open the folder with Assets and ProjectSettings as a project using Unity.
Update: We have a new part for this article series! Check it out here.
Here is the final code for all the scripts we have worked with today:
SeedData.cs
using System.Collections;
using System.Collections.Generic;
using UnityEngine;

[CreateAssetMenu(menuName ="Items/Seed")]
public class SeedData : ItemData
{
    //Time it takes before the seed matures into a crop
    public int daysToGrow;

    //The crop the seed will yield
    public ItemData cropToYield;

    //The seedling GameObject
    public GameObject seedling;
}
CropBehaviour.cs
using System.Collections;
using System.Collections.Generic;
using UnityEngine;

public class CropBehaviour : MonoBehaviour
{
    //Information on what the crop will grow into
    SeedData seedToGrow;

    [Header("Stages of Life")]
    public GameObject seed;
    private GameObject seedling;
    private GameObject harvestable;

    //The growth points of the crop
    int growth;
    //How many growth points it takes before it becomes harvestable
    int maxGrowth;

    public enum CropState
    {
        Seed, Seedling, Harvestable
    }
    //The current stage in the crop's growth
    public CropState cropState;

    //Initialisation for the crop GameObject
    //Called when the player plants a seed
    public void Plant(SeedData seedToGrow)
    {
        //Save the seed information
        this.seedToGrow = seedToGrow;

        //Instantiate the seedling and harvestable GameObjects
        seedling = Instantiate(seedToGrow.seedling, transform);

        //Access the crop item data
        ItemData cropToYield = seedToGrow.cropToYield;

        //Instantiate the harvestable crop
        harvestable = Instantiate(cropToYield.gameModel, transform);

        //Convert Days To Grow into hours
        int hoursToGrow = GameTimestamp.DaysToHours(seedToGrow.daysToGrow);
        //Convert it to minutes
        maxGrowth = GameTimestamp.HoursToMinutes(hoursToGrow);

        //Set the initial state to Seed
        SwitchState(CropState.Seed);

    }

    //The crop will grow when watered
    public void Grow()
    {
        //Increase the growth point by 1
        growth++;

        //The seed will sprout into a seedling when the growth is at 50%
        if(growth >= maxGrowth / 2 && cropState == CropState.Seed)
        {
            SwitchState(CropState.Seedling);
        }

        //Grow from seedling to harvestable
        if(growth >= maxGrowth && cropState == CropState.Seedling)
        {
            SwitchState(CropState.Harvestable);
        }
    }

    //Function to handle the state changes
    void SwitchState(CropState stateToSwitch)
    {
        //Reset everything and set all GameObjects to inactive
        seed.SetActive(false);
        seedling.SetActive(false);
        harvestable.SetActive(false);

        switch (stateToSwitch)
        {
            case CropState.Seed:
                //Enable the Seed GameObject
                seed.SetActive(true);
                break;
            case CropState.Seedling:
                //Enable the Seedling GameObject
                seedling.SetActive(true);
                break;
            case CropState.Harvestable:
                //Enable the Harvestable GameObject
                harvestable.SetActive(true);
                //Unparent it to the crop
                harvestable.transform.parent = null;

                Destroy(gameObject);
                break;
        }

        //Set the current crop state to the state we're switching to
        cropState = stateToSwitch;
    }
}
Land.cs
using System.Collections;
using System.Collections.Generic;
using UnityEngine;

public class Land : MonoBehaviour, ITimeTracker
{
    public enum LandStatus
    {
        Soil, Farmland, Watered
    }

    public LandStatus landStatus;

    public Material soilMat, farmlandMat, wateredMat;
    new Renderer renderer;

    //The selection gameobject to enable when the player is selecting the land
    public GameObject select;

    //Cache the time the land was watered
    GameTimestamp timeWatered;

    [Header("Crops")]
    //The crop prefab to instantiate
    public GameObject cropPrefab;

    //The crop currently planted on the land
    CropBehaviour cropPlanted = null;

    // Start is called before the first frame update
    void Start()
    {
        //Get the renderer component
        renderer = GetComponent<Renderer>();

        //Set the land to soil by default
        SwitchLandStatus(LandStatus.Soil);

        //Deselect the land by default
        Select(false);

        //Add this to TimeManager's Listener list
        TimeManager.Instance.RegisterTracker(this);
    }

    public void SwitchLandStatus(LandStatus statusToSwitch)
    {
        //Set land status accordingly
        landStatus = statusToSwitch;

        Material materialToSwitch = soilMat;

        //Decide what material to switch to
        switch (statusToSwitch)
        {
            case LandStatus.Soil:
                //Switch to the soil material
                materialToSwitch = soilMat;
                break;
            case LandStatus.Farmland:
                //Switch to farmland material
                materialToSwitch = farmlandMat;
                break;

            case LandStatus.Watered:
                //Switch to watered material
                materialToSwitch = wateredMat;

                //Cache the time it was watered
                timeWatered = TimeManager.Instance.GetGameTimestamp();
                break;

        }

        //Get the renderer to apply the changes
        renderer.material = materialToSwitch;
    }

    public void Select(bool toggle)
    {
        select.SetActive(toggle);
    }

    //When the player presses the interact button while selecting this land
    public void Interact()
    {
        //Check the player's tool slot
        ItemData toolSlot = InventoryManager.Instance.equippedTool;

        //If there's nothing equipped, return
        if (toolSlot == null)
        {
            return;
        }

        //Try casting the itemdata in the toolslot as EquipmentData
        EquipmentData equipmentTool = toolSlot as EquipmentData;

        //Check if it is of type EquipmentData
        if(equipmentTool != null)
        {
            //Get the tool type
            EquipmentData.ToolType toolType = equipmentTool.toolType;

            switch (toolType)
            {
                case EquipmentData.ToolType.Hoe:
                    SwitchLandStatus(LandStatus.Farmland);
                    break;
                case EquipmentData.ToolType.WateringCan:
                    SwitchLandStatus(LandStatus.Watered);
                    break;
            }

            //We don't need to check for seeds if we have already confirmed the tool to be an equipment
            return;
        }

        //Try casting the itemdata in the toolslot as SeedData
        SeedData seedTool = toolSlot as SeedData;

        ///Conditions for the player to be able to plant a seed
        ///1: He is holding a tool of type SeedData
        ///2: The Land State must be either watered or farmland
        ///3. There isn't already a crop that has been planted
        if(seedTool != null && landStatus != LandStatus.Soil && cropPlanted == null)
        {
            //Instantiate the crop object parented to the land
            GameObject cropObject = Instantiate(cropPrefab, transform);
            //Move the crop object to the top of the land gameobject
            cropObject.transform.position = new Vector3(transform.position.x, 0, transform.position.z);

            //Access the CropBehaviour of the crop we're going to plant
            cropPlanted = cropObject.GetComponent<CropBehaviour>();
            //Plant it with the seed's information
            cropPlanted.Plant(seedTool);

        }
    }

    public void ClockUpdate(GameTimestamp timestamp)
    {
        //Checked if 24 hours has passed since last watered
        if(landStatus == LandStatus.Watered)
        {
            //Hours since the land was watered
            int hoursElapsed = GameTimestamp.CompareTimestamps(timeWatered, timestamp);
            Debug.Log(hoursElapsed + " hours since this was watered");

            //Grow the planted crop, if any
            if(cropPlanted != null)
            {
                cropPlanted.Grow();
            }

            if(hoursElapsed > 24)
            {
                //Dry up (Switch back to farmland)
                SwitchLandStatus(LandStatus.Farmland);
            }
        }
    }
}
InventoryManager.cs
using System.Collections;
using System.Collections.Generic;
using UnityEngine;

public class InventoryManager : MonoBehaviour
{
    public static InventoryManager Instance { get; private set; }

    private void Awake()
    {
        //If there is more than one instance, destroy the extra
        if(Instance != null && Instance != this)
        {
            Destroy(this);
        }
        else
        {
            //Set the static instance to this instance
            Instance = this;
        }
    }

    [Header("Tools")]
    //Tool Slots
    public ItemData[] tools = new ItemData[8];
    //Tool in the player's hand
    public ItemData equippedTool = null;

    [Header("Items")]
    //Item Slots
    public ItemData[] items = new ItemData[8];
    //Item in the player's hand
    public ItemData equippedItem = null;

    //The transform for the player to hold items in the scene
    public Transform handPoint;

    //Equipping

    //Handles movement of item from Inventory to Hand
    public void InventoryToHand(int slotIndex, InventorySlot.InventoryType inventoryType)
    {
        if(inventoryType == InventorySlot.InventoryType.Item)
        {
            //Cache the Inventory slot ItemData from InventoryManager
            ItemData itemToEquip = items[slotIndex];

            //Change the Inventory Slot to the Hand's
            items[slotIndex] = equippedItem;

            //Change the Hand's Slot to the Inventory Slot's
            equippedItem = itemToEquip;

            //Update the changes in the scene
            RenderHand();

        } else
        {
            //Cache the Inventory slot ItemData from InventoryManager
            ItemData toolToEquip = tools[slotIndex];

            //Change the Inventory Slot to the Hand's
            tools[slotIndex] = equippedTool;

            //Change the Hand's Slot to the Inventory Slot's
            equippedTool = toolToEquip;
        }

        //Update the changes to the UI
        UIManager.Instance.RenderInventory();


    }

    //Handles movement of item from Hand to Inventory
    public void HandToInventory(InventorySlot.InventoryType inventoryType)
    {
        if(inventoryType == InventorySlot.InventoryType.Item)
        {
            //Iterate through each inventory slot and find an empty slot
            for(int i =0; i < items.Length; i++)
            {
                if(items[i] == null)
                {
                    //Send the equipped item over to its new slot
                    items[i] = equippedItem;
                    //Remove the item from the hand
                    equippedItem = null;
                    break;
                }
            }

            //Update the changes in the scene
            RenderHand();

        } else
        {
            //Iterate through each inventory slot and find an empty slot
            for (int i = 0; i < tools.Length; i++)
            {
                if (tools[i] == null)
                {
                    //Send the equipped item over to its new slot
                    tools[i] = equippedTool;
                    //Remove the item from the hand
                    equippedTool = null;
                    break;
                }
            }

        }
        //Update changes in the inventory
        UIManager.Instance.RenderInventory();
    }

    //Render the player's equipped item in the scene
    public void RenderHand()
    {
        //Reset objects on the hand
        if(handPoint.childCount > 0)
        {
            Destroy(handPoint.GetChild(0).gameObject);
        }

        //Check if the player has anything equipped
        if(equippedItem != null)
        {
            //Instantiate the game model on the player's hand and put it on the scene
            Instantiate(equippedItem.gameModel, handPoint);
        }

    }


    // Start is called before the first frame update
    void Start()
    {

    }

    // Update is called once per frame
    void Update()
    {

    }
}
PlayerInteraction.cs
using System.Collections;
using System.Collections.Generic;
using UnityEngine;

public class PlayerInteraction : MonoBehaviour
{
    PlayerController playerController;

    //The land the player is currently selecting
    Land selectedLand = null;

    //The interactable object the player is currently selecting
    InteractableObject selectedInteractable = null;

    // Start is called before the first frame update
    void Start()
    {
        //Get access to our PlayerController component
        playerController = transform.parent.GetComponent<PlayerController>();
    }

    // Update is called once per frame
    void Update()
    {
        RaycastHit hit;
        if(Physics.Raycast(transform.position, Vector3.down,out hit,  1))
        {
            OnInteractableHit(hit);
        }
    }

    //Handles what happens when the interaction raycast hits something interactable
    void OnInteractableHit(RaycastHit hit)
    {
        Collider other = hit.collider;

        //Check if the player is going to interact with land
        if(other.tag == "Land")
        {
            //Get the land component
            Land land = other.GetComponent<Land>();
            SelectLand(land);
            return;
        }

        //Check if the player is going to interact with an Item
        if(other.tag == "Item")
        {
            //Set the interactable to the currently selected interactable
            selectedInteractable = other.GetComponent<InteractableObject>();
            return;
        }

        //Deselect the interactable if the player is not standing on anything at the moment
        if(selectedInteractable != null)
        {
            selectedInteractable = null;
        }

        //Deselect the land if the player is not standing on any land at the moment
        if(selectedLand != null)
        {
            selectedLand.Select(false);
            selectedLand = null;
        }
    }

    //Handles the selection process of the land
    void SelectLand(Land land)
    {
        //Set the previously selected land to false (If any)
        if (selectedLand != null)
        {
            selectedLand.Select(false);
        }

        //Set the new selected land to the land we're selecting now.
        selectedLand = land;
        land.Select(true);
    }

    //Triggered when the player presses the tool button
    public void Interact()
    {
        //The player shouldn't be able to use his tool when he has his hands full with an item
        if(InventoryManager.Instance.equippedItem != null)
        {
            return;
        }

        //Check if the player is selecting any land
        if(selectedLand != null)
        {
            selectedLand.Interact();
            return;
        }

        Debug.Log("Not on any land!");
    }

    //Triggered when the player presses the item interact button
    public void ItemInteract()
    {
        //If the player is holding something, keep it in his inventory
        if(InventoryManager.Instance.equippedItem != null)
        {
            InventoryManager.Instance.HandToInventory(InventorySlot.InventoryType.Item);
            return;
        }

        //If the player isn't holding anything, pick up an item

        //Check if there is an interactable selected
        if (selectedInteractable != null)
        {
            //Pick it up
            selectedInteractable.Pickup();
        }

    }
}
PlayerController.cs
using System.Collections;
using System.Collections.Generic;
using UnityEngine;

public class PlayerController : MonoBehaviour
{
    //Movement Components
    private CharacterController controller;
    private Animator animator;

    private float moveSpeed = 4f;

    [Header("Movement System")]
    public float walkSpeed = 4f;
    public float runSpeed = 8f;


    //Interaction components
    PlayerInteraction playerInteraction;

    // Start is called before the first frame update
    void Start()
    {
        //Get movement components
        controller = GetComponent<CharacterController>();
        animator = GetComponent<Animator>();

        //Get interaction component
        playerInteraction = GetComponentInChildren<PlayerInteraction>();

    }

    // Update is called once per frame
    void Update()
    {
        //Runs the function that handles all movement
        Move();

        //Runs the function that handles all interaction
        Interact();


        //Debugging purposes only
        //Skip the time when the right square bracket is pressed
        if (Input.GetKey(KeyCode.RightBracket))
        {
            TimeManager.Instance.Tick();
        }
    }

    public void Interact()
    {
        //Tool interaction
        if (Input.GetButtonDown("Fire1"))
        {
            //Interact
            playerInteraction.Interact();
        }

        //Item interaction
        if (Input.GetButtonDown("Fire2"))
        {
            playerInteraction.ItemInteract();
        }
    }


    public void Move()
    {
        //Get the horizontal and vertical inputs as a number
        float horizontal = Input.GetAxisRaw("Horizontal");
        float vertical = Input.GetAxisRaw("Vertical");

        //Direction in a normalised vector
        Vector3 dir = new Vector3(horizontal, 0f, vertical).normalized;
        Vector3 velocity = moveSpeed * Time.deltaTime * dir;

        //Is the sprint key pressed down?
        if (Input.GetButton("Sprint"))
        {
            //Set the animation to run and increase our movespeed
            moveSpeed = runSpeed;
            animator.SetBool("Running", true);
        } else
        {
            //Set the animation to walk and decrease our movespeed
            moveSpeed = walkSpeed;
            animator.SetBool("Running", false);
        }


        //Check if there is movement
        if (dir.magnitude >= 0.1f)
        {
            //Look towards that direction
            transform.rotation = Quaternion.LookRotation(dir);

            //Move
            controller.Move(velocity);

        }

        //Animation speed parameter
        animator.SetFloat("Speed", velocity.magnitude);


    }
}
InteractableObject.cs
using System.Collections;
using System.Collections.Generic;
using UnityEngine;

public class InteractableObject : MonoBehaviour
{
    //The item information the GameObject is supposed to represent
    public ItemData item;

    public void Pickup()
    {
        //Set the player's inventory to the item
        InventoryManager.Instance.equippedItem = item;
        //Update the changes in the scene
        InventoryManager.Instance.RenderHand();
        //Destroy this instance so as to not have multiple copies
        Destroy(gameObject);
    }
}
Why is my seeding inactive after time passed…even after watering every 24 hours….how can I fix it? I can see the seed but seeding and harvestable are inactive in game mode.
Hi Mehenaz,
Is the cropState updating to seedling?
Thanks for these tutorials! I’m having a small issue, I can equip a cabbage if it’s from my inventory, but I can’t pick one up from the floor! I’ve made sure my Interactor game object in the Player is over the cabbage but no luck! Any idea? Thanks!
Hi Tom, apologies for taking some time to get back to you. Jonathan (the developer for this series) will respond to you soon.
In the meantime, you can try to add a
print(hit.collider.name);inPlayerInteraction.Update(), above theOnInteractableHit(hit)line. My uneducated guess is that this will print the name of the object that the Interactor is hitting in every frame in the Console. Stand over the cabbage, and see which object’s name is being printed in the Console. Chances are, there is something that is blocking the ray from hitting the cabbage.Thank you! This worked perfectly, for some reason my Cabbage prefab split into 2 LOD child components..So this helped me see I was focusing on one of these for some reason!
Hi Tom, also check if you have given the Cabbage GameObject the ‘Item’ tag. It could also be a collider issue, which you can determine by printing messages at various points in the OnInteractableHit function, in addition to what Terence has suggested.
Thank you! This worked perfectly, for some reason my Cabbage prefab split into 2 LOD child components..I’ve fixed this slightly by adding an Item tag to one of the LOD but will fix the Prefab now!
Hi! I’m still having error when the seed planted on Land, it says “NullReferenceException: Object reference not set to an instance of an object” even with your solution implemented, any idea?
hi Terence, please help, I’m still stuck with section 2B bug, or on the video on 18:02, I tried rewind the tutorial, recheck everything but the bug keeps showing
Sorry I was forgot to put Crop behavior on crop prefab that’s why, thanks!
Hi Milky, sorry, I missed out on your comment. Glad to know you managed to fix your issue!
Just to add on to your comment, NullReferenceException errors happen when you attempt to access properties or functions in a null object. For example, the following code below will cause a NullReferenceException if
objis null.NullReferenceExceptions are usually caused by unassigned variables, either in the Inspector or in the code. If you double-click on the error in the Console, you can see which line in your code is responsible for this error, and this can give you a hint into which variables are unassigned.
I just paid for Patreon please can you complete the full tutorial and how to create environment for the farm game and I want to buy the low poly farm pack full one so I can create a standard farm
Hi Kub, thank you for your support! We’ve sent you a personal message on Patreon. Do check it out!