Ever wanted to create a game like Harvest Moon in Unity? Check out Part 1 of our guide here, where we go through how to create animations and movement for the player character.
This is a loose transcription of our accompanying video guide on Youtube. We suggest you watch the video guide instead and use this article as a supplement to it.
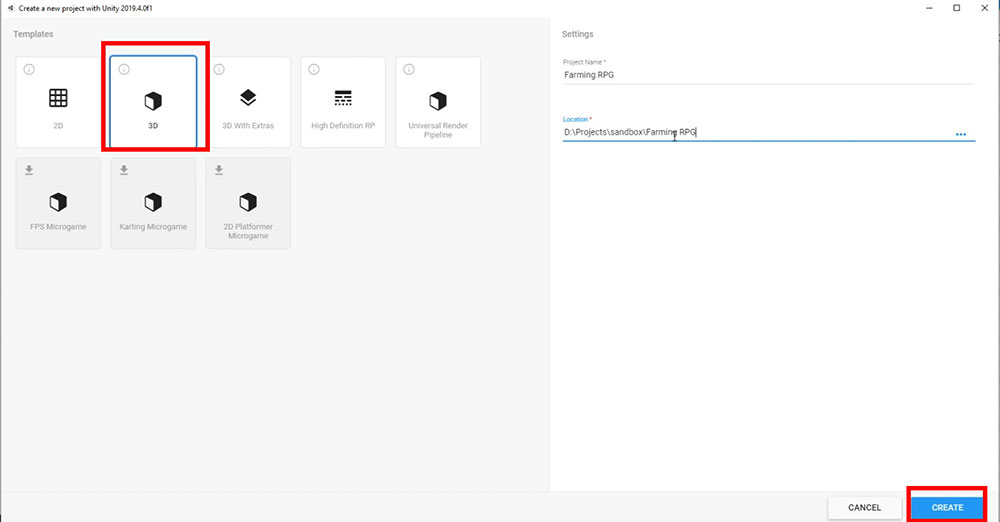
1. Creating the project
Create a new Unity project with the 3D Template.
2. Finding assets to work with
You can source assets on your own, but for this particular tutorial we will be using models and animations from Mixamo, a free online service under Adobe that provides 3D Characters, Rigging and Animations for free.
Simply go to their website and log in with an Adobe account (sign-ups are free, with no subscription required).

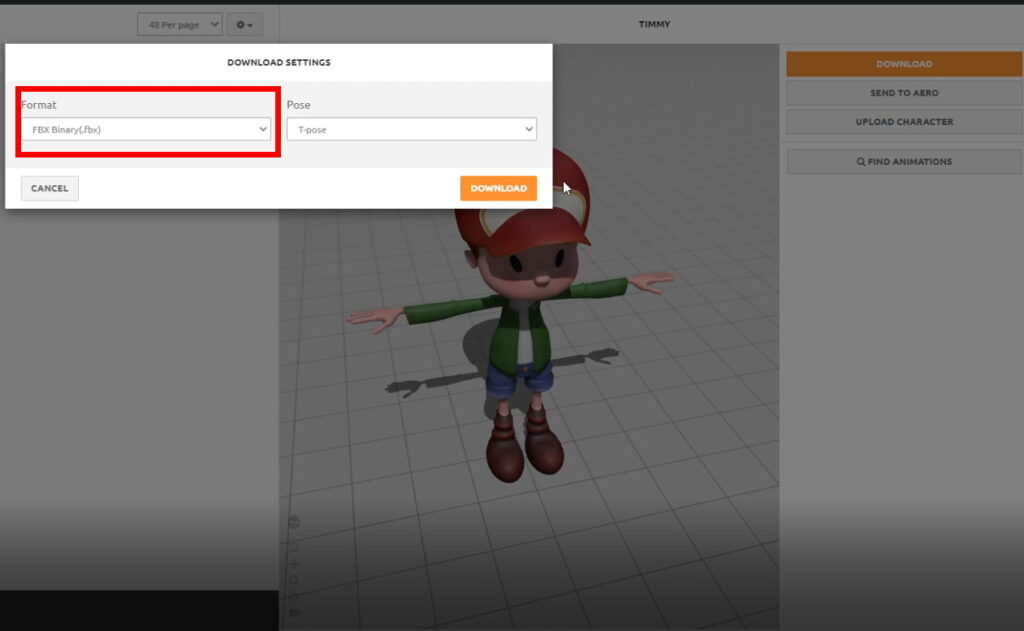
a. Finding a player model
Find a suitable model and download the FBX. For this tutorial, we will be using the Timmy character (you need to log-in to Mixamo to access the link).
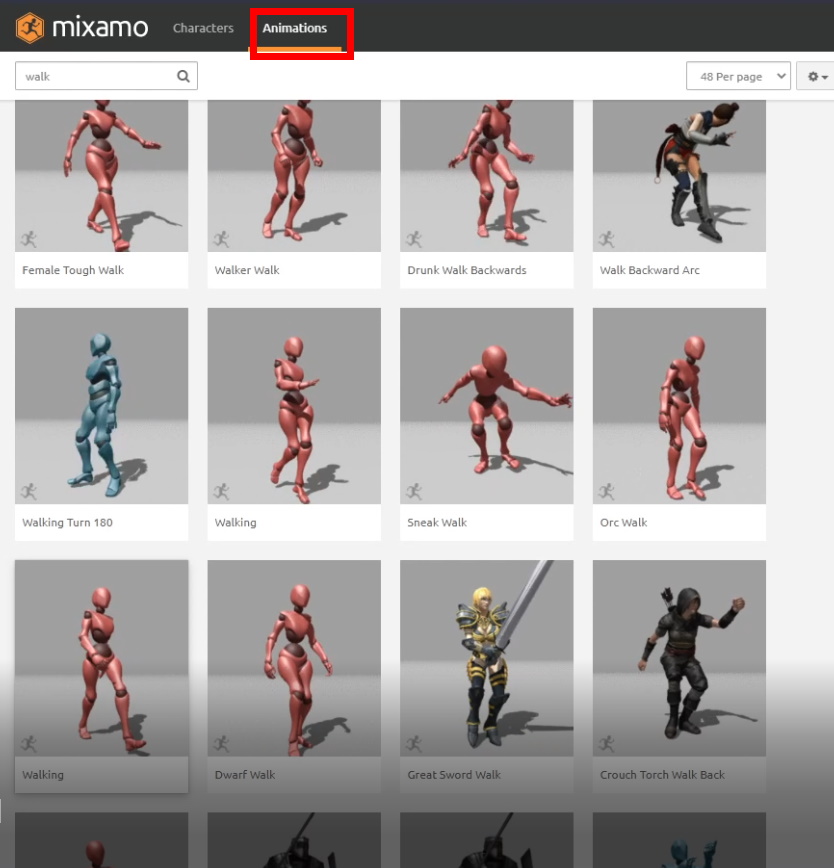
b. Finding animations
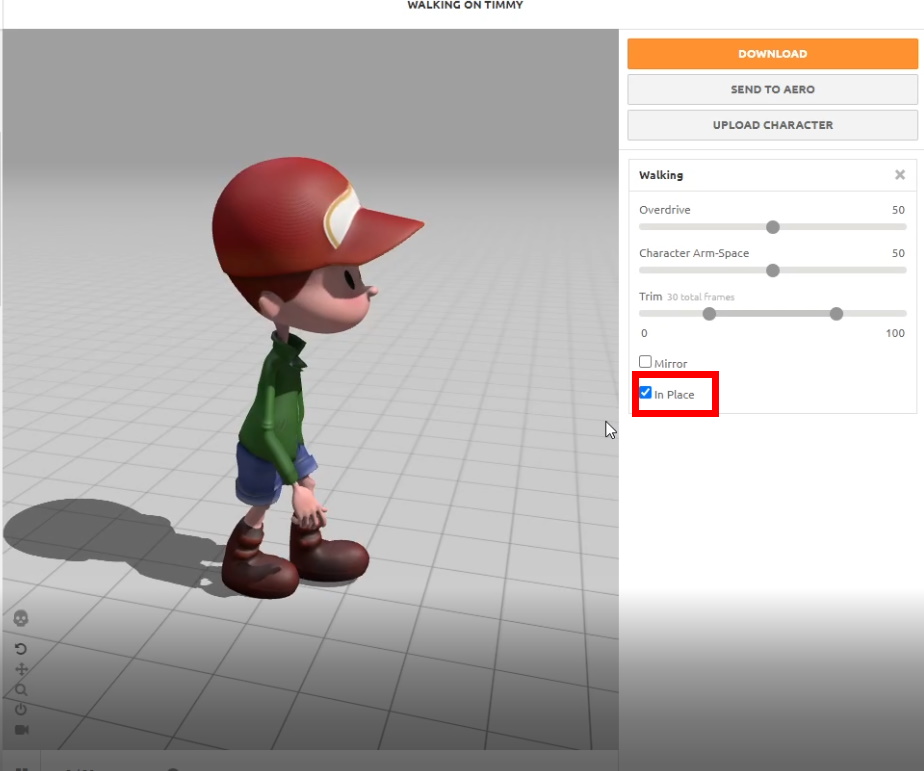
For this tutorial we will need the Idle, Walking, and Running animations. You can find them by switching to the Animations tab, and picking out the animations:
As you select an animation, they will show you a preview of the animation with your chosen model. Ensure that ‘In Place‘ is checked for movement animations, so that the animation does not use root motion. Not doing so will mess up the positioning of our character in the game later.
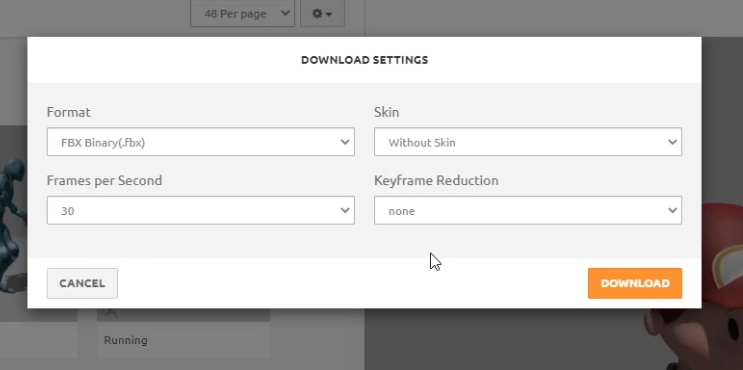
When you download the animations, make sure that they are in FBX format, and Without Skin under the Skin options.
3. Prepping the imported files in Unity
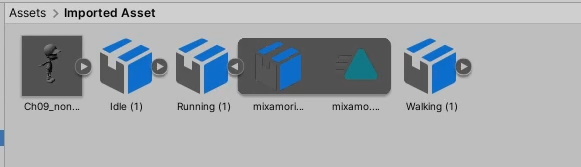
We’ll create a new folder called Imported Asset, and import all our downloaded files there.
a. Player character textures
If you were to drag the player character in the scene, it would not have any textures loaded in. In the model file’s Import Settings, go to the Materials tab and click Extract Textures.
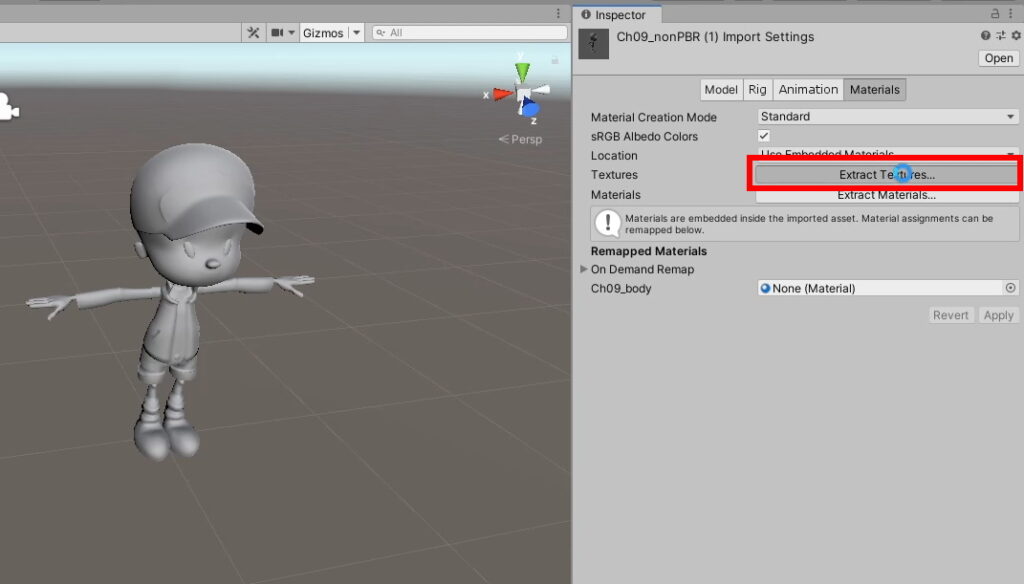
You will be asked to select the folder to generate the texture files in. Simply select the Imported Asset folder and the textures should load in. You might get the following popup:
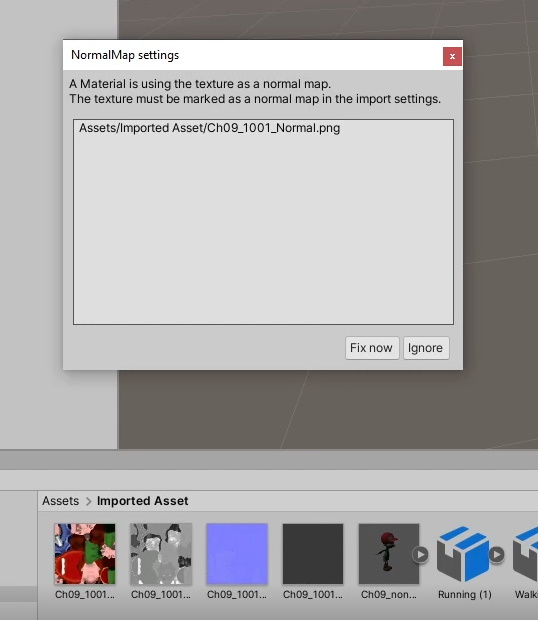
Click ‘Fix now‘ and they will mark the texture as a normal map for you.
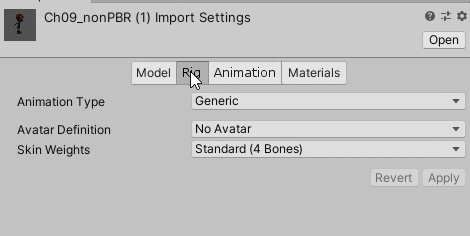
b. Configuring the Rig
On the character model’s import settings, go to the Rig tab.
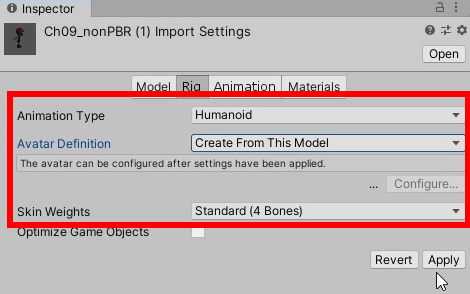
Set the following parameters to these values:
- Animation Type: Humanoid
- Avatar Definition: Create From This Model
Then, click Apply and an Avatar for your model should be created.
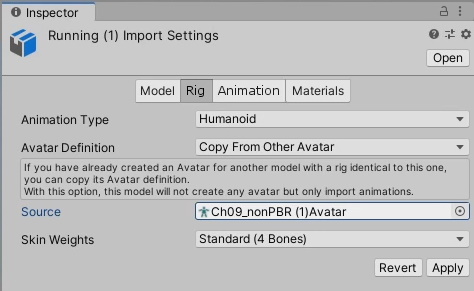
On the FBX files containing our animations, set the following parameters:
- Animation Type: Humanoid
- Avatar Definition: Copy From Other Avatar
- Source: Set to the newly-created Avatar (find it in the Project window)
Similarly, once done, click Apply.
4. Setting up the player Prefab
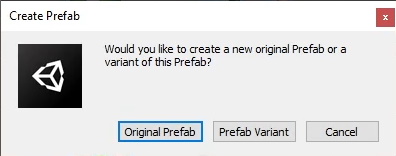
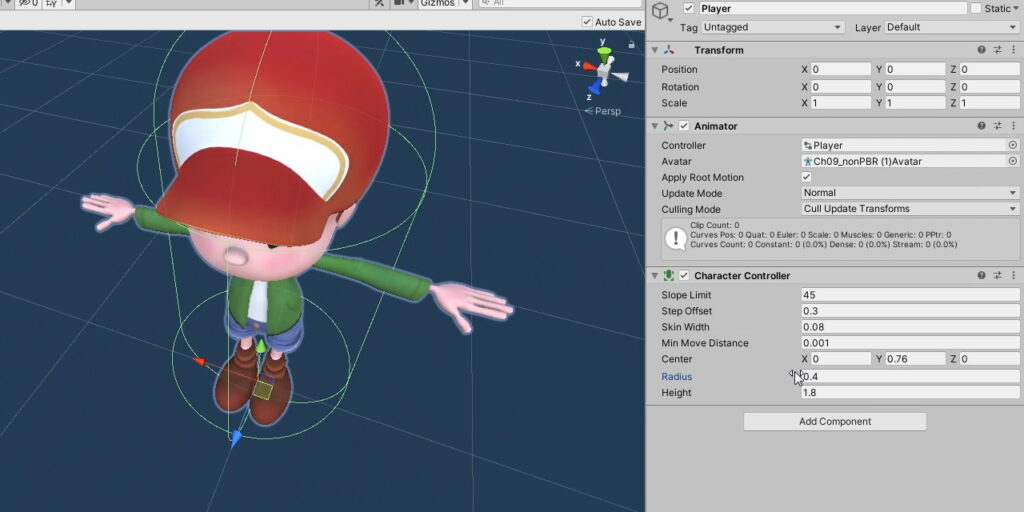
Create a folder called Prefabs. Drag an instance of your model into the scene, rename it to “Player”, and drag it to the Prefabs folder to save it as a new Prefab.
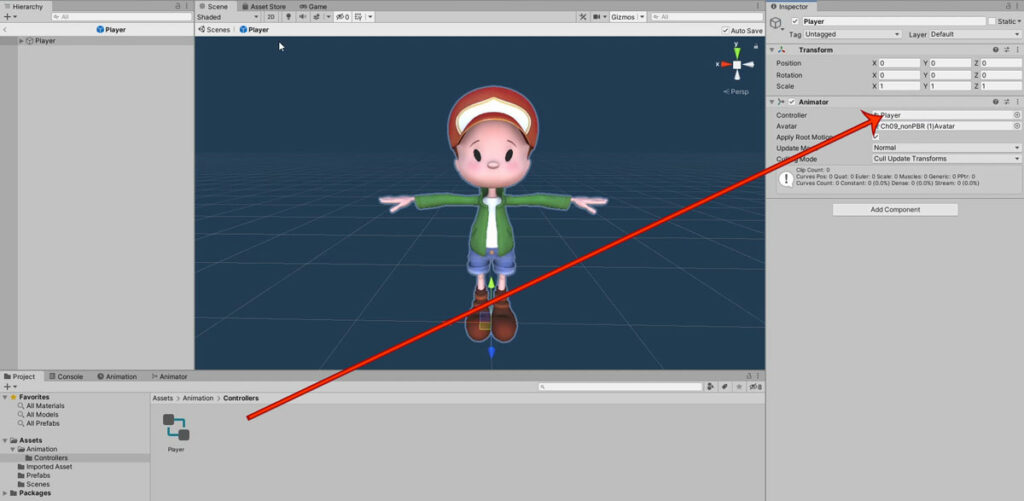
Create another folder called Animation. In the folder, create another folder, Controllers. In there, create an empty Animator Controller called Player, then drag it to the Player prefab’s Animator component.
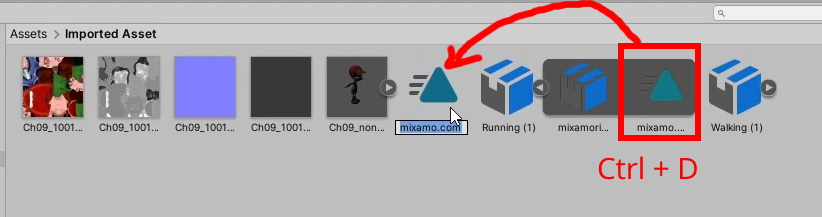
The thing about imported animations is that they are locked as readonly. This prevents us from modifying the animations in any way, such as tweaking the motion, or adding Animation Events.
On each of the imported animation FBX files, expand the file, select the animation. Duplicate them and rename the copied Mixamo animation to its respective names.
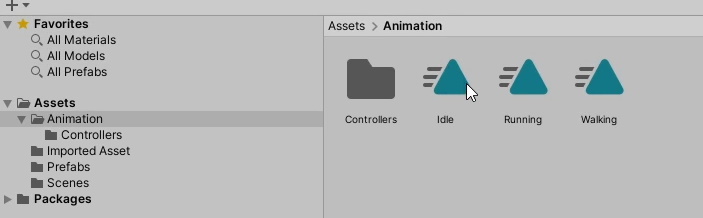
Move all the copied animations to the Animation folder.
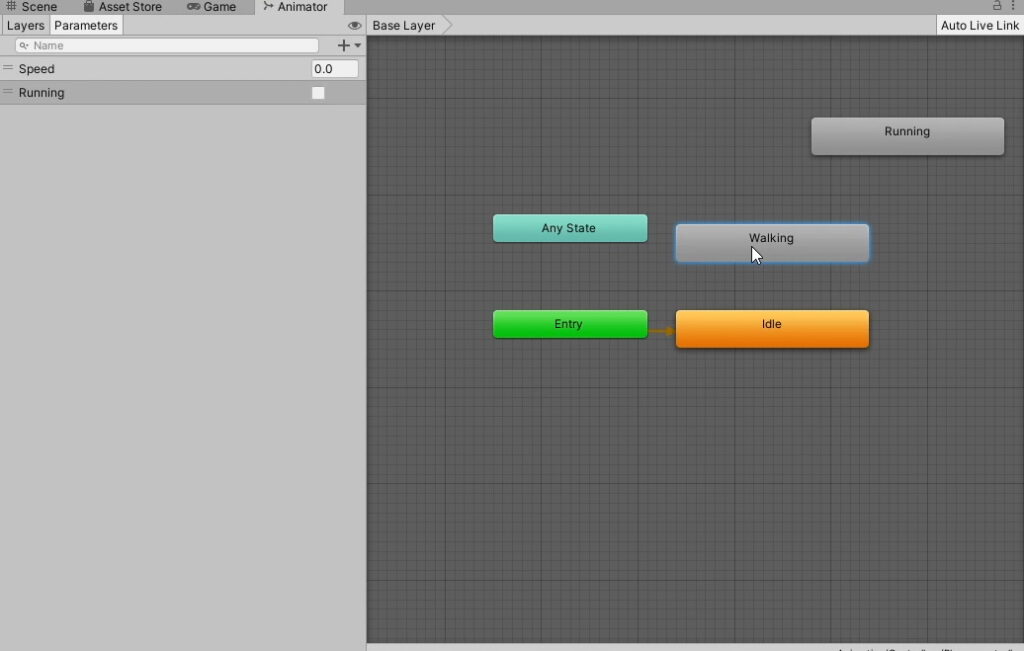
Drag the newly copied animations into the player’s Animator. Create a float parameter called Speed, and a Boolean parameter called Running.
Add a Character Controller component to the prefab and resize it to fit the model.
5. Coding the player movement
Create a new Scripts folder and a new script file called PlayerController. Add it as a component to the Prefab.

PlayerController script.a. Getting the components
We will need to access the Unity components in our PlayerController script to get them to work together.
PlayerController.cs
using System.Collections;
using System.Collections.Generic;
using UnityEngine;

public class PlayerController : MonoBehaviour
{
    //Movement Components
    private CharacterController controller;
    private Animator animator;


    // Start is called before the first frame update
    void Start()
    {
        //Get movement components
        controller = GetComponent<CharacterController>();
        animator = GetComponent<Animator>();


    }

    // Update is called once per frame
    void Update()
    {

    }
}
b. Determining the facing direction
First, let’s set up a function within the Update() method to handle the movement-related actions.
PlayerController.cs
using System.Collections;
using System.Collections.Generic;
using UnityEngine;

public class PlayerController : MonoBehaviour
{
    //Movement Components
    private CharacterController controller;
    private Animator animator;


    // Start is called before the first frame update
    void Start()
    {
        //Get movement components
        controller = GetComponent<CharacterController>();
        animator = GetComponent<Animator>();


    }

    // Update is called once per frame
    void Update()
    {
        //Runs the function that handles all movement
        Move();
    }


    public void Move()
    {

    }
}
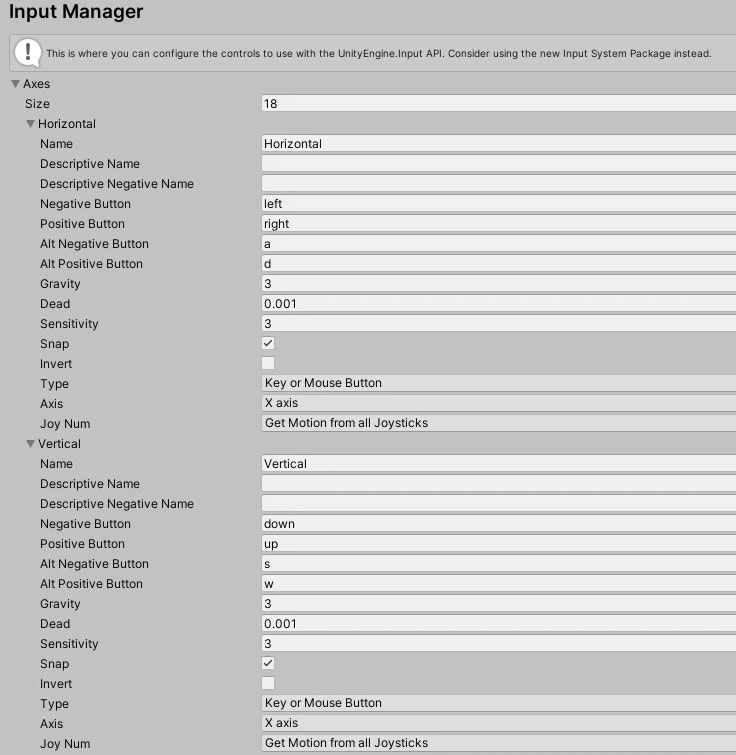
We want the player character to respond to our button presses. Go to Edit > Project Settings > Input Manager. Take note of the “Horizontal” and “Vertical” axes. These are the Input axes we will be keeping track of in our script.
We will store the inputs from the Horizontal and Vertical axes as float values. We can then use these float values to determine the direction the player should be facing, like so:
PlayerController.cs
using System.Collections;
using System.Collections.Generic;
using UnityEngine;

public class PlayerController : MonoBehaviour
{
    //Movement Components
    private CharacterController controller;
    private Animator animator;


    // Start is called before the first frame update
    void Start()
    {
        //Get movement components
        controller = GetComponent<CharacterController>();
        animator = GetComponent<Animator>();


    }

    // Update is called once per frame
    void Update()
    {
        //Runs the function that handles all movement
        Move();
    }


    public void Move()
    {
        //Get the horizontal and vertical inputs as a number
        float horizontal = Input.GetAxisRaw("Horizontal");
        float vertical = Input.GetAxisRaw("Vertical");

        //Direction in a normalised vector
        Vector3 dir = new Vector3(horizontal, 0f, vertical).normalized;

        //Check if there is movement
        if (dir.magnitude >= 0.1f)
        {
            // Look towards that direction
            transform.rotation = Quaternion.LookRotation(dir);
        }


    }
}
If everything is working correctly, your player character should face the direction of your W A S D or ↑ ↓ ← → keys.
c. Moving the player
Calculating the direction is already half the work done. The CharacterController.Move function allows us to move our player in our desired direction. Since we stored our direction as a normalised vector, we just have to multiply it by our desired speed with time to get our player to move accordingly, like so:
PlayerController.cs
using System.Collections;
using System.Collections.Generic;
using UnityEngine;

public class PlayerController : MonoBehaviour
{
    //Movement Components
    private CharacterController controller;
    private Animator animator;

    private float moveSpeed = 4f;


    // Start is called before the first frame update
    void Start()
    {
        //Get movement components
        controller = GetComponent<CharacterController>();
        animator = GetComponent<Animator>();


    }

    // Update is called once per frame
    void Update()
    {
        //Runs the function that handles all movement
        Move();
    }


    public void Move()
    {
        //Get the horizontal and vertical inputs as a number
        float horizontal = Input.GetAxisRaw("Horizontal");
        float vertical = Input.GetAxisRaw("Vertical");

        //Direction in a normalised vector
        Vector3 dir = new Vector3(horizontal, 0f, vertical).normalized;
        Vector3 velocity = moveSpeed * Time.deltaTime * dir;

        //Check if there is movement
        if (dir.magnitude >= 0.1f)
        {
            //Look towards that direction
            transform.rotation = Quaternion.LookRotation(dir);

            //Move
            controller.Move(velocity);

        }

    }
}
With this, our character can move around accordingly.
d. Play the walk animation
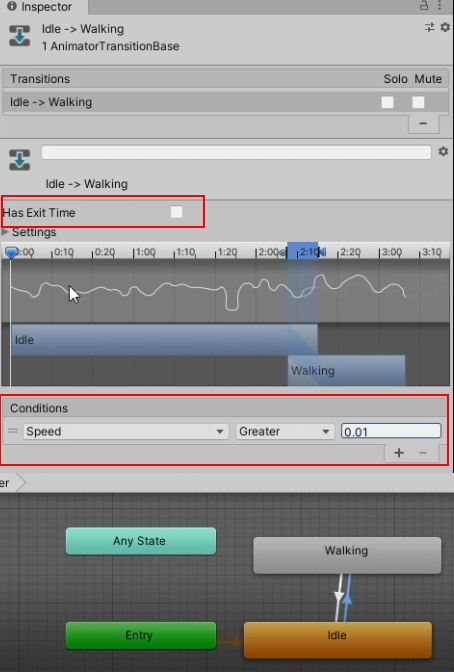
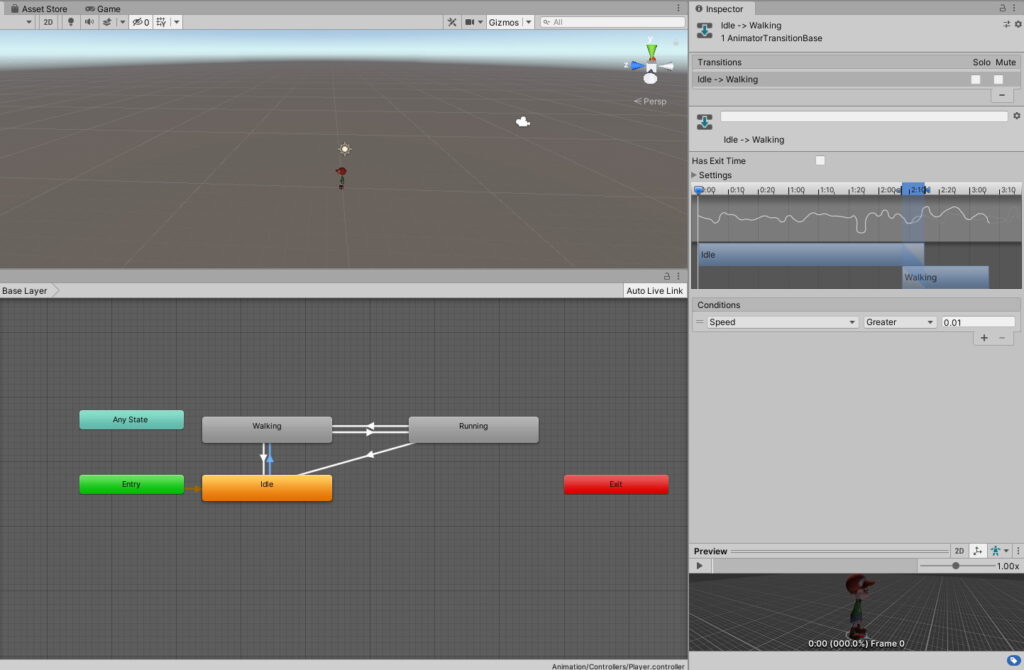
Although our character is able to move about, it doesn’t have a corresponding animation to match. Having our character float around in space isn’t a good look. Thus, let’s set up our animator transitions with the Speed (float) parameter this way:
Now we just need to work with our Animator parameters through our script:
PlayerController.cs
using System.Collections;
using System.Collections.Generic;
using UnityEngine;

public class PlayerController : MonoBehaviour
{
    //Movement Components
    private CharacterController controller;
    private Animator animator;

    private float moveSpeed = 4f;


    // Start is called before the first frame update
    void Start()
    {
        //Get movement components
        controller = GetComponent<CharacterController>();
        animator = GetComponent<Animator>();


    }

    // Update is called once per frame
    void Update()
    {
        //Runs the function that handles all movement
        Move();
    }


    public void Move()
    {
        //Get the horizontal and vertical inputs as a number
        float horizontal = Input.GetAxisRaw("Horizontal");
        float vertical = Input.GetAxisRaw("Vertical");

        //Direction in a normalised vector
        Vector3 dir = new Vector3(horizontal, 0f, vertical).normalized;
        Vector3 velocity = moveSpeed * Time.deltaTime * dir;

        //Check if there is movement
        if (dir.magnitude >= 0.1f)
        {
            //Look towards that direction
            transform.rotation = Quaternion.LookRotation(dir);

            //Move
            controller.Move(velocity);

        }

        //Animation speed parameter
        animator.SetFloat("Speed", velocity.magnitude);

    }
}
e. Sprinting
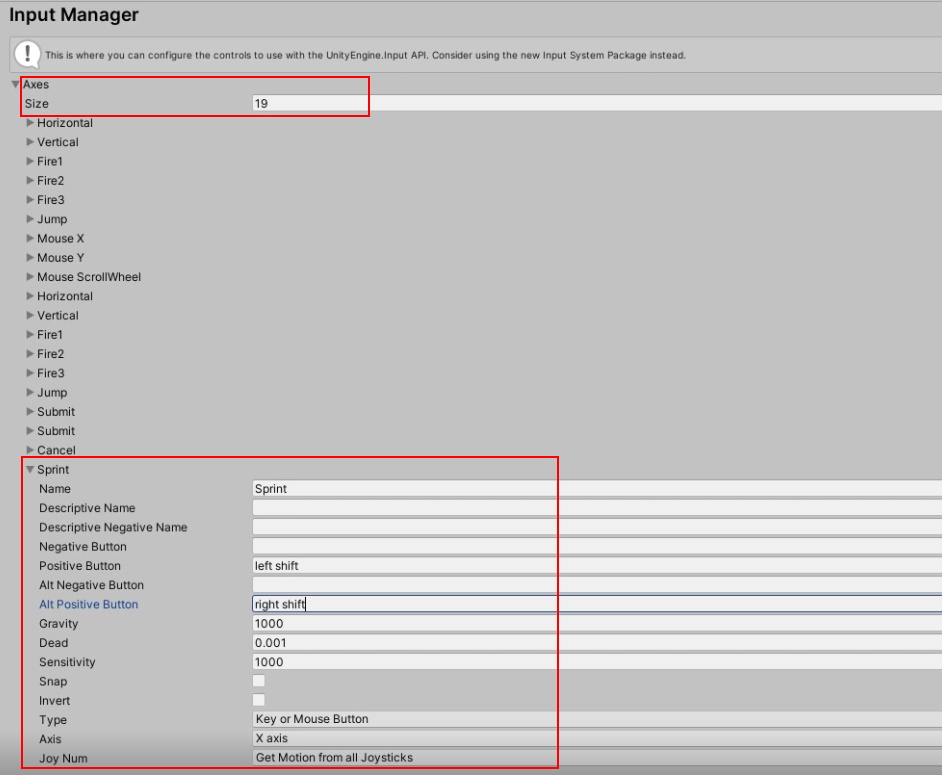
We also need a button that we can hold to make the player sprint when moving. Add a Sprint button into the Input Manager by increasing its size and configuring it like so:
Let’s also implement the button in our script:
PlayerController.cs
using System.Collections;
using System.Collections.Generic;
using UnityEngine;

public class PlayerController : MonoBehaviour
{
    //Movement Components
    private CharacterController controller;
    private Animator animator;

    private float moveSpeed = 4f;

    [Header("Movement System")]
    public float walkSpeed = 4f;
    public float runSpeed = 8f;


    // Start is called before the first frame update
    void Start()
    {
        //Get movement components
        controller = GetComponent<CharacterController>();
        animator = GetComponent<Animator>();


    }

    // Update is called once per frame
    void Update()
    {
        //Runs the function that handles all movement
        Move();
    }


    public void Move()
    {
        //Get the horizontal and vertical inputs as a number
        float horizontal = Input.GetAxisRaw("Horizontal");
        float vertical = Input.GetAxisRaw("Vertical");

        //Direction in a normalised vector
        Vector3 dir = new Vector3(horizontal, 0f, vertical).normalized;
        Vector3 velocity = moveSpeed * Time.deltaTime * dir;

        //Is the sprint key pressed down?
        if (Input.GetButton("Sprint"))
        {
            moveSpeed = runSpeed;
        } else
        {
            moveSpeed = walkSpeed;
        }

        //Check if there is movement
        if (dir.magnitude >= 0.1f)
        {
            //Look towards that direction
            transform.rotation = Quaternion.LookRotation(dir);

            //Move
            controller.Move(velocity);

        }

        //Animation speed parameter
        animator.SetFloat("Speed", velocity.magnitude);

    }
}
Your character should be moving faster when you hold the Shift (sprint) key. Let’s make our player character play the running animation when it happens.
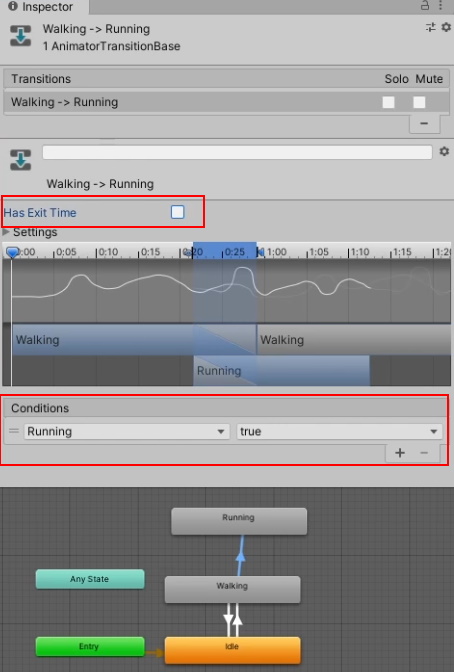
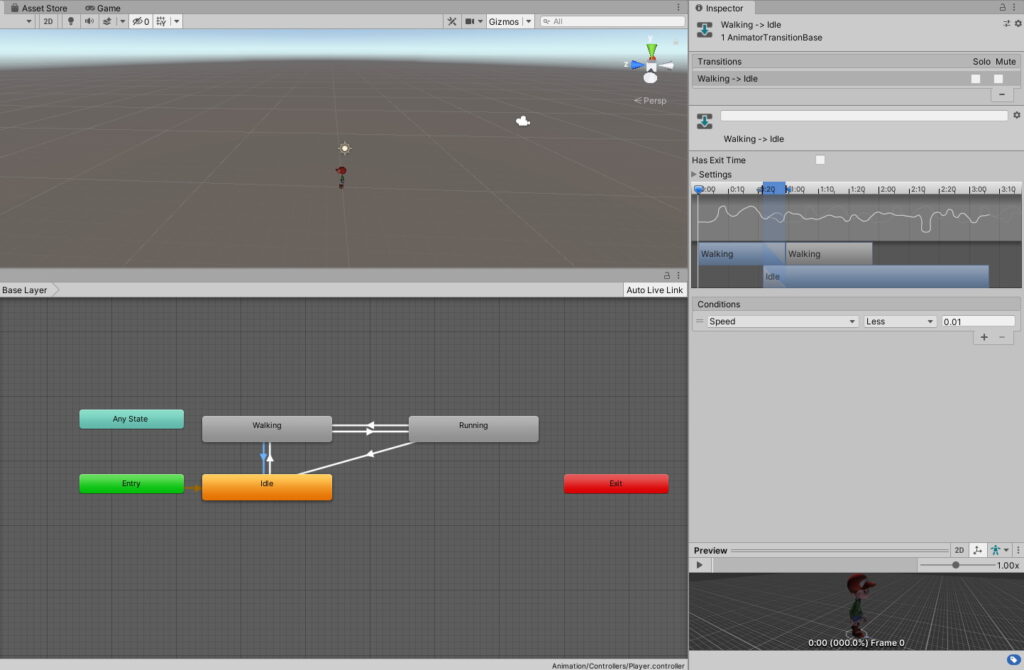
On the Animator, set up the transitions accordingly:
Now we get the script to work with the transitions:
PlayerController.cs
using System.Collections;
using System.Collections.Generic;
using UnityEngine;

public class PlayerController : MonoBehaviour
{
    //Movement Components
    private CharacterController controller;
    private Animator animator;

    private float moveSpeed = 4f;

    [Header("Movement System")]
    public float walkSpeed = 4f;
    public float runSpeed = 8f;


    // Start is called before the first frame update
    void Start()
    {
        //Get movement components
        controller = GetComponent<CharacterController>();
        animator = GetComponent<Animator>();


    }

    // Update is called once per frame
    void Update()
    {
        //Runs the function that handles all movement
        Move();
    }


    public void Move()
    {
        //Get the horizontal and vertical inputs as a number
        float horizontal = Input.GetAxisRaw("Horizontal");
        float vertical = Input.GetAxisRaw("Vertical");

        //Direction in a normalised vector
        Vector3 dir = new Vector3(horizontal, 0f, vertical).normalized;
        Vector3 velocity = moveSpeed * Time.deltaTime * dir;

        //Is the sprint key pressed down?
        if (Input.GetButton("Sprint"))
        {
            //Set the animation to run and increase our movespeed
            moveSpeed = runSpeed;
            animator.SetBool("Running", true);
        } else
        {
            //Set the animation to walk and decrease our movespeed
            moveSpeed = walkSpeed;
            animator.SetBool("Running", false);
        }

        //Check if there is movement
        if (dir.magnitude >= 0.1f)
        {
            //Look towards that direction
            transform.rotation = Quaternion.LookRotation(dir);

            //Move
            controller.Move(velocity);

        }

        //Animation speed parameter
        animator.SetFloat("Speed", velocity.magnitude);

    }
}
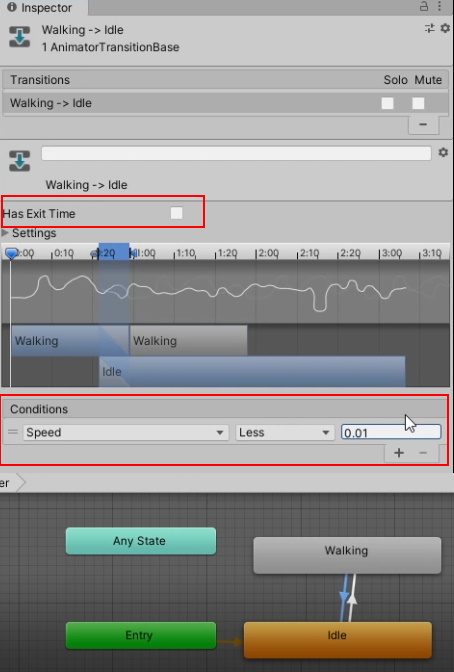
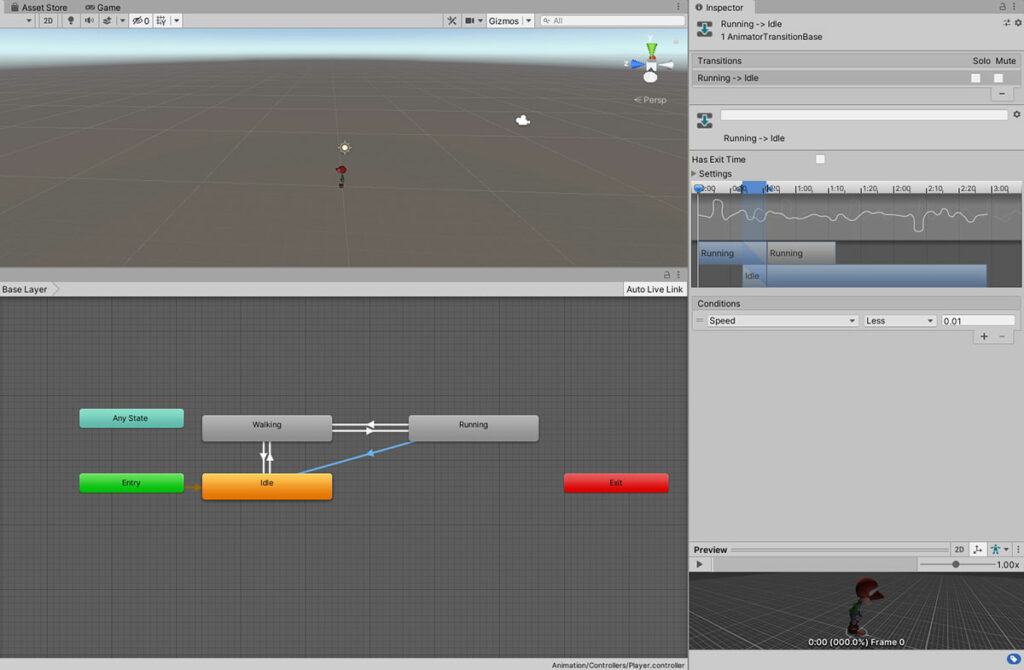
Everything should work relatively fine now, except for this: if we hold Shift without pressing any of the moving keys, the player character will be stuck in the running animation. To fix this, just add a transition from running to idle, like so:
6. Conclusion
That’s it for this part. We will be working on the camera movement and farmable land in the next part. Here’s what your code should finally look like:
PlayerController.cs
using System.Collections;
using System.Collections.Generic;
using UnityEngine;

public class PlayerController : MonoBehaviour
{
    //Movement Components
    private CharacterController controller;
    private Animator animator;

    private float moveSpeed = 4f;

    [Header("Movement System")]
    public float walkSpeed = 4f;
    public float runSpeed = 8f;


    // Start is called before the first frame update
    void Start()
    {
        //Get movement components
        controller = GetComponent<CharacterController>();
        animator = GetComponent<Animator>();


    }

    // Update is called once per frame
    void Update()
    {
        //Runs the function that handles all movement
        Move();
    }


    public void Move()
    {
        //Get the horizontal and vertical inputs as a number
        float horizontal = Input.GetAxisRaw("Horizontal");
        float vertical = Input.GetAxisRaw("Vertical");

        //Direction in a normalised vector
        Vector3 dir = new Vector3(horizontal, 0f, vertical).normalized;
        Vector3 velocity = moveSpeed * Time.deltaTime * dir;

        //Is the sprint key pressed down?
        if (Input.GetButton("Sprint"))
        {
            //Set the animation to run and increase our movespeed
            moveSpeed = runSpeed;
            animator.SetBool("Running", true);
        } else
        {
            //Set the animation to walk and decrease our movespeed
            moveSpeed = walkSpeed;
            animator.SetBool("Running", false);
        }


        //Check if there is movement
        if (dir.magnitude >= 0.1f)
        {
            //Look towards that direction
            transform.rotation = Quaternion.LookRotation(dir);

            //Move
            controller.Move(velocity);

        }

        //Animation speed parameter
        animator.SetFloat("Speed", velocity.magnitude);


    }
}
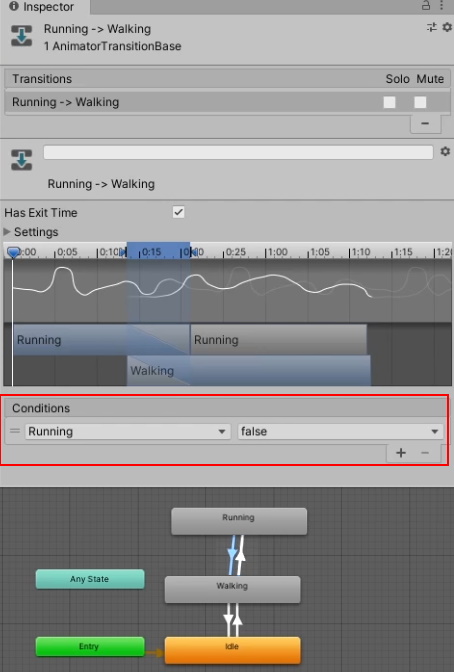
Here are all the animation transitions:


Very much appreciated. Thank you for this excellent article. Keep posting!