
Looking to learn Git on your own, but not sure about where to get started? This article will be a great starting point for you. It’s the first in a series of articles called “Git” good, designed to cut to the meat of the issue, and help you learn Git with a set of simple and straightforward exercises.
In this article, we will be going through the install process for Git and exploring its most basic functionalities.
1. What is Git?
Git is a source control system. It is a software that is designed to track changes on a set of files, most often used by programmers to backup and version their projects, as well as collaborate with each other. The unique thing about Git as a source control system is that it can be used both as a local source control system, as well as a distributed source control system.
In this article, we will be exploring:
- How to install Git and set up some essential Git settings.
- How to set up Git on a project, and make local snapshots of our project with commits.
This article will have a simple exercise that you can follow along, that will expedite your understanding of how Git works. Note that we will only be exploring the capabilities of Git as a local source control system, which means that we won’t be pushing our project onto an online repository like GitHub.
Want to learn more about the types of source control systems available? You can check out this article.
2. Installing Git
a. Downloading your OS installer
To get started, the first thing we need to do is install Git SCM using one of the links below, depending on the operating system you are on:
Windows:
git-scm.com/download/win
While there are other, more user-friendly softwares (such as GitHub Desktop) that can also manage Git projects, they usually don’t offer the full suite of features and capabilities that Git provides.
b. Setting the default text editor
Use the default or recommended settings for all the prompts in your installation, except for the one that asks for you to set your default Git text editor. Select Notepad (or any other text editor you are familiar with), or TextEdit if you are on Mac.
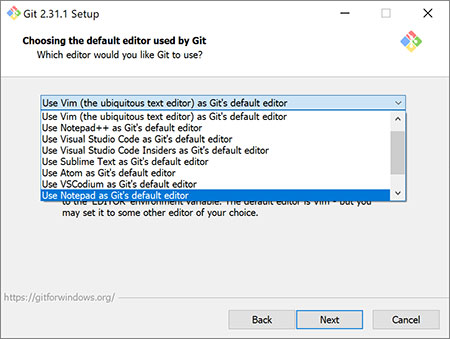
We will be using Notepad as our text editor in this guide.
3. Running Git for the first time
Once Git is installed, you’ll want to right-click anywhere in a folder or on a Desktop and select Git Bash Here. This will open the Git command line, which is where we will be doing most of our work on.
a. Set a username and email address
The first thing you’ll want to do in Git Bash is to execute the following commands:
$ git config --global user.name "John Doe"
$ git config --global user.email johndoe@example.com
This sets the username and email that will be tagged to commits made by this computer. While not particularly important in smaller, one-man projects, proper authorship tagging is important in team projects that are eventually uploaded onto a repository like GitHub, or shared amongst multiple computers, as it allows us to track all changes to our projects and who made them.
b. Re-setting the default text editor
If you did not set the correct text editor for yourself during installation, you can still set it in Git Bash with the following command:
$ git config --global core.editor [EDITOR_NAME]
To set your text editor to Notepad, you will use the following command:
$ git config --global core.editor notepad
4. Starting on our project
a. git init
To allow Git to start doing its file tracking work, we will need to put all the files we want Git to manage into a project folder.
Create a folder on your computer, and create the following text file inside:
main.md
This is the main file in our project!
We will be editing it later on.
.md files are known as Markdown files. Markdown is a lightweight markup language that you can use to add formatting elements to plain text text documents, and they are seen used in platforms like GitHub. If you don’t know how to create Markdown files on your text editor, you can also create a .txt file.
Next, open Git Bash by right-clicking inside your project folder, and select Git Bash Here. Then, type in the following command into Git Bash.
$ git init
This converts your folder into a Git project folder, which creates a hidden .git folder in your project folder. This hidden folder stores all of your Git project data.

.git folder, it’s because the folder is hidden. You’ll need to show hidden files and folders.We are now ready to do some source control with Git.
b. git add and git commit
As our project continues to be developed, we will add more and more files to it, and modify the contents of existing files. Whenever significant work is done on a project, we will want to make a commit of the project.
A commit is a snapshot of the project. Having a commit allows us to roll our project back to this version if anything goes wrong (e.g. if the new version introduces errors that breaks the program, and we can’t fix it).
Before we do a commit, we need to first open Git Bash and type in:
$ git add *
This tells Git that we want all the files in our project folder to be included in our commit. Once this is done, we run the following command to commit.
$ git commit
You will get some messages on Git Bash, followed by a pop-up on Notepad that contains text similar to what you see in the box below. Type in a commit message on the first line of the pop-up, then press Ctrl + S to save the message. Once you are done, close Notepad.
This is our first commit for the project!
# Please enter the commit message for your changes. Lines starting
# with '#' will be ignored, and an empty message aborts the commit.
# Please enter the commit message for your changes. Lines starting
# with '#' will be ignored, and an empty message aborts the commit.
#
# On branch master
#
# Initial commit
#
# Changes to be committed:
#	new file:   main.md
#
c. git log
To confirm that your commit has been made, you can use the git log command, which should give the following output:
$ git log
commit f66d99d6f6d905c29cad2ce37ad3862c82aeb968 (HEAD -> master)
Author: Terence <terence@example.com>
Date:   Sun May 23 17:24:00 2021 +0800

	This is our first commit of the project!
d. git status
As the project is developed further, we are going to make more commits at key points in the project development. Hence, we are going to explore how to commit further changes made to our projects.
Change main.md by making the following changes (highlighted below):
main.md
This is the main file in our project!
We will be editing it later on.
Here is one more line.
Then, add the following file to our project:
sub.md
This is a subfile in our project!
It may also be modified later.
Now, run git status to see how our project has changed since the last commit. You should find the following output:
$ git status
 On branch master
 Changes not staged for commit:
   (use "git add …" to update what will be committed)
   (use "git restore …" to discard changes in working directory)
         modified:   main.md
 Untracked files:
   (use "git add …" to include in what will be committed)
         sub.md
 no changes added to commit (use "git add" and/or "git commit -a")
Essentially, the command will tell you:
- Which files have had their contents updated, and;
- Which new files have been added.
e. git diff [FILENAME]
We can also run git diff [FILENAME], which will compare the file with the last committed version and show the differences between them. For example, here is the output for git diff main.md:
Note: If your output for git diff is very long, use the ↑ and ↓ arrow keys to navigate through it. When you are done, press the Q key to exit.
$ git diff swissknife.py
 diff --git a/main.md b/main.md
 index 6e31d97..1460977 100644
 --- a/main.md
 +++ b/main.md
 @@ -1,2 +1,3 @@
 This is the main file in our project!
-We will be editing it later on.
\ No newline at end of file
+We will be editing it later on.
+Here is one more line.
\ No newline at end of file
Note: You can also use the git diff command without specifying a filename, but it’s not recommended as that will output a lot of data if there are many changed files.
f. git commit -m "[YOUR MESSAGE]"
The next thing we want to do is add all new and changed files:
$ git add *
Then, we make another commit. This time, however, we use a longer command, so that our message is keyed in together with the commit.
$ git commit -m "Our second commit"
With our commit message specified using the -m argument, Git will not ask us for a commit message after we run the command.
Git does not allow its users to make a commit with an empty message. This is because providing a meaningful commit message is a good development and repository managmenet practice.
Afterwards, the git log should once again show us our previous commit.
$ git log
commit b5c65ae31b2f03d4872be6ae1bdf9032c265590c (HEAD -> master)
Author: Terence <terence@example.com>
Date:   Mon May 24 01:31:06 2021 +0800
        Our second commit.

commit f66d99d6f6d905c29cad2ce37ad3862c82aeb968 (HEAD -> master)
Author: Terence <terence@example.com>
Date:   Sun May 23 17:24:00 2021 +0800
	This is our first commit of the project!
Fun fact: You can also use git show to display the details of your last commit. git show is different from git log because it also shows you the changes made to each file (similar to what you get in git diff).
5. Conclusion
This wraps up Part 1 of our article. In the next article, we will be exploring how to revert changes to our projects, as well as how to use branches to safely develop new features to our project without affecting the stability of our existing codebase.
Be sure to drop us a comment if you like the article, or if you have any suggestions on how you can make it better.