Forum begins after the advertisement:
[Part 2] Yellow lines on tile map
Home › Forums › Video Game Tutorial Series › Creating a Rogue-like Shoot-em Up in Unity › [Part 2] Yellow lines on tile map
- This topic has 6 replies, 3 voices, and was last updated 1 year, 3 months ago by
Paulius Križinauskas.
-
AuthorPosts
-
March 9, 2025 at 8:41 pm #17454::
Here is a link to a video showing it:
View post on imgur.com
I am following the series as best as I can, I am at the start of the second video where I just created a background tile map. But for some reason when ingame, you can these yellow lines. Turning off anti_alaising didn’t help (it was off by default), and another solution that I found was a Sprite Atlas, but it didn’t help either, and also when I tried to delete it after, it bricked my project and I had to redo everything up to that point :( (except for scripts ofcourse)
Any help is appreciated!
March 9, 2025 at 8:51 pm #17455March 10, 2025 at 1:25 am #17459March 10, 2025 at 1:35 am #17460::As I mentioned in my post I have already tried to change Anti Aliasing to disabled, and it didn’t work, it is also off by default for me.
(also I THINK I am using the newest Unity version, and anti aliasing in now in the main camera, not quality settings)
Just to make sure, I tried it again and nothing changes :(
I also wanted to try this workaround:
But I can’t understand how to exactly add the the tilesheet padding….
(also sorry, I don’t know how to tag people)
March 10, 2025 at 1:35 am #17461::It sounds like you’re dealing with visual issues in Unity related to tilemaps, and you’ve already looked into disabling anti-aliasing without success. Let’s address the tilemap padding issue you’re trying to implement.
Adding Padding to Your Tilesheet
If you want to add padding to your tilesheet in Unity, you can follow these steps:
-
Select Your Tilesheet Texture: In the Project window, click on the tilesheet texture that you’re using for your tilemap.
-
Open the Sprite Editor: In the Inspector window, there should be an option to open the Sprite Editor. Click on it. If you don’t see this option, make sure that your texture type is set to ‘Sprite (2D and UI)’.
-
Add Padding:
- In the Sprite Editor, you can create individual sprites from your tilesheet.
- After selecting the entire tilesheet or specific tiles, you will see options to adjust the borders and padding.
- You can manually enter values for the padding (for example, 1 or 2 pixels) around each tile. This helps to prevent texture bleeding where one tile may appear to overlap with another due to filtering.
-
Save and Apply Changes: After adjusting the padding, make sure to apply the changes and save the sprite settings.
-
Check Your Tilemap Settings: Ensure that your tilemap is set to use the updated tilesheet and that the tilemap renderer is configured correctly.
Additional Tips
-
Camera Settings: While you’re already aware that anti-aliasing is handled in the camera settings, double-check that your camera’s projection and settings align with your design requirements.
-
Tilemap Renderer Settings: Make sure that your Tilemap Renderer component is set correctly. Sometimes toggling settings like “Tilemap Color” can also affect visuals.
-
Quality Settings: Although you’ve mentioned that anti-aliasing is disabled, ensure that your project’s quality settings (Edit > Project Settings > Quality) do not enforce any unintended settings.
If you’ve done all this and are still experiencing issues, consider posting some screenshots or more details about your settings, as that can help others in the community provide more specific assistance. Good luck!
March 10, 2025 at 2:02 am #17462::I tried the AI comment, and if I did it correctly, it also didn’t work :(
When I got to splice the texture, the B T L R are the ones that I need to put at 1 or 2?
If that is correct, then I added padding and redid the map/chunk and it didn’t do anything…
March 10, 2025 at 2:06 am #17463::It sounds like you’re working with texture mapping, possibly in a game engine or graphics framework, and you’re trying to use splicing to handle your textures. The terms B, T, L, and R typically refer to the boundaries of the texture (Bottom, Top, Left, Right). However, the specific values you should use for these parameters can depend on the context of your application.
Here are a few steps to help you troubleshoot your issue:
-
Understand the Parameters:
- B (Bottom): The bottom coordinate of your texture.
- T (Top): The top coordinate of your texture.
- L (Left): The left coordinate of your texture.
- R (Right): The right coordinate of your texture. Make sure you know what each parameter represents in terms of the coordinates of your texture.
-
Setting Values:
- Typically, if you are splicing a texture, you would set these parameters based on the portion of the texture you want to use. For example, if you want to use the entire texture, you might set B to
0, T to1, L to0, and R to1. If you want to use only a part of it, adjust these values accordingly.
- Typically, if you are splicing a texture, you would set these parameters based on the portion of the texture you want to use. For example, if you want to use the entire texture, you might set B to
-
Padding:
- If you added padding, ensure that the new coordinates take this into account. For example, if you added a padding of
0.1to all sides, you would adjust your coordinates to reflect that. So, if your original coordinates wereB=0,T=1,L=0,R=1, after padding you’d haveB=0.1,T=0.9,L=0.1,R=0.9.
- If you added padding, ensure that the new coordinates take this into account. For example, if you added a padding of
-
Check the Mapping Logic:
- Ensure that your texture mapping logic is correctly implemented. Sometimes issues can arise from how the texture is being applied to the geometry. Make sure that the UV mapping (if applicable) is set up correctly.
-
Debugging:
- If it’s still not working, consider adding debug logs to output the values of B, T, L, R before applying the texture. This can help you verify that the values are what you expect.
-
Consult Documentation:
- If you’re using a specific library or engine, consult its documentation to see if there are any specific requirements or common pitfalls regarding texture splicing.
If you can provide a snippet of your code where this splicing and mapping is happening, I would be happy to help you further!
March 10, 2025 at 2:47 am #17464::If the AI is correct, and if I understood it correctly, I might have not added padding, but where is it?
When I open the splice editor, at the bottom right where I can set the size of the splice I have these parameters: Position (X, Y, Width, Height) Border (L,R,T,B) Pivot options Pivot Unit Mode options Custom Pivot (disabled atm)
Where do I find the padding?
March 10, 2025 at 2:51 am #17465::It sounds like you’re working with a splice editor that allows you to manipulate the layout of an element, possibly in a UI or game development context. In many UI design tools, padding is often separate from the border settings, which you mentioned.
Here are a few steps to check for padding in your splice editor:
-
Look for Padding Settings: Sometimes padding options are listed under a separate section in the properties panel. Check if there is a dedicated “Padding” category that allows you to set values for each side (Left, Right, Top, Bottom).
-
Check Style Options: If your splice editor has a style or appearance tab, padding might be included there. Look for any options that might relate to layout adjustments or spacing.
-
Inspect Layout or Advanced Settings: Some editors have advanced settings where more detailed layout options are hidden. Look for an “Advanced” or “Layout” section to see if padding is mentioned.
-
Consult Documentation: If you’re unable to find the padding settings within the interface, consult the documentation for the tool you’re using. It may provide insights on where to locate padding options.
-
Check for Default Padding: In some cases, an element might have default padding applied that isn’t explicitly shown in the editor. Try adjusting other layout parameters to see if they affect the spacing.
If you’re still having trouble, please provide more details about the specific tool or software you are using, and I can offer more tailored advice.
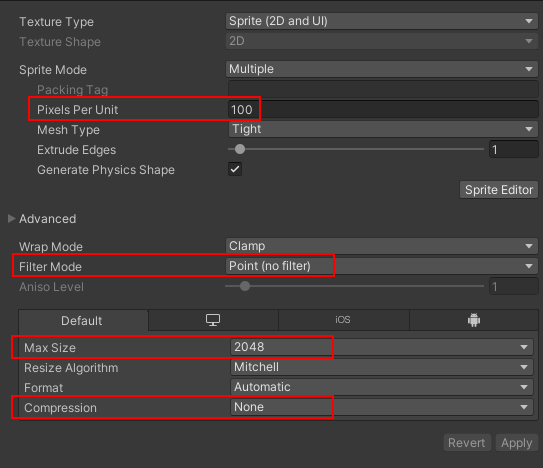
March 10, 2025 at 1:33 pm #17467::@pauliuskrizinauskas pardon the AI, I don’t think your issue can be fixed through the sprite editor.
Another thing you can try is selecting the sprite(s) for your tilemap in your Project window, then setting each of the sprites to Point (no filter) for Filter Mode.
If that fails as well, you can check out this article for other things you can try, such as using a pixel perfect camera, or packing your sprites into a sprite atlas: https://blog.terresquall.com/2023/03/how-to-fix-gaps-in-your-tiles-in-unitys-2d-tilemaps/
March 10, 2025 at 5:53 pm #17476 -
-
AuthorPosts
- You must be logged in to reply to this topic.
Advertisement below: