In the second part of this series, we explore a very common problem that teams usually run into when collaborating on GitHub Desktop—merge conflicts. These can cause significant delay to your work, as you are forced to handle them when they occur before progressing; and it can take a fair bit of time and skill to solve them.
Resolving them incorrectly can also cause work progress to be lost.
Hence, in this article, we’ll be covering what they are, how you can avoid them, and how you can resolve them.
1. How merge conflicts happen
To understand why merge conflicts happen, it is best to first understand how Git does its version control magic.
a. How project history is maintained
When you are working on a project in Git, all changes made to the project are arranged in a linear fashion.
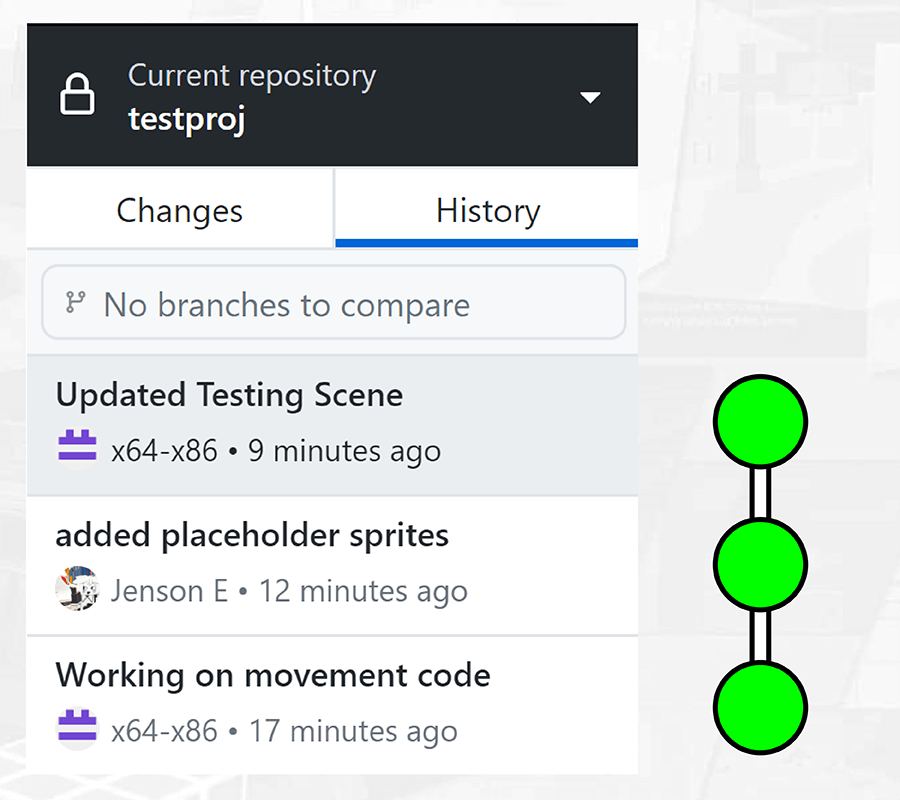
Hence, whenever you make changes to the project and push them onto GitHub, Git will try to add your changes to the end of the chain.
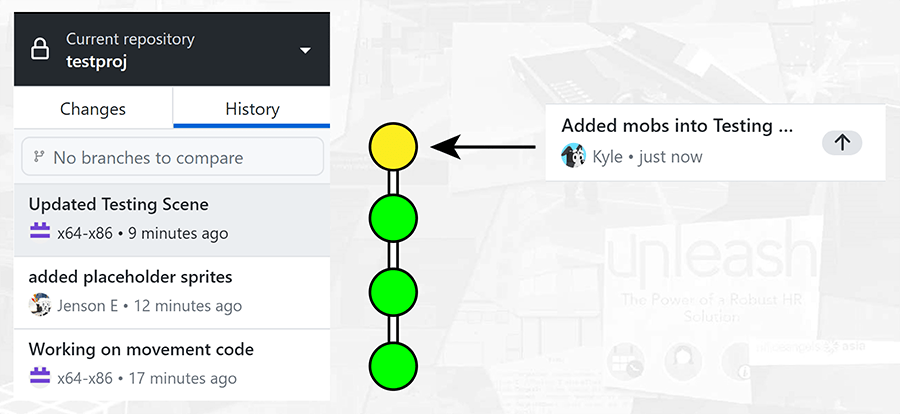
However, keeping this chain linear is not always possible. You may run into scenarios where:
- You make changes to your existing copy of the project without remembering to do a Fetch origin (i.e. what Git calls making a pull), which fetches any updates that other team members have made to the project since the last time you accessed it.

- You have finished your latest set of changes, and are trying to push the project—only to find that someone else has pushed a new set of changes while you were working.

In such cases, Git will put the incoming changes before your own, as shown in the diagram below.
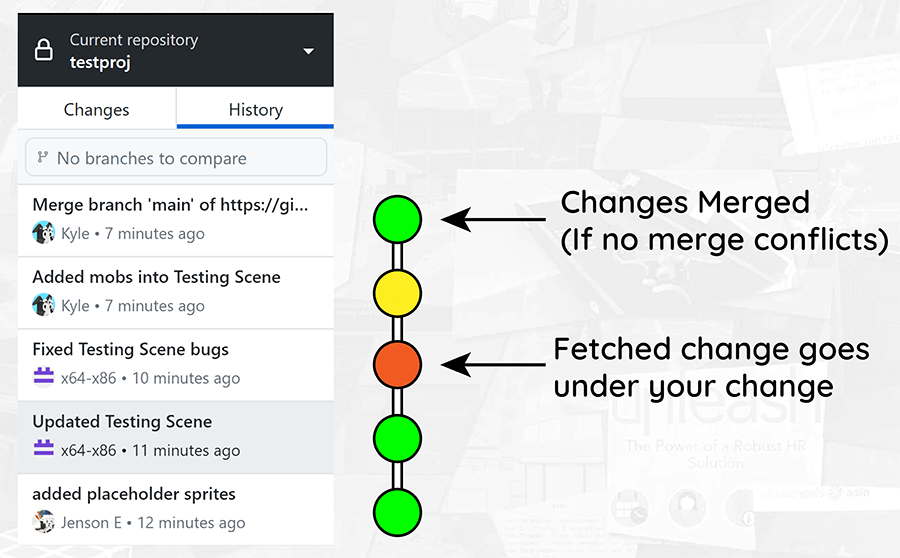
And if both the incoming changes and your own set of changes affect the same file in your project, Git will automatically merge them together. For example, these 2 scripts:
class Example {
    void Hi() { print("Hi"); }
}
class Example {
    void Bye() { print("Bye"); }
}
When merged, will become:
class Example {
    void Hi() { print("Hi"); }
    void Bye() { print("Bye"); }
}
b. Enter the merge conflict
Merge conflicts happen when Git is unable to automatically merge your files in different changesets, because both changesets modify the same section:
class Example {
    void Hi() { print("Hi"); }
}
class Example {
    void Hi() { print("Bye"); }
}
In such a case, the merge will include both versions of the code in conflict, with symbols delineating them:
class Example {
<<<<<<< HEAD
    void Hi() { print("Hi"); }
=======
    void Hi() { print("Bye"); }
>>>>>>> your-version
}
This will be done to all conflicting files, and GitHub Desktop will issue you a nice little warning after that. When this happens, your Unity project will become logjammed—you will be unable to run it, and your conflicting Scenes / Prefabs will not be accessible. This is because the extra <<<, >>> and === symbols introduced into the conflicting files break your scripts, Scenes and Prefabs.
Below is a video that documents this wonderful process:
2. Fixing your merge conflicts
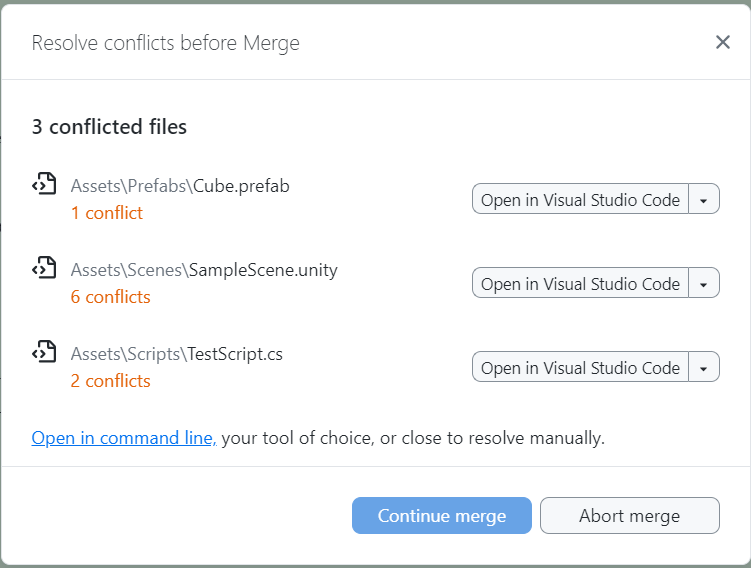
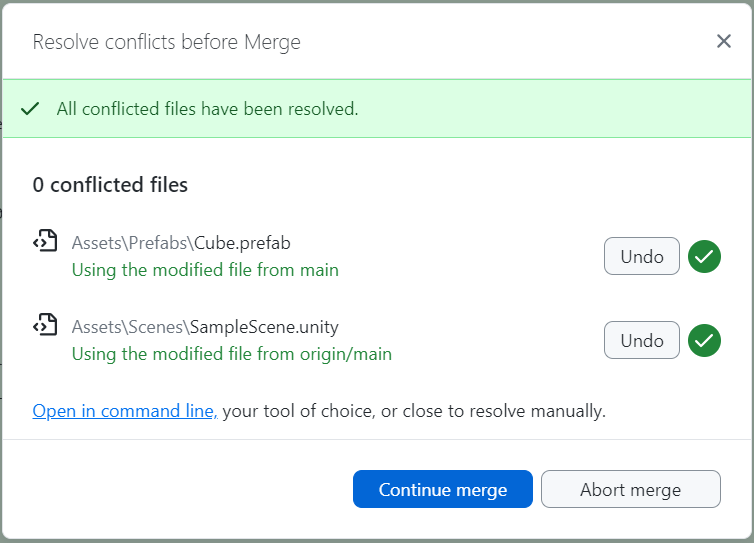
When merge conflicts are found in your project, a pleasant popup like the one shown below appears, and you will have to resolve all of the merge conflicts in the listed files before you can continue working on your project, and you have no choice in this matter.
Fixing your merge conflicts entails open your conflicting files in a text or code editor, and picking 1 of the 2 conflicting options. Using the example above, it means picking one of the options below:
class Example {
<<<<<<< HEAD
    void Hi() { print("Hi"); }
=======
    void Hi() { print("Bye"); }
>>>>>>> your-version
}
class Example {
<<<<<<< HEAD
    void Hi() { print("Hi"); }
=======
    void Hi() { print("Bye"); }
>>>>>>> your-version
}
…or merging both options in a unique manner.
class Example {
<<<<<<< HEAD
    void Hi() { print("Hi"); print("Bye"); }
=======
    void Hi() { print("Bye"); }
>>>>>>> your-version
}
Depending on the file that is conflicting, you will have different merge options.
a. Merging C# scripts
If the conflicting files are C# scripts, you will have the option to open them using Visual Studio’s Merge Editor.
If you have any other supported code editor installed (e.g. Visual Studio Code, Notepad++), Github Desktop may not show Visual Studio as a merge option. In such cases, if you’d still like to use Visual Studio, you can go open up the conflicting script in Visual Studio and click “Open Merge Editor” on the header above.

I recommend just sticking with the Merge Editor since it allows you to easily compare and pick the lines to merge.
After opening the conflicting script in Visual Studio, you’ll be presented with three windows:
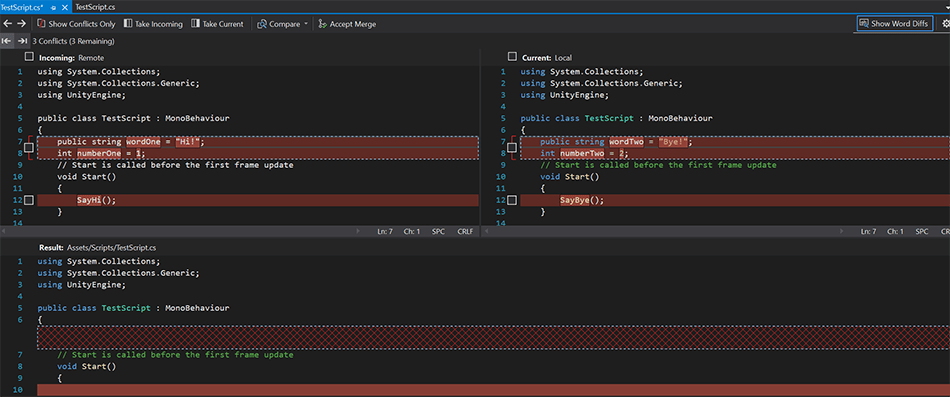
- The left window shows what the code on the remote repository looks like (Remote)
- The right window shows the code that you previously tried to push (Local)
- The bottom window shows you what the merged code will look like (Result)
The only windows you’ll need to edit in are the Remote and Local ones. The Result window just shows you what the merged code will look like.
Lines that have conflicting code will have a checkbox at the side, which you can tick to keep that line of code to merge. You can either tick the boxes on the Remote, Local, or both sides depending on the code you’d like to keep. This will update the result window at the bottom so you’ll know what lines of code will end up in the merged script.
Once you’re done comparing and picking the lines of code, check that the code in the result window is what you’d want to merge. If everything looks okay, you can click the “Accept Merge” button on the top to get the merged script, which will hopefully resolve the conflict.
b. Prefabs and Scene files
Merge conflicts in Prefabs and Scene files are harder to resolve as these files usually contain thousands of lines of text in a format known as YAML. The text stores information about all the GameObjects and their attached components in both your Prefabs and Scenes.
You can click the coloured text below to view the text contents of a prefab and a scene. We’ve put them in a dropdown for reasons you’ll see later…
> A Prefab file of a cube with its components
%YAML 1.1
%TAG !u! tag:unity3d.com,2011:
--- !u!1 &2269730876603209846
GameObject:
  m_ObjectHideFlags: 0
  m_CorrespondingSourceObject: {fileID: 0}
  m_PrefabInstance: {fileID: 0}
  m_PrefabAsset: {fileID: 0}
  serializedVersion: 6
  m_Component:
  - component: {fileID: 1436742694280336396}
  - component: {fileID: 2633293972622283301}
  - component: {fileID: 188020014399789215}
  - component: {fileID: 483219338925593252}
  m_Layer: 0
  m_Name: Cube 1
  m_TagString: Untagged
  m_Icon: {fileID: 0}
  m_NavMeshLayer: 0
  m_StaticEditorFlags: 0
  m_IsActive: 1
--- !u!4 &1436742694280336396
Transform:
  m_ObjectHideFlags: 0
  m_CorrespondingSourceObject: {fileID: 0}
  m_PrefabInstance: {fileID: 0}
  m_PrefabAsset: {fileID: 0}
  m_GameObject: {fileID: 2269730876603209846}
  serializedVersion: 2
  m_LocalRotation: {x: 0, y: 0, z: 0, w: 1}
  m_LocalPosition: {x: 0, y: 0, z: -1}
  m_LocalScale: {x: 1, y: 1, z: 1}
  m_ConstrainProportionsScale: 0
  m_Children: []
  m_Father: {fileID: 0}
  m_LocalEulerAnglesHint: {x: 0, y: 0, z: 0}
--- !u!33 &2633293972622283301
MeshFilter:
  m_ObjectHideFlags: 0
  m_CorrespondingSourceObject: {fileID: 0}
  m_PrefabInstance: {fileID: 0}
  m_PrefabAsset: {fileID: 0}
  m_GameObject: {fileID: 2269730876603209846}
  m_Mesh: {fileID: 10202, guid: 0000000000000000e000000000000000, type: 0}
--- !u!23 &188020014399789215
MeshRenderer:
  m_ObjectHideFlags: 0
  m_CorrespondingSourceObject: {fileID: 0}
  m_PrefabInstance: {fileID: 0}
  m_PrefabAsset: {fileID: 0}
  m_GameObject: {fileID: 2269730876603209846}
  m_Enabled: 1
  m_CastShadows: 1
  m_ReceiveShadows: 1
  m_DynamicOccludee: 1
  m_StaticShadowCaster: 0
  m_MotionVectors: 1
  m_LightProbeUsage: 1
  m_ReflectionProbeUsage: 1
  m_RayTracingMode: 2
  m_RayTraceProcedural: 0
  m_RenderingLayerMask: 1
  m_RendererPriority: 0
  m_Materials:
  - {fileID: 10303, guid: 0000000000000000f000000000000000, type: 0}
  m_StaticBatchInfo:
    firstSubMesh: 0
    subMeshCount: 0
  m_StaticBatchRoot: {fileID: 0}
  m_ProbeAnchor: {fileID: 0}
  m_LightProbeVolumeOverride: {fileID: 0}
  m_ScaleInLightmap: 1
  m_ReceiveGI: 1
  m_PreserveUVs: 0
  m_IgnoreNormalsForChartDetection: 0
  m_ImportantGI: 0
  m_StitchLightmapSeams: 1
  m_SelectedEditorRenderState: 3
  m_MinimumChartSize: 4
  m_AutoUVMaxDistance: 0.5
  m_AutoUVMaxAngle: 89
  m_LightmapParameters: {fileID: 0}
  m_SortingLayerID: 0
  m_SortingLayer: 0
  m_SortingOrder: 0
  m_AdditionalVertexStreams: {fileID: 0}
--- !u!65 &483219338925593252
BoxCollider:
  m_ObjectHideFlags: 0
  m_CorrespondingSourceObject: {fileID: 0}
  m_PrefabInstance: {fileID: 0}
  m_PrefabAsset: {fileID: 0}
  m_GameObject: {fileID: 2269730876603209846}
  m_Material: {fileID: 0}
  m_IncludeLayers:
    serializedVersion: 2
    m_Bits: 0
  m_ExcludeLayers:
    serializedVersion: 2
    m_Bits: 0
  m_LayerOverridePriority: 0
  m_IsTrigger: 0
  m_ProvidesContacts: 0
  m_Enabled: 1
  serializedVersion: 3
  m_Size: {x: 1, y: 1, z: 1}
  m_Center: {x: 0, y: 0, z: 0}
> A Scene file containing a camera and directional light
%YAML 1.1
%TAG !u! tag:unity3d.com,2011:
--- !u!29 &1
OcclusionCullingSettings:
  m_ObjectHideFlags: 0
  serializedVersion: 2
  m_OcclusionBakeSettings:
    smallestOccluder: 5
    smallestHole: 0.25
    backfaceThreshold: 100
  m_SceneGUID: 00000000000000000000000000000000
  m_OcclusionCullingData: {fileID: 0}
--- !u!104 &2
RenderSettings:
  m_ObjectHideFlags: 0
  serializedVersion: 9
  m_Fog: 0
  m_FogColor: {r: 0.5, g: 0.5, b: 0.5, a: 1}
  m_FogMode: 3
  m_FogDensity: 0.01
  m_LinearFogStart: 0
  m_LinearFogEnd: 300
  m_AmbientSkyColor: {r: 0.212, g: 0.227, b: 0.259, a: 1}
  m_AmbientEquatorColor: {r: 0.114, g: 0.125, b: 0.133, a: 1}
  m_AmbientGroundColor: {r: 0.047, g: 0.043, b: 0.035, a: 1}
  m_AmbientIntensity: 1
  m_AmbientMode: 0
  m_SubtractiveShadowColor: {r: 0.42, g: 0.478, b: 0.627, a: 1}
  m_SkyboxMaterial: {fileID: 10304, guid: 0000000000000000f000000000000000, type: 0}
  m_HaloStrength: 0.5
  m_FlareStrength: 1
  m_FlareFadeSpeed: 3
  m_HaloTexture: {fileID: 0}
  m_SpotCookie: {fileID: 10001, guid: 0000000000000000e000000000000000, type: 0}
  m_DefaultReflectionMode: 0
  m_DefaultReflectionResolution: 128
  m_ReflectionBounces: 1
  m_ReflectionIntensity: 1
  m_CustomReflection: {fileID: 0}
  m_Sun: {fileID: 0}
  m_IndirectSpecularColor: {r: 0.18028378, g: 0.22571412, b: 0.30692285, a: 1}
  m_UseRadianceAmbientProbe: 0
--- !u!157 &3
LightmapSettings:
  m_ObjectHideFlags: 0
  serializedVersion: 12
  m_GIWorkflowMode: 1
  m_GISettings:
    serializedVersion: 2
    m_BounceScale: 1
    m_IndirectOutputScale: 1
    m_AlbedoBoost: 1
    m_EnvironmentLightingMode: 0
    m_EnableBakedLightmaps: 1
    m_EnableRealtimeLightmaps: 0
  m_LightmapEditorSettings:
    serializedVersion: 12
    m_Resolution: 2
    m_BakeResolution: 40
    m_AtlasSize: 1024
    m_AO: 0
    m_AOMaxDistance: 1
    m_CompAOExponent: 1
    m_CompAOExponentDirect: 0
    m_ExtractAmbientOcclusion: 0
    m_Padding: 2
    m_LightmapParameters: {fileID: 0}
    m_LightmapsBakeMode: 1
    m_TextureCompression: 1
    m_FinalGather: 0
    m_FinalGatherFiltering: 1
    m_FinalGatherRayCount: 256
    m_ReflectionCompression: 2
    m_MixedBakeMode: 2
    m_BakeBackend: 1
    m_PVRSampling: 1
    m_PVRDirectSampleCount: 32
    m_PVRSampleCount: 512
    m_PVRBounces: 2
    m_PVREnvironmentSampleCount: 256
    m_PVREnvironmentReferencePointCount: 2048
    m_PVRFilteringMode: 1
    m_PVRDenoiserTypeDirect: 1
    m_PVRDenoiserTypeIndirect: 1
    m_PVRDenoiserTypeAO: 1
    m_PVRFilterTypeDirect: 0
    m_PVRFilterTypeIndirect: 0
    m_PVRFilterTypeAO: 0
    m_PVREnvironmentMIS: 1
    m_PVRCulling: 1
    m_PVRFilteringGaussRadiusDirect: 1
    m_PVRFilteringGaussRadiusIndirect: 5
    m_PVRFilteringGaussRadiusAO: 2
    m_PVRFilteringAtrousPositionSigmaDirect: 0.5
    m_PVRFilteringAtrousPositionSigmaIndirect: 2
    m_PVRFilteringAtrousPositionSigmaAO: 1
    m_ExportTrainingData: 0
    m_TrainingDataDestination: TrainingData
    m_LightProbeSampleCountMultiplier: 4
  m_LightingDataAsset: {fileID: 0}
  m_LightingSettings: {fileID: 0}
--- !u!196 &4
NavMeshSettings:
  serializedVersion: 2
  m_ObjectHideFlags: 0
  m_BuildSettings:
    serializedVersion: 3
    agentTypeID: 0
    agentRadius: 0.5
    agentHeight: 2
    agentSlope: 45
    agentClimb: 0.4
    ledgeDropHeight: 0
    maxJumpAcrossDistance: 0
    minRegionArea: 2
    manualCellSize: 0
    cellSize: 0.16666667
    manualTileSize: 0
    tileSize: 256
    buildHeightMesh: 0
    maxJobWorkers: 0
    preserveTilesOutsideBounds: 0
    debug:
      m_Flags: 0
  m_NavMeshData: {fileID: 0}
--- !u!1 &825476309
GameObject:
  m_ObjectHideFlags: 0
  m_CorrespondingSourceObject: {fileID: 0}
  m_PrefabInstance: {fileID: 0}
  m_PrefabAsset: {fileID: 0}
  serializedVersion: 6
  m_Component:
  - component: {fileID: 825476312}
  - component: {fileID: 825476311}
  - component: {fileID: 825476310}
  m_Layer: 0
  m_Name: Main Camera
  m_TagString: MainCamera
  m_Icon: {fileID: 0}
  m_NavMeshLayer: 0
  m_StaticEditorFlags: 0
  m_IsActive: 1
--- !u!81 &825476310
AudioListener:
  m_ObjectHideFlags: 0
  m_CorrespondingSourceObject: {fileID: 0}
  m_PrefabInstance: {fileID: 0}
  m_PrefabAsset: {fileID: 0}
  m_GameObject: {fileID: 825476309}
  m_Enabled: 1
--- !u!20 &825476311
Camera:
  m_ObjectHideFlags: 0
  m_CorrespondingSourceObject: {fileID: 0}
  m_PrefabInstance: {fileID: 0}
  m_PrefabAsset: {fileID: 0}
  m_GameObject: {fileID: 825476309}
  m_Enabled: 1
  serializedVersion: 2
  m_ClearFlags: 1
  m_BackGroundColor: {r: 0.19215687, g: 0.3019608, b: 0.4745098, a: 0}
  m_projectionMatrixMode: 1
  m_GateFitMode: 2
  m_FOVAxisMode: 0
  m_Iso: 200
  m_ShutterSpeed: 0.005
  m_Aperture: 16
  m_FocusDistance: 10
  m_FocalLength: 50
  m_BladeCount: 5
  m_Curvature: {x: 2, y: 11}
  m_BarrelClipping: 0.25
  m_Anamorphism: 0
  m_SensorSize: {x: 36, y: 24}
  m_LensShift: {x: 0, y: 0}
  m_NormalizedViewPortRect:
    serializedVersion: 2
    x: 0
    y: 0
    width: 1
    height: 1
  near clip plane: 0.3
  far clip plane: 1000
  field of view: 60
  orthographic: 0
  orthographic size: 5
  m_Depth: -1
  m_CullingMask:
    serializedVersion: 2
    m_Bits: 4294967295
  m_RenderingPath: -1
  m_TargetTexture: {fileID: 0}
  m_TargetDisplay: 0
  m_TargetEye: 3
  m_HDR: 1
  m_AllowMSAA: 1
  m_AllowDynamicResolution: 0
  m_ForceIntoRT: 0
  m_OcclusionCulling: 1
  m_StereoConvergence: 10
  m_StereoSeparation: 0.022
--- !u!4 &825476312
Transform:
  m_ObjectHideFlags: 0
  m_CorrespondingSourceObject: {fileID: 0}
  m_PrefabInstance: {fileID: 0}
  m_PrefabAsset: {fileID: 0}
  m_GameObject: {fileID: 825476309}
  serializedVersion: 2
  m_LocalRotation: {x: 0, y: 0, z: 0, w: 1}
  m_LocalPosition: {x: 0, y: 1, z: -10}
  m_LocalScale: {x: 1, y: 1, z: 1}
  m_ConstrainProportionsScale: 0
  m_Children: []
  m_Father: {fileID: 0}
  m_LocalEulerAnglesHint: {x: 0, y: 0, z: 0}
--- !u!1 &1578399938
GameObject:
  m_ObjectHideFlags: 0
  m_CorrespondingSourceObject: {fileID: 0}
  m_PrefabInstance: {fileID: 0}
  m_PrefabAsset: {fileID: 0}
  serializedVersion: 6
  m_Component:
  - component: {fileID: 1578399940}
  - component: {fileID: 1578399939}
  m_Layer: 0
  m_Name: Directional Light
  m_TagString: Untagged
  m_Icon: {fileID: 0}
  m_NavMeshLayer: 0
  m_StaticEditorFlags: 0
  m_IsActive: 1
--- !u!108 &1578399939
Light:
  m_ObjectHideFlags: 0
  m_CorrespondingSourceObject: {fileID: 0}
  m_PrefabInstance: {fileID: 0}
  m_PrefabAsset: {fileID: 0}
  m_GameObject: {fileID: 1578399938}
  m_Enabled: 1
  serializedVersion: 10
  m_Type: 1
  m_Shape: 0
  m_Color: {r: 1, g: 0.95686275, b: 0.8392157, a: 1}
  m_Intensity: 1
  m_Range: 10
  m_SpotAngle: 30
  m_InnerSpotAngle: 21.80208
  m_CookieSize: 10
  m_Shadows:
    m_Type: 2
    m_Resolution: -1
    m_CustomResolution: -1
    m_Strength: 1
    m_Bias: 0.05
    m_NormalBias: 0.4
    m_NearPlane: 0.2
    m_CullingMatrixOverride:
      e00: 1
      e01: 0
      e02: 0
      e03: 0
      e10: 0
      e11: 1
      e12: 0
      e13: 0
      e20: 0
      e21: 0
      e22: 1
      e23: 0
      e30: 0
      e31: 0
      e32: 0
      e33: 1
    m_UseCullingMatrixOverride: 0
  m_Cookie: {fileID: 0}
  m_DrawHalo: 0
  m_Flare: {fileID: 0}
  m_RenderMode: 0
  m_CullingMask:
    serializedVersion: 2
    m_Bits: 4294967295
  m_RenderingLayerMask: 1
  m_Lightmapping: 4
  m_LightShadowCasterMode: 0
  m_AreaSize: {x: 1, y: 1}
  m_BounceIntensity: 1
  m_ColorTemperature: 6570
  m_UseColorTemperature: 0
  m_BoundingSphereOverride: {x: 0, y: 0, z: 0, w: 0}
  m_UseBoundingSphereOverride: 0
  m_UseViewFrustumForShadowCasterCull: 1
  m_ShadowRadius: 0
  m_ShadowAngle: 0
--- !u!4 &1578399940
Transform:
  m_ObjectHideFlags: 0
  m_CorrespondingSourceObject: {fileID: 0}
  m_PrefabInstance: {fileID: 0}
  m_PrefabAsset: {fileID: 0}
  m_GameObject: {fileID: 1578399938}
  serializedVersion: 2
  m_LocalRotation: {x: 0.40821788, y: -0.23456968, z: 0.10938163, w: 0.8754261}
  m_LocalPosition: {x: 0, y: 3, z: 0}
  m_LocalScale: {x: 1, y: 1, z: 1}
  m_ConstrainProportionsScale: 0
  m_Children: []
  m_Father: {fileID: 0}
  m_LocalEulerAnglesHint: {x: 50, y: -30, z: 0}
--- !u!1660057539 &9223372036854775807
SceneRoots:
  m_ObjectHideFlags: 0
  m_Roots:
  - {fileID: 825476312}
  - {fileID: 1578399940}
To resolve these merge conflicts, you will be prompted to open up the conflicting Prefab or Scene file in a code editor (though using Notepad or TextEdit works just as well). Unlike Visual Studio’s Merge Editor though, you’ll need to manually remove the merge symbols yourself in your Scene or Prefab files.
Another option you can try is Unity’s built-in YAML merger, though it is not 100% guaranteed to properly merge any conflicting scenes/prefabs you may have.
Word of Warning
When fixing merge conflicts with Scenes and Prefabs, it is possible for the merge to break the files. This is because it is possible for the same GameObjects to have different IDs across different projects. Hence, when merging, you may select a changeset that has a different ID from what your Scene or Prefab needs. This can lead to Scenes with missing GameObjects or Prefabs, or Prefabs that do not show up.
c. Merging other files
If you have other kinds of files that conflict (e.g. ScriptableObject asset files), the process for resolving the conflict will be similar to resolving the conflict in Prefabs and Scenes.
d. Discarding one of the versions
Sometimes, instead of automatically merging the files, GitHub Desktop allows you to either choose one or the other to keep instead. If this happens, you can expand the dropdowns on the merge conflict popup and choose one of the two options:

- Use the modified file from main – Keep and push the file on your local repository (i.e. replace the file in the remote repository with your changes)
- Use the modified file from origin/main – Keep the file on the remote repository (i.e. your changes get discarded)
e. Resolving deleted files
It is also possible to run into merge conflicts because one changeset modifies a file that another changeset deletes. In such an instance, you will simply be prompted to either keep or remove the file.
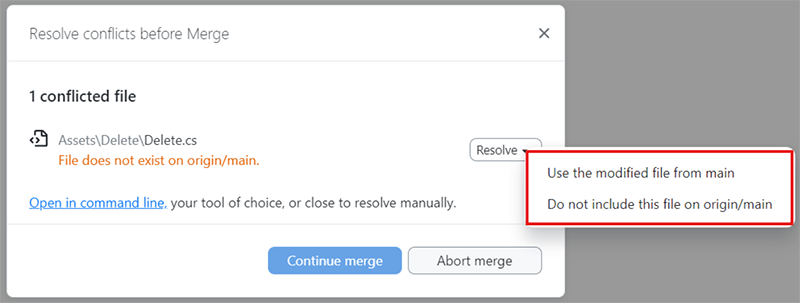
- Use the modified file from main – Push the file on your local repository (i.e. creates that file/folders on the remote repository)
- Do not include this file on origin/main – Does not push the file on your local repository to the remote repository (i.e. Discards the file you changed)
3. Preventing merge conflicts
Prevention is better than cure—merge conflicts can be a headache to deal with, so it’s best to not encounter them in the first place.
Here are a few ways to prevent merge conflicts from popping up.
a. Always remember to Fetch Origin before working

Since merge conflicts can be caused by forgetting to update your project before working on it, you should try to—y’know… never forgetting to do a Fetch origin before you work on your project.
Too many hours have been wasted on resolving merge conflicts, simply because people forget to click on Fetch origin!
b. Avoid working on the same files at the same time
Merge conflicts happen when we need to merge files, and this only happens when multiple team members are working on the same files at the same time. To avoid merge conflicts, we therefore have to avoid modifying the same files at the same time. This is especially important for Scene files and Prefabs, since they are more difficult to merge.
One simple practice you can consider to minimise the chance of members working on the same file is to assign people who need to work at the same time to work only on specific folders. For example, if team member A is assigned to work on the scripts in the UI folder, then no other teammate should modify files in that folder until A has committed his work, and everyone else has pulled his edits to it.
c. Make use of branches
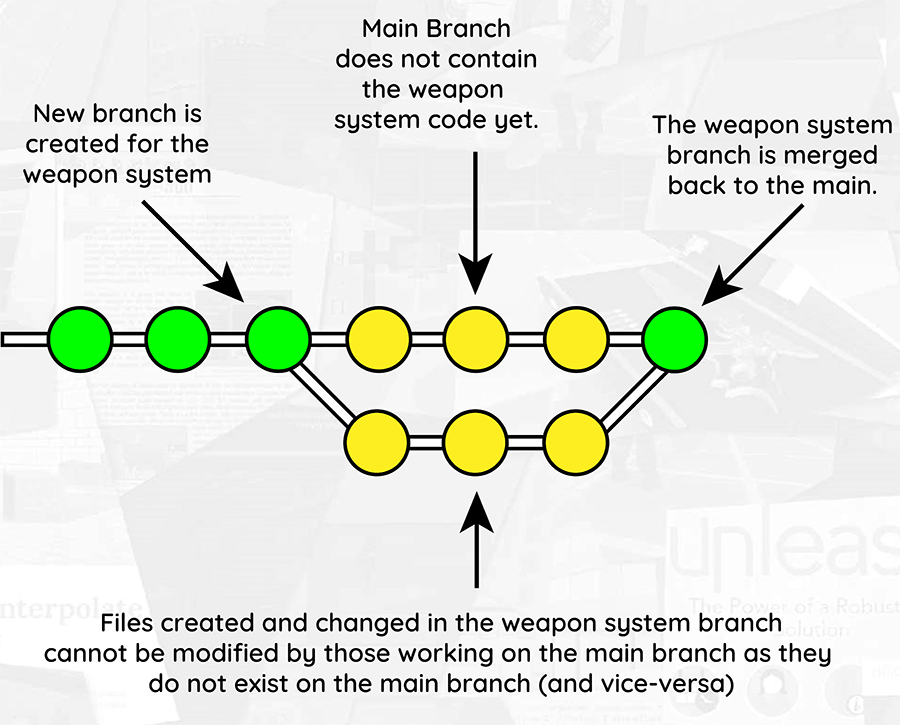
If different team members are developing different features at the same time, and may need to modify the same files, you can have one or a few of them develop on different branches.
This is only applicable for development of features over a longer-term timeframe. For example, if a few team members are developing the game’s weapon system while the rest of the team are bug fixing the core combat system, it will be a good practice to develop the weapon system on a separate branch.
Once the weapon system is finished, you will do one single merge to combine it back into the primary branch. By organising things this way, you avoid having to deal with dozens of merge conflicts that the new weapon system may cause.
d. Communicate with your teammates
Professional game development teams often use chatgroups like Slack or Discord to coordinate their work so that they avoid running into merge conflicts—there is nothing worse than grappling with a difficult merge conflict when you are crunching for a release date.
4. Wrapping Up
Merge conflicts can range from minor inconveniences to major headaches. With proper communication between your teammates however, you should be able to collaborate together without ever running into a merge conflict.
If you’ve got any tips to share on how you can avoid merge conflicts, or are running into merge conflicts yourself and need help, feel free to comment down below! Thanks for reading!
