Lighting in Unity can either be simple or tedious, and it can be hard to get the right look that you’re going for. So, after building a beautiful scene and messing around with lighting settings and various values in render settings for a while, you finally take a look at your hard work to see if it looks good. Sometimes, it does! Other times, it might look like this…
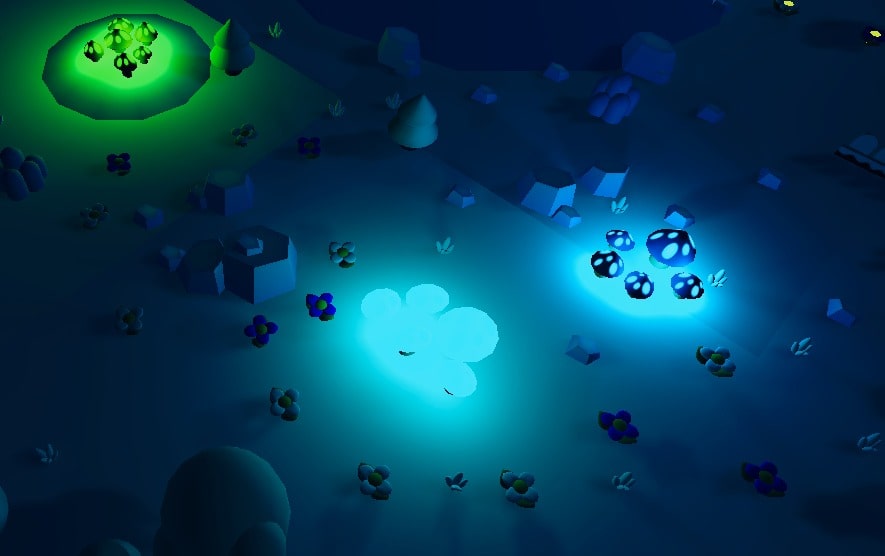
Those lighting artifacts stick out like a sore thumb. They can occur for all sorts of reasons, but in this article I’ll be explaining the specific reason these artifacts occurred for me, as well as how I got rid of them by switching the Rendering Path of Unity.
- Understanding the Rendering Paths in Unity
- How these Lighting Artifacts Occurred
- Switching to Deferred Rendering…
- Pros & Cons of Deferred Rendering
- Alternatives to Deferred Rendering
- Conclusion
1. Understanding the Rendering Paths in Unity
Before I tell you how these lighting artifacts happened, I think it’s a good idea to also get a basic understanding of the Rendering Paths that are available by default in Unity. The ones I’ll be mentioning in this article are the Forward Rendering and Deferred Rendering Paths.
According to Unity’s Documentation, a Rendering Path is a series of operations related to Lighting and Shading, and thus they may affect how your scene will look. Different Rendering Paths render scenes with different steps, resulting in different impacts on performance when devices render the Scene.
Forward and Deferred Rendering Paths are available in all three of Unity’s Render Pipelines: Built-In, Universal, and High Definition Render Pipelines.
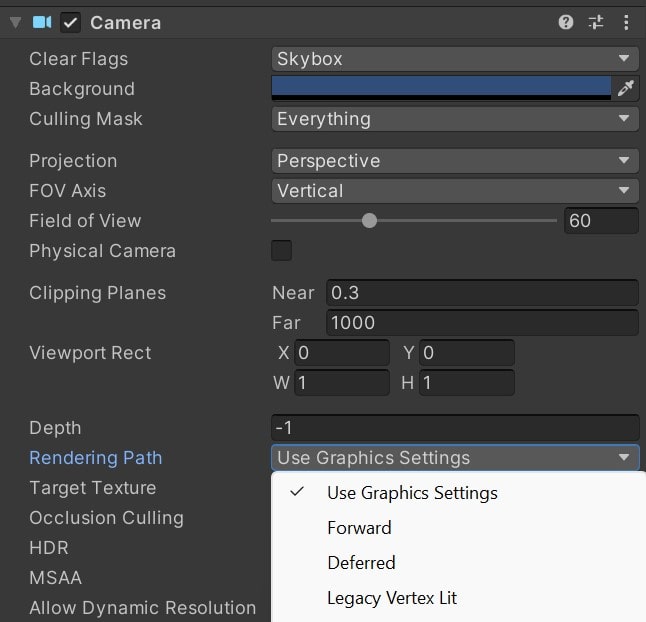
In projects using the Built-In Pipeline, you can change which Rendering Path you’re currently using in the Camera component.
For URP and HDRP, the Rendering Path can be chosen from the Pipelines’ respective Pipeline Asset. By default, Unity uses Forward Rendering, as it is a more universal, general-purpose Rendering Path. Thus, you may not have a reason to switch to Deferred Rendering depending on your project.
One key difference between Forward and Deferred Rendering is that Forward Rendering has a limit to the number of lights that can influence an object. This is crucial to how my lighting artifacts occurred, so remember this!
2. How these Lighting Artifacts Occurred
When I was building my scenes, I was using a lot of Point Lights with large ranges to light up the scene, and these are actually the reason why my scene had these strange lighting artifacts.
Since I was using a lot of lights together with the Forward Rendering path, I was actually exceeding the limit on the number of lights per object. As a result, when rendering the scene, objects will only be influenced by the lights closest to them, up to the limit set by the Forward Rendering Path.
This value can be changed in URP to accommodate more lights, though this appears to have a hard limit of 8 Lights, and Built-In’s Forward Rendering Path is fixed to a maximum of 4 Lights. In my scene, large numbers of Lights are grouped closely together. Combined with the limits set by the Forward Rendering Path, parts of my terrain had noticeable different lighting since they were only being influenced by the Lights closest to them.
You might have noticed that I bring up the number of lights that an object can be lit by in the Forward Rendering Path. But what about the Deferred Rendering Path? As it turns out, there’s actually no limit in the Deferred Rendering Paths of the Built-In and Universal Render Pipelines.
This key difference is what allowed me to fix my lighting artifacts, while still having all my lights in the scene.
On that note, the Forward Rendering Path in the High-Definition Render Pipeline has a much higher limit on the number of lights that can influence an object, so these lighting artifacts didn’t occur there.
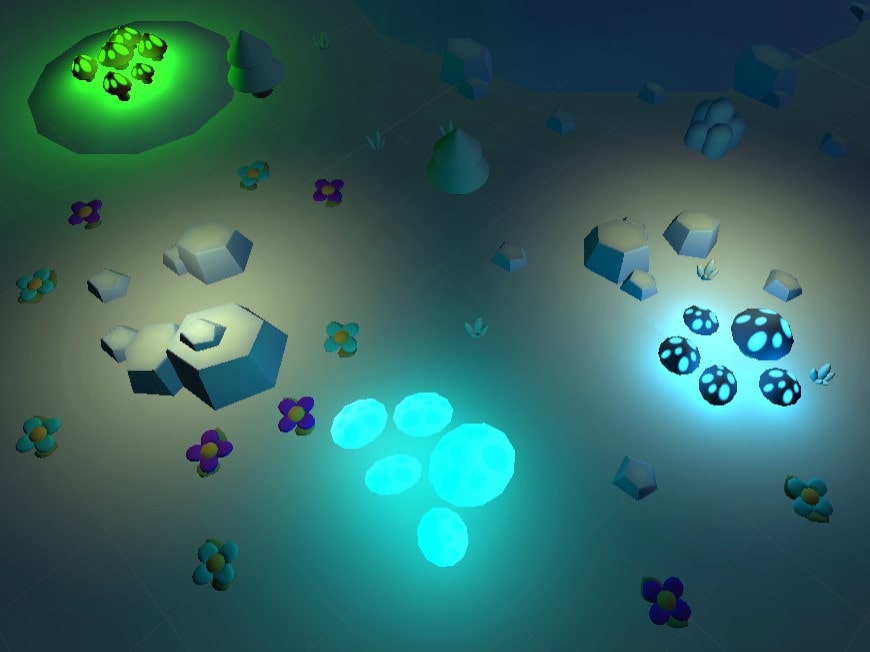
Now that we know one possible solution for these artifacts, let’s go ahead and start getting rid of them by changing our Rendering Paths.
3. Switching to Deferred Rendering…
a. …for the Built-In Render Pipeline
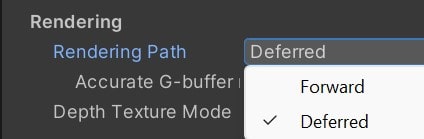
If your project is using the Built-In Render Pipeline, then switching Rendering Paths is as simple as a button. Go to the Camera that will be rendering your scene and look for the Rendering Path field. If you click on it, you should see a dropdown; Select Deferred, and there you go! That’s all you need to do, and your scene will now be rendered using Deferred Rendering.
Since the selected Rendering Path is not shared amongst all Cameras in your project, you might need to change the Rendering Path used by any other Cameras that would benefit from Deferred Rendering.
b. …for the Universal Render Pipeline
If your project is using the Universal Render Pipeline, it’s a bit more complicated to switch to Deferred Rendering. First of all, Deferred Rendering is only available in Unity 2021.2+. If your project is made using an older version than that, you will be unable to switch to Deferred Rendering in the Universal Render Pipeline. If that’s the case, you’ll need to upgrade your project to a newer version.
Afterwards, you’ll need to find the URP Renderer Asset. One easy way to locate it is to go to Edit > Project Settings > Graphics. Clicking on the Pipeline Asset in the Scriptable Render Pipeline Settings will direct you to wherever this asset is stored in your project.
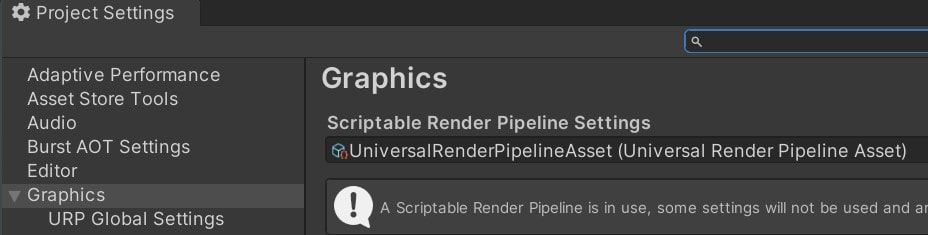
This is only the URP Asset, not the URP Renderer Asset. They should typically be in the same location, but in case yours isn’t, you can find it by looking at the Renderer List in the Pipeline Asset on the Inspector Screen.
Once you’ve located the URP Renderer Asset, look for the Rendering Path field and select Deferred. Now, your entire project will be rendered with the Deferred Rendering Path, so you don’t need to manually change it for every Camera/Scene that you want to use Deferred Rendering.
c. …for the High-Definition Render Pipeline
The steps for switching to Deferred Rendering in the HD Render Pipeline is similar to that of the Universal Render Pipeline. One key difference, though, is that Deferred Rendering is still available in Unity versions older than 2021.2, so you won’t need to worry about upgrading your project’s Unity version.
You just need to find the HD Pipeline Asset in your project. Then, in the Inspector, look for the Rendering tab and expand it. Look for the Lit Shader Mode field. Lastly, select Deferred. Just like in the Universal Render Pipeline, this will be applied to all scenes.

4. Pros & Cons of Deferred Rendering
So now that we know how to use Deferred Rendering and some of its capabilities, why doesn’t Unity use this as the default Rendering Path (other than for backwards-compatibility)?
a. The Pros
After all, compared to Forward Rendering, Deferred Rendering can handle far more dynamic lights without a significant impact on performance. This could be a relevant benefit depending on the project; One example could be a game where you shoot lasers with lights attached to them. This is one of its biggest pros, in my opinion.
Deferred Rendering can also have greater lighting and shadow fidelity, which can help enhance the look of your scenes.
a. The Cons
However, there are some drawbacks. Deferred Rendering is not suitable for lower-end devices as they may have insufficient memory and bandwidth to support Deferred Rendering Path’s features. If your project plans to target lower-end devices like mobile phones, consider sticking to the Forward Rendering Path.
Additionally, Deferred Rendering cannot support semi-transparent objects, which may be relevant if these are part of your scene.
Deferred Rendering does not support orthographic projections, so you will likely face issues if you try to make a game with an orthographic camera.
These are just some benefits and drawbacks to using Deferred Rendering, and I recommend doing your own research, as well as figuring out what your game needs, to decide whether or not this Rendering Path is suitable for you.
5. Alternatives to Deferred Rendering
The whole reason we delved into Rendering Paths in this article is because they helped me fix some lighting artifacts. But what if Deferred Rendering is not a suitable solution for you? Besides switching back to Forward Rendering, what else could we do to resolve these issues.
One of the most straightforward solutions is to simply reduce the number of lights. Each light that you have in your scene is another light that Unity needs to render, and lighting can be expensive and take a hit to your performance! Figure out which lights are necessary for your scene, and which ones are more redundant and unnecessary. Sometimes, less is more, and more performance is always a good thing.
Another solution you could consider is using Emissive Materials. Instead of actually attaching a light to an object, you can make the material of the object emit light using an emissive texture. This is perfect for objects that would glow or emit light like light bulbs, TVs, screens, etc.
I won’t be going through the specifics of setting up Emissive Materials in this article, because they already have their own article dedicated to them! You can check it out here.
This way, you can still make your scene look like its being lit by plenty of lights, without actually having all the lights and thus impacting your performance.
6. Conclusion
I hope this article was able to teach you something new, help you learn some basic information about Rendering Paths and applying that to your own situation. If there’s anything else you want to know about Rendering Paths, feel free to ask about them in the forums and we’ll do our best to answer your questions.
See you next time!