
Over the past 4 months, my team and I have been working on a rogue-like hack-and-slash game for our school’s final year project called Dust to Dust. We have very high ambitions for the game, and we had never worked on projects as large of a scale as this. Of course, by doing that, the challenges we encountered got bigger as well. We had to keep track of many parameters in developing a role-playing video game, and quickly realised that the time taken to find Inspector properties in the project was getting longer and longer. Furthermore, the project was on a 15-week timeline, so every minute was valuable.
Hence, we needed an effective solution that would ease navigation in the project, and — like before — it became clear that we had to once again extend the Unity Editor to suit our needs.
The problem
In any given Unity project, you are probably going to be using the inspector a lot to view and edit variables. Simply declare a public variable:
EnemyStats.cs
public class EnemyStats : MonoBehaviour
{
	public int health;
}
And Unity immediately displays it for you as an editable field in the inspector.

However, throughout the development of a game, the number of fields that you have to manage will inevitably grow.
EnemyStats.cs
public class EnemyStats : MonoBehaviour
{
	public int health;
	public int defense;
	public float movementSpeed;

	public int attack;
	public float attackRange;
	public float attackSpeed;

	public int magicResistance;
	public bool hasMagic;
	public int mana;
	public enum MagicElementType { Fire, Water, Earth, Air };
	public MagicElementType magicType;
	public int magicDamage;
}
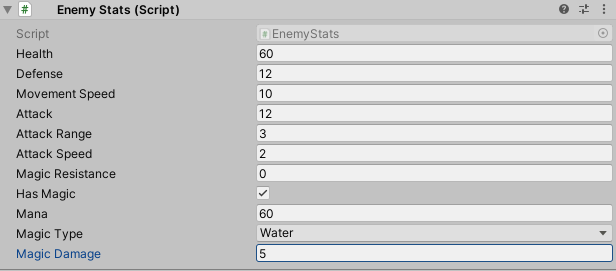
This leads to an increasingly-cluttered Inspector interface over time.
The easy way out: Header Attributes
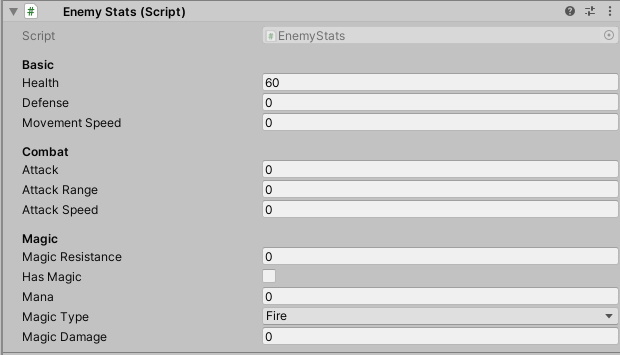
You can easily organise your variables into sections and add a Header Attribute to the start of each of them.
EnemyStats.cs
public class EnemyStats : MonoBehaviour
{
	[Header("Basic")]
	public int health;
	public int defense;
	public float movementSpeed;

	[Header("Combat")]
	public int attack;
	public float attackRange;
	public float attackSpeed;

	[Header("Magic")]
	public int magicResistance;
	public bool hasMagic;
	public int mana;
	public enum MagicElementType { Fire, Water, Earth, Air };
	public MagicElementType magicType;
	public int magicDamage;
}
This might help you find certain things faster, but this too will not be an effective solution beyond a certain number of properties.

Filtering with a dropdown
Having all of the information displayed at once in the Inspector is problematic as it would still take some time to look around. To minimise the time that is taken for you to find things, the Editor should only be displaying the information that you are looking for.

Setting up
To start, we have to write a class to override the default render view of the object’s Inspector panel. I will be categorising our variables into 3 types:
- Basic
- Combat
- Magic
We will need to represent this as a variable. Hence, we will represent these categories with an enumeration type, which is used to define a set of constants. In this case, the 3 enumerations — Basic, Combat, and Magic — will be members of an enumerated type we will call DisplayCategory.
Enumerations (or enum in short, as they are written in code) are a way to declare a new variable type. They are used to declare variable types that can hold only a fixed number of values. Read more about them here.
Since enums are user-defined, you can name and declare categories in any way that is helpful to you. Let us create this Editor class now:
EnemyStatsEditor.cs
using UnityEditor;

// Tells Unity to use this Editor class with the EnemyStats component.
[CustomEditor(typeof(EnemyStats))]
public class EnemyStatsEditor : Editor
{
    // The various categories the editor will display the variables in
    public enum DisplayCategory
    {
        Basic, Combat, Magic
    }
    // The enum field that will determine what variables to display in the Inspector
    public DisplayCategory categoryToDisplay;

    // The function that makes the custom editor work
    public override void OnInspectorGUI()
    {
        // Draws the default Inspector interface (we will be removing this soon)
        base.InspectorGUI();

        // Display the enum popup in the inspector
        // Check the value of the enum and display variables based on it

    //Save all changes made on the inspector
    serializedObject.ApplyModifiedProperties();
    }
}
Note: You must place this script in a folder called “Editor” so Unity will not include this script when you build your game!
As mentioned in a previous article, OnInspectorGUI is the function that is responsible for drawing out the inspector interface for the object.
Hence, if you were to look at the Inspector after setting this up, you would see that nothing has changed. This is because we have left base.InspectorGUI() in the function, which draws out the default Inspector interface for us.
Displaying the enum dropdown
You would also realise that the DisplayCategory enum that we had just declared in EnemyStatsEditor is not displaying. This is because we have not told Unity to draw it in the Inspector yet. We should also get Unity to stop displaying the default interface as we are replacing it with our own. To this end, make the following changes to OnInspectorGUI():
EnemyStatsEditor.cs
//The function that makes the custom editor work public override void OnInspectorGUI() {base.InspectorGUI();// Draws the default Unity Inspector interface. // Display the enum popup in the inspector categoryToDisplay = (DisplayCategory) EditorGUILayout.EnumPopup("Display", categoryToDisplay); // Create a space to separate this enum popup from the other variables EditorGUILayout.Space(); // Check the value of the enum and display variables based on it // Save all changes made on the Inspector serializedObject.ApplyModifiedProperties(); }
We will be using EditorGUILayout a lot from here on to display and style the elements in our custom editor. The thing about this class is that it helps organise the layout and positioning of your elements automatically. You can also use EditorGUI, which essentially serves the same function with the exception of the automatic layout. Use the latter only if you would like more control over the positioning of your elements.
Here are a few useful methods that you would be likely use often when doing custom editors:
| Method | What it does |
|---|---|
| EditorGUILayout.IntField() | Draws a text field for int values. |
| EditorGUILayout.FloatField | Draws a text field for float values |
| EditorGUILayout.EnumPopup | Draws an enum popup field |
| EditorGUILayout.TextField | Draws a text field. |
| EditorGUILayout.LabelField | Draws a label field. |
| EditorGUILayout.PropertyField | Draws a field for a SerializedProperty.(We will be using this for the most part) |

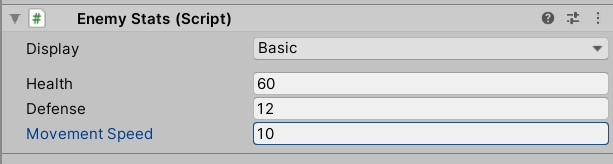
If you look at the inspector now, you should see nothing but the enum field. As of now, you can only change the value of the enum popup.
Checking what to display
We need to make the editor react based on what is selected in the enum popup. Hence, set up a switch statement with a method to handle each case:
EnemyStatsEditor.cs
    public override void OnInspectorGUI()
    {
        //Display the enum popup in the inspector
        categoryToDisplay = (DisplayCategory) EditorGUILayout.EnumPopup("Display", categoryToDisplay);

//Create a space to separate this enum popup from the other variables
        EditorGUILayout.Space();

        //Switch statement to handle what happens for each category
        switch (categoryToDisplay)
        {
            case DisplayCategory.Basic:
                DisplayBasicInfo();
                break;

            case DisplayCategory.Combat:
                DisplayCombatInfo();
                break;

            case DisplayCategory.Magic:
                DisplayMagicInfo();
                break;

        }
        serializedObject.ApplyModifiedProperties();
    }

    //When the categoryToDisplay enum is at "Basic"
    void DisplayBasicInfo()
    {

    }

    //When the categoryToDisplay enum is at "Combat"
    void DisplayCombatInfo()
    {

    }

    //When the categoryToDisplay enum is at "Magic"
    void DisplayMagicInfo()
    {

    }
The editor script can get messy when we have more categories, so having a separate method for each case makes it look a lot cleaner and easier to work with overall.
Accessing the variables in the target script
We could easily get the enum popup to show up in the inspector, as we could access the categoryToDisplay variable the usual way. But how do we access the variables of EnemyStats?
We can access them with the following snippet:
EnemyStatsEditor.cs
// Cast the target object into the EnemyStats class
EnemyStats enemyStats = (EnemyStats) target;
Note: This is just an example, you don’t have to put this in your code!
target is a property in the Editor class that stores a reference to the target script as a base Object class. However, directly accessing and modifying the variables in this way would be problematic, as we need to be able to make changes to our variables and undo them as and when we want. Modifying the variables directly would not give us this flexibility.
Hence, we will be editing our variables with the SerializedObject and SerializedProperty classes instead. This is because they are classes that are designed to handle writable data (i.e. data that is meant to be saved). In a SerializedObject and SerializedProperty, data is represented generically as a data stream, which can be easily-written into persistent storage. This method of representation also makes it possible to record the edits made in the Inspector, allowing Unity’s Undo system to track changes to object properties. All it takes is a simple ApplyModifiedProperties() call for the properties to be updated in the Inspector.
Furthermore, by accessing our variables through a SerializedProperty class, we can easily draw all our variables with EditorGUILayout.PropertyField, regardless of the variable type. Without further ado, let us set up property fields for our variables:
EnemyStatsEditor.cs
    // When the categoryToDisplay enum is at "Basic"
    void DisplayBasicInfo()
    {
        EditorGUILayout.PropertyField(serializedObject.FindProperty("health"));
        EditorGUILayout.PropertyField(serializedObject.FindProperty("defense"));
        EditorGUILayout.PropertyField(serializedObject.FindProperty("movementSpeed"));
    }

    // When the categoryToDisplay enum is at "Combat"
    void DisplayCombatInfo()
    {
        EditorGUILayout.PropertyField(serializedObject.FindProperty("attack"));
        EditorGUILayout.PropertyField(serializedObject.FindProperty("attackRange"));
        EditorGUILayout.PropertyField(serializedObject.FindProperty("attackSpeed"));
    }

    // When the categoryToDisplay enum is at "Magic"
    void DisplayMagicInfo()
    {
        EditorGUILayout.PropertyField(serializedObject.FindProperty("magicResistance"));
    EditorGUILayout.PropertyField(serializedObject.FindProperty("hasMagic"));
    EditorGUILayout.PropertyField(serializedObject.FindProperty("mana"));
    EditorGUILayout.PropertyField(serializedObject.FindProperty("magicType"));
    EditorGUILayout.PropertyField(serializedObject.FindProperty("magicDamage"));

    }
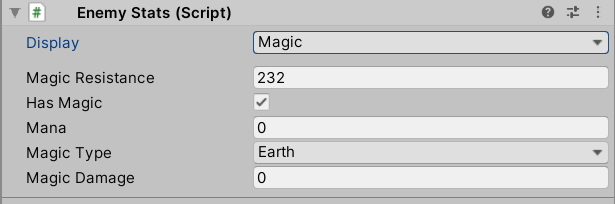
As you can see, our new custom editor is fully-functional now. However, we might have some variables that are only needed in certain conditions. In this example, we only need to specify the mana, magic type and magic damage only if the hasMagic boolean is true.
To that end, let us make the editor change dynamically to reflect this. We will make the editor display these variables only when hasMagic is checked:
EnemyStatsEditor.cs
//When the categoryToDisplay enum is at "Magic" void DisplayMagicInfo() { EditorGUILayout.PropertyField(serializedObject.FindProperty("magicResistance"));EditorGUILayout.PropertyField(serializedObject.FindProperty("mana"));EditorGUILayout.PropertyField(serializedObject.FindProperty("magicType"));EditorGUILayout.PropertyField(serializedObject.FindProperty("magicDamage"));// Store the hasMagic bool as a serializedProperty so we can access it SerializedProperty hasMagicProperty = serializedObject.FindProperty("hasMagic"); // Draw a property for the hasMagic bool EditorGUILayout.PropertyField(hasMagicProperty); // Check if hasMagic is true if (hasMagicProperty.boolValue) { EditorGUILayout.PropertyField(serializedObject.FindProperty("mana")); EditorGUILayout.PropertyField(serializedObject.FindProperty("magicType")); EditorGUILayout.PropertyField(serializedObject.FindProperty("magicDamage")); } }
Once all that is done, we will end up with this:
Here is the finished script for EnemyStatsEditor.cs:
EnemyStatsEditor.cs
using UnityEditor;

[CustomEditor(typeof(EnemyStats))]
public class EnemyStatsEditor : Editor
{
    // The various categories the editor will display the variables in
    public enum DisplayCategory
    {
        Basic, Combat, Magic
    }

    // The enum field that will determine what variables to display in the Inspector
    public DisplayCategory categoryToDisplay;

    // The function that makes the custom editor work
    public override void OnInspectorGUI()
    {
        // Display the enum popup in the inspector
        categoryToDisplay = (DisplayCategory) EditorGUILayout.EnumPopup("Display", categoryToDisplay);

        // Create a space to separate this enum popup from other variables
        EditorGUILayout.Space();

        // Switch statement to handle what happens for each category
        switch (categoryToDisplay)
        {
            case DisplayCategory.Basic:
                DisplayBasicInfo();
                break;

            case DisplayCategory.Combat:
                DisplayCombatInfo();
                break;

            case DisplayCategory.Magic:
                DisplayMagicInfo();
                break;

        }
        serializedObject.ApplyModifiedProperties();
    }

    // When the categoryToDisplay enum is at "Basic"
    void DisplayBasicInfo()
    {
        EditorGUILayout.PropertyField(serializedObject.FindProperty("health"));
        EditorGUILayout.PropertyField(serializedObject.FindProperty("defense"));
        EditorGUILayout.PropertyField(serializedObject.FindProperty("movementSpeed"));
    }

    // When the categoryToDisplay enum is at "Combat"
    void DisplayCombatInfo()
    {
        EditorGUILayout.PropertyField(serializedObject.FindProperty("attack"));
        EditorGUILayout.PropertyField(serializedObject.FindProperty("attackRange"));
        EditorGUILayout.PropertyField(serializedObject.FindProperty("attackSpeed"));
    }

    // When the categoryToDisplay enum is at "Magic"
    void DisplayMagicInfo()
    {
        EditorGUILayout.PropertyField(serializedObject.FindProperty("magicResistance"));

        // Store the hasMagic bool as a serializedProperty so we can access it
        SerializedProperty hasMagicProperty = serializedObject.FindProperty("hasMagic");

        // Draw a property for the hasMagic bool
        EditorGUILayout.PropertyField(hasMagicProperty);

        // Check if hasMagic is true
        if (hasMagicProperty.boolValue)
        {
            EditorGUILayout.PropertyField(serializedObject.FindProperty("mana"));
            EditorGUILayout.PropertyField(serializedObject.FindProperty("magicType"));
            EditorGUILayout.PropertyField(serializedObject.FindProperty("magicDamage"));
        }
    }
}
I hope you found this short article useful!
Hi. This isn’t working for me, it’s not doing anything. I’ve even tried just copying your final script into a file in the Editor file, then creating a test public instance of the class. It’s just listed out the properties in a list. Any ideas what I could be missing? 2021.1.0b1. Thanks.
Figured it out. So this only works if the class is its own object inheriting from ScriptableObject or MonoBehavior. I was trying to use this on a vanilla class that I’d serialized and was using to store data.
Hey Felipe, did you place the following statement at the start of the script:
using UnityEditor;?eu não consigo seguir o tutorial, o “Editor” em public class EnemyStatsEditor : (Editor) não aparece, o UnityEngine.Editor esta importado, o [CustomEditor(typeof(EnemyStats))] também não funciona. oque eu faço?
I can not follow the tutorial, the “Editor” in public class EnemyStatsEditor : (Editor) does not appear, UnityEngine.Editor is imported, the [CustomEditor(typeof(EnemyStats)) also does not work. what do I do?