
Update: Like this article? Then check out this other article on creating a dropdown filter for the Unity Inspector.
Over the last 5 months or so, me and my team have been involved in the development of a hybrid tower defense and RTS game called Ex-Terminator (click on the link to try it out, it’s free!) as part of a school project. During the course of developing the game, we quickly realised that, in order to allow us to have the flexibility to experiment with our level design, we had to experiment with a class in Unity called the ReorderableList.
If you’ve read some of the other articles here, you’d have noticed that we normally link Unity classes to its page on the Unity Scripting Reference. We didn’t do so here because there is no official documentation for it at the time this article was written. The ReorderableList class is filed under the namespace of UnityEditorInternal, which also doesn’t have official documentation. We’ve decided to write an article about it, however, because of how useful it is, and because of how little information there is currently about it online.
The video guide
Now, if you’re the kind who prefers to watch instead of read, we’ve created a video version of this guide for you below. For the rest of you avid readers, scroll on downwards.
The problem with the default foldout
This is what we normally resort to if we want to maintain a collection of objects on one of our GameObjects in the Inspector — we declare an array or a list, and then make it public:
// Note that Wave is a struct, whose contents we will explore later in the article.
public Wave[] wave;
// This will give us the exact same result on the Inspector as above.
public List<Wave> wave;
This will give us a foldout which we can use to insert elements into the collection.
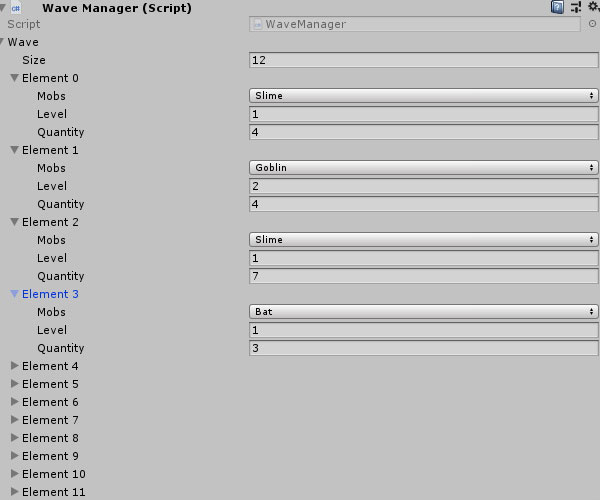
This foldout has a big problem, however — because you cannot reorganise the order of your elements. This gave us a big problem, because the WaveManager script was supposed to allow us to easily manage the spawning of our mobs in-game. If we could not even do something as simple as reordering our wave elements, there would be no point to this script!
To that end, we explored other interface options and found…
The solution: ReorderableLists

…which solved the team’s problem, making the level design process quicker and more efficient than before. I could now look at the entirety of an array with a glance, and make quick adjustments much more effortlessly.
You are probably here because you Googled about ReorderableList, so let me share how I got mine up without further ado.

Setting up
For starters, this is the data structure of each individual element in my wave array. We’re dealing with structure types (i.e. structs) and enumeration types (i.e. enums) here, so if you are not familar with them, you’ll want to do some reading up. Basically speaking, structs and enums are ways to declare new data types for your code.
Wave.cs
[System.Serializable]
public struct Wave
{
    // Declares the Mobs enum type.
    public enum Mobs
    {
        Goblin,
        Slime,
        Bat
    }

    public Mobs mobs; // What kind of enemy should be spawned in this wave?
    public int level; // Level of the enemy.
    public int quantity; // How many enemies of this type should we spawn?
}
So, in the above struct, we are declaring the types of values that each element of our list will store. Then, in our WaveManager class, we create an array using the Wave data type.
WaveManager.cs
using System.Collections;
using System.Collections.Generic;
using UnityEngine;

public class WaveManager : MonoBehaviour
{
     public Wave[] wave;
}
This will give us the default array foldout in the Inspector:
To replace that, we have to write a class for it to override the default render view of the object’s Inspector panel:
WaveManagerEditor.cs
using UnityEditor;
using UnityEditorInternal;

// Tells Unity to use this Editor class with the WaveManager script component.
[CustomEditor(typeof(WaveManager))]
public class WaveManagerEditor : Editor
{

    // This will contain the <wave> array of the WaveManager.
    SerializedProperty wave;

    // The Reorderable List we will be working with
    ReorderableList list;

    private void OnEnable()
    {
        // Get the <wave> array from WaveManager, in SerializedProperty form.
        // Set up the reorderable list

    }

    //This is the function that makes the custom editor work
    public override void OnInspectorGUI()
    {

        base.OnInspectorGUI();

        // Update the array property's representation in the inspector
        // Have the ReorderableList do its work
        // Apply any property modification
    }
}
It does not matter what the class is named, as long as you specify the class that you want to modify the Inspector view of in [CustomEditor( typeof(WaveManager) )]. For the sake of organisation, however, people normally name custom editor classes after the class the custom editor is modifying (hence WaveManagerEditor). Also, ensure that this class inherits from Editor instead of the usual MonoBehaviour.
What are these methods for?
We will be working with 2 methods primarily in WaveManagerEditor.cs.
OnEnable(): This method runs whenever aWaveManagerobject is loaded in the Unity Editor. It is used to retrieve the properties ofWaveManagerontoWaveManagerEditor.OnInspectorGUI(): This method is responsible for drawing out the Inspector interface for the object.base.OnInspectorGUI()draws out the default Inspector interface for an object, so if we were to leave it on our code, we will get the default, clunky foldout. Eventually, we will remove it because we don’t want the foldout, but for now, I recommend keepingbase.OnInspectorGUI()there while working on theReorderableList. This causes both both the foldout andReorderableListto be drawn, allowing us to compare and reference them easily.
Initialising our class properties
To start off, we will be doing 2 things:
- Getting the
wavearray fromWaveManager.cs. - Initialising the
ReorderableList.
To this end, OnEnable() should be added with the following lines:
WaveManagerEditor.cs
private void OnEnable()
{
    // Get the <wave> array from WaveManager, in SerializedProperty form.
    // Note that <serializedObject> is a property of the parent Editor class.
    wave = serializedObject.FindProperty("wave");

    // Set up the reorderable list
    list = new ReorderableList(serializedObject, wave, true, true, true, true);
}
We now have a ReorderableList initialised, but that is not enough to get it up and running, which brings us to the next step:
Defining how the list is drawn
We still need to tell the ReorderableList how we want it to be presented. This is done by defining methods for the callback delegates that ReorderableList provides. These delegates allow us to customise particular sections of the ReorderableList. Here are a few useful ones:
| Callback delegate | Description |
| drawElementCallback | Determines how each element in the list is drawn |
| drawHeaderCallback | Determines how the header is drawn |
| elementHeightCallback | Determines the height of each element. |
| onAddCallback | Invoked when an element is added. |
| onRemoveCallback | Invoked when an element is removed. |
There are many more callback delegates that you can use, which you (unfortunately) only can find from looking through their official source code. In this article, we will only be using drawElementCallback and drawHeaderCallback, to draw the header and the body of the list respectively.
WaveManagerEditor.cs
private void OnEnable()
{
    // Gets the wave property in WaveManager so we can access it.
    wave = serializedObject.FindProperty("wave");

    // Initialises the ReorderableList. We are creating a Reorderable List from the "wave" property.
    // In this, we want a ReorderableList that is draggable, with a display header, with add and remove buttons
    list = new ReorderableList(serializedObject, wave, true, true, true, true);

    list.drawElementCallback = DrawListItems; // Delegate to draw the elements on the list
    list.drawHeaderCallback = DrawHeader; // Skip this line if you set displayHeader to 'false' in your ReorderableList constructor.
}

// Draws the elements on the list
void DrawListItems(Rect rect, int index, bool isActive, bool isFocused)
{
}

//Draws the header
void DrawHeader(Rect rect)
{
}
Note: DrawListItems() and DrawHeader() take the same parameters as the delegates they are assigned to. If you look at the delegates defined in the source code, you will see they have the same parameter definition.
Drawing the header
To create the header of the ReorderableList, we use EditorGUI.LabelField() to draw some text on it.
WaveManagerEditor.cs
void DrawHeader(Rect rect)
{
    string name = "Wave";
    EditorGUI.LabelField(rect, name);
}
This will give us the header of the ReorderableList like so:
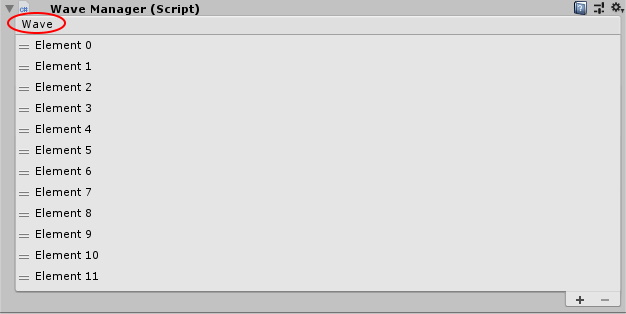
ReorderableList looks like now.Drawing the list elements
For each of the elements in ReorderableList, we’ll need to draw out the individual properties of each element (the ones we defined in Wave.cs earlier on).
In the code below, EditorGUI.PropertyField() draws out an input field, whilst EditorGUI.LabelFields() draws out the text that describes the input field.
WaveManagerEditor.cs
void DrawListItems(Rect rect, int index, bool isActive, bool isFocused)
{

    SerializedProperty element = list.serializedProperty.GetArrayElementAtIndex(index); // The element in the list

    //Create a property field and label field for each property.

    //The 'mobs' property. Since the enum is self-evident, I am not making a label field for it.
    //The property field for mobs (width 100, height of a single line)
    EditorGUI.PropertyField(
        new Rect(rect.x, rect.y, 100, EditorGUIUtility.singleLineHeight),
        element.FindPropertyRelative("mobs"),
        GUIContent.none
    );


    //The 'level' property
    //The label field for level (width 100, height of a single line)
    EditorGUI.LabelField(new Rect(rect.x, rect.y, 100, EditorGUIUtility.singleLineHeight), "Level");

    //The property field for level. Since we do not need so much space in an int, width is set to 20, height of a single line.
    EditorGUI.PropertyField(
        new Rect(rect.x, rect.y, 20, EditorGUIUtility.singleLineHeight),
        element.FindPropertyRelative("level"),
        GUIContent.none
    );

    //The 'quantity' property
    //The label field for quantity (width 100, height of a single line)
    EditorGUI.LabelField(new Rect(rect.x, rect.y, 100, EditorGUIUtility.singleLineHeight), "Quantity");

    //The property field for quantity (width 20, height of a single line)
    EditorGUI.PropertyField(
        new Rect(rect.x, rect.y, 20, EditorGUIUtility.singleLineHeight),
        element.FindPropertyRelative("quantity"),
        GUIContent.none
    );

}
Rendering the list
If you were to check the Inspector at this point, you will see no ReorderableList. This is because we need to instruct the ReorderableList to draw itself in OnInspectorGUI().
WaveManagerEditor.cs
//This is the function that makes the custom editor work
public override void OnInspectorGUI()
{
    base.OnInspectorGUI();
    serializedObject.Update(); // Update the array property's representation in the inspector

    list.DoLayoutList(); // Have the ReorderableList do its work

    // We need to call this so that changes on the Inspector are saved by Unity.
    serializedObject.ApplyModifiedProperties();
}
When you check the Inspector, it should look like this:
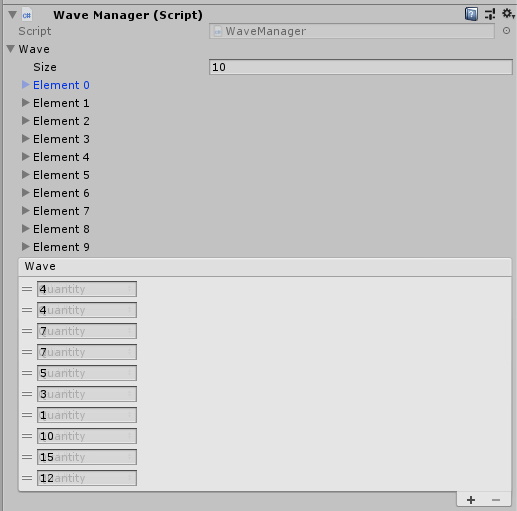
There are 2 problems here:
- The old array foldout is still there. We just have to remove
base.OnInspectorGUI()in our code to fix this. - The fields for our elements are overlapping each other, because we have not set where their positions should be.
So make the following edits to the methods below:
WaveManagerEditor.cs
//This is the function that makes the custom editor work public override void OnInspectorGUI() {base.OnInspectorGUI();serializedObject.Update(); // Update the array property's representation in the inspector list.DoLayoutList(); // Have the ReorderableList do its work // We need to call this so that changes on the Inspector are saved by Unity. serializedObject.ApplyModifiedProperties(); }
WaveManagerEditor.cs
 void DrawListItems(Rect rect, int index, bool isActive, bool isFocused)
 {

    SerializedProperty element = list.serializedProperty.GetArrayElementAtIndex(index); //The element in the list

    // Create a property field and label field for each property.

    // The 'mobs' property. Since the enum is self-evident, I am not making a label field for it.
    // The property field for mobs (width 100, height of a single line)
    EditorGUI.PropertyField(
        new Rect(rect.x, rect.y, 100, EditorGUIUtility.singleLineHeight),
        element.FindPropertyRelative("mobs"),
        GUIContent.none
    );

    // The 'level' property
    // The label field for level (width 100, height of a single line)
    EditorGUI.LabelField(new Rect(rect.x + 120, rect.y, 100, EditorGUIUtility.singleLineHeight), "Level");

    // The property field for level. Since we do not need so much space in an int, width is set to 20, height of a single line.
    EditorGUI.PropertyField(
        new Rect(rect.x + 160, rect.y, 20, EditorGUIUtility.singleLineHeight),
        element.FindPropertyRelative("level"),
        GUIContent.none
    );

    // The 'quantity' property
    // The label field for quantity (width 100, height of a single line)
    EditorGUI.LabelField(new Rect(rect.x + 200, rect.y, 100, EditorGUIUtility.singleLineHeight), "Quantity");

    // The property field for quantity (width 20, height of a single line)
    EditorGUI.PropertyField(
        new Rect(rect.x + 250, rect.y, 20, EditorGUIUtility.singleLineHeight),
        element.FindPropertyRelative("quantity"),
        GUIContent.none
    );
}
Once this is all done, we will end up with something like this:
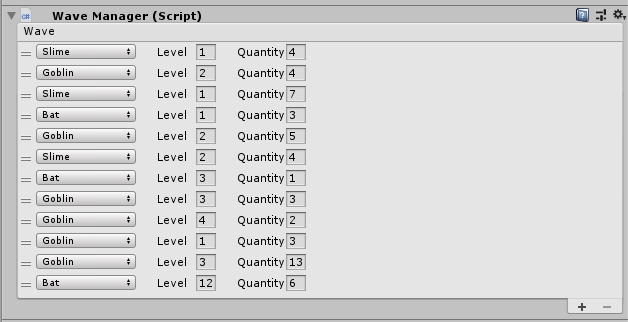
Here is the finished script for WaveManagerEditor.cs:
WaveManagerEditor.cs
using UnityEngine;
using UnityEditor;
using UnityEditorInternal;

//Tells the Editor class that this will be the Editor for the WaveManager
[CustomEditor(typeof(WaveManager))]
public class WaveManagerEditor : Editor
{
    //The array property we will edit
    SerializedProperty wave;

    //The Reorderable list we will be working with
    ReorderableList list;

    private void OnEnable()
    {
        //Gets the wave property in WaveManager so we can access it.
        wave = serializedObject.FindProperty("wave");

        //Initialises the ReorderableList. We are creating a Reorderable List from the "wave" property.
        //In this, we want a ReorderableList that is draggable, with a display header, with add and remove buttons
        list = new ReorderableList(serializedObject, wave, true, true, true, true);

        list.drawElementCallback = DrawListItems;
        list.drawHeaderCallback = DrawHeader;

    }

    void DrawListItems(Rect rect, int index, bool isActive, bool isFocused)
    {
        SerializedProperty element = list.serializedProperty.GetArrayElementAtIndex(index); //The element in the list

        // Create a property field and label field for each property.

        // The 'mobs' property. Since the enum is self-evident, I am not making a label field for it.
        // The property field for mobs (width 100, height of a single line)
        EditorGUI.PropertyField(
            new Rect(rect.x, rect.y, 100, EditorGUIUtility.singleLineHeight),
            element.FindPropertyRelative("mobs"),
            GUIContent.none
        );

        // The 'level' property
        // The label field for level (width 100, height of a single line)
        EditorGUI.LabelField(new Rect(rect.x + 120, rect.y, 100, EditorGUIUtility.singleLineHeight), "Level");

        //The property field for level. Since we do not need so much space in an int, width is set to 20, height of a single line.
        EditorGUI.PropertyField(
            new Rect(rect.x + 160, rect.y, 20, EditorGUIUtility.singleLineHeight),
            element.FindPropertyRelative("level"),
            GUIContent.none
        );


        // The 'quantity' property
        // The label field for quantity (width 100, height of a single line)
        EditorGUI.LabelField(new Rect(rect.x + 200, rect.y, 100, EditorGUIUtility.singleLineHeight), "Quantity");

        //The property field for quantity (width 20, height of a single line)
        EditorGUI.PropertyField(
            new Rect(rect.x + 250, rect.y, 20, EditorGUIUtility.singleLineHeight),
            element.FindPropertyRelative("quantity"),
            GUIContent.none
        );

    }

    void DrawHeader(Rect rect)
    {
        string name = "Wave";
        EditorGUI.LabelField(rect, name);
    }

    //This is the function that makes the custom editor work
    public override void OnInspectorGUI()
    {
        serializedObject.Update();
        list.DoLayoutList();
        serializedObject.ApplyModifiedProperties();
    }
}
This help me out quite a bit. Very well put together tutorial on a subject that is otherwise difficult to learn. You should definitely be proud. Well done!
Nice, but is it possible to do it as a List decorator? In t hose cases, the callback methods are not called at all… :(
Hey! I’m having some troubles with that… Is it possible to contact you? My discord is DonTomas#6605
I’ve been trying so hard to figure out how to get that editor display in the inspector on my scripts. Thank you so much!
Hi there! How can I make the wave title a foldout for all the element that it has.
Cheers :))
Level and Quantity have a redundant nested Rect statement.
I.e. “new Rect(new Rect(…))” could be shortened to “new Rect(…)”
Thank you. That’s a nice mistake you spotted. It’s been fixed :)
Amazing tutorial! Just what I needed. Many thanks for putting this together!
Useful tutorial, thank you ! :)