Forum begins after the advertisement:
[Part 16] Creating the Clock Lancet weapon using the new system
Home › Forums › Video Game Tutorial Series › Creating a Rogue-like Shoot-em Up in Unity › [Part 16] Creating the Clock Lancet weapon using the new system
- This topic has 1 reply, 1 voice, and was last updated 1 year, 5 months ago by
Terence.
-
AuthorPosts
-
August 25, 2024 at 4:07 pm #15684::
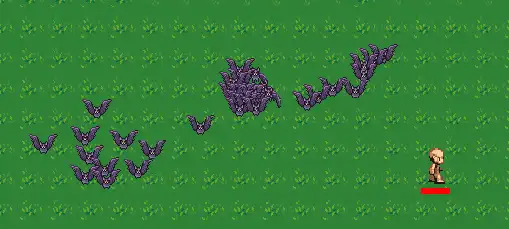
Hi everyone, here’s a quick guide for how to create the Clock Lancet weapon from Vampire Survivors using the weapon system we set up in Parts 15 and 16.
If you want to implement the Freeze debuff though, you will need to have implemented the Buff / Debuff system from Part 23 as well.
1. Setting up the weapon data
Fundamentally, the Clock Lancet weapon is a projectile weapon, so it can work just fine if you duplicate the Knife weapon and make some modifications to it.
View post on imgur.com
For the projectile, I’ll be creating a video on how to create the visual effect soon. Once it is done, it will be posted here.
If you already have a working buff / debuff system, you will need to create a buff for it, and assign the buff to each level of your weapon (since higher levels of the weapon increase the duration). The weapon level up stats can be found in the Vampire Survivors wiki.
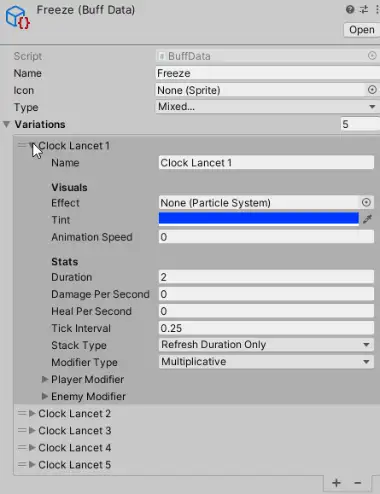
In the levels where the buff is upgraded, you will need to reset the buff.
View post on imgur.com
2. The
ClockLancetWeaponscriptOnce the weapon is set up, you will need to create a script that subclasses
ProjectileWeapon. The objective of this is to override how the weapon is fired.ClockLancetWeapon.cs
using UnityEngine;

public class ClockLancetWeapon : ProjectileWeapon
{
    public const int NUMBER_OF_ANGLES = 12;
    protected float currentAngle = 90; // -90 degrees points in the 12 o'clock direction.

    // How many degrees this weapon turns after every shot.
    protected static float turnAngle = -360f / NUMBER_OF_ANGLES;

    protected override bool Attack(int attackCount = 1)
    {
        // If the attack is successful, advance the current angle.
        if(base.Attack(1))
        {
            currentAngle += turnAngle;

            // If our result's value is more than 180 or less than -180.
            if(Mathf.Abs(currentAngle) > 180f)
                // Convert the value to be between -180 and 180.
                currentAngle = -Mathf.Sign(currentAngle) * (360f - Mathf.Abs(currentAngle));

            return true;
        }
        return false;
    }

    // Override the spawn direction of the weapon to shoot the
    // projectile in the current angle.
    protected override float GetSpawnAngle() { return currentAngle; }
}
Because the weapon resembles the Knife weapon in a lot of ways, we can subclass the
ProjectileWeaponscript to inherit most of the weapon functionality. The most important overrides are on theGetSpawnAngle()function, where we replace the shooting direction with acurrentAnglevariable (the default setting fromProjectileWeaponshoots the knife towards where we are facing); and theAttack()function, which forces the Clock Lancet to always only fire 1 projectile (so that increasing your Amount stat on the player doesn’t affect it), and increments thecurrentAngleto move the angle that the weapon is shot towards.Once the code is done, you can change the weapon data on your Clock Lancet weapon to use
ClockLancetWeaponinstead:View post on imgur.com
And your Clock Lancet weapon should be working!
3. How to create the projectile
If you have trouble creating the projectile for the weapon, you can duplicate the Knife weapon from Part 15, and replace the Sprite Renderer component with a Particle System component. The video for creating the particle effect will be released on our YouTube channel soon.
You will also want to replace the collider with a CircleCollider2D, and make sure that the Rigidbody2D’s Collision Detection setting is set to Continuous. This is because the beam moves very fast, and the Discrete collision mode will sometimes miss targets.
Here are the settings for my Clock Lancet projectile:
View post on imgur.com
August 26, 2024 at 7:18 pm #15688::Just an extra note: Notice that in the
Attack()function, after incrementing theturnAngleof the weapon, I also do a check on the angle to make sure that it stays within -180 and 180.protected override bool Attack(int attackCount = 1) { // If the attack is successful, advance the current angle. if(base.Attack(1)) { currentAngle += turnAngle; // If our result's value is more than 180 or less than -180. if(Mathf.Abs(currentAngle) > 180f) // Convert the value to be between -180 and 180. currentAngle = -Mathf.Sign(currentAngle) * (360f - Mathf.Abs(currentAngle)); return true; } return false; }This is because in Unity, angles are typically represented using a value between -180 to 180 retrieved.
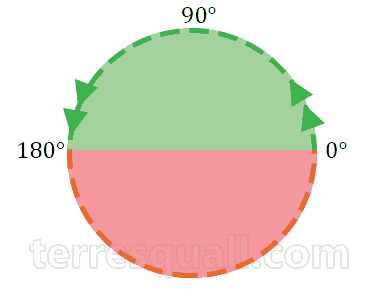
While the code will still work if we don’t clamp the angles, if we do not constantly clamp the value, we will eventually end up with a very large angle for the
currentAngle, which can make it difficult to use the value for other purposes.If you want to read more about the algorithm, you can read this article here:
Calculating the shorter angle of rotation in 2D
-
AuthorPosts
- You must be logged in to reply to this topic.
Advertisement below: