In this blog post, we’ll go through how to create this blood splatter effect that progressively stains your level with each blood splatter.
1. Scene Setup
In this section, we will first set up the necessary components needed for this blood splatter effect.
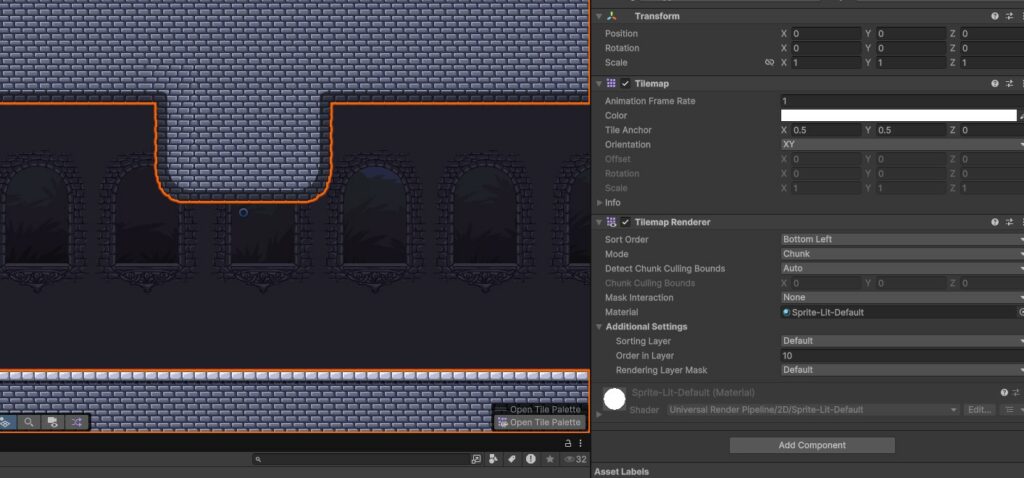
a. Tilemap
Firstly, let’s create a tilemap and paint in our tiles.
Afterwards, add a Tilemap Collider 2D and a Composite Collider 2D component onto your tilemap, a Rigidbody 2D component should automatically be added with the Composite Collider 2D. This will ensure proper collision detection for our blood particles whilst also improving performance by merging multiple tile colliders into a single shape.
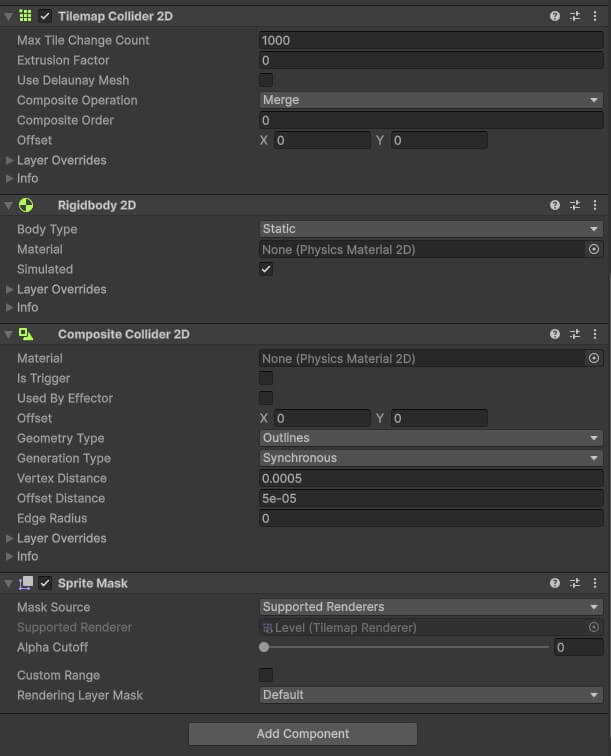
Then lastly, add a Sprite Mask component. This component will ensure that our blood splatter sprite stays within our tilemap and hides the parts of it that extend beyond the tilemap.
b. Blood Splatter Particle
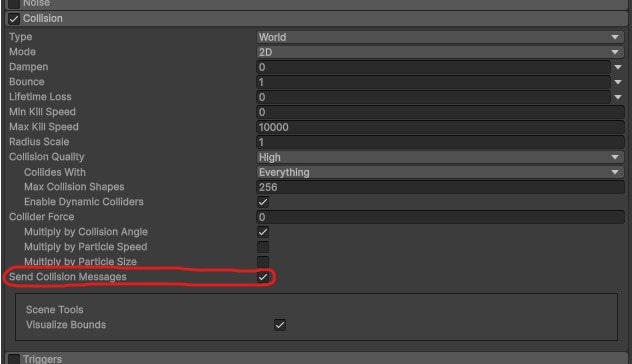
For our blood splatter particle, we will aim to create a explosion of particles that bounces on collisions.
The speed, size, and lifetime can be customised to your liking. Under “Emission”, change the “Rate Over Time” to 0, and add a burst instead. The important part is to enable “Send Collision Messages” under the “Collision” tab.
2. Blood Explosion Script
Moving on to the script, let’s first make a BloodExplosion.cs script. This script will handle logic relating to blood particles colliding with surfaces and spawning blood splatters accordingly.
a. Script Setup
This is not a necessary step, but it helps ensure that the script is used correctly and avoids potential issues.
Above our script class, let’s add [DisallowMultipleComponent] and [RequireComponent(typeof(ParticleSystem))].
This makes sure that a GameObject can only have one instance of this script on it and also ensures that a Particle System component is attached to the object.
b. Creating Variables
We will define the following variables in our script.
public Vector3 minBloodScale = new Vector3(0.5f, 0.5f, 0.5f),
               maxBloodScale = new Vector3(1f, 1f, 1f);

public Gradient bloodColors;
[Range(0,1)] public float ratio = 0.34f;

List<ParticleCollisionEvent> collisionEvents = new List<ParticleCollisionEvent>();
ParticleSystem particles;
| Variables | Value | Description |
|---|---|---|
minBloodScale, minBloodScale | new Vector3(0.5f, 0.5f, 0.5f), new Vector3(1f, 1f, 1f) | These variables will give our blood sprite a random size within the minimum and maximum value. |
bloodColors | Set in Unity Inspector. | Controls the color of our blood sprite. When the sprite is spawned, it will set itself to a random color within this gradient. To achieve the gradual staining effect with our blood, ensure that the colors in the gradient has a low opacity (around 40 – 130 Alpha is the values we used but feel free to adjust it to your liking). |
ratio | 0.34f | This affects the spawn chance of our blood sprite. We used 0.34f which means the sprite has a 34% chance of spawning with each bounce. |
List<ParticleCollisionEvent> collisionEvents = new List<ParticleCollisionEvent>() | N/a | Stores collision information made by our particle. |
ParticleSystem particles | N/a | ParticleSystem reference. |
c. Blood Explosion Script Functions
In our Start() function, let’s set the reference of our ParticleSystem variable.
void Start() {
    particles = GetComponent<ParticleSystem>();
}
Next, we add a OnParticleCollision(GameObject other) function. This function is a built-in Unity function that is called whenever the ParticleSystem’s particles collide with an object. This function is called by our blood particle’s Send Collision Messages option that we enabled earlier.
void OnParticleCollision(GameObject other) {
    // Code.
}
Inside our OnParticleCollision function, let’s first check if the object we collided with has a Tilemap Renderer component, if not, the collision might not have been with our level and as a result we simply exit the function. Similarly, we will also exit the function if the Random.value, which gives a random float between 0.0 and 1.0, exceeds the ratio that we set earlier.
if(!other.TryGetComponent(out TilemapRenderer t)) return;
if(Random.value > ratio) return;
Afterwards, we will cycle through each collision event from the particle system and check if the collision happened within the collided GameObject. If it did, we get the collision’s hit position and call a function from another script that handles the spawning of the blood stain.
int numCollisionEvents = particles.GetCollisionEvents(other, collisionEvents);
for (int i = 0; i < numCollisionEvents; i++) {

// Only consider collisions that hit our component.
if(collisionEvents[i].colliderComponent.gameObject == other) {
        // Return to this later.
    }
}
We will return to this part of the code later to finish it up. We need to first create another script that handles the spawning and setting of our blood sprite itself.
3. Blood Spawner Script
Create a new script called BloodSpawner.cs to handle the spawning of the blood stains. On this new script, we will create a static function called CreateBloodStain. This function will spawn a blood splatter at the point of impact, setting its appearance, and ensuring it properly integrates with the game’s rendering system.
a. Variables
Firstly, define this variable in our script.
public static Sprite[] bloodStainSprites;
Then from the inspector, assign a few different blood stains to this array to give your blood stains a bit more variety.
b. Blood Stain Spawning Function
public static SpriteRenderer CreateBloodStain(Transform parent, Vector3 position, Color color, Vector3 scale, int sortingLayerId = -1, int sortOrder = 10) {
    GameObject go = new GameObject("Blood Stain");
    SpriteRenderer sr = go.AddComponent<SpriteRenderer>();
    sr.sprite = bloodStainSprites[Random.Range(0, bloodStainSprites.Length)];
    sr.color = color;
    sr.maskInteraction = SpriteMaskInteraction.VisibleInsideMask;
    sr.sortingLayerID = sortingLayerId > 0 ? sortingLayerId : SortingLayer.layers[SortingLayer.layers.Length - 1].id;
    sr.sortingOrder = sortOrder;
    go.transform.SetParent(parent);
    go.transform.position = position;
    go.transform.localScale = scale;
    return sr;
}
c. Blood Stain Spawning Function Explanation
- Creating the GameObject
- A new
GameObjectnamed"Blood Stain"is instantiated. This serves as the container for our blood splatter.
- A new
- Adding a SpriteRenderer Component
- A
SpriteRendereris added to display the blood splatter image.
- A
- Assigning a Random Blood Sprite
- The sprite is chosen randomly from
bloodStainSprites, an array of blood textures stored inGameManager.cs.
- The sprite is chosen randomly from
- Applying Color
- The color is then set based on the randomly chosen value from the
bloodColorsgradient inBloodExplosion.cs. - Using different shades of red helps create a layered blood buildup effect.
- The color is then set based on the randomly chosen value from the
- Mask Out Sprites Outside Of Tilemap
- The
maskInteractionproperty is set toVisibleInsideMask, this makes the blood splatter appear only within our tilemap. - This prevents blood from floating outside of our floor and ceiling.
- The
- Sorting and Layering
- The function assigns a sorting layer ID and sorting order to ensure blood stains appear correctly over the environment.
- If no specific
sortingLayerIdis provided, it defaults to the top sorting layer in the game. - The default
sortOrderof10ensures it appears above other ground elements but can be adjusted for layering effects.
- Parenting to the Collided Object
- The splatter is set as a child of the impacted GameObject (should be a tilemap in our case).
- This helps with organization as well as making sure that if the object moves or changes, the blood splatter remains correctly positioned with it.
- Positioning and Scaling
- The blood stain is placed at the exact impact position of the particle collision.
- A random scale within the defined
minBloodScaleandmaxBloodScaleis applied to introduce variation.
4. Final Changes To Blood Explosion Script
Now for the last part, we will head back to our BloodExplosion.cs script.
Replace our // Return to this later comment with the following lines.
Vector2 sfxPos = collisionEvents[i].intersection;

BloodSpawner.CreateBloodStain(
    other.transform,
    sfxPos,
    bloodColors.Evaluate(Random.Range(0, 1)),
    new Vector3(
        Random.Range(minBloodScale.x, maxBloodScale.x),
        Random.Range(minBloodScale.y, maxBloodScale.y),
        Random.Range(minBloodScale.z, maxBloodScale.z)
    )
);
a. Function Explanation
We first define the collision point of our particle in a local variable sfxPos.
We then call the CreateBloodStain function from BloodSpawner.cs with BloodSpawner.CreateBloodStain.
Then we feed in the required variables to our CreateBloodStain function.
other.transformis the collided GameObject’s transform.- sfxPos as mentioned earlier is the collision’s point of contact in the GameObject.
bloodColors.Evaluate(Random.Range(0, 1))will pick a random color within our gradient.new Vector3sets the size of our sprite to a random amount within our minimum and maximum scale.
b. Extra: Validation
In case you’d like to make your script less prone to user error, you can add this function.
void OnValidate() {
    minBloodScale = new Vector3(
        Mathf.Min(minBloodScale.x, maxBloodScale.x),
        Mathf.Min(minBloodScale.y, maxBloodScale.y),
        Mathf.Min(minBloodScale.z, maxBloodScale.z)
    );
}
OnValidate() is a built-in Unity method that runs whenever a value is changed in the inspector. In Unity, if Random.Range is called with the minimum value being higher than the maximum value, Unity will throw an error and the function containing Random.Range will break.
This snippet simply ensures that the minBloodScale variable will always be either equal to or less than the maxBloodScale.
c. Full BloodExplosion.cs Script
using UnityEngine;
using System.Collections.Generic;
using UnityEngine.Tilemaps;

[DisallowMultipleComponent]
[RequireComponent(typeof(ParticleSystem))]
public class BloodExplosion : MonoBehaviour {

    public Vector3 minBloodScale = new Vector3(0.5f, 0.5f, 0.5f),
                   maxBloodScale = new Vector3(1f, 1f, 1f);
    public Gradient bloodColors;
    [Range(0,1)] public float ratio = 0.34f;

    List<ParticleCollisionEvent> collisionEvents = new List<ParticleCollisionEvent>();
    ParticleSystem particles;

    void Start() {
        particles = GetComponent<ParticleSystem>();
    }

    void OnParticleCollision(GameObject other) {

        if(!other.TryGetComponent(out TilemapRenderer t)) return;
        if(Random.value > ratio) return;

        // We have to cycle through all collision events.
        int numCollisionEvents = particles.GetCollisionEvents(other, collisionEvents);
        for (int i = 0; i < numCollisionEvents; i++) {

            // Only consider collisions that hit our component.
            if(collisionEvents[i].colliderComponent.gameObject == other) {
                Vector2 sfxPos = collisionEvents[i].intersection;
                GameManager.CreateBloodStain(
                    other.transform, sfxPos,
                    bloodColors.Evaluate(Random.Range(0, 1)),
                    new Vector3(
                        Random.Range(minBloodScale.x, maxBloodScale.x),
                        Random.Range(minBloodScale.y, maxBloodScale.y),
                        Random.Range(minBloodScale.z, maxBloodScale.z)
                    )
                );
            }
        }
    }

    // Ensure minBloodScale does not exceed maxBloodScale.
    void OnValidate() {
        minBloodScale = new Vector3(
            Mathf.Min(minBloodScale.x, maxBloodScale.x),
            Mathf.Min(minBloodScale.y, maxBloodScale.y),
            Mathf.Min(minBloodScale.z, maxBloodScale.z)
        );
    }
}
5. Conclusion
That’s it! We hope you enjoyed this tutorial and have learned some new things that you can implement into your own games.