After setting up your Unity project’s Github Repository, you’ll be able to grant your teammates access to the repository and allow them to contribute to the project. This article will run you through the invite process and how your teammates can make their changes to the project once invited.
1. Adding collaborators into your project
Before your teammates access the repository, you’ll need to invite them in first. Note that they will need a registered Github account in order to receive invitations:
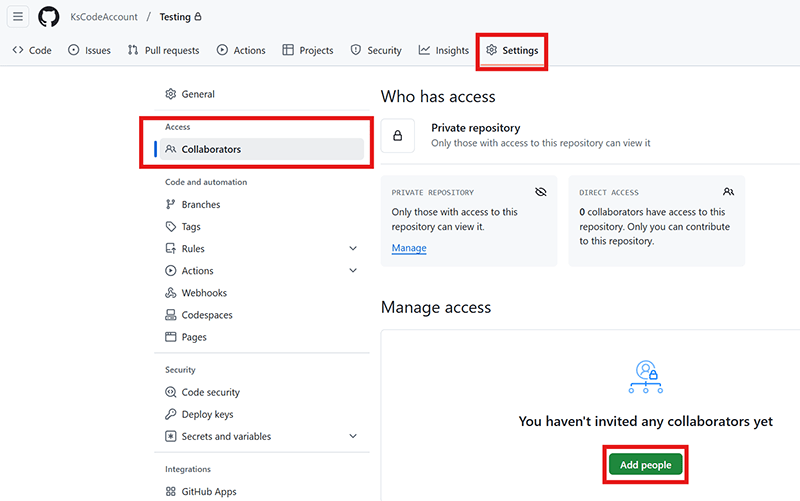
- Log in to GitHub, and navigate to your repository’s settings page. Head over to the ‘Collaborators’ section and click ‘Add people’.
- From here, you’ll be able to search for your teammates’ names or Emails and add them as a repository member.
- After that, your collaborators will receive an email to accept the invitation to be added as a collaborator.
- Now, they will be able to clone the repository from their own GitHub Desktop application and make their own commits to the project.

2. How your teammates connect to the repository
Once the repository is set up, your teammates (i.e. collaborators) will have to connect themselves to your repository to start working with you.
a. Cloning the project files (for collaborators)
In order for your collaborators to connect to the repository, they will have to clone the files from the repository. This will create a copy of the project on their computer that is automatically connected to your GitHub repository.
- Go to File > Clone repository on GitHub Desktop.
- Select and clone the project that was added onto GitHub (if you don’t see it, then you haven’t been added as a Collaborator).
- Open one of the Unity scene files from the project. Unity should automatically compile some files and open the scene (as well as the project) for you. Alternatively, you can open the GitHub folder as a project in Unity.
b. Opening the cloned project
Once the project has been cloned, to open your project for the first time, you will need to find where you have cloned the project to:
- Click on the Show in Explorer / Finder button (or use Ctrl + Shift + F) on GitHub Desktop to identify the newly-cloned project folder.
- Take note of the path of the folder that GitHub Desktop opens. This is the folder you will have to Open as a project in Unity.
Once you find the folder, open the project by using the Add button in Unity Hub, or by using File > Open Project in an open Unity Editor.
c. Pulling and pushing updates
To ensure that your local repository is always up-to-date, you should always press the ‘Fetch origin’ button every time before starting work on the project. This will check whether any new changes have been made to the remote repository and prompt you to pull them into your local repository if there are.

This is extremely important as overwriting unupdated files could lead to a merge conflict, which are hard to resolve.
After you’ve fetched, you’ll be able to make your changes to the project, like creating scripts or editing scenes. Any changes made to the project will be reflected in the ‘Changes’ tab of Github Desktop. To commit these changes onto the remote repository, you’ll need to:
- Fill in the Summary field. You are recommended to write something descriptive here. It’s also recommended to write a description of the commit but it is not required.
- Press the Commit to main button, which will make changes to the project on your computer.
- Press the Push origin button, which will apply the updates to your project on GitHub.
As a rule of thumb, before any commit, it is good practice to look through at all the changed files. This will prevent you from committing any unintended changes. After that, your teammates will be able to fetch these changes and pull them into their own local repositories!
3. Wrapping up
Since there are other people working on the repository, you’ll all need to remember to fetch origin before starting work to ensure your local repositories are up-to-date, as well as communicate with each other to reduce the risk of files being unintentionally overwritten or deleted—we will elaborate more on this in the next part of the series.
With good teamwork, you and your team will be able to collaborate smoothly and get more work done with the people onboard.
